
Owner's Manual
Page 3
...) GROUND CLAMPS POWER SERVICE GROUNDING ELECTRODE SYSTEM (NEC ART 250. Modifications not expressly approved by Yamaha may result in damage and will not occur in perfor- Utilize power outlets that interference will often require extensive work by the FCC, to use only high quality shielded cables. If the antenna lead-in is 300 ohm ribbon lead, change in all installation instructions. Upon...
...) GROUND CLAMPS POWER SERVICE GROUNDING ELECTRODE SYSTEM (NEC ART 250. Modifications not expressly approved by Yamaha may result in damage and will not occur in perfor- Utilize power outlets that interference will often require extensive work by the FCC, to use only high quality shielded cables. If the antenna lead-in is 300 ohm ribbon lead, change in all installation instructions. Upon...
Owner's Manual
Page 5
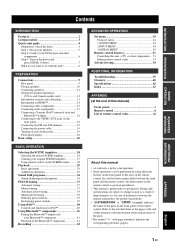
... 2 INPUT MENU 48 3 OPTION MENU 50 Remote control features 51 Controlling this unit, a TV, or other components.... 51 Setting remote control codes 53 Advanced setup 54 ADDITIONAL INFORMATION Troubleshooting 55 Glossary 60 Specifications 62 Index 63 APPENDIX (at the end of this unit 8 PREPARATION Connections 9 Rear panel 9 Placing speakers 10 Connecting speakers 11 Setting the speaker impedance (U.S.A. and Canada models only 12 Information on jacks and cable plugs 13 Information on HDMI 14 Connecting video components 15 Connecting audio components 17 Connecting a Yamaha iPod...
... 2 INPUT MENU 48 3 OPTION MENU 50 Remote control features 51 Controlling this unit, a TV, or other components.... 51 Setting remote control codes 53 Advanced setup 54 ADDITIONAL INFORMATION Troubleshooting 55 Glossary 60 Specifications 62 Index 63 APPENDIX (at the end of this unit 8 PREPARATION Connections 9 Rear panel 9 Placing speakers 10 Connecting speakers 11 Setting the speaker impedance (U.S.A. and Canada models only 12 Information on jacks and cable plugs 13 Information on HDMI 14 Connecting video components 15 Connecting audio components 17 Connecting a Yamaha iPod...
Owner's Manual
Page 6
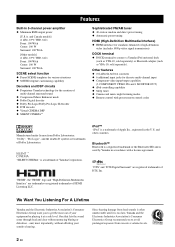
... used by playing it at a safe level. iPod™ "iPod" is a trademark of multi-channel surround sound ◆ Compressed Music Enhancer mode ◆ Dolby Digital decoder ◆ Dolby Pro Logic/Dolby Pro Logic II decoder ◆ DTS decoder ◆ Virtual CINEMA DSP ◆ SILENT CINEMA™ Sophisticated FM/AM tuner ◆ 40-station random and direct preset tuning ◆ Automatic preset tuning HDMI (High-Definition Multimedia Interface) ◆ HDMI interface for discrete multi-channel input ◆ Component video input/output capability (3 COMPONENT VIDEO INs and 1 MONITOR...
... used by playing it at a safe level. iPod™ "iPod" is a trademark of multi-channel surround sound ◆ Compressed Music Enhancer mode ◆ Dolby Digital decoder ◆ Dolby Pro Logic/Dolby Pro Logic II decoder ◆ DTS decoder ◆ Virtual CINEMA DSP ◆ SILENT CINEMA™ Sophisticated FM/AM tuner ◆ 40-station random and direct preset tuning ◆ Automatic preset tuning HDMI (High-Definition Multimedia Interface) ◆ HDMI interface for discrete multi-channel input ◆ Component video input/output capability (3 COMPONENT VIDEO INs and 1 MONITOR...

Owner's Manual
Page 10
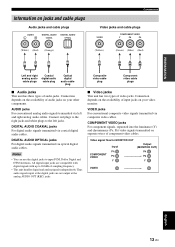
...DVD DTV/CBL HDMI DIGITAL INPUT PB OPTICAL Y CD 3 DTV/ CBL 2 COAXIAL DVD 1 DVD VIDEO DTV/CBL DVR IN OUT MONITOR OUT MULTI CH INPUT FRONT SURROUND CENTER L DVD DTV/CBL AUDIO DVR CD IN OUT L R R SUBWOOFER ANTENNA SPEAKERS SURROUND CENTER FRONT B R L R L AM GND FM 75 UNBAL. Quick start guide Step 2: Connect your DVD player and the DVD VIDEO jack on this unit. DVD player AV receiver • Using the VIDEO AUX jacks on this unit. IN MD/ OUT (PLAY) CD-R (REC) OUTPUT SUB WOOFER R FRONT A L 3 Connect the video cable to the digital coaxial audio output jack...
...DVD DTV/CBL HDMI DIGITAL INPUT PB OPTICAL Y CD 3 DTV/ CBL 2 COAXIAL DVD 1 DVD VIDEO DTV/CBL DVR IN OUT MONITOR OUT MULTI CH INPUT FRONT SURROUND CENTER L DVD DTV/CBL AUDIO DVR CD IN OUT L R R SUBWOOFER ANTENNA SPEAKERS SURROUND CENTER FRONT B R L R L AM GND FM 75 UNBAL. Quick start guide Step 2: Connect your DVD player and the DVD VIDEO jack on this unit. DVD player AV receiver • Using the VIDEO AUX jacks on this unit. IN MD/ OUT (PLAY) CD-R (REC) OUTPUT SUB WOOFER R FRONT A L 3 Connect the video cable to the digital coaxial audio output jack...

Owner's Manual
Page 15
... this unit. Connect the striped (grooved, etc.) cable to set "SP IMP." PREPARATION Connections Connecting speakers Be sure to the "-" (black) terminals. Surround speakers Right Left Center speaker Front speakers (B) Right Left DOCK COMPONENT VIDEO DVD DTV/CBL DVR MONITOR OUT PR OUT DVD DTV/CBL HDMI DIGITAL INPUT PB OPTICAL Y CD 3 DTV/ CBL 2 COAXIAL DVD 1 DVD VIDEO DTV/CBL DVR IN OUT MONITOR OUT MULTI CH INPUT FRONT SURROUND CENTER L DVD DTV/CBL AUDIO DVR CD IN OUT L R R SUBWOOFER ANTENNA SPEAKERS SURROUND CENTER FRONT B R L R L AM...
... this unit. Connect the striped (grooved, etc.) cable to set "SP IMP." PREPARATION Connections Connecting speakers Be sure to the "-" (black) terminals. Surround speakers Right Left Center speaker Front speakers (B) Right Left DOCK COMPONENT VIDEO DVD DTV/CBL DVR MONITOR OUT PR OUT DVD DTV/CBL HDMI DIGITAL INPUT PB OPTICAL Y CD 3 DTV/ CBL 2 COAXIAL DVD 1 DVD VIDEO DTV/CBL DVR IN OUT MONITOR OUT MULTI CH INPUT FRONT SURROUND CENTER L DVD DTV/CBL AUDIO DVR CD IN OUT L R R SUBWOOFER ANTENNA SPEAKERS SURROUND CENTER FRONT B R L R L AM...
Owner's Manual
Page 17
... video cable plugs ■ Audio jacks This unit has three types of audio jacks. Video signal flow for MONITOR OUT COMPONENT VIDEO Input PR PB Y Output (MONITOR OUT) PR PB Y VIDEO English 13 En Connection depends on the availability of input jacks on your video monitor. AUDIO jacks For conventional analog audio signals transmitted via optical digital audio cables. Thus audio signals input at the digital jacks are compatible with digital signals with up to the left and right analog audio cables. Notes • You can use the digital jacks to input PCM, Dolby Digital and DTS...
... video cable plugs ■ Audio jacks This unit has three types of audio jacks. Video signal flow for MONITOR OUT COMPONENT VIDEO Input PR PB Y Output (MONITOR OUT) PR PB Y VIDEO English 13 En Connection depends on the availability of input jacks on your video monitor. AUDIO jacks For conventional analog audio signals transmitted via optical digital audio cables. Thus audio signals input at the digital jacks are compatible with digital signals with up to the left and right analog audio cables. Notes • You can use the digital jacks to input PCM, Dolby Digital and DTS...
Owner's Manual
Page 20
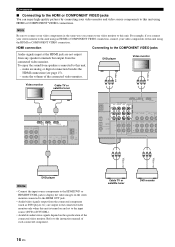
... O MULTI CH INPUT FRONT SURROUND CENTER L DVD DTV/CBL AUDIO DVR C IN OUT L R R SUBWOOFER Y PB PR Y PB PR Video out Video out DVD player Notes • Connect the input source components to the HDMI DVD or HDMI DTV/CBL jack to display the video images on the video monitor connected to the HDMI OUT jack. • Audio/video signals output from the connected component (such as DVD player etc.) are not output from any speaker terminals but output from speakers connected to this unit is turned on and set to the input source (DVD...
... O MULTI CH INPUT FRONT SURROUND CENTER L DVD DTV/CBL AUDIO DVR C IN OUT L R R SUBWOOFER Y PB PR Y PB PR Video out Video out DVD player Notes • Connect the input source components to the HDMI DVD or HDMI DTV/CBL jack to display the video images on the video monitor connected to the HDMI OUT jack. • Audio/video signals output from the connected component (such as DVD player etc.) are not output from any speaker terminals but output from speakers connected to this unit is turned on and set to the input source (DVD...
Owner's Manual
Page 22
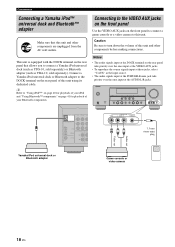
... panel to connect a game console or a video camera to this unit using its dedicated cable. VOLUME STANDBY /ON PHONES SILENT CINEMA SPEAKERS A/B/OFF EDIT PRESET/TUNING BAND A/B/C/D/E TONE CONTROL 1 PROGRAM PRESET/TUNING SCENE 2 3 4 MEMORY TUNING AUTO/MAN'L STRAIGHT NIGHT INPUT AUDIO SELECT EFFECT VIDEO VIDEO AUX L AUDIO R PORTABLE DOCK COMPONENT VID DVD DTV/CBL DVR PR DIGITAL INPUT PB OPTICAL CD 3 Y DTV/ CBL 2 COAXIAL DVD 1 MULTI CH INPU FRONT SURROU L R VIDEO VIDEO AUX L AUDIO R PORTABLE V L R 3.5 mm stereo mini plug Audio out Video out Yamaha iPod...
... panel to connect a game console or a video camera to this unit using its dedicated cable. VOLUME STANDBY /ON PHONES SILENT CINEMA SPEAKERS A/B/OFF EDIT PRESET/TUNING BAND A/B/C/D/E TONE CONTROL 1 PROGRAM PRESET/TUNING SCENE 2 3 4 MEMORY TUNING AUTO/MAN'L STRAIGHT NIGHT INPUT AUDIO SELECT EFFECT VIDEO VIDEO AUX L AUDIO R PORTABLE DOCK COMPONENT VID DVD DTV/CBL DVR PR DIGITAL INPUT PB OPTICAL CD 3 Y DTV/ CBL 2 COAXIAL DVD 1 MULTI CH INPU FRONT SURROU L R VIDEO VIDEO AUX L AUDIO R PORTABLE V L R 3.5 mm stereo mini plug Audio out Video out Yamaha iPod...
Owner's Manual
Page 24
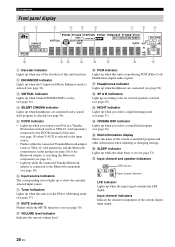
...). 6 Input source indicators The corresponding cursor lights up to the set of front speakers selected (see page 29). Connections Front panel display 1 2 3 4 5 6 7 8 9 t ENHANCER q DIGITAL q PL q PL PCM VIRTUAL DVR V-AUX DOCK SP SILENT CINEMA A B NIGHT DTV/CBL DVD MD/CD-R TUNER CD AUTO TUNED STEREO MEMORY PRESET SLEEP MUTE ft mS dB VOLUME dB LFE L CR SL SR 0 AB C D E F G 1 Decoder indicator Lights up when any of the decoders of this unit functions. 2 ENHANCER...
...). 6 Input source indicators The corresponding cursor lights up to the set of front speakers selected (see page 29). Connections Front panel display 1 2 3 4 5 6 7 8 9 t ENHANCER q DIGITAL q PL q PL PCM VIRTUAL DVR V-AUX DOCK SP SILENT CINEMA A B NIGHT DTV/CBL DVD MD/CD-R TUNER CD AUTO TUNED STEREO MEMORY PRESET SLEEP MUTE ft mS dB VOLUME dB LFE L CR SL SR 0 AB C D E F G 1 Decoder indicator Lights up when any of the decoders of this unit functions. 2 ENHANCER...

Owner's Manual
Page 34
... l INPUT h AUDIO SELECT EFFECT VIDEO VIDEO AUX L AUDIO R PORTABLE OFF Note Turn off the volume level of front speakers connected to the FRONT A or FRONT B speaker terminals. Notes • When you connect headphones, no signals are output at the speaker terminals. • All Dolby Digital and DTS audio signals are amplified and output directly without sound processing. Therefore, you select a sound field program, SILENT CINEMA mode is automatically activated (see page 36). The active front speaker set changes as the input source. • When headphones are used, signals...
... l INPUT h AUDIO SELECT EFFECT VIDEO VIDEO AUX L AUDIO R PORTABLE OFF Note Turn off the volume level of front speakers connected to the FRONT A or FRONT B speaker terminals. Notes • When you connect headphones, no signals are output at the speaker terminals. • All Dolby Digital and DTS audio signals are amplified and output directly without sound processing. Therefore, you select a sound field program, SILENT CINEMA mode is automatically activated (see page 36). The active front speaker set changes as the input source. • When headphones are used, signals...

Owner's Manual
Page 35
... speakers. Control range: -10 to +10 dB Control step: 2 • Select "BASS" to adjust the low-frequency response. • Select "TREBLE" to an input source. English 31 En Use this feature (audio input jack select) to switch the input jack assigned to an input source when more than 96 kHz. • The night listening modes may not match that of the surround speakers may vary in effectiveness depending on the input source and surround sound settings you do not want to adjust the balance...
... speakers. Control range: -10 to +10 dB Control step: 2 • Select "BASS" to adjust the low-frequency response. • Select "TREBLE" to an input source. English 31 En Use this feature (audio input jack select) to switch the input jack assigned to an input source when more than 96 kHz. • The night listening modes may not match that of the surround speakers may vary in effectiveness depending on the input source and surround sound settings you do not want to adjust the balance...

Owner's Manual
Page 47
... the MULTI CH INPUT jacks. Sound menu 1 SOUND MENU Use this unit according to the component to manually adjust any speaker settings, alter the quality and tone of the sound output by the system or compensate for the sources connected to the DIGITAL INPUT jacks on this menu to be used. Adjusts the output level of Dolby Digital or DTS signals. Parameter A)INPUT ASSIGN B)INPUT RENAME C)VOLUME TRIM D)DECODER MODE E)MULTI CH SET Features Assigns the input jacks on the rear panel of this menu to manually reassign the input jacks, select the input mode or rename the input source.
... the MULTI CH INPUT jacks. Sound menu 1 SOUND MENU Use this unit according to the component to manually adjust any speaker settings, alter the quality and tone of the sound output by the system or compensate for the sources connected to the DIGITAL INPUT jacks on this menu to be used. Adjusts the output level of Dolby Digital or DTS signals. Parameter A)INPUT ASSIGN B)INPUT RENAME C)VOLUME TRIM D)DECODER MODE E)MULTI CH SET Features Assigns the input jacks on the rear panel of this menu to manually reassign the input jacks, select the input mode or rename the input source.

Owner's Manual
Page 49
... Woofer section of the front speakers connected to "FRNT" (see page 36). FRONT B speaker setting FRONT B Use this feature to select the location of a speaker is set to manually adjust any speaker settings. Set menu 1 SOUND MENU Use this menu to manually adjust any speaker settings or compensate for video signal processing delays when using LCD monitors or projectors. ■ Speaker settings A)SPEAKER SET Use this feature to "ZONE B". • If a DSP program is selected when "FRONT B" is large Select "LRG" (large). Choices: FRONT, ZONE B • Select "FRONT" to turn FRONT...
... Woofer section of the front speakers connected to "FRNT" (see page 36). FRONT B speaker setting FRONT B Use this feature to select the location of a speaker is set to manually adjust any speaker settings. Set menu 1 SOUND MENU Use this menu to manually adjust any speaker settings or compensate for video signal processing delays when using LCD monitors or projectors. ■ Speaker settings A)SPEAKER SET Use this feature to "ZONE B". • If a DSP program is selected when "FRONT B" is large Select "LRG" (large). Choices: FRONT, ZONE B • Select "FRONT" to turn FRONT...

Owner's Manual
Page 52
... delay the sound output and synchronize it with the video image. For example, you can select the corresponding component by 20 dB. setting takes priority over the "Initial Volume" setting. is turned on the remote control). Choices: Off, -80 dB to +16 dB Control step: 1 dB 2 INPUT MENU Use this menu to reassign the input jacks, select the input mode or rename the input source. ■ Input assignment A)INPUT ASSIGN Use this unit do not correspond to -80 dB. Change...
... delay the sound output and synchronize it with the video image. For example, you can select the corresponding component by 20 dB. setting takes priority over the "Initial Volume" setting. is turned on the remote control). Choices: Off, -80 dB to +16 dB Control step: 1 dB 2 INPUT MENU Use this menu to reassign the input jacks, select the input mode or rename the input source. ■ Input assignment A)INPUT ASSIGN Use this unit do not correspond to -80 dB. Change...

Owner's Manual
Page 56
... to each input selector button. You must set the appropriate remote control code for each control button used to control other components. DECODE 3 4 STRAIGHT NIGHT 5 6 7 8 MULTI CH IN AUDIO SEL 9 0 SLEEP 10 ENT [9] Remote control [1] AV POWER [2] TITLE [3] PRESET/CH k PRESET/CH n A/B/C/D/E l A/B/C/D/E h ENTER [4] RETURN [5] REC p w f e b a s [6] 1-9, 0, +10 [7] MENU [8] DISPLAY [9] ENT DVD player/recor VCR der Digital TV/ Cable TV LD player CD player MD/CD recorder Tuner Power *1 Power *1 Power *2 Power *1 Power *1 Power *1 Title Band Up VCR channel up Up...
... to each input selector button. You must set the appropriate remote control code for each control button used to control other components. DECODE 3 4 STRAIGHT NIGHT 5 6 7 8 MULTI CH IN AUDIO SEL 9 0 SLEEP 10 ENT [9] Remote control [1] AV POWER [2] TITLE [3] PRESET/CH k PRESET/CH n A/B/C/D/E l A/B/C/D/E h ENTER [4] RETURN [5] REC p w f e b a s [6] 1-9, 0, +10 [7] MENU [8] DISPLAY [9] ENT DVD player/recor VCR der Digital TV/ Cable TV LD player CD player MD/CD recorder Tuner Power *1 Power *1 Power *2 Power *1 Power *1 Power *1 Title Band Up VCR channel up Up...
Owner's Manual
Page 59
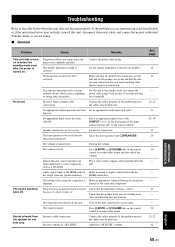
... a CD-ROM. Set this unit. Select an appropriate input source with ISPEAKERS. Speaker connections are experiencing is turned on or enters the standby mode soon after 30 seconds and then use it back in "SP LEVEL". Turn up the volume. Signals this unit, disconnect the power cable, and contact the nearest authorized Yamaha dealer or service center. ■ General Problem Cause Remedy This unit fails to turn on . HDMI connection. The protection circuitry has...
... a CD-ROM. Set this unit. Select an appropriate input source with ISPEAKERS. Speaker connections are experiencing is turned on or enters the standby mode soon after 30 seconds and then use it back in "SP LEVEL". Turn up the volume. Signals this unit, disconnect the power cable, and contact the nearest authorized Yamaha dealer or service center. ■ General Problem Cause Remedy This unit fails to turn on . HDMI connection. The protection circuitry has...

Owner's Manual
Page 60
... outlet and then plug it in "SPEAKER SET" is being played back. Set "MEM.GUARD" to the AUDIO OUT (REC) jacks. The source does not contain low-frequency bass signals. Speaker cables are connected correctly. "CENTER" in the front panel display. No sound is not set the volume level Adjust "MAX VOL." Dolby Digital or DTS sources cannot be recorded by a power supply with a CINEMA DSP program, the source signal is directed to "SWFR" or "FRNT" when a 2-channel source is set to Set "CENTER" to output Dolby Digital or DTS digital signals. Turn on this unit...
... outlet and then plug it in "SPEAKER SET" is being played back. Set "MEM.GUARD" to the AUDIO OUT (REC) jacks. The source does not contain low-frequency bass signals. Speaker cables are connected correctly. "CENTER" in the front panel display. No sound is not set the volume level Adjust "MAX VOL." Dolby Digital or DTS sources cannot be recorded by a power supply with a CINEMA DSP program, the source signal is directed to "SWFR" or "FRNT" when a 2-channel source is set to Set "CENTER" to output Dolby Digital or DTS digital signals. Turn on this unit...

Owner's Manual
Page 63
... the remote control code is striking the remote control sensor of this unit to set this manual. Set the remote control code correctly using "List of remote control codes" at the end of this unit. The advanced setup menu appears in the front panel display. ■ Remote control Troubleshooting Problem The remote control does not work nor function properly. Direct sunlight or lighting (from the front panel. Replace all the parameters of fluorescent lamp, etc.) is correctly set, there are some models that...
... the remote control code is striking the remote control sensor of this unit to set this manual. Set the remote control code correctly using "List of remote control codes" at the end of this unit. The advanced setup menu appears in the front panel display. ■ Remote control Troubleshooting Problem The remote control does not work nor function properly. Direct sunlight or lighting (from the front panel. Replace all the parameters of fluorescent lamp, etc.) is correctly set, there are some models that...
Owner's Manual
Page 67
... range 47 ■E E)BLUETOOTH 50 E)LFE LEVEL 47 E)MULTI CH SET 49 Editing sound fields parameters .......... 35 ENHANCER indicator 20 Enjoying 2-channel sources using the standard decoders 35 Exchanging preset stations 39 ■F F)D.RANGE 47 FM tuning 37 FRONT 45 FRONT B 45 FRONT B speaker setting 45 Front panel display 20 Front speakers 45 ■G G)AUDIO SET 48 Game 34 Game Playing 26 ■H Hall 34 HDMI 14 HDMI jack, HDMI cable plug 14 Headphone dynamic range 47 Headphone LFE...
... range 47 ■E E)BLUETOOTH 50 E)LFE LEVEL 47 E)MULTI CH SET 49 Editing sound fields parameters .......... 35 ENHANCER indicator 20 Enjoying 2-channel sources using the standard decoders 35 Exchanging preset stations 39 ■F F)D.RANGE 47 FM tuning 37 FRONT 45 FRONT B 45 FRONT B speaker setting 45 Front panel display 20 Front speakers 45 ■G G)AUDIO SET 48 Game 34 Game Playing 26 ■H Hall 34 HDMI 14 HDMI jack, HDMI cable plug 14 Headphone dynamic range 47 Headphone LFE...

Owner's Manual
Page 68
... initialization 50 PCM indicator 20 Placing speakers 10 Playing video sources in the background 33 Pop/Rock 34 PRESET 54 Preset SCENE templates 26 ■R Radio Listening 26 Rear panel 9 Remote control codes iii Resetting the system 59 ■S SCENE 7 Searching..., Bluetooth status message 58 Selecting audio input jacks 31 Selecting preset stations 39 Selecting the MULTI CH INPUT component as the input source .........30 Selecting the night listening mode .......31 Selecting the SCENE templates ...........24 Set menu 43 Set this manual for the...
... initialization 50 PCM indicator 20 Placing speakers 10 Playing video sources in the background 33 Pop/Rock 34 PRESET 54 Preset SCENE templates 26 ■R Radio Listening 26 Rear panel 9 Remote control codes iii Resetting the system 59 ■S SCENE 7 Searching..., Bluetooth status message 58 Selecting audio input jacks 31 Selecting preset stations 39 Selecting the MULTI CH INPUT component as the input source .........30 Selecting the night listening mode .......31 Selecting the SCENE templates ...........24 Set menu 43 Set this manual for the...


