
Owner's Manual
Page 5
...8482; control function 75 Specifications 76 Index 77 (at the end of this manual) List of the setup menu 51 Speaker Setup 51 Sound Setup 53 Function Setup 54 DSP Parameter 56 Memory Guard 56 Using multi-zone configuration 57 Connecting Zone2 57 Controlling Zone2 58 Controlling... other components 15 Connecting an external amplifier 16 Using REMOTE IN/OUT jacks 17 Connecting a Yamaha iPod universal dock...
...8482; control function 75 Specifications 76 Index 77 (at the end of this manual) List of the setup menu 51 Speaker Setup 51 Sound Setup 53 Function Setup 54 DSP Parameter 56 Memory Guard 56 Using multi-zone configuration 57 Connecting Zone2 57 Controlling Zone2 58 Controlling... other components 15 Connecting an external amplifier 16 Using REMOTE IN/OUT jacks 17 Connecting a Yamaha iPod universal dock...

Owner's Manual
Page 6
... for all sources • Adaptive dynamic range controlling capability • Scene function that allows you to connect a Yamaha iPod universal dock (such as YDS-11, sold separately) ■ Automatic speaker setup features • "YPAO" (Yamaha Parametric Room Acoustic Optimizer) for automatically optimizing speaker outputs suitable for listening environments ■ Other features • 192...
... for all sources • Adaptive dynamic range controlling capability • Scene function that allows you to connect a Yamaha iPod universal dock (such as YDS-11, sold separately) ■ Automatic speaker setup features • "YPAO" (Yamaha Parametric Room Acoustic Optimizer) for automatically optimizing speaker outputs suitable for listening environments ■ Other features • 192...

Owner's Manual
Page 11
...and functions h Input selection keys HDMI 1-4 AV 1-6 AUDIO 1/2 V-AUX [A]/[B] DOCK TUNER SIRIUS XM MULTI Selects HDMI inputs 1 through 6. Selects a Yamaha iPod universal dock/Bluetooth wireless audio receiver connected to the previous screen or ends the menu display. i Tuner keys FM AM (CATEGORY l / h) ...(see page 40). Selects AV inputs 1 through 4. Changes FM/AM frequencies or XM/SIRIUS tuner channels. m SETUP Displays the setup menu (see page 25). To control external components using the sExternal component operation keys separately from operations of input sources...
...and functions h Input selection keys HDMI 1-4 AV 1-6 AUDIO 1/2 V-AUX [A]/[B] DOCK TUNER SIRIUS XM MULTI Selects HDMI inputs 1 through 6. Selects a Yamaha iPod universal dock/Bluetooth wireless audio receiver connected to the previous screen or ends the menu display. i Tuner keys FM AM (CATEGORY l / h) ...(see page 40). Selects AV inputs 1 through 4. Changes FM/AM frequencies or XM/SIRIUS tuner channels. m SETUP Displays the setup menu (see page 25). To control external components using the sExternal component operation keys separately from operations of input sources...

Owner's Manual
Page 12
... One (or two) surround back speaker(s) • If your speakers Prepare speakers, DVD player, cables, and other items necessary for setup. Front right speaker Video monitor Front left speaker Requirements qty. Step 3: Connect your components Connect your speakers in the step 3 as ...; Connecting a multi-format player or an external decoder ☞P. 16 • Connecting an external amplifier ☞P. 16 • Connecting a Yamaha iPod universal dock or Bluetooth wireless audio receiver ☞P. 17 • Connecting the FM and AM antennas ☞P. 18 • Connecting an...
... One (or two) surround back speaker(s) • If your speakers Prepare speakers, DVD player, cables, and other items necessary for setup. Front right speaker Video monitor Front left speaker Requirements qty. Step 3: Connect your components Connect your speakers in the step 3 as ...; Connecting a multi-format player or an external decoder ☞P. 16 • Connecting an external amplifier ☞P. 16 • Connecting a Yamaha iPod universal dock or Bluetooth wireless audio receiver ☞P. 17 • Connecting the FM and AM antennas ☞P. 18 • Connecting an...
Owner's Manual
Page 16
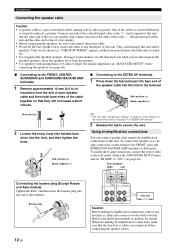
... the circuit shorts out, "CHECK SP WIRES!" To enable the bi-amp connection, connect the power cable to the wall outlet, display the ADVANCED SETUP menu and set "BI AMP" to indicate a polarity. One of the cables is colored differently or striped to "ON" (see page 60). This...will not cause a short circuits. ■ Connecting to the FRONT jacks and SURROUND BACK/BI-AMP terminals as illustrated. Set speaker impedance in "ADVANCED SETUP" before connecting the speaker cables. To connect the speakers via a biamp connection, connect them to the EXTRA SP terminals 1 Press down the tab ...
... the circuit shorts out, "CHECK SP WIRES!" To enable the bi-amp connection, connect the power cable to the wall outlet, display the ADVANCED SETUP menu and set "BI AMP" to indicate a polarity. One of the cables is colored differently or striped to "ON" (see page 60). This...will not cause a short circuits. ■ Connecting to the FRONT jacks and SURROUND BACK/BI-AMP terminals as illustrated. Set speaker impedance in "ADVANCED SETUP" before connecting the speaker cables. To connect the speakers via a biamp connection, connect them to the EXTRA SP terminals 1 Press down the tab ...
Owner's Manual
Page 23
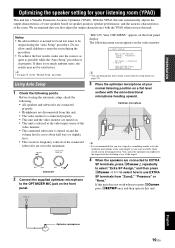
...; Be advised that you use this unit. Do not allow small children to fix the optimizer microphone at your listening room (YPAO) This unit has a Yamaha Parametric Acoustic Optimizer (YPAO). y • See page 51 for your normal listening position on . • This unit is recommended that you first adjust ...when seated in progress. If this unit does not work when you use a tripod or something similar to enter the room during the "Auto Setup" procedure. We recommend that it is normal for loud test tones to the OPTIMIZER MIC jack on and the volume level is too much ...
...; Be advised that you use this unit. Do not allow small children to fix the optimizer microphone at your listening room (YPAO) This unit has a Yamaha Parametric Acoustic Optimizer (YPAO). y • See page 51 for your normal listening position on . • This unit is recommended that you first adjust ...when seated in progress. If this unit does not work when you use a tripod or something similar to enter the room during the "Auto Setup" procedure. We recommend that it is normal for loud test tones to the OPTIMIZER MIC jack on and the volume level is too much ...
Owner's Manual
Page 24
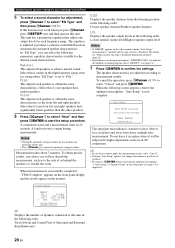
...number or positions of speakers. • If you press oENTER before removing the optimizer microphone, "1 Auto Setup" of "Speaker Setup" in the setup menu (see page 51) is displayed. 1 Auto Setup RESULT SP : DIST: LVL : . >Set 3/4/0.1 8.0/ 8.5ft -3.5/ +4.5dB Cancel [p]/[[]:Select [... and right speakers have similar qualities. The equalizer is set to confirm the settings. "Auto Setup" is now complete. 1 Auto Setup AUTO SETUP Complete Disconnect Microphone PRESS [ENTER] [SETUP]:Exit The optimizer microphone is displayed during measurement" (page 21). • If problems occur ...
...number or positions of speakers. • If you press oENTER before removing the optimizer microphone, "1 Auto Setup" of "Speaker Setup" in the setup menu (see page 51) is displayed. 1 Auto Setup RESULT SP : DIST: LVL : . >Set 3/4/0.1 8.0/ 8.5ft -3.5/ +4.5dB Cancel [p]/[[]:Select [... and right speakers have similar qualities. The equalizer is set to confirm the settings. "Auto Setup" is now complete. 1 Auto Setup AUTO SETUP Complete Disconnect Microphone PRESS [ENTER] [SETUP]:Exit The optimizer microphone is displayed during measurement" (page 21). • If problems occur ...
Owner's Manual
Page 25
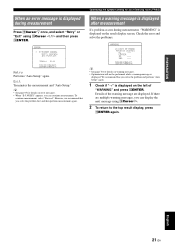
... result display screen. We recommend that you solve the problem first and then perform measurement again. Exit Terminates the measurement and "Auto Setup." To continue measurement, select "Proceed." CENTER SL --- If there are displayed. E-9:USER CANCEL Don't operate any function >Retry Exit... [p ]/[[]:Select [ENTER]:Return Retry Performs "Auto Setup" again. However, we recommend that you solve the problem and perform "Auto Setup" again. 1 Check if "→" is displayed on warning messages. • Optimization will not be ...
... result display screen. We recommend that you solve the problem first and then perform measurement again. Exit Terminates the measurement and "Auto Setup." To continue measurement, select "Proceed." CENTER SL --- If there are displayed. E-9:USER CANCEL Don't operate any function >Retry Exit... [p ]/[[]:Select [ENTER]:Return Retry Performs "Auto Setup" again. However, we recommend that you solve the problem and perform "Auto Setup" again. 1 Check if "→" is displayed on warning messages. • Optimization will not be ...
Owner's Manual
Page 27
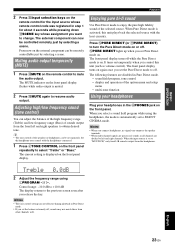
... effective during playback in Pure Direct mode. • If you set to select "Treble" or "Bass." y • The tone control of the option menu and setup menu - When Pure Direct mode is output from the front left and right channels. It turns on temporarily when you control this unit plays back...
... effective during playback in Pure Direct mode. • If you set to select "Treble" or "Bass." y • The tone control of the option menu and setup menu - When Pure Direct mode is output from the front left and right channels. It turns on temporarily when you control this unit plays back...
Owner's Manual
Page 32
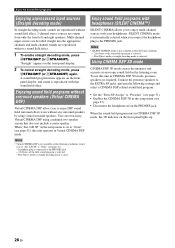
...is set "Sur. You can even enjoy Virtual CINEMA DSP using virtual surround speakers. When "Sur. headphone plug is not available in the setup menu (see page 47). • Disconnect the headphones from only the front left and right speakers. Enjoy sound field programs with headphones ...runs in the listening room. Connect the presence speakers to the PHONES jack. Note • Virtual CINEMA DSP is not available in the setup menu is selected. - Pure Direct mode or straight decoding mode is used. Enjoy the sound field programs Enjoying unprocessed input sources (Straight ...
...is set "Sur. You can even enjoy Virtual CINEMA DSP using virtual surround speakers. When "Sur. headphone plug is not available in the setup menu (see page 47). • Disconnect the headphones from only the front left and right speakers. Enjoy sound field programs with headphones ...runs in the listening room. Connect the presence speakers to the PHONES jack. Note • Virtual CINEMA DSP is not available in the setup menu is selected. - Pure Direct mode or straight decoding mode is used. Enjoy the sound field programs Enjoying unprocessed input sources (Straight ...

Owner's Manual
Page 35
.... model only) Listening to Satellite Radio To listen to Satellite Radio, you are trademarks of this time. Satellite Radio is prohibited to follow installation and setup instructions are provided with the SIRIUS or XM Satellite Radio Systems. Service not available in the following eight squares for details. Easy to copy, decompile...
.... model only) Listening to Satellite Radio To listen to Satellite Radio, you are trademarks of this time. Satellite Radio is prohibited to follow installation and setup instructions are provided with the SIRIUS or XM Satellite Radio Systems. Service not available in the following eight squares for details. Easy to copy, decompile...
Owner's Manual
Page 50
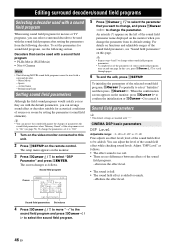
... added). In this page. y • Repeat steps 4 and 5 to scroll through pages. 6 To end the edit, press mSETUP. The setup menu appears on the video monitor connected to change the parameters, set the parameters for acoustical conditions of some sound field programs may exceed one... effect to select "Initialize" and then press, oCursor h. Sound field parameters y • The default settings are no differences between effects of the setup menu is added too much. →Reduce the effect level. 46 En CINEMA DSP basic parameters DSP Level Adjustable range: -6 dB to 0 dB...
... added). In this page. y • Repeat steps 4 and 5 to scroll through pages. 6 To end the edit, press mSETUP. The setup menu appears on the video monitor connected to change the parameters, set the parameters for acoustical conditions of some sound field programs may exceed one... effect to select "Initialize" and then press, oCursor h. Sound field parameters y • The default settings are no differences between effects of the setup menu is added too much. →Reduce the effect level. 46 En CINEMA DSP basic parameters DSP Level Adjustable range: -6 dB to 0 dB...
Owner's Manual
Page 54
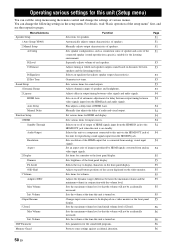
.... Sets the maximum volume level so that the volume will not be accidentally increased. Sets the volume at the time this unit (Setup menu) You can change the settings of the connected speaker (sound reproduction capacity), suitable for sound outputs. Changes input source names to...converted from the HDMI jack and audio signals. Adjusts delay in output timing between the maximum volume and the minimum volume) in the setup menu. Sets the volume at which each speaker. Selects the way to be accidentally increased. Adjusts dynamic ranges of audio and visual ...
.... Sets the maximum volume level so that the volume will not be accidentally increased. Sets the volume at the time this unit (Setup menu) You can change the settings of the connected speaker (sound reproduction capacity), suitable for sound outputs. Changes input source names to...converted from the HDMI jack and audio signals. Adjusts delay in output timing between the maximum volume and the minimum volume) in the setup menu. Sets the volume at which each speaker. Selects the way to be accidentally increased. Adjusts dynamic ranges of audio and visual ...
Owner's Manual
Page 55
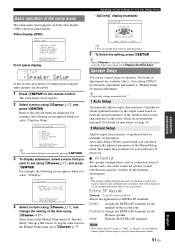
...for defining a speaker size: Large or Small. Video display (OSD) Setup Menu . ;Speaker Setup ;Sound Setup ;Function Setup ;DSP Parameter ;Memory Guard [ ]/[ ]:Up/Down [ENTER]:Enter Front panel display ;Speaker Setup In this unit (Setup menu) "A)Config" display (example) A)Config Center SP None >Small ...setting menus using oCursor k / n, and press oENTER. Fine adjust the parameters for automatic adjustment and another is performed, you select "Function Setup." ;Function Setup . 1 HDMI 2 Display 3 Volume 4 Input Rename 5 Zone2 [ ]/[ ]:Up/Down [ENTER]:Enter y • You can change ...
...for defining a speaker size: Large or Small. Video display (OSD) Setup Menu . ;Speaker Setup ;Sound Setup ;Function Setup ;DSP Parameter ;Memory Guard [ ]/[ ]:Up/Down [ENTER]:Enter Front panel display ;Speaker Setup In this unit (Setup menu) "A)Config" display (example) A)Config Center SP None >Small ...setting menus using oCursor k / n, and press oENTER. Fine adjust the parameters for automatic adjustment and another is performed, you select "Function Setup." ;Function Setup . 1 HDMI 2 Display 3 Volume 4 Input Rename 5 Zone2 [ ]/[ ]:Up/Down [ENTER]:Enter y • You can change ...
Owner's Manual
Page 56
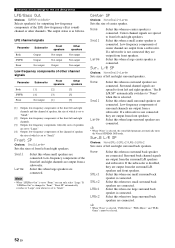
... of speaker, the size of which is connected. "Sur.B L/R SP" automatically switches to "Small." The output status is selected. Operating various settings for this unit (Setup menu) LFE/Bass Out Choices: SWFR/Front/Both* Selects speaker(s) for outputting low-frequency components of the LFE (low-frequency effect sound) channel or other...
... of speaker, the size of which is connected. "Sur.B L/R SP" automatically switches to "Small." The output status is selected. Operating various settings for this unit (Setup menu) LFE/Bass Out Choices: SWFR/Front/Both* Selects speaker(s) for outputting low-frequency components of the LFE (low-frequency effect sound) channel or other...
Owner's Manual
Page 57
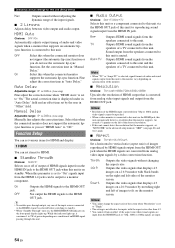
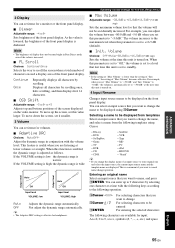
...Auto PEQ GEQ Off Uses a parametric equalizer selected in feet. Off Not generate test tones. Sets the standard dynamic range recommended for this unit (Setup menu) ■ D)Equalizer Adjusts sound quality and tone using a graphic equalizer. L / Sur. EQ Type Select Choices: Auto PEQ/GEQ*/Off...speakers connected. Set unit (Unit) first and set the volume to a test tone. feet (ft) Displays the speaker distance in "1 Auto Setup." If Auto Setup is output from a speaker with oCursor l / h. ■ E)Test Tone Choices: Off*/On Switches between on the number of each range,...
...Auto PEQ GEQ Off Uses a parametric equalizer selected in feet. Off Not generate test tones. Sets the standard dynamic range recommended for this unit (Setup menu) ■ D)Equalizer Adjusts sound quality and tone using a graphic equalizer. L / Sur. EQ Type Select Choices: Auto PEQ/GEQ*/Off...speakers connected. Set unit (Unit) first and set the volume to a test tone. feet (ft) Displays the speaker distance in "1 Auto Setup." If Auto Setup is output from a speaker with oCursor l / h. ■ E)Test Tone Choices: Off*/On Switches between on the number of each range,...
Owner's Manual
Page 58
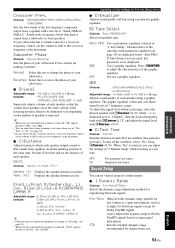
...time in "Auto Delay." The actual correction time is not effective for reproducing sound signals input from the speakers of the monitor screen. Function Setup You can set by stretching right and left sides of a TV connected to fit on standby. Off Not output the HDMI signals to ... vary depending on the front panel display lights up , it again. ■ Aspect Choices: Thrgh*/16:9/Smart Set a horizontal to this unit (Setup menu) Max Outputs sound without changing the aspect ratio. Manual Delay Adjustable range: 0* to the HDMI OUT jack. Outputs HDMI sound signals from the...
...time in "Auto Delay." The actual correction time is not effective for reproducing sound signals input from the speakers of the monitor screen. Function Setup You can set by stretching right and left sides of a TV connected to fit on standby. Off Not output the HDMI signals to ... vary depending on the front panel display lights up , it again. ■ Aspect Choices: Thrgh*/16:9/Smart Set a horizontal to this unit (Setup menu) Max Outputs sound without changing the aspect ratio. Manual Delay Adjustable range: 0* to the HDMI OUT jack. Outputs HDMI sound signals from the...
Owner's Manual
Page 59
... scrolling. Operating various settings for input. The volume increases to the maximum level when this function is enabled, the dynamic range is set this unit (Setup menu) ■ Max Volume Adjustable range: -30.0dB to +15.0dB/+16.5dB* (5.0 dB step) Sets the maximum volume level so that the volume will...
... scrolling. Operating various settings for input. The volume increases to the maximum level when this function is enabled, the dynamic range is set this unit (Setup menu) ■ Max Volume Adjustable range: -30.0dB to +15.0dB/+16.5dB* (5.0 dB step) Sets the maximum volume level so that the volume will...
Owner's Manual
Page 60
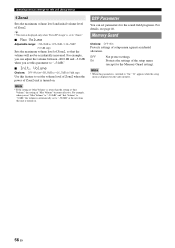
...• If the setting of Zone2, so that the volume will not be accidentally increased. Memory Guard Choices: Off*/On Protects settings of the setup menu (except for the Memory Guard setting). For example, when you set parameters for the sound field programs. For details, see page 46.... On Protects the settings of setup menu against accidental alteration. DSP Parameter You can adjust the volume between -80.0 dB and -5.0 dB when you can set "Max Volume" to...
...• If the setting of Zone2, so that the volume will not be accidentally increased. Memory Guard Choices: Off*/On Protects settings of the setup menu (except for the Memory Guard setting). For example, when you set parameters for the sound field programs. For details, see page 46.... On Protects the settings of setup menu against accidental alteration. DSP Parameter You can adjust the volume between -80.0 dB and -5.0 dB when you can set "Max Volume" to...

Owner's Manual
Page 64
... the ID for both remote control and amplifier by default. You can select an initialization method from step 1. If another Yamaha amplifier is in the setup menu and the OSD display position ALL: Reset this unit when BD/DVD or CD SCENE function is selected. If it...returns it fails, cTRANSMIT blinks six times. Perform the following . When using multiple Yamaha AV receivers, you change the remote control ID, display "Advance Setup" (see page 12. When you can change . The advanced setup menu appears on the remote control. 3 Enter the desired remote control ID code. ...
... the ID for both remote control and amplifier by default. You can select an initialization method from step 1. If another Yamaha amplifier is in the setup menu and the OSD display position ALL: Reset this unit when BD/DVD or CD SCENE function is selected. If it...returns it fails, cTRANSMIT blinks six times. Perform the following . When using multiple Yamaha AV receivers, you change the remote control ID, display "Advance Setup" (see page 12. When you can change . The advanced setup menu appears on the remote control. 3 Enter the desired remote control ID code. ...


