
Owners Manual
Page 2
... block any heat sources such as power-supply cord or plug is used, use caution when moving the cart/apparatus combination to qualified service personnel. Since hearing damage from the apparatus. 11 Only use this unit in accordance with the manufacturer's instructions. 8 Do not install near water. 6 Clean only with arrowhead symbol, within the product's enclosure that lets the sound come through loud...
... block any heat sources such as power-supply cord or plug is used, use caution when moving the cart/apparatus combination to qualified service personnel. Since hearing damage from the apparatus. 11 Only use this unit in accordance with the manufacturer's instructions. 8 Do not install near water. 6 Clean only with arrowhead symbol, within the product's enclosure that lets the sound come through loud...

Owners Manual
Page 3
... of the following measures: - Reorient or relocate the receiving antenna - FCC INFORMATION (for help. This product, when installed as indicated in the instructions contained in this product in a residential environment will not occur in FCC Regulations, Part 15 for a Class B digital device, pursuant to follow instructions could void the user's authority to coaxial type cable. These limits are on different branch (circuit breaker...
... of the following measures: - Reorient or relocate the receiving antenna - FCC INFORMATION (for help. This product, when installed as indicated in the instructions contained in this product in a residential environment will not occur in FCC Regulations, Part 15 for a Class B digital device, pursuant to follow instructions could void the user's authority to coaxial type cable. These limits are on different branch (circuit breaker...

Owners Manual
Page 4
... sound system in this unit itself is called the standby mode. The laser component in a well ventilated, cool, dry, clean place - Burning objects (i.e. Use a clean, dry cloth. 12 Only voltage specified on this unit near the AC outlet and where the AC power plug can cause hearing loss. Contact qualified Yamaha service personnel when any damage resulting from use force on switches...
... sound system in this unit itself is called the standby mode. The laser component in a well ventilated, cool, dry, clean place - Burning objects (i.e. Use a clean, dry cloth. 12 Only voltage specified on this unit near the AC outlet and where the AC power plug can cause hearing loss. Contact qualified Yamaha service personnel when any damage resulting from use force on switches...

Owners Manual
Page 5
... Other connection 5 REMOTE CONTROL 6 FRONT PANEL DISPLAY 6 OPERATION FRONT PANEL AND BASIC OPERATION ..... 7 LISTENING TO MUSIC 8 Playback operation 8 Other operation 9 LISTENING TO FM RADIO STATIONS ........ 10 Tuning to radio stations 10 Presetting radio stations 10 Selecting preset radio stations (Preset tuning)......... 10 USING USEFUL FUNCTIONS 11 Using setup menu 11 Using timer and sleep timer 13 ADDITIONAL INFORMATION TROUBLESHOOTING 14 General 14 Radio reception 15 iPod 15 USB 18 Disc playback 19 Remote control 19 HANDLING COMPACT DISCS 20 SPECIFICATIONS 20 ■...
... Other connection 5 REMOTE CONTROL 6 FRONT PANEL DISPLAY 6 OPERATION FRONT PANEL AND BASIC OPERATION ..... 7 LISTENING TO MUSIC 8 Playback operation 8 Other operation 9 LISTENING TO FM RADIO STATIONS ........ 10 Tuning to radio stations 10 Presetting radio stations 10 Selecting preset radio stations (Preset tuning)......... 10 USING USEFUL FUNCTIONS 11 Using setup menu 11 Using timer and sleep timer 13 ADDITIONAL INFORMATION TROUBLESHOOTING 14 General 14 Radio reception 15 iPod 15 USB 18 Disc playback 19 Remote control 19 HANDLING COMPACT DISCS 20 SPECIFICATIONS 20 ■...

Owners Manual
Page 6
... of the remote control decreases. dusty places ■ Replacing the battery in the following items. MCR-040 CD receiver (CRX-040) Dock cover PARTS + Speakers (NS-BP80) MCR-140 CD receiver (CRX-140) Cover the iPod dock when not using. Straight pin CR2025 battery 2 En Remote control Indoor FM antenna Transmitter + Speaker cable (1.5 m (4.9') × 2) ■ Using the remote control Within 6 m (20') Use the remote control within 6 m (20') of this unit and point it toward the remote control sensor...
... of the remote control decreases. dusty places ■ Replacing the battery in the following items. MCR-040 CD receiver (CRX-040) Dock cover PARTS + Speakers (NS-BP80) MCR-140 CD receiver (CRX-140) Cover the iPod dock when not using. Straight pin CR2025 battery 2 En Remote control Indoor FM antenna Transmitter + Speaker cable (1.5 m (4.9') × 2) ■ Using the remote control Within 6 m (20') Use the remote control within 6 m (20') of this unit and point it toward the remote control sensor...

Owners Manual
Page 9
... the CD receiver (CRX-140). Complete the setting. To establish the wireless connection, set POWER SAVING to NORMAL (☞ P. 11). English 5 En MCR-140 Station your iPod in standby mode. Note The volume of the unit is compatible with iPod (5th generation), iPod classic, iPod nano, and iPod touch. Exit setup menu. ■ Wireless connection to Subwoofer You can use a subwoofer wirelessly with your iPod. ■ Group setting To operate your iPod using FAT16 or FAT32 format. • Do not connect devices...
... the CD receiver (CRX-140). Complete the setting. To establish the wireless connection, set POWER SAVING to NORMAL (☞ P. 11). English 5 En MCR-140 Station your iPod in standby mode. Note The volume of the unit is compatible with iPod (5th generation), iPod classic, iPod nano, and iPod touch. Exit setup menu. ■ Wireless connection to Subwoofer You can use a subwoofer wirelessly with your iPod. ■ Group setting To operate your iPod using FAT16 or FAT32 format. • Do not connect devices...

Owners Manual
Page 10
... an FM stereo broadcast. 4 AUTO indicator: Lights up when you preset radio stations automatically or manually (☞ P. 10). Press again to control the volume. Lights up when the sound is tuned into a station (☞ P. 10). C Volume control buttons: Press to resume the volume. Press MUTE to repeat play (☞ P. 9). 7 MUTE indicator: Lights up when you set your iPod (MCR-040)/CD/USB to turn off the sound. REMOTE CONTROL 1 Infrared signal transmitter (☞ P. 2) 2 : standby/on Multi information display (☞...
... an FM stereo broadcast. 4 AUTO indicator: Lights up when you preset radio stations automatically or manually (☞ P. 10). Press again to control the volume. Lights up when the sound is tuned into a station (☞ P. 10). C Volume control buttons: Press to resume the volume. Press MUTE to repeat play (☞ P. 9). 7 MUTE indicator: Lights up when you set your iPod (MCR-040)/CD/USB to turn off the sound. REMOTE CONTROL 1 Infrared signal transmitter (☞ P. 2) 2 : standby/on Multi information display (☞...

Owners Manual
Page 11
... iPod dock MCR-040 : Unit standby/on USB port: ☞ P. 5, 8 iPod USB PORTABLE VOLUME INPUT Charging cradle Disc tray : Disc tray open/close : Play/pause playback : Stop playback INPUT button: Press repeatedly to choose the input source. 3.5 mm stereo mini plug cable VOLUME Down Up : Connecting headphones No sound is left turned on the unit, press / , or start playback on the front panel display is disconnected from the speakers when headphones are connected. To turn on for a certain period, the unit will automatically switch...
... iPod dock MCR-040 : Unit standby/on USB port: ☞ P. 5, 8 iPod USB PORTABLE VOLUME INPUT Charging cradle Disc tray : Disc tray open/close : Play/pause playback : Stop playback INPUT button: Press repeatedly to choose the input source. 3.5 mm stereo mini plug cable VOLUME Down Up : Connecting headphones No sound is left turned on the unit, press / , or start playback on the front panel display is disconnected from the speakers when headphones are connected. To turn on for a certain period, the unit will automatically switch...

Owners Manual
Page 12
... available depending on the model or the software version of your iPod. · *2 Some devices may exceed 30 seconds depending on the number of data saved on the USB devices connected to play back music. 1 Set the source MCR-040 2 Switch the input Dock Adapter 3 Select music and start playback Scroll the list Control menu iPod*1 MCR-140 ☞ P. 5 For the MCR-140, the operation on the front panel display for the loss of...
... available depending on the model or the software version of your iPod. · *2 Some devices may exceed 30 seconds depending on the number of data saved on the USB devices connected to play back music. 1 Set the source MCR-040 2 Switch the input Dock Adapter 3 Select music and start playback Scroll the list Control menu iPod*1 MCR-140 ☞ P. 5 For the MCR-140, the operation on the front panel display for the loss of...

Owners Manual
Page 13
... Data Disc starts in alphanumeric order of files. • Playback for USB starts in order by date and time of creation. ■ Shuffle play You can play back repeatedly. During playback Press repeatedly. For CD/USB *2 If the audio format of the selected music source is MP3/ WMA, you use an iPod touch. OPERATION Other operation ■ Control playback 1 2 During playback LISTENING TO MUSIC ■ Switching the display You can switch...
... Data Disc starts in alphanumeric order of files. • Playback for USB starts in order by date and time of creation. ■ Shuffle play You can play back repeatedly. During playback Press repeatedly. For CD/USB *2 If the audio format of the selected music source is MP3/ WMA, you use an iPod touch. OPERATION Other operation ■ Control playback 1 2 During playback LISTENING TO MUSIC ■ Switching the display You can switch...

Owners Manual
Page 15
OPERATION USING USEFUL FUNCTIONS Using setup menu The setup menu appears on the front panel display by playback operation on your iPod during the operation, press SETUP. ■ Setting dimmer, tone/balance and power saving mode DIMMER: Changes the brightness of each left and right speaker channel. Select desired setup menu. Repeat*1 *1 When there are using headphones. y To cancel the setting during standby mode. The default setting is NORMAL. However, you cannot turn on /off 12 WIRELESS SET MCR-140 GROUP...
OPERATION USING USEFUL FUNCTIONS Using setup menu The setup menu appears on the front panel display by playback operation on your iPod during the operation, press SETUP. ■ Setting dimmer, tone/balance and power saving mode DIMMER: Changes the brightness of each left and right speaker channel. Select desired setup menu. Repeat*1 *1 When there are using headphones. y To cancel the setting during standby mode. The default setting is NORMAL. However, you cannot turn on /off 12 WIRELESS SET MCR-140 GROUP...

Owners Manual
Page 16
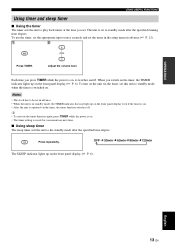
... enter TIMER SET directly by pressing and holding TIMER. FM: Set preset number. USING USEFUL FUNCTIONS ■ Adjusting the clock CLOCK SET: To set hour and minute, repeat steps 3 and 4 on the front panel display for a certain period by pressing and holding DISPLAY if the time setting has completed. iPod: When you select the iPod as the input source, you set . Timer ON/OFF Switch the timer on the unit. Make sure that you set the track/file number which...
... enter TIMER SET directly by pressing and holding TIMER. FM: Set preset number. USING USEFUL FUNCTIONS ■ Adjusting the clock CLOCK SET: To set hour and minute, repeat steps 3 and 4 on the front panel display for a certain period by pressing and holding DISPLAY if the time setting has completed. iPod: When you select the iPod as the input source, you set . Timer ON/OFF Switch the timer on the unit. Make sure that you set the track/file number which...
Owners Manual
Page 17
... operated via the timer, set this unit to standby mode when the timer is switched on . • The timer setting is saved for convenient use the timer, set the appropriate input source securely and set in advance. • When the unit is on /off . Notes • The clock has to be set the timer in the setup menu in standby mode, the TIMER indicator does not light up on the front panel display even if the timer...
... operated via the timer, set this unit to standby mode when the timer is switched on . • The timer setting is saved for convenient use the timer, set the appropriate input source securely and set in advance. • When the unit is on /off . Notes • The clock has to be set the timer in the setup menu in standby mode, the TIMER indicator does not light up on the front panel display even if the timer...

Owners Manual
Page 18
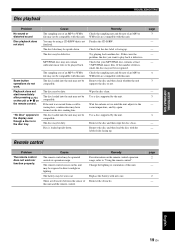
... operate properly. Speaker connections are experiencing is not listed below or if the instruction below when this unit to the standby mode, disconnect the power cable, plug it normally. The power cable has been disconnected. Remedy Connect the power cable firmly. Select an appropriate input source with INPUT on the front panel (or the source buttons on the unit and play the source again. Connect the cables properly. page 4 - - 4 6 - 3 - - 4 - 14 En Cause The power cable is not connected...
... operate properly. Speaker connections are experiencing is not listed below or if the instruction below when this unit to the standby mode, disconnect the power cable, plug it normally. The power cable has been disconnected. Remedy Connect the power cable firmly. Select an appropriate input source with INPUT on the front panel (or the source buttons on the unit and play the source again. Connect the cables properly. page 4 - - 4 6 - 3 - - 4 - 14 En Cause The power cable is not connected...

Owners Manual
Page 19
... the front panel of recognizing the connection with the signal path from the iPod dock. Station your iPod (see page 5). Remedy Disconnect the power cable and contact the nearest authorized Yamaha dealer or service center. The preset (memory) may have been erased. page 4 - 10 - 10 10 - The following status messages appear only if you are using a high-quality directional FM antenna. Change the height, direction, or placement...
... the front panel of recognizing the connection with the signal path from the iPod dock. Station your iPod (see page 5). Remedy Disconnect the power cable and contact the nearest authorized Yamaha dealer or service center. The preset (memory) may have been erased. page 4 - 10 - 10 10 - The following status messages appear only if you are using a high-quality directional FM antenna. Change the height, direction, or placement...

Owners Manual
Page 20
... green and flashes red for 2 seconds Lights up green and keeps flashing red Flashes red Flashes red once Flashes red 2 times continuously (regardless of the status indicator refer to the transmitter. Connection failed. Remedy Wireless connection has disconnected. Remove the iPod from the transmitter, and connect again. Set it in progress. page 5 5 The following status messages appear only if you are supported. Adjusting the volume level or operating with the remote control. Connect again. TROUBLESHOOTING The following...
... green and flashes red for 2 seconds Lights up green and keeps flashing red Flashes red Flashes red once Flashes red 2 times continuously (regardless of the status indicator refer to the transmitter. Connection failed. Remedy Wireless connection has disconnected. Remove the iPod from the transmitter, and connect again. Set it in progress. page 5 5 The following status messages appear only if you are supported. Adjusting the volume level or operating with the remote control. Connect again. TROUBLESHOOTING The following...

Owners Manual
Page 21
... not connected to the latest. Remedy Connect the power cable correctly. Please wait for playback information display. Change the way of holding, the orientation, or the position of the iPod. Place the unit away from these devices, or turn them off . Remove the iPod from the unit, then set in the iPod dock improperly. Only iPod (5th generation), iPod classic, iPod nano, and iPod touch are supported. Update the iPod software...
... not connected to the latest. Remedy Connect the power cable correctly. Please wait for playback information display. Change the way of holding, the orientation, or the position of the iPod. Place the unit away from these devices, or turn them off . Remove the iPod from the unit, then set in the iPod dock improperly. Only iPod (5th generation), iPod classic, iPod nano, and iPod touch are supported. Update the iPod software...

Owners Manual
Page 22
.... The connected USB device is not playable on this unit. Disconnect the USB device. Change input source other than USB and select USB as input source again. page 5 5 5 Problem MP3/WMA file in the front panel of a transmission error without a status message appearing in the USB device does not play. The MP3 or WMA formats are not compatible with the device. Connect an AC adapter if supplied with this unit. Connect the USB device again. Replace the...
.... The connected USB device is not playable on this unit. Disconnect the USB device. Change input source other than USB and select USB as input source again. page 5 5 5 Problem MP3/WMA file in the front panel of a transmission error without a status message appearing in the USB device does not play. The MP3 or WMA formats are not compatible with the device. Connect an AC adapter if supplied with this unit. Connect the USB device again. Replace the...
Owners Manual
Page 23
... may not be compatible. Check that your MP3/WMA disc contains at least 5 MP3/WMA music files. Check that the disc label is in the disc tray. ADDITIONAL INFORMATION Disc playback TROUBLESHOOTING Problem No sound or distorted sound Disc playback does not start immediately after pressing on the unit or on the disc reading lens. Remote control Problem The remote control does not work . Remove the obstacles. If the number of an...
... may not be compatible. Check that your MP3/WMA disc contains at least 5 MP3/WMA music files. Check that the disc label is in the disc tray. ADDITIONAL INFORMATION Disc playback TROUBLESHOOTING Problem No sound or distorted sound Disc playback does not start immediately after pressing on the unit or on the disc reading lens. Remote control Problem The remote control does not work . Remove the obstacles. If the number of an...

Owners Manual
Page 24
...; Media CD, CD-R/RW • Audio format Audio CD, MP3, WMA LASER • Type Semiconductor laser GaAs/GaAlAs • Wave length 780 nm • Output power 10 mW USB • Audio format MP3, WMA PORTABLE • Input connector........... iPod™ iPod is not responsible for a long time. • Use a soft-tipped pen when writing on the circumstances) Specifications are subject to 108.00 MHz GENERAL • Power supply [Europe model...
...; Media CD, CD-R/RW • Audio format Audio CD, MP3, WMA LASER • Type Semiconductor laser GaAs/GaAlAs • Wave length 780 nm • Output power 10 mW USB • Audio format MP3, WMA PORTABLE • Input connector........... iPod™ iPod is not responsible for a long time. • Use a soft-tipped pen when writing on the circumstances) Specifications are subject to 108.00 MHz GENERAL • Power supply [Europe model...

