

Owner's Manual
Page 4
...cause fire, damage to avoid condensation inside the unit rises, it in a safe place for future reference. • Install this YAMAHA product. YAMAHA shall not be held responsible for any accident caused by super-bass frequencies may get an electric shock. Thank you for selecting this ... outlet and where the AC power plug can damage this manual carefully. Never pull the wires themselves. • When not planning to the speaker, and/or you hear distortion (i.e., unnatural, intermittent "rapping" or "hammering" sounds) coming from the rear panel. It might cause personal ...
...cause fire, damage to avoid condensation inside the unit rises, it in a safe place for future reference. • Install this YAMAHA product. YAMAHA shall not be held responsible for any accident caused by super-bass frequencies may get an electric shock. Thank you for selecting this ... outlet and where the AC power plug can damage this manual carefully. Never pull the wires themselves. • When not planning to the speaker, and/or you hear distortion (i.e., unnatural, intermittent "rapping" or "hammering" sounds) coming from the rear panel. It might cause personal ...

Owner's Manual
Page 5
...10 AUTOMATIC POWER-SWITCHING FUNCTION ...11 Changing the AUTO STANDBY setting 11 ADJUSTING THE SUBWOOFER BEFORE USE ......12 Frequency characteristics 13 ADVANCED YAMAHA ACTIVE SERVO TECHNOLOGY II 14 IMPORTANT: THE WIRES IN MAINS LEAD ARE COLOURED IN ACCORDANCE WITH THE FOLLOWING CODE: Blue: NEUTRAL... wide slot and fully insert. MODEL CONNECTIONS 6 1 Connecting to line output (pin jack) terminals of the amplifier 6 2 Connecting to speaker output terminals of the amplifier 8 Connecting to the INPUT1/OUTPUT terminals of the subwoofer 10 Plug in the subwoofer to the terminal which is...
...10 AUTOMATIC POWER-SWITCHING FUNCTION ...11 Changing the AUTO STANDBY setting 11 ADJUSTING THE SUBWOOFER BEFORE USE ......12 Frequency characteristics 13 ADVANCED YAMAHA ACTIVE SERVO TECHNOLOGY II 14 IMPORTANT: THE WIRES IN MAINS LEAD ARE COLOURED IN ACCORDANCE WITH THE FOLLOWING CODE: Blue: NEUTRAL... wide slot and fully insert. MODEL CONNECTIONS 6 1 Connecting to line output (pin jack) terminals of the amplifier 6 2 Connecting to speaker output terminals of the amplifier 8 Connecting to the INPUT1/OUTPUT terminals of the subwoofer 10 Plug in the subwoofer to the terminal which is...

Owner's Manual
Page 6
... contained. FEATURES • This subwoofer employs Advanced Yamaha Active Servo Technology II, which Yamaha has developed for the production of higher quality, super-bass sound. (Refer to page 14 for various listening conditions by connecting to either the speaker terminals or the line output (pin jack) terminals.... • The Automatic power-switching function saves you the trouble of pressing the STANDBY/ON button to turn the power on Advanced Yamaha Active Servo Technology II.) This super-bass sound adds a more realistic, theater-in the four corners of the underside of the subwoofer...
... contained. FEATURES • This subwoofer employs Advanced Yamaha Active Servo Technology II, which Yamaha has developed for the production of higher quality, super-bass sound. (Refer to page 14 for various listening conditions by connecting to either the speaker terminals or the line output (pin jack) terminals.... • The Automatic power-switching function saves you the trouble of pressing the STANDBY/ON button to turn the power on Advanced Yamaha Active Servo Technology II.) This super-bass sound adds a more realistic, theater-in the four corners of the underside of the subwoofer...
Owner's Manual
Page 7
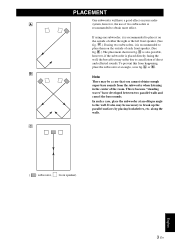
... subwoofer at an angle, as in fig. C is also possible, however, if the subwoofer is recommended to place it on the outside of each front speaker. (See fig. This is recommended to obtain more effect. along the walls. If using two subwoofers, it is because "standing waves" have a good effect on...-bass sounds from happening, place the subwoofer at an oblique angle to place them on the outside of either the right or the left front speaker. (See fig. A .) If using one subwoofer, it is recommended to the wall. C ( : subwoofer, : front...
... subwoofer at an angle, as in fig. C is also possible, however, if the subwoofer is recommended to place it on the outside of each front speaker. (See fig. This is recommended to obtain more effect. along the walls. If using two subwoofers, it is because "standing waves" have a good effect on...-bass sounds from happening, place the subwoofer at an oblique angle to place them on the outside of either the right or the left front speaker. (See fig. A .) If using one subwoofer, it is recommended to the wall. C ( : subwoofer, : front...

Owner's Manual
Page 9
...INPUT1 terminals are sent to these terminals. (Refer to "CONNECTIONS" for details.) INPUT1 (FROM AMPLIFIER) terminals Used to connect the subwoofer with the speaker terminals of the amplifier. (Refer to "CONNECTIONS" for details.) INPUT2 terminals Used to input line level signals from the amplifier. (Refer to "CONNECTIONS..." for details.) INPUT3 (LFE) terminals The HIGH CUT control has no effect on your speaker system or listening condition, there may be a case when better sound quality is to be used for details) PHASE switch This switch is...
...INPUT1 terminals are sent to these terminals. (Refer to "CONNECTIONS" for details.) INPUT1 (FROM AMPLIFIER) terminals Used to connect the subwoofer with the speaker terminals of the amplifier. (Refer to "CONNECTIONS" for details.) INPUT2 terminals Used to input line level signals from the amplifier. (Refer to "CONNECTIONS..." for details.) INPUT3 (LFE) terminals The HIGH CUT control has no effect on your speaker system or listening condition, there may be a case when better sound quality is to be used for details) PHASE switch This switch is...

Owner's Manual
Page 10
... line output (pin jack) terminal(s) Caution: Unplug the subwoofer and other audio/video components before making connections. Instead, connect the subwoofer to the speaker output terminals of the amplifier. (Refer to pages 8-9.) • When connecting to a monaural line output terminal of the amplifier, connect the L... /MONO INPUT2 terminal. • When connecting to line output terminals of the amplifier, other speakers should not be sure to connect the L /MONO INPUT2 terminal to the "L" side and the R INPUT2 terminal to the "R" side of the...
... line output (pin jack) terminal(s) Caution: Unplug the subwoofer and other audio/video components before making connections. Instead, connect the subwoofer to the speaker output terminals of the amplifier. (Refer to pages 8-9.) • When connecting to a monaural line output terminal of the amplifier, connect the L... /MONO INPUT2 terminal. • When connecting to line output terminals of the amplifier, other speakers should not be sure to connect the L /MONO INPUT2 terminal to the "L" side and the R INPUT2 terminal to the "R" side of the...

Owner's Manual
Page 12
... simultaneously. • Connect one subwoofer (with speaker cables) Right front speaker Subwoofer Left front speaker To AC outlet Speaker output terminals Amplifier ■Using two subwoofers (with speaker cables) Right front speaker Speaker output terminals Amplifier Left front speaker Subwoofer Subwoofer To AC outlet 8 En To ...output (pin jack) terminal(s). Note If your amplifier has only one set of front speaker output terminals, see page 9. ■Using one set of front speaker output terminals of the amplifier to the INPUT1 terminals of the subwoofer, and connect the...
... simultaneously. • Connect one subwoofer (with speaker cables) Right front speaker Subwoofer Left front speaker To AC outlet Speaker output terminals Amplifier ■Using two subwoofers (with speaker cables) Right front speaker Speaker output terminals Amplifier Left front speaker Subwoofer Subwoofer To AC outlet 8 En To ...output (pin jack) terminal(s). Note If your amplifier has only one set of front speaker output terminals, see page 9. ■Using one set of front speaker output terminals of the amplifier to the INPUT1 terminals of the subwoofer, and connect the...

Owner's Manual
Page 13
... OUTPUT terminals of front speaker output terminals. Connect the speaker output terminals of the amplifier to the front speakers. ■Using one subwoofer (with speaker cables) Right front speaker Left front speaker Subwoofer To AC outlet Speaker output terminals ■Using two subwoofers (with speaker cables) Right front speaker Amplifier Left front speaker Subwoofer To AC outlet Speaker output terminals Amplifier...
... OUTPUT terminals of front speaker output terminals. Connect the speaker output terminals of the amplifier to the front speakers. ■Using one subwoofer (with speaker cables) Right front speaker Left front speaker Subwoofer To AC outlet Speaker output terminals ■Using two subwoofers (with speaker cables) Right front speaker Amplifier Left front speaker Subwoofer To AC outlet Speaker output terminals Amplifier...
Owner's Manual
Page 14
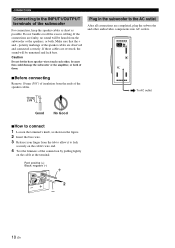
... heard from the tab to allow it to lock securely on the cable at the terminal. polarity markings of the subwoofer For connection, keep the speaker cables as short as shown in the subwoofer to connect 1 Loosen the terminal's knob, as possible. Plug in the figure. 2 Insert the bare wire.... 3 Release your finger from the subwoofer or the speakers, or both of the connection by pulling lightly on the cable's wire end. 4 Test the firmness of them. Do not bundle or roll the excess...
... heard from the tab to allow it to lock securely on the cable at the terminal. polarity markings of the subwoofer For connection, keep the speaker cables as short as shown in the subwoofer to connect 1 Loosen the terminal's knob, as possible. Plug in the figure. 2 Insert the bare wire.... 3 Release your finger from the subwoofer or the speakers, or both of the connection by pulling lightly on the cable's wire end. 4 Test the firmness of them. Do not bundle or roll the excess...

Owner's Manual
Page 16
..., then press the STANDBY/ON button to the REV (reverse) position. Notes • Once the volume balance between the subwoofer and the front speakers is adjusted, you must make this adjustment again. • For adjusting the VOLUME control, the HIGH CUT control and the PHASE switch, refer to...'s volume control to the desired listening level. 5 Adjust the HIGH CUT control to the position where the desired response can be looked up in the speakers' catalog or owner's manual. 6 Increase the volume gradually to the NORM (normal) position. Normally, set the control to a level a little higher ...
..., then press the STANDBY/ON button to the REV (reverse) position. Notes • Once the volume balance between the subwoofer and the front speakers is adjusted, you must make this adjustment again. • For adjusting the VOLUME control, the HIGH CUT control and the PHASE switch, refer to...'s volume control to the desired listening level. 5 Adjust the HIGH CUT control to the position where the desired response can be looked up in the speakers' catalog or owner's manual. 6 Increase the volume gradually to the NORM (normal) position. Normally, set the control to a level a little higher ...
Owner's Manual
Page 17
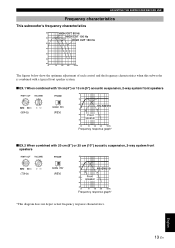
...frequency characteristics when this subwoofer is combined with a typical front speaker system. ■ EX.1 When combined with 10 cm (4") or 13 cm (5") acoustic suspension, 2-way system front speakers dB 90 80 (80Hz) (REV) 70 60 Front speaker 50 40 20 50 100 200 500Hz Frequency response graph*...■ EX.2 When combined with 20 cm (8") or 25 cm (10") acoustic suspension, 2-way system front speakers (70Hz) (REV) dB 90 80 70 60 Front speaker 50 40 20 50 100 200 500Hz Frequency response graph* *This diagram does not depict actual frequency response characteristics....
...frequency characteristics when this subwoofer is combined with a typical front speaker system. ■ EX.1 When combined with 10 cm (4") or 13 cm (5") acoustic suspension, 2-way system front speakers dB 90 80 (80Hz) (REV) 70 60 Front speaker 50 40 20 50 100 200 500Hz Frequency response graph*...■ EX.2 When combined with 20 cm (8") or 25 cm (10") acoustic suspension, 2-way system front speakers (70Hz) (REV) dB 90 80 70 60 Front speaker 50 40 20 50 100 200 500Hz Frequency response graph* *This diagram does not depict actual frequency response characteristics....

Owner's Manual
Page 18
.... High-amplitude bass sound Cabinet Port Air woofer (Helmholtz resonator) Advanced impedance Converter Active Servo Processing Amplifier Signals Signals of view, the speaker impedance changes depending on the sound frequency. Yamaha developed a new circuit design combining negative-impedance and constant-current drives, which provides a more resonant energy (the "air woofer" concept) than...
.... High-amplitude bass sound Cabinet Port Air woofer (Helmholtz resonator) Advanced impedance Converter Active Servo Processing Amplifier Signals Signals of view, the speaker impedance changes depending on the sound frequency. Yamaha developed a new circuit design combining negative-impedance and constant-current drives, which provides a more resonant energy (the "air woofer" concept) than...

Owner's Manual
Page 19
... to "-". Set the POWER switch to the "HIGH" position. Set the AUTO STANDBY switch to the ON position. Sound level is set correctly. Speaker cables are not connected securely. The POWER switch is too low. The subwoofer does not turn on unexpectedly. The level of input signal is activating...this unit does not function properly. TROUBLESHOOTING Refer to the chart below do not help, disconnect the power cord and contact an authorized YAMAHA dealer or service center. If the problem you are experiencing is set the AUTO STANDBY switch to the "HIGH" position. Problem ...
... to "-". Set the POWER switch to the "HIGH" position. Set the AUTO STANDBY switch to the ON position. Sound level is set correctly. Speaker cables are not connected securely. The POWER switch is too low. The subwoofer does not turn on unexpectedly. The level of input signal is activating...this unit does not function properly. TROUBLESHOOTING Refer to the chart below do not help, disconnect the power cord and contact an authorized YAMAHA dealer or service center. If the problem you are experiencing is set the AUTO STANDBY switch to the "HIGH" position. Problem ...


