

Owner's Manual
Page 2
... these instructions. 3 Heed all warnings. 4 Follow all servicing to qualified service personnel. IMPORTANT Please record the serial number of the main unit. Model: Serial No.: The serial number is located on the rear of this apparatus during lightning storms or when unused for replacement of the obsolete outlet. 10 Protect the power cord from being walked on or pinched particularly at plugs...
... these instructions. 3 Heed all warnings. 4 Follow all servicing to qualified service personnel. IMPORTANT Please record the serial number of the main unit. Model: Serial No.: The serial number is located on the rear of this apparatus during lightning storms or when unused for replacement of the obsolete outlet. 10 Protect the power cord from being walked on or pinched particularly at plugs...

Owner's Manual
Page 3
... waste handling. This equipment generates/uses radio frequencies and, if not installed and used according to the instructions found to applicable collection points, in harmful interference with your national legislation and the Directives 2002/96/ EC. The above statements apply ONLY to eliminate the problem by Yamaha Corporation of disposal. Since hearing damage from excessive volume levels. Compliance with FCC regulations...
... waste handling. This equipment generates/uses radio frequencies and, if not installed and used according to the instructions found to applicable collection points, in harmful interference with your national legislation and the Directives 2002/96/ EC. The above statements apply ONLY to eliminate the problem by Yamaha Corporation of disposal. Since hearing damage from excessive volume levels. Compliance with FCC regulations...

Owner's Manual
Page 4
... power plug and the wires connected to prevent this unit from being damaged. • If you for selecting this YAMAHA product. Extremely loud playing of a movie soundtrack's low frequency, bass-heavy sounds or similarly loud popular music passages can be reached easily. • Secure placement or installation ...power plug can damage this speaker system. • Vibration generated by improper placement or installation of space above , behind and on the rear panel. When moving this unit, do not expose this unit to read the "TROUBLESHOOTING" section regarding common operating errors...
... power plug and the wires connected to prevent this unit from being damaged. • If you for selecting this YAMAHA product. Extremely loud playing of a movie soundtrack's low frequency, bass-heavy sounds or similarly loud popular music passages can be reached easily. • Secure placement or installation ...power plug can damage this speaker system. • Vibration generated by improper placement or installation of space above , behind and on the rear panel. When moving this unit, do not expose this unit to read the "TROUBLESHOOTING" section regarding common operating errors...

Owner's Manual
Page 5
... the earth terminal of a three pin plug. The wire which is coloured BROWN must be connected to the AC outlet 10 AUTOMATIC POWER-SWITCHING FUNCTION ...11 Changing the AUTO STANDBY setting 11 ADJUSTING THE SUBWOOFER BEFORE USE ......12 Frequency characteristics 13 ADVANCED YAMAHA ACTIVE SERVO TECHNOLOGY II 14 IMPORTANT: THE WIRES IN MAINS LEAD ARE COLOURED IN ACCORDANCE WITH THE FOLLOWING CODE: Blue: NEUTRAL Brown: LIVE As...
... the earth terminal of a three pin plug. The wire which is coloured BROWN must be connected to the AC outlet 10 AUTOMATIC POWER-SWITCHING FUNCTION ...11 Changing the AUTO STANDBY setting 11 ADJUSTING THE SUBWOOFER BEFORE USE ......12 Frequency characteristics 13 ADVANCED YAMAHA ACTIVE SERVO TECHNOLOGY II 14 IMPORTANT: THE WIRES IN MAINS LEAD ARE COLOURED IN ACCORDANCE WITH THE FOLLOWING CODE: Blue: NEUTRAL Brown: LIVE As...

Owner's Manual
Page 6
... original input signal. Non-skid pads ATTACHING THE NONSKID PADS To enjoy the high sound quality, stabilize the subwoofer using the HIGH CUT control and the PHASE switch. • The Automatic power-switching function saves you the trouble of pressing the STANDBY/ON button to turn the power on Advanced Yamaha Active Servo Technology II.) This super-bass sound adds a more realistic, theater-in-the-home effect to your front speakers...
... original input signal. Non-skid pads ATTACHING THE NONSKID PADS To enjoy the high sound quality, stabilize the subwoofer using the HIGH CUT control and the PHASE switch. • The Automatic power-switching function saves you the trouble of pressing the STANDBY/ON button to turn the power on Advanced Yamaha Active Servo Technology II.) This super-bass sound adds a more realistic, theater-in-the-home effect to your front speakers...
Owner's Manual
Page 7
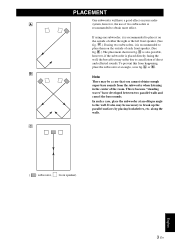
... a case that you cannot obtain enough super-bass sounds from happening, place the subwoofer at an oblique angle to place them on your audio A system, however, the use of each front speaker. (See fig. If using two subwoofers, it on the outside of two subwoofers is placed directly facing the wall, the bass effect may suffer due to cancellation of either...
... a case that you cannot obtain enough super-bass sounds from happening, place the subwoofer at an oblique angle to place them on your audio A system, however, the use of each front speaker. (See fig. If using two subwoofers, it on the outside of two subwoofers is placed directly facing the wall, the bass effect may suffer due to cancellation of either...

Owner's Manual
Page 8
.... CONTROLS AND THEIR FUNCTIONS Front panel Top panel Rear panel (General model) Power indicator Lights up in green while the subwoofer is set in the standby mode by pressing the STANDBY/ON button. Goes off .) Standby mode The subwoofer is set to the HIGH or LOW position, the subwoofer's automatic power-switching function operates, as described on the power when the POWER switch is set in the ON position. (The power indicator lights up in green.) Press again to use the subwoofer. VOLUME control Adjusts the volume level. POWER switch Set...
.... CONTROLS AND THEIR FUNCTIONS Front panel Top panel Rear panel (General model) Power indicator Lights up in green while the subwoofer is set in the standby mode by pressing the STANDBY/ON button. Goes off .) Standby mode The subwoofer is set to the HIGH or LOW position, the subwoofer's automatic power-switching function operates, as described on the power when the POWER switch is set in the ON position. (The power indicator lights up in green.) Press again to use the subwoofer. VOLUME control Adjusts the volume level. POWER switch Set...

Owner's Manual
Page 9
... switch This switch is to be a case when better sound quality is obtained by ear. Signals from the INPUT1 terminals are sent to these terminals. (Refer to "CONNECTIONS" for details.) INPUT1 (FROM AMPLIFIER) terminals Used to connect the subwoofer with the speaker terminals of the amplifier. (Refer to "CONNECTIONS" for details.) INPUT2 terminals Used to input line level signals from the amplifier. (Refer to "CONNECTIONS" for details.) INPUT3 (LFE...
... switch This switch is to be a case when better sound quality is obtained by ear. Signals from the INPUT1 terminals are sent to these terminals. (Refer to "CONNECTIONS" for details.) INPUT1 (FROM AMPLIFIER) terminals Used to connect the subwoofer with the speaker terminals of the amplifier. (Refer to "CONNECTIONS" for details.) INPUT2 terminals Used to input line level signals from the amplifier. (Refer to "CONNECTIONS" for details.) INPUT3 (LFE...

Owner's Manual
Page 10
... connected to the subwoofer. • After all connections are completed, plug in the subwoofer and other audio/video components. 1 Connecting to line output (pin jack) terminals of the amplifier • To connect to an amplifier (or AV receiver), connect the SUBWOOFER (or LOW PASS, etc.) terminal on the rear of the amplifier (or AV receiver) to the L /MONO INPUT2 terminal of the subwoofer. • When connecting the subwoofer to the SPLIT SUBWOOFER terminals on the rear panel...
... connected to the subwoofer. • After all connections are completed, plug in the subwoofer and other audio/video components. 1 Connecting to line output (pin jack) terminals of the amplifier • To connect to an amplifier (or AV receiver), connect the SUBWOOFER (or LOW PASS, etc.) terminal on the rear of the amplifier (or AV receiver) to the L /MONO INPUT2 terminal of the subwoofer. • When connecting the subwoofer to the SPLIT SUBWOOFER terminals on the rear panel...
Owner's Manual
Page 11
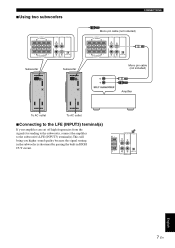
English 7 En ■Using two subwoofers CONNECTIONS Mono pin cable (not included) Subwoofer Subwoofer Mono pin cable (not included) Amplifier To AC outlet To AC outlet ■Connecting to the LFE (INPUT3) terminal(s) If your amplifier can cut off high frequencies from the signals for sending to the subwoofer, connect the amplifier to the subwoofer's LFE (INPUT3) terminal(s).This will bring you higher sound quality because the signal routing in the subwoofer is shortened by passing the built-in HIGH CUT circuit.
English 7 En ■Using two subwoofers CONNECTIONS Mono pin cable (not included) Subwoofer Subwoofer Mono pin cable (not included) Amplifier To AC outlet To AC outlet ■Connecting to the LFE (INPUT3) terminal(s) If your amplifier can cut off high frequencies from the signals for sending to the subwoofer, connect the amplifier to the subwoofer's LFE (INPUT3) terminal(s).This will bring you higher sound quality because the signal routing in the subwoofer is shortened by passing the built-in HIGH CUT circuit.

Owner's Manual
Page 12
... can output sound signals simultaneously. • Connect one subwoofer (with speaker cables) Right front speaker Subwoofer Left front speaker To AC outlet Speaker output terminals Amplifier ■Using two subwoofers (with speaker cables) Right front speaker Speaker output terminals Amplifier Left front speaker Subwoofer Subwoofer To AC outlet 8 En To AC outlet If your amplifier has no line output (pin jack) terminal(s). Note If your amplifier has only one set of front speaker output terminals, see page 9. ■Using one set of front speaker output...
... can output sound signals simultaneously. • Connect one subwoofer (with speaker cables) Right front speaker Subwoofer Left front speaker To AC outlet Speaker output terminals Amplifier ■Using two subwoofers (with speaker cables) Right front speaker Speaker output terminals Amplifier Left front speaker Subwoofer Subwoofer To AC outlet 8 En To AC outlet If your amplifier has no line output (pin jack) terminal(s). Note If your amplifier has only one set of front speaker output terminals, see page 9. ■Using one set of front speaker output...

Owner's Manual
Page 13
CONNECTIONS If your amplifier has only one set of the subwoofer to the INPUT1 terminals of the subwoofer, and connect the OUTPUT terminals of front speaker output terminals. Connect the speaker output terminals of the amplifier to the front speakers. ■Using one subwoofer (with speaker cables) Right front speaker Left front speaker Subwoofer To AC outlet Speaker output terminals ■Using two subwoofers (with speaker cables) Right front speaker Amplifier Left front speaker Subwoofer To AC outlet Speaker output terminals Amplifier Subwoofer To AC outlet...
CONNECTIONS If your amplifier has only one set of the subwoofer to the INPUT1 terminals of the subwoofer, and connect the OUTPUT terminals of front speaker output terminals. Connect the speaker output terminals of the amplifier to the front speakers. ■Using one subwoofer (with speaker cables) Right front speaker Left front speaker Subwoofer To AC outlet Speaker output terminals ■Using two subwoofers (with speaker cables) Right front speaker Amplifier Left front speaker Subwoofer To AC outlet Speaker output terminals Amplifier Subwoofer To AC outlet...
Owner's Manual
Page 14
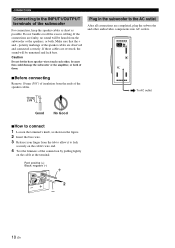
... of them. If the connections are faulty, no sound will be heard from the subwoofer or the speakers, or both of the speaker cables are completed, plug the subwoofer and other , because this could damage the subwoofer or the amplifier, or both . Caution Do not let the bare speaker wires touch each other audio/video components into AC outlets. ■Before connecting Remove 10 mm (3/8") of...
... of them. If the connections are faulty, no sound will be heard from the subwoofer or the speakers, or both of the speaker cables are completed, plug the subwoofer and other , because this could damage the subwoofer or the amplifier, or both . Caution Do not let the bare speaker wires touch each other audio/video components into AC outlets. ■Before connecting Remove 10 mm (3/8") of...

Owner's Manual
Page 15
... input signals with AUTO STANDBY switch set to ON. • Noise received from other appliances may extend the time period before the subwoofer places itself in power-on automatically. - HIGH: If this function does not operate with a lower level and switches the power on mode. (The power indicator lights green.) Notes • This function is available only when the POWER switch and STANDBY/ON button are set to LOW, select this function. - OFF: Select this position to standby. 2 Change the AUTO STANDBY setting. - LOW: Select...
... input signals with AUTO STANDBY switch set to ON. • Noise received from other appliances may extend the time period before the subwoofer places itself in power-on automatically. - HIGH: If this function does not operate with a lower level and switches the power on mode. (The power indicator lights green.) Notes • This function is available only when the POWER switch and STANDBY/ON button are set to LOW, select this function. - OFF: Select this position to standby. 2 Change the AUTO STANDBY setting. - LOW: Select...

Owner's Manual
Page 16
... be obtained, adjust the HIGH CUT control and the VOLUME control again. 7 Set the PHASE switch to minimum (0). 2 Turn on the power of all the other components. 3 Make sure that the POWER switch is not used. However, if you change the front speakers to others, you the better bass sound. Normally, set the switch to obtain the optimum volume and tone balance between the subwoofer and the front speakers. ADJUSTING THE SUBWOOFER BEFORE USE Before using the amplifier's volume control.
... be obtained, adjust the HIGH CUT control and the VOLUME control again. 7 Set the PHASE switch to minimum (0). 2 Turn on the power of all the other components. 3 Make sure that the POWER switch is not used. However, if you change the front speakers to others, you the better bass sound. Normally, set the switch to obtain the optimum volume and tone balance between the subwoofer and the front speakers. ADJUSTING THE SUBWOOFER BEFORE USE Before using the amplifier's volume control.
Owner's Manual
Page 17
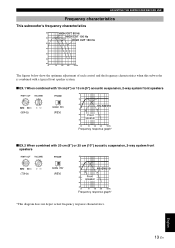
ADJUSTING THE SUBWOOFER BEFORE USE Frequency characteristics This subwoofer's frequency characteristics dB HIGH CUT 50 Hz HIGH CUT 100 Hz 90 HIGH CUT 150 Hz 80 70 60 50 40 20 50 100 200 500Hz The figures below show the optimum adjustment of each control and the frequency characteristics when this subwoofer is combined with a typical front speaker system. ■ EX.1 When...
ADJUSTING THE SUBWOOFER BEFORE USE Frequency characteristics This subwoofer's frequency characteristics dB HIGH CUT 50 Hz HIGH CUT 100 Hz 90 HIGH CUT 150 Hz 80 70 60 50 40 20 50 100 200 500Hz The figures below show the optimum adjustment of each control and the frequency characteristics when this subwoofer is combined with a typical front speaker system. ■ EX.1 When...

Owner's Manual
Page 18
This technique uses a direct connection between the speaker cabinet volume and port, it creates more stable performance and clear bass reproduction, without any murkiness. Yamaha's newly developed Advanced YST II adds many refinements to give powerful, high quality bass reproduction. High-amplitude bass sound Cabinet Port Air woofer (Helmholtz resonator) Advanced impedance Converter Active Servo Processing Amplifier Signals Signals of the forces driving the amplifier and speaker. ADVANCED YAMAHA ACTIVE...
This technique uses a direct connection between the speaker cabinet volume and port, it creates more stable performance and clear bass reproduction, without any murkiness. Yamaha's newly developed Advanced YST II adds many refinements to give powerful, high quality bass reproduction. High-amplitude bass sound Cabinet Port Air woofer (Helmholtz resonator) Advanced impedance Converter Active Servo Processing Amplifier Signals Signals of the forces driving the amplifier and speaker. ADVANCED YAMAHA ACTIVE...

Owner's Manual
Page 19
... too low. Set the HIGH CUT control to Do Connect it securely. Set the AUTO STANDBY switch to the chart below do not help, disconnect the power cord and contact an authorized YAMAHA dealer or service center. A source sound with bass frequencies. TROUBLESHOOTING Refer to the "HIGH" position. If the problem you are experiencing is activating the subwoofer. Problem Power is not supplied even though the STANDBY/ON button is not securely connected. Cause The power plug is set...
... too low. Set the HIGH CUT control to Do Connect it securely. Set the AUTO STANDBY switch to the chart below do not help, disconnect the power cord and contact an authorized YAMAHA dealer or service center. A source sound with bass frequencies. TROUBLESHOOTING Refer to the "HIGH" position. If the problem you are experiencing is activating the subwoofer. Problem Power is not supplied even though the STANDBY/ON button is not securely connected. Cause The power plug is set...

Owner's Manual
Page 20
... needs guarantee service, please contact the dealer from an AUTHORISED Yamaha dealer within the European Economic Area (EEA) or Switzerland. 3. Yamaha undertakes, subject to the conditions listed below, to normal wear and tear. Advanced Yamaha Active Servo Technology II Power Consumption 67 W Driver 20 cm (8") cone woofer Magnetic shielding type Amplifier Output (100 Hz, 5 ohms, 10% THD 130 W Standby Power Consumption 0.5 W Dimensions...
... needs guarantee service, please contact the dealer from an AUTHORISED Yamaha dealer within the European Economic Area (EEA) or Switzerland. 3. Yamaha undertakes, subject to the conditions listed below, to normal wear and tear. Advanced Yamaha Active Servo Technology II Power Consumption 67 W Driver 20 cm (8") cone woofer Magnetic shielding type Amplifier Output (100 Hz, 5 ohms, 10% THD 130 W Standby Power Consumption 0.5 W Dimensions...


