

Owner's Manual
Page 5
... the AC outlet 10 AUTOMATIC POWER-SWITCHING FUNCTION ...11 Changing the AUTO STANDBY setting 11 ADJUSTING THE SUBWOOFER BEFORE USE ......12 Frequency characteristics 13 ADVANCED YAMAHA ACTIVE SERVO TECHNOLOGY II 14 IMPORTANT: THE WIRES IN MAINS LEAD ARE COLOURED IN ACCORDANCE WITH THE FOLLOWING CODE: Blue: NEUTRAL Brown: LIVE As the ...
... the AC outlet 10 AUTOMATIC POWER-SWITCHING FUNCTION ...11 Changing the AUTO STANDBY setting 11 ADJUSTING THE SUBWOOFER BEFORE USE ......12 Frequency characteristics 13 ADVANCED YAMAHA ACTIVE SERVO TECHNOLOGY II 14 IMPORTANT: THE WIRES IN MAINS LEAD ARE COLOURED IN ACCORDANCE WITH THE FOLLOWING CODE: Blue: NEUTRAL Brown: LIVE As the ...

Owner's Manual
Page 6
... theater-in the original input signal. Attach the provided non-skid pads in the four corners of the underside of the subwoofer to Yamaha that the following parts are contained. SUPPLIED ACCESSORIES After unpacking, check that provides smooth bass response during playback, minimizing extraneous... on and off. • This subwoofer system is equipped with a linear port unique to prevent the subwoofer from moving as a result of vibration, etc. 2 En FEATURES • This subwoofer employs Advanced Yamaha Active Servo Technology II, which Yamaha has developed for the production of higher...
... theater-in the original input signal. Attach the provided non-skid pads in the four corners of the underside of the subwoofer to Yamaha that the following parts are contained. SUPPLIED ACCESSORIES After unpacking, check that provides smooth bass response during playback, minimizing extraneous... on and off. • This subwoofer system is equipped with a linear port unique to prevent the subwoofer from moving as a result of vibration, etc. 2 En FEATURES • This subwoofer employs Advanced Yamaha Active Servo Technology II, which Yamaha has developed for the production of higher...
Owner's Manual
Page 7
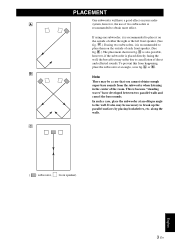
...bass effect may be a case that you cannot obtain enough super-bass sounds from happening, place the subwoofer at an oblique angle to obtain more effect. If using two subwoofers, it is recommended to break up the parallel surfaces by placing bookshelves, etc. B Note There may ...right or the left front speaker. (See fig. In such a case, place the subwoofer at an angle, as in fig. along the walls. PLACEMENT One subwoofer will have developed between two parallel walls and cancel the bass sounds. C ( : subwoofer, : front speaker) English 3 En A or B . B .) The placement ...
...bass effect may be a case that you cannot obtain enough super-bass sounds from happening, place the subwoofer at an oblique angle to obtain more effect. If using two subwoofers, it is recommended to break up the parallel surfaces by placing bookshelves, etc. B Note There may ...right or the left front speaker. (See fig. In such a case, place the subwoofer at an angle, as in fig. along the walls. PLACEMENT One subwoofer will have developed between two parallel walls and cancel the bass sounds. C ( : subwoofer, : front speaker) English 3 En A or B . B .) The placement ...

Owner's Manual
Page 8
...in this control are unsure of this state, you are all cut off point. HIGH CUT control Adjusts the high frequency cut off the subwoofer's power supply from the AC outlet. Frequencies higher than the frequency selected by pressing the STANDBY/ON button. Set this switch to the... set in the standby mode. In this control represents 10 Hz. Turn the control clockwise to increase the volume, and counterclockwise to unplug the subwoofer before setting the VOLTAGE SELECTOR switch correctly. 4 En If you do not need this function, leave this switch in the OFF position. * ...
...in this control are unsure of this state, you are all cut off point. HIGH CUT control Adjusts the high frequency cut off the subwoofer's power supply from the AC outlet. Frequencies higher than the frequency selected by pressing the STANDBY/ON button. Set this switch to the... set in the standby mode. In this control represents 10 Hz. Turn the control clockwise to increase the volume, and counterclockwise to unplug the subwoofer before setting the VOLTAGE SELECTOR switch correctly. 4 En If you do not need this function, leave this switch in the OFF position. * ...

Owner's Manual
Page 9
... FUNCTIONS English 5 En However, depending on the signals inputted to these terminals. (Refer to "CONNECTIONS" for details.) INPUT1 (FROM AMPLIFIER) terminals Used to connect the subwoofer with the speaker terminals of the amplifier. (Refer to "CONNECTIONS" for details.) INPUT2 terminals Used to input line level signals from the amplifier. (Refer to...
... FUNCTIONS English 5 En However, depending on the signals inputted to these terminals. (Refer to "CONNECTIONS" for details.) INPUT1 (FROM AMPLIFIER) terminals Used to connect the subwoofer with the speaker terminals of the amplifier. (Refer to "CONNECTIONS" for details.) INPUT2 terminals Used to input line level signals from the amplifier. (Refer to...

Owner's Manual
Page 10
If the amplifier has only one set of PRE OUT terminals. If connected, they will not produce sound. ■Using one subwoofer Subwoofer Mono pin cable (not included) To AC outlet Amplifier Audio pin cable (not included) 6 En Notes • All connections must be sure to connect the L /...MONO INPUT2 terminal to the "L" side and the R INPUT2 terminal to the PRE OUT terminals. When you connect the subwoofer to the PRE OUT terminals of the amplifier, make sure that is to say L (left) to L, R (right) to R, "+" to "+" and "-" to the SPLIT...
If the amplifier has only one set of PRE OUT terminals. If connected, they will not produce sound. ■Using one subwoofer Subwoofer Mono pin cable (not included) To AC outlet Amplifier Audio pin cable (not included) 6 En Notes • All connections must be sure to connect the L /...MONO INPUT2 terminal to the "L" side and the R INPUT2 terminal to the PRE OUT terminals. When you connect the subwoofer to the PRE OUT terminals of the amplifier, make sure that is to say L (left) to L, R (right) to R, "+" to "+" and "-" to the SPLIT...
Owner's Manual
Page 11
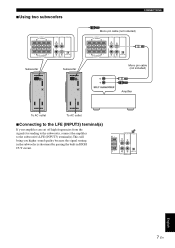
■Using two subwoofers CONNECTIONS Mono pin cable (not included) Subwoofer Subwoofer Mono pin cable (not included) Amplifier To AC outlet To AC outlet ■Connecting to the LFE (INPUT3) terminal(s) If your amplifier can cut off high frequencies from the signals for sending to the subwoofer, connect the amplifier to the subwoofer's LFE (INPUT3) terminal(s).This will bring you higher sound quality because the signal routing in the subwoofer is shortened by passing the built-in HIGH CUT circuit. English 7 En
■Using two subwoofers CONNECTIONS Mono pin cable (not included) Subwoofer Subwoofer Mono pin cable (not included) Amplifier To AC outlet To AC outlet ■Connecting to the LFE (INPUT3) terminal(s) If your amplifier can cut off high frequencies from the signals for sending to the subwoofer, connect the amplifier to the subwoofer's LFE (INPUT3) terminal(s).This will bring you higher sound quality because the signal routing in the subwoofer is shortened by passing the built-in HIGH CUT circuit. English 7 En

Owner's Manual
Page 12
...terminals, see page 9. ■Using one set of front speaker output terminals of the amplifier to the INPUT1 terminals of the subwoofer, and connect the other set of front speaker output terminals of the amplifier to the front speakers. • Set the ... simultaneously. • Connect one subwoofer (with speaker cables) Right front speaker Subwoofer Left front speaker To AC outlet Speaker output terminals Amplifier ■Using two subwoofers (with speaker cables) Right front speaker Speaker output terminals Amplifier Left front speaker Subwoofer Subwoofer To AC outlet 8 En To...
...terminals, see page 9. ■Using one set of front speaker output terminals of the amplifier to the INPUT1 terminals of the subwoofer, and connect the other set of front speaker output terminals of the amplifier to the front speakers. • Set the ... simultaneously. • Connect one subwoofer (with speaker cables) Right front speaker Subwoofer Left front speaker To AC outlet Speaker output terminals Amplifier ■Using two subwoofers (with speaker cables) Right front speaker Speaker output terminals Amplifier Left front speaker Subwoofer Subwoofer To AC outlet 8 En To...

Owner's Manual
Page 13
CONNECTIONS If your amplifier has only one subwoofer (with speaker cables) Right front speaker Left front speaker Subwoofer To AC outlet Speaker output terminals ■Using two subwoofers (with speaker cables) Right front speaker Amplifier Left front speaker Subwoofer To AC outlet Speaker output terminals Amplifier Subwoofer To AC outlet 9 En English Connect the speaker output terminals of the amplifier to the INPUT1 terminals of the subwoofer, and connect the OUTPUT terminals of the subwoofer to the front speakers. ■Using one set of front speaker output terminals.
CONNECTIONS If your amplifier has only one subwoofer (with speaker cables) Right front speaker Left front speaker Subwoofer To AC outlet Speaker output terminals ■Using two subwoofers (with speaker cables) Right front speaker Amplifier Left front speaker Subwoofer To AC outlet Speaker output terminals Amplifier Subwoofer To AC outlet 9 En English Connect the speaker output terminals of the amplifier to the INPUT1 terminals of the subwoofer, and connect the OUTPUT terminals of the subwoofer to the front speakers. ■Using one set of front speaker output terminals.
Owner's Manual
Page 14
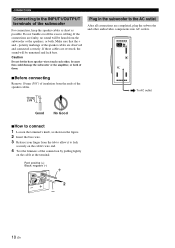
...markings of the speaker cables are faulty, no sound will be heard from the subwoofer or the speakers, or both of them. If these cables are completed, plug the subwoofer and other , because this could damage the subwoofer or the amplifier, or both . Caution Do not let the bare speaker .... If the connections are observed and connected correctly. CONNECTIONS Connecting to the INPUT1/OUTPUT terminals of the subwoofer For connection, keep the speaker cables as short as shown in the subwoofer to the AC outlet After all connections are reversed, the sound will be unnatural and lack bass. ...
...markings of the speaker cables are faulty, no sound will be heard from the subwoofer or the speakers, or both of them. If these cables are completed, plug the subwoofer and other , because this could damage the subwoofer or the amplifier, or both . Caution Do not let the bare speaker .... If the connections are observed and connected correctly. CONNECTIONS Connecting to the INPUT1/OUTPUT terminals of the subwoofer For connection, keep the speaker cables as short as shown in the subwoofer to the AC outlet After all connections are reversed, the sound will be unnatural and lack bass. ...

Owner's Manual
Page 15
...; This function is available only when the POWER switch and STANDBY/ON button are set to LOW, select this position so that the subwoofer detects input signals with AUTO STANDBY switch set to ON. • Noise received from other appliances may extend the time period before the... by sensing noises from other appliances. 11 En English Changing the AUTO STANDBY setting 1 Set the subwoofer to activate this function, for 7 or 8 minutes. (The power indicator lights red.) When the subwoofer detects a bass signal input of below 200 Hz, it automatically places itself in standby mode to ...
...; This function is available only when the POWER switch and STANDBY/ON button are set to LOW, select this position so that the subwoofer detects input signals with AUTO STANDBY switch set to ON. • Noise received from other appliances may extend the time period before the... by sensing noises from other appliances. 11 En English Changing the AUTO STANDBY setting 1 Set the subwoofer to activate this function, for 7 or 8 minutes. (The power indicator lights red.) When the subwoofer detects a bass signal input of below 200 Hz, it automatically places itself in standby mode to ...

Owner's Manual
Page 16
...PHASE switch to adjust the volume balance between the subwoofer and the front speakers is not used. ADJUSTING THE SUBWOOFER BEFORE USE Before using the subwoofer, adjust the subwoofer to obtain the optimum volume and tone balance between the subwoofer and the front speakers by using the amplifier's ...the volume of your entire sound system by following the procedure described below. 1 Set the VOLUME control to minimum (0). 2 Turn on the subwoofer. * The Power indicator lights up in green. 4 Play a source containing low-frequency components and adjust the amplifier's volume control to the...
...PHASE switch to adjust the volume balance between the subwoofer and the front speakers is not used. ADJUSTING THE SUBWOOFER BEFORE USE Before using the subwoofer, adjust the subwoofer to obtain the optimum volume and tone balance between the subwoofer and the front speakers by using the amplifier's ...the volume of your entire sound system by following the procedure described below. 1 Set the VOLUME control to minimum (0). 2 Turn on the subwoofer. * The Power indicator lights up in green. 4 Play a source containing low-frequency components and adjust the amplifier's volume control to the...
Owner's Manual
Page 17
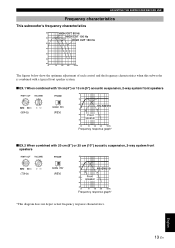
English 13 En ADJUSTING THE SUBWOOFER BEFORE USE Frequency characteristics This subwoofer's frequency characteristics dB HIGH CUT 50 Hz HIGH CUT 100 Hz 90 HIGH CUT 150 Hz 80 70 60 50 40 20 50 100 200 ...500Hz The figures below show the optimum adjustment of each control and the frequency characteristics when this subwoofer is combined with a typical front speaker system. ■ EX.1 When combined with 10 cm (4") or 13 cm (5") acoustic suspension, 2-way system front speakers dB 90...
English 13 En ADJUSTING THE SUBWOOFER BEFORE USE Frequency characteristics This subwoofer's frequency characteristics dB HIGH CUT 50 Hz HIGH CUT 100 Hz 90 HIGH CUT 150 Hz 80 70 60 50 40 20 50 100 200 ...500Hz The figures below show the optimum adjustment of each control and the frequency characteristics when this subwoofer is combined with a typical front speaker system. ■ EX.1 When combined with 10 cm (4") or 13 cm (5") acoustic suspension, 2-way system front speakers dB 90...

Owner's Manual
Page 19
... L, R (right) to R, "+" to "+" and "-" to "-". Play a source sound with little bass frequency content is set to the OFF position. Reposition the subwoofer or break up . Set the AUTO STANDBY switch to the other position. TROUBLESHOOTING Refer to the chart below do not help, disconnect the power cord... and contact an authorized YAMAHA dealer or service center. Sound level is activating the subwoofer. The PHASE switch is set correctly. The STANDBY/ON button is not set to the OFF position....
... L, R (right) to R, "+" to "+" and "-" to "-". Play a source sound with little bass frequency content is set to the OFF position. Reposition the subwoofer or break up . Set the AUTO STANDBY switch to the other position. TROUBLESHOOTING Refer to the chart below do not help, disconnect the power cord... and contact an authorized YAMAHA dealer or service center. Sound level is activating the subwoofer. The PHASE switch is set correctly. The STANDBY/ON button is not set to the OFF position....


