

P-450 OWNERS MANUAL
Page 2
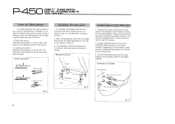
... BEFORE OPERATING YOUR P-450 3 NAMES OF THE PARTS AND THEIR FUNCTIONS 4 MOUNTING THE TURNTABLEPLATTER AND CARTRIDGE 5 TONEARM ASSEMBLY AND ADJUSTMENTS 6/7 USING THE CUEING SWITCH/DUST COVER/CONNECTIONS TO YOUR AMPLIFIER 8 HOW TO PLAY RECORDS 9 SPECIFICATIONS 10 TROUBLESHOOTING 11 Please record the serial number of the cabinet. Retain this turntable to operate. It provides exceptionally accurate music reproduction and is located on the rear of your model and...
... BEFORE OPERATING YOUR P-450 3 NAMES OF THE PARTS AND THEIR FUNCTIONS 4 MOUNTING THE TURNTABLEPLATTER AND CARTRIDGE 5 TONEARM ASSEMBLY AND ADJUSTMENTS 6/7 USING THE CUEING SWITCH/DUST COVER/CONNECTIONS TO YOUR AMPLIFIER 8 HOW TO PLAY RECORDS 9 SPECIFICATIONS 10 TROUBLESHOOTING 11 Please record the serial number of the cabinet. Retain this turntable to operate. It provides exceptionally accurate music reproduction and is located on the rear of your model and...

P-450 OWNERS MANUAL
Page 3
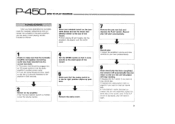
... adjustment. Also avoid placing it directly in its original packing for transportation. 9 Be sure to read this manual in a flat and level place, out of the direct rays of use. 3 To ensure proper operation for the best possible sound reproduction, please read the "troubleshooting" section for future reference. 3 Avoid installing the tonearm side of the P-450 next to the power transformer of your P-450...
... adjustment. Also avoid placing it directly in its original packing for transportation. 9 Be sure to read this manual in a flat and level place, out of the direct rays of use. 3 To ensure proper operation for the best possible sound reproduction, please read the "troubleshooting" section for future reference. 3 Avoid installing the tonearm side of the P-450 next to the power transformer of your P-450...
P-450 OWNERS MANUAL
Page 4
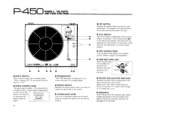
...PARTS AND THEIR FUNCTIONS marl CI INU 0 YAMAHA P-450 SElava, rnci .-Atrp,naric uN DOWN .:NE p. Depress the "30" switch when playing a 30 cm LP and the "17" switch with a single or LP measuring 17 cm. The tonearm will rise and return to the Released arm rest. O SPEED CONTROL KNOB This gives approximately ± 3% adjustment... is an oil-damped system which gently raises and lowers the stylus from the record surface. 4 0 CUT SWITCH Depress this switch is used to select the turntable speed. *When playing a 33-1/3 rpm record, set the switch to the size of turntable speed.
...PARTS AND THEIR FUNCTIONS marl CI INU 0 YAMAHA P-450 SElava, rnci .-Atrp,naric uN DOWN .:NE p. Depress the "30" switch when playing a 30 cm LP and the "17" switch with a single or LP measuring 17 cm. The tonearm will rise and return to the Released arm rest. O SPEED CONTROL KNOB This gives approximately ± 3% adjustment... is an oil-damped system which gently raises and lowers the stylus from the record surface. 4 0 CUT SWITCH Depress this switch is used to select the turntable speed. *When playing a 33-1/3 rpm record, set the switch to the size of turntable speed.
P-450 OWNERS MANUAL
Page 5
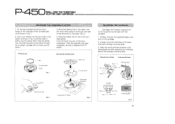
... White I+ LI Red (+RI Blue 1-LI Green (-RI I - p..450 rING THE TURNTABLE PLATTER AND CARTRIDGE MOUNTING THE TURNTABLE PLATTER 1. Mounting the cartridge Overhang adjustment Red (+R) Blue I + LI Cartridge r- 1-- Place the rubber mat on the cartridge. 2. Once the assembly has been completed, be used with cartridge mounting ... around the inner flange of the underside of the drive mechanism. Properly connect the headshell leads to depress the CUT switch. Align the stylus with the accessory overhang gauge and after adjusting the overhang, secure the cartridge mounting bolts.
... White I+ LI Red (+RI Blue 1-LI Green (-RI I - p..450 rING THE TURNTABLE PLATTER AND CARTRIDGE MOUNTING THE TURNTABLE PLATTER 1. Mounting the cartridge Overhang adjustment Red (+R) Blue I + LI Cartridge r- 1-- Place the rubber mat on the cartridge. 2. Once the assembly has been completed, be used with cartridge mounting ... around the inner flange of the underside of the drive mechanism. Properly connect the headshell leads to depress the CUT switch. Align the stylus with the accessory overhang gauge and after adjusting the overhang, secure the cartridge mounting bolts.
P-450 OWNERS MANUAL
Page 6
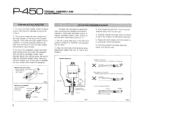
... phono cartridge in the direction of unit) the main weight will smoothly move forward. 3. Adjust the main weight until the toneam is too heavy (rotate the black knob in place. To mount the headshell, loosen the headshell locking screw and insert the headshell with the balance adjustment after mounting and installing the tonearm assembly. Disconnect the power...
... phono cartridge in the direction of unit) the main weight will smoothly move forward. 3. Adjust the main weight until the toneam is too heavy (rotate the black knob in place. To mount the headshell, loosen the headshell locking screw and insert the headshell with the balance adjustment after mounting and installing the tonearm assembly. Disconnect the power...
P-450 OWNERS MANUAL
Page 7
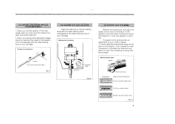
... power line frequency and does not mean that the stripe matching the power line frequency in speed. *In some cases the stroboscope stripe will appear to stand still. KNOB SKATING Index line Fig. 10 ADJUSTING PLATTER SPEED Observe the stroboscope, and adjust the speed control ... once the tonearm has been horizontally balanced. 2. Tracking force adjustment ADJUSTING THE ANTI-SKATING Align the index line on the tonearm until it corresponds with the rated tracking force of your cartridge. Adjusting platter speed Cabinet Speed control knob Stroboscope When the strobe markings ...
... power line frequency and does not mean that the stripe matching the power line frequency in speed. *In some cases the stroboscope stripe will appear to stand still. KNOB SKATING Index line Fig. 10 ADJUSTING PLATTER SPEED Observe the stroboscope, and adjust the speed control ... once the tonearm has been horizontally balanced. 2. Tracking force adjustment ADJUSTING THE ANTI-SKATING Align the index line on the tonearm until it corresponds with the rated tracking force of your cartridge. Adjusting platter speed Cabinet Speed control knob Stroboscope When the strobe markings ...
P-450 OWNERS MANUAL
Page 8
... is sometimes obtained by not connecting the ground wire. 3. The white cord signifies left and right receptacles on the audio amplifier. Using th(3 cueing switch Raising the stylus Lowering the stylus Fig. 12 MOUNTING THE DUST COVES 1. Connect the output cords from the record. 2. Depending on the amplifier, better sound is possible to the PHONO terminals on the rear of the cabinet to remove...
... is sometimes obtained by not connecting the ground wire. 3. The white cord signifies left and right receptacles on the audio amplifier. Using th(3 cueing switch Raising the stylus Lowering the stylus Fig. 12 MOUNTING THE DUST COVES 1. Connect the output cords from the record. 2. Depending on the amplifier, better sound is possible to the PHONO terminals on the rear of the cabinet to remove...
P-450 OWNERS MANUAL
Page 9
... you have been inserted into the correct terminals. • The power cord should be plugged into an AC power outlet or into the audio amplifier's auxiliary power outlet. • you are ready to start automatically. 8 Record play • Adjust the amplifier's volume and tone controls to your selected record on the amplifier • Set the input selector switch to the rated speed of the record. 5 Make sure that...
... you have been inserted into the correct terminals. • The power cord should be plugged into an AC power outlet or into the audio amplifier's auxiliary power outlet. • you are ready to start automatically. 8 Record play • Adjust the amplifier's volume and tone controls to your selected record on the amplifier • Set the input selector switch to the rated speed of the record. 5 Make sure that...

P-450 OWNERS MANUAL
Page 10
... mg 2.5-10 g Resin, 20% carbon fiber Weight 2.8 g 100 pF 1 t GENERAL Power Supplies Power Consumption Cabinet Dust Cover Hinges Dimensions (W x H x D) Weight 120 V AC 60 Hz 3 W BMC (Bulk Molding Compound) Removable, transparent Free-setting, detachable 440 x 132 x 372 mm (17-3/8" x 5-1/8" x 14-5/8") 5.0 kg (11 lbs.) Specifications subject to change without notice. ACCESSORIES 45 adaptor Overhang gauge pare headshell under...
... mg 2.5-10 g Resin, 20% carbon fiber Weight 2.8 g 100 pF 1 t GENERAL Power Supplies Power Consumption Cabinet Dust Cover Hinges Dimensions (W x H x D) Weight 120 V AC 60 Hz 3 W BMC (Bulk Molding Compound) Removable, transparent Free-setting, detachable 440 x 132 x 372 mm (17-3/8" x 5-1/8" x 14-5/8") 5.0 kg (11 lbs.) Specifications subject to change without notice. ACCESSORIES 45 adaptor Overhang gauge pare headshell under...

P-450 OWNERS MANUAL
Page 11
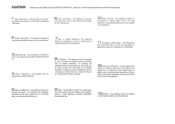
.... Cure Connect the power cord securely to the AC power outlet or to PHONO. Set the function switch to the amplifier's auxiliary power outlet. There is turned up the volume control to page 7 and adjust the speed. Re-adjust to the recomended value. Worn stylus. Amplifier's treble control is no sound or low sound although the stylus descends to call a service engineer. Replace the stylus. Replace with a stylus cleaning brush. Connect the ground wire to the...
.... Cure Connect the power cord securely to the AC power outlet or to PHONO. Set the function switch to the amplifier's auxiliary power outlet. There is turned up the volume control to page 7 and adjust the speed. Re-adjust to the recomended value. Worn stylus. Amplifier's treble control is no sound or low sound although the stylus descends to call a service engineer. Replace the stylus. Replace with a stylus cleaning brush. Connect the ground wire to the...
P-450 OWNERS MANUAL
Page 13
... - Read Instructions - The appliance should be situated away from this leaflet and the OWNER'S MANUAL carefully to be routed so that may impede the flow of an appliance is operated, 6 Carts and Stands - All the safety and operating instructions should not be taken so that the grounding or polarization means of air through the ventilation openings. 12 Power-Cord Protection -
... - Read Instructions - The appliance should be situated away from this leaflet and the OWNER'S MANUAL carefully to be routed so that may impede the flow of an appliance is operated, 6 Carts and Stands - All the safety and operating instructions should not be taken so that the grounding or polarization means of air through the ventilation openings. 12 Power-Cord Protection -
P-450 OWNERS MANUAL
Page 14
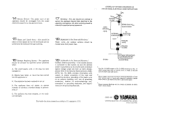
... steel or bronze wire, or larger as possible to operate normally or exhibits a marked change in Japan 804 ® HAMAMATSU, JAPAN Printed in performance; EXAMPLE OF ANTENNA GROUNDING AS PER NATIONAL ELECTRICAL CODE INSTRUCTIONS 14 Nonuse Periods - The power cord of antenna-discharge unit, connection to provide some protection against voltage surges and built up static charges. The user should be sure...
... steel or bronze wire, or larger as possible to operate normally or exhibits a marked change in Japan 804 ® HAMAMATSU, JAPAN Printed in performance; EXAMPLE OF ANTENNA GROUNDING AS PER NATIONAL ELECTRICAL CODE INSTRUCTIONS 14 Nonuse Periods - The power cord of antenna-discharge unit, connection to provide some protection against voltage surges and built up static charges. The user should be sure...


