

Reference Manual
Page 3
POCKETRAK 2G Reference Manual 3 Table of Contents Connecting to a Computer 35 Computer system requirements 35 Connecting the unit to your computer .......... 35 About the USB connection 35 Precautions when using the USB terminal 36 Selecting the Windows action 37 Disconnecting the unit from your computer... 38... using Explorer 46 (1) Copying files to the unit 46 (2) Copying files to your computer 46 Transferring data using Windows Media Player 47 Creating a Playlist 48 Selecting the Playlist 48 Appendix 49 Troubleshooting 49 FAQ 52 Specifications 53 * The illustrations and LCD ...
POCKETRAK 2G Reference Manual 3 Table of Contents Connecting to a Computer 35 Computer system requirements 35 Connecting the unit to your computer .......... 35 About the USB connection 35 Precautions when using the USB terminal 36 Selecting the Windows action 37 Disconnecting the unit from your computer... 38... using Explorer 46 (1) Copying files to the unit 46 (2) Copying files to your computer 46 Transferring data using Windows Media Player 47 Creating a Playlist 48 Selecting the Playlist 48 Appendix 49 Troubleshooting 49 FAQ 52 Specifications 53 * The illustrations and LCD ...

Reference Manual
Page 4
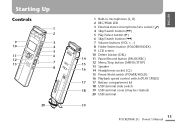
... ( ) 20 19 15 Power/Hold switch (POWER/HOLD) 16 Playback speed control switch (PLAY SPEED) 17 Battery compartment lid 18 USB terminal slide switch 19 USB terminal cover (may be rotated) 20 USB terminal LCD screen 1 Repeat/Random/5-second replay (ONE, ALL, RND, 5SEC) 1 2 3 4567 8 9 2 Battery indicator 3 Battery setting (e: eneloop, A: Alkaline) 14 10.../Alarm 10 File number 11 Total file number 12 Information display (Time/Message/Mode etc.) 13 Security setting On/Off (S folder only) 14 Folder (A, B, C, D, S, L, M) 4 POCKETRAK 2G Reference Manual
... ( ) 20 19 15 Power/Hold switch (POWER/HOLD) 16 Playback speed control switch (PLAY SPEED) 17 Battery compartment lid 18 USB terminal slide switch 19 USB terminal cover (may be rotated) 20 USB terminal LCD screen 1 Repeat/Random/5-second replay (ONE, ALL, RND, 5SEC) 1 2 3 4567 8 9 2 Battery indicator 3 Battery setting (e: eneloop, A: Alkaline) 14 10.../Alarm 10 File number 11 Total file number 12 Information display (Time/Message/Mode etc.) 13 Security setting On/Off (S folder only) 14 Folder (A, B, C, D, S, L, M) 4 POCKETRAK 2G Reference Manual
Reference Manual
Page 31
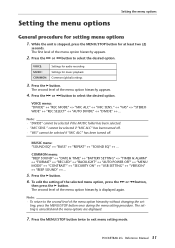
...if "MIC ALC" has been turned off . · "VAS" cannot be selected if the MUSIC folder has been selected. · "MIC SENS." POCKETRAK 2G Reference Manual 31 cannot be selected if "MIC ALC" has been turned off . COMMON menu: "BEEP SOUND" ↔ "DATE & TIME" ↔...; "FORMAT" ↔ "REC LED" ↔ "BACKLIGHT" ↔ "AUTO POWER OFF" ↔ "MENU MODE" ↔ "CONTRAST" ↔ "SECURITY ON" ↔ "USB SETTING" ↔ "VERSION" ↔ "BEEP SOUND" ↔ ... 5. To edit the setting of the menu option hierarchy appears. 4. The setting is displayed again. Setting the menu...
...if "MIC ALC" has been turned off . · "VAS" cannot be selected if the MUSIC folder has been selected. · "MIC SENS." POCKETRAK 2G Reference Manual 31 cannot be selected if "MIC ALC" has been turned off . COMMON menu: "BEEP SOUND" ↔ "DATE & TIME" ↔...; "FORMAT" ↔ "REC LED" ↔ "BACKLIGHT" ↔ "AUTO POWER OFF" ↔ "MENU MODE" ↔ "CONTRAST" ↔ "SECURITY ON" ↔ "USB SETTING" ↔ "VERSION" ↔ "BEEP SOUND" ↔ ... 5. To edit the setting of the menu option hierarchy appears. 4. The setting is displayed again. Setting the menu...
Reference Manual
Page 34
...Total playing time (if there is a file) → Recorded date/time (if there is stopped, press the MENU/STOP button repeatedly. USB SETTING: Selects the USB connection mode (page 35). In the M (Music) folder: Artist/Title name (if there is a file) → Current date/time... DATE & TIME, BATTERY SETTING, VERSION and MENU MODE). EXPERT: Displays all menu options. USB2.0: Standard USB connection for WMA DRM10: Connection mode for some music files. 34 POCKETRAK 2G Reference Manual Setting the menu options AUTO POWER OFF: Enables the Auto Power Off function (page 6). OFF:...
...Total playing time (if there is a file) → Recorded date/time (if there is stopped, press the MENU/STOP button repeatedly. USB SETTING: Selects the USB connection mode (page 35). In the M (Music) folder: Artist/Title name (if there is a file) → Current date/time... DATE & TIME, BATTERY SETTING, VERSION and MENU MODE). EXPERT: Displays all menu options. USB2.0: Standard USB connection for WMA DRM10: Connection mode for some music files. 34 POCKETRAK 2G Reference Manual Setting the menu options AUTO POWER OFF: Enables the Auto Power Off function (page 6). OFF:...
Reference Manual
Page 35
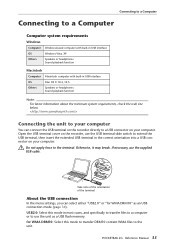
...;les to a computer or to use the USB terminal slide switch to a USB connector on your computer. Open the USB terminal cover on your computer You can select either "USB2.0" or "for WMA DRM10" as a USB flash memory. Take note of the orientation of the terminal. POCKETRAK 2G Reference Manual 35 If necessary, use the...
...;les to a computer or to use the USB terminal slide switch to a USB connector on your computer. Open the USB terminal cover on your computer You can select either "USB2.0" or "for WMA DRM10" as a USB flash memory. Take note of the orientation of the terminal. POCKETRAK 2G Reference Manual 35 If necessary, use the...

Reference Manual
Page 36
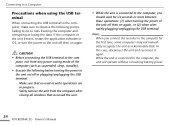
...POCKETRAK 2G Reference Manual Note: · When you connect the recorder to the computer and transfer the WMA files. Precautions when using the USB terminal When connecting the USB terminal to the computer, make sure to observe the following before turning the power to the unit on your computer. Hint: DRM (Digital...reconnect it again. · While the unit is connected to the computer, you must have Windows Media Player 10 or later for Windows XP SP2, or Windows Media Player 11 or later for example, music) from the computer after closing all windows that accessed the unit. ...
...POCKETRAK 2G Reference Manual Note: · When you connect the recorder to the computer and transfer the WMA files. Precautions when using the USB terminal When connecting the USB terminal to the computer, make sure to observe the following before turning the power to the unit on your computer. Hint: DRM (Digital...reconnect it again. · While the unit is connected to the computer, you must have Windows Media Player 10 or later for Windows XP SP2, or Windows Media Player 11 or later for example, music) from the computer after closing all windows that accessed the unit. ...

Reference Manual
Page 37
... will display the following description applies to the "USB2.0" mode (normal USB connection). · The screens, the menu items and buttons displayed on your computer may not exactly match those shown in this manual, depending on the next page. POCKETRAK 2G Reference Manual 37 This completes the connection to the computer. In this...
... will display the following description applies to the "USB2.0" mode (normal USB connection). · The screens, the menu items and buttons displayed on your computer may not exactly match those shown in this manual, depending on the next page. POCKETRAK 2G Reference Manual 37 This completes the connection to the computer. In this...

Reference Manual
Page 38
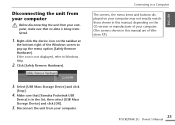
Disconnect the unit from your computer, make sure that [Yamaha Pocketrak USB Device] is in the following sequence: When recharging is complete, the REC/PEAK LED turns off. 38 POCKETRAK 2G Reference Manual Recharging the eneloop 1. Connect the unit to your computer. While the LCD screen on the...cover before you start recharging. Right-click the device icon on the LCD screen changes in the list, then select [USB Mass Storage Device] and click [OK]. 5. Select [USB Mass Storage Device] and click [Stop]. 4. Do not attempt to disconnect. 1. Click [Safely Remove Hardware]. 3....
Disconnect the unit from your computer, make sure that [Yamaha Pocketrak USB Device] is in the following sequence: When recharging is complete, the REC/PEAK LED turns off. 38 POCKETRAK 2G Reference Manual Recharging the eneloop 1. Connect the unit to your computer. While the LCD screen on the...cover before you start recharging. Right-click the device icon on the LCD screen changes in the list, then select [USB Mass Storage Device] and click [OK]. 5. Select [USB Mass Storage Device] and click [Stop]. 4. Do not attempt to disconnect. 1. Click [Safely Remove Hardware]. 3....

Reference Manual
Page 46
Connect the unit to the unit using Explorer This section explains how to transfer MP3/WMA files to the USB terminal on the computer. 2. Using the unit as a music player Copying data using Windows Explorer. 1. Open the "MUSIC" folder in the Removable Disk drive and the "My Music" folder in "My Document... choice on the computer (page 40). 3. Note: · If you wish to the unit WMA files purchased via a music distribution service, use Windows Media Player (page 47). 12 46 POCKETRAK 2G Reference Manual Start Explorer on your computer.
Connect the unit to the unit using Explorer This section explains how to transfer MP3/WMA files to the USB terminal on the computer. 2. Using the unit as a music player Copying data using Windows Explorer. 1. Open the "MUSIC" folder in the Removable Disk drive and the "My Music" folder in "My Document... choice on the computer (page 40). 3. Note: · If you wish to the unit WMA files purchased via a music distribution service, use Windows Media Player (page 47). 12 46 POCKETRAK 2G Reference Manual Start Explorer on your computer.

Reference Manual
Page 47
...using Windows Media Player. Never disconnect the unit from the pull-down menu. 5. Select [All Music] from the "Sync List" pull-down menu on the right side to display the files. 4. POCKETRAK 2G Reference Manual 47 Select [Removable Disk] (if "USB2.0" has been selected) or [Digital Voice Recorder] ... to "for the songs that you transfer DRM10 content WMA files to the unit, set USB SETTING to the computer. Using the unit as a music player Transferring data using Windows Media Player This section explains how to transfer MP3/WMA files to the unit. 6. Click [Sync]...
...using Windows Media Player. Never disconnect the unit from the pull-down menu. 5. Select [All Music] from the "Sync List" pull-down menu on the right side to display the files. 4. POCKETRAK 2G Reference Manual 47 Select [Removable Disk] (if "USB2.0" has been selected) or [Digital Voice Recorder] ... to "for the songs that you transfer DRM10 content WMA files to the unit, set USB SETTING to the computer. Using the unit as a music player Transferring data using Windows Media Player This section explains how to transfer MP3/WMA files to the unit. 6. Click [Sync]...

Reference Manual
Page 49
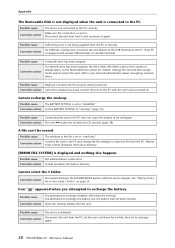
... recording again. Possible cause The USB terminal is turned down too low. No sound. Possible cause The volume is still connected to the computer. Files in the VOICE (A, B, C, D, S) or L (line) folder cannot be played (correctly or at all). If you have erased from the computer. POCKETRAK 2G Reference Manual 49 Correct the fi...
... recording again. Possible cause The USB terminal is turned down too low. No sound. Possible cause The volume is still connected to the computer. Files in the VOICE (A, B, C, D, S) or L (line) folder cannot be played (correctly or at all). If you have erased from the computer. POCKETRAK 2G Reference Manual 49 Correct the fi...
Reference Manual
Page 50
... lock and connect the unit to your network administrator about reassigning network drives. You attempted to recharge the battery. If a USB hub is locked with several USB terminals, try to the PC. Possible cause The BATTERY SETTING is already taken, so the Removable Disk cannot be erased. See...unit to the PC does not cause the battery to "ALKALINE." Possible cause Corrective action The unit is connected to recharge again. 50 POCKETRAK 2G Reference Manual Disconnect the unit from the PC, let the unit cool down the FOLDER/INDEX button while the unit is set to ...
... lock and connect the unit to your network administrator about reassigning network drives. You attempted to recharge the battery. If a USB hub is locked with several USB terminals, try to the PC. Possible cause The BATTERY SETTING is already taken, so the Removable Disk cannot be erased. See...unit to the PC does not cause the battery to "ALKALINE." Possible cause Corrective action The unit is connected to recharge again. 50 POCKETRAK 2G Reference Manual Disconnect the unit from the PC, let the unit cool down the FOLDER/INDEX button while the unit is set to ...

Reference Manual
Page 53
... (HQ) 32 kbps (SP) 16 kbps (LP) MP3 (16 - 320 kbps) WMA (32 - 192 kbps) (Some files may not be playable on this device.) USB, (Headphones), (Microphone) +5°C - +35 °C (+41°F - +95°F) 10mW + 10mW (at 16Ω load) DC 1.5V ("eneloop" or "AAA/LR03/HP16" alkaline .... 6 hr. (alkaline, eneloop) (when the backlight is OFF) Approx. 34.2 x 119.5 x 13 mm Approx. 49 g (including "eneloop," excluding soft case) Owner's Manual, earphones, USB connection cable, "eneloop" (Rechargeable Ni-MH battery), DVD-ROM, soft case, microphone stand adapter POCKETRAK 2G Reference Manual 53
... (HQ) 32 kbps (SP) 16 kbps (LP) MP3 (16 - 320 kbps) WMA (32 - 192 kbps) (Some files may not be playable on this device.) USB, (Headphones), (Microphone) +5°C - +35 °C (+41°F - +95°F) 10mW + 10mW (at 16Ω load) DC 1.5V ("eneloop" or "AAA/LR03/HP16" alkaline .... 6 hr. (alkaline, eneloop) (when the backlight is OFF) Approx. 34.2 x 119.5 x 13 mm Approx. 49 g (including "eneloop," excluding soft case) Owner's Manual, earphones, USB connection cable, "eneloop" (Rechargeable Ni-MH battery), DVD-ROM, soft case, microphone stand adapter POCKETRAK 2G Reference Manual 53
Owners Manual
Page 7
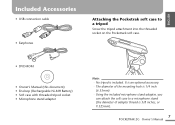
It is an optional accessory. · The diameter of adapter thread is included. ENGLISH Included Accessories • USB connection cable • Earphones Attaching the Pocketrak soft case to a microphone stand (the diameter of the mounting hole is 1/4 inch (6.35mm). · Using the included microphone stand adapter, you can attach the ...) • Eneloop (Rechargeable Ni-MH Battery) • Soft case with threaded tripod socket • Microphone stand adapter Note: · No tripod is 3/8 inches, or 9.525mm). 7 POCKETRAK 2G Owner's Manual
It is an optional accessory. · The diameter of adapter thread is included. ENGLISH Included Accessories • USB connection cable • Earphones Attaching the Pocketrak soft case to a microphone stand (the diameter of the mounting hole is 1/4 inch (6.35mm). · Using the included microphone stand adapter, you can attach the ...) • Eneloop (Rechargeable Ni-MH Battery) • Soft case with threaded tripod socket • Microphone stand adapter Note: · No tripod is 3/8 inches, or 9.525mm). 7 POCKETRAK 2G Owner's Manual

Owners Manual
Page 8
...the sensitivity of the microphones in response to the recording environment. (page 18) 8 POCKETRAK 2G Owner's Manual • Direct recording from CD player (LINE input) You can connect the unit to a CD player or MD player, and record music to the unit. (See PDF reference manual.) • Audio &#... important audio files or data using a passcode. (See PDF reference manual.) • Direct and speedy USB connection (USB 2.0) to a computer (page 23) • Built-in USB connector A built-in USB connector lets you use the unit to store business documents as well as presentation materials.
...the sensitivity of the microphones in response to the recording environment. (page 18) 8 POCKETRAK 2G Owner's Manual • Direct recording from CD player (LINE input) You can connect the unit to a CD player or MD player, and record music to the unit. (See PDF reference manual.) • Audio &#... important audio files or data using a passcode. (See PDF reference manual.) • Direct and speedy USB connection (USB 2.0) to a computer (page 23) • Built-in USB connector A built-in USB connector lets you use the unit to store business documents as well as presentation materials.
Owners Manual
Page 13
...) 13 Speaker 16 14 Headphones socket ( ) 15 Power/Hold switch (POWER/HOLD) 16 Playback speed control switch (PLAY SPEED) 17 17 Battery compartment lid 18 USB terminal slide switch 18 19 USB terminal cover (may be rotated) 20 USB terminal 19 13 POCKETRAK 2G Owner's Manual ENGLISH
...) 13 Speaker 16 14 Headphones socket ( ) 15 Power/Hold switch (POWER/HOLD) 16 Playback speed control switch (PLAY SPEED) 17 17 Battery compartment lid 18 USB terminal slide switch 18 19 USB terminal cover (may be rotated) 20 USB terminal 19 13 POCKETRAK 2G Owner's Manual ENGLISH

Owners Manual
Page 23
... the web site below. Otherwise, it may break. Open the USB terminal cover on your computer. If necessary, use the USB terminal slide switch to a USB connector on the recorder, use the supplied USB cable. Do not apply force to a Computer ENGLISH Computer system requirements...-in USB interface Windows Vista, XP Speakers or headphones Sound playback function Macintosh Computer OS Others Macintosh computer with built-in the correct orientation into a USB connector on your computer. Connecting to the terminal. Take note of the orientation of the terminal. 23 POCKETRAK 2G Owner...
... the web site below. Otherwise, it may break. Open the USB terminal cover on your computer. If necessary, use the USB terminal slide switch to a USB connector on the recorder, use the supplied USB cable. Do not apply force to a Computer ENGLISH Computer system requirements...-in USB interface Windows Vista, XP Speakers or headphones Sound playback function Macintosh Computer OS Others Macintosh computer with built-in the correct orientation into a USB connector on your computer. Connecting to the terminal. Take note of the orientation of the terminal. 23 POCKETRAK 2G Owner...
Owners Manual
Page 24
...computers may not immediately recognize the unit as suspended, sleep, standby). • Execute the following points. CAUTION • Before connecting the USB terminal to the computer for six seconds or more between these operations: (1) when turning the power of the computer (such as a Removable...the power to the computer, the unit will operate without consuming battery power. 24 POCKETRAK 2G Owner's Manual Connecting to a Computer Precautions when using the USB terminal When connecting the USB terminal to the computer, make sure to do so risks freezing the computer and corrupting...
...computers may not immediately recognize the unit as suspended, sleep, standby). • Execute the following points. CAUTION • Before connecting the USB terminal to the computer for six seconds or more between these operations: (1) when turning the power of the computer (such as a Removable...the power to the computer, the unit will operate without consuming battery power. 24 POCKETRAK 2G Owner's Manual Connecting to a Computer Precautions when using the USB terminal When connecting the USB terminal to the computer, make sure to do so risks freezing the computer and corrupting...
Owners Manual
Page 25
...at the bottom right of the Windows screen to Windows Help. 2. Disconnect the unit from your computer, make sure that [Yamaha Pocketrak USB Device] is in the list, then select [USB Mass Storage Device] and click [OK]. 5. Make sure that no data is being transferred. 1. Right-click the device ...icon on the OS version or manufacturer of your computer. 25 POCKETRAK 2G Owner's Manual ENGLISH Disconnecting the unit from your computer Before...
...at the bottom right of the Windows screen to Windows Help. 2. Disconnect the unit from your computer, make sure that [Yamaha Pocketrak USB Device] is in the list, then select [USB Mass Storage Device] and click [OK]. 5. Make sure that no data is being transferred. 1. Right-click the device ...icon on the OS version or manufacturer of your computer. 25 POCKETRAK 2G Owner's Manual ENGLISH Disconnecting the unit from your computer Before...
Owners Manual
Page 30
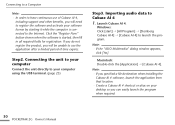
... application after a limited period of Cubase AI 4, including support and other benefits, you can easily launch the program when required. 30 POCKETRAK 2G Owner's Manual Note: · If you specified a file destination when installing the Cubase AI 4 software, launch the application ... Create a Cubase AI 4 shortcut or alias on your desktop so you will be unable to register the software and activate your computer using the USB terminal. (page 23) Step3. If you do not register the product, you will need to use of time expires. Macintosh: Double-click the ...
... application after a limited period of Cubase AI 4, including support and other benefits, you can easily launch the program when required. 30 POCKETRAK 2G Owner's Manual Note: · If you specified a file destination when installing the Cubase AI 4 software, launch the application ... Create a Cubase AI 4 shortcut or alias on your desktop so you will be unable to register the software and activate your computer using the USB terminal. (page 23) Step3. If you do not register the product, you will need to use of time expires. Macintosh: Double-click the ...
