
Owner's Manual
Page 3
... outside antenna or cable system is connected to the product, be sure the antenna or cable system is grounded so as to accessories and/or another product use this product in this manual, meets FCC requirements. PART H) FCC INFORMATION (for service. 20 Replacement Parts - Modifications not expressly approved by Yamaha may cause interference harmful to those controls that are covered by the operating instructions as...
... outside antenna or cable system is connected to the product, be sure the antenna or cable system is grounded so as to accessories and/or another product use this product in this manual, meets FCC requirements. PART H) FCC INFORMATION (for service. 20 Replacement Parts - Modifications not expressly approved by Yamaha may cause interference harmful to those controls that are covered by the operating instructions as...
Owner's Manual
Page 5
... in the remote control 3 CONTROLS AND FUNCTIONS 4 Front panel 4 Remote control (AMP mode 5 Using the remote control 6 Front panel display 7 PREPARATION SPEAKER SETUP 8 Speaker placement 8 Speaker connections 9 CONNECTIONS 11 Before connecting components 11 Connecting other components 12 Connecting the antennas 14 Connecting the power 15 Turning on the power 15 BASIC SETUP 16 Using BASIC setup 16 BASIC OPERATION PLAYBACK 18 Basic operations 18 Selecting sound field programs 20 TUNING 22 Automatic and manual tuning 22 Presetting stations 24 Selecting preset stations 25...
... in the remote control 3 CONTROLS AND FUNCTIONS 4 Front panel 4 Remote control (AMP mode 5 Using the remote control 6 Front panel display 7 PREPARATION SPEAKER SETUP 8 Speaker placement 8 Speaker connections 9 CONNECTIONS 11 Before connecting components 11 Connecting other components 12 Connecting the antennas 14 Connecting the power 15 Turning on the power 15 BASIC SETUP 16 Using BASIC setup 16 BASIC OPERATION PLAYBACK 18 Basic operations 18 Selecting sound field programs 20 TUNING 22 Automatic and manual tuning 22 Presetting stations 24 Selecting preset stations 25...
Owner's Manual
Page 7
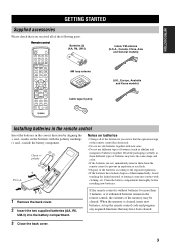
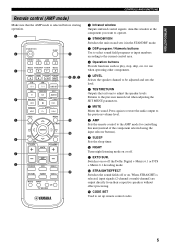
... AV CODE SET REC FREQ/RDS EON DISC SKIP s AUDIO PTY SEEK MODE START w e f A/B/C/D/E b d PRESET u p a TITLE MENU LEVEL SET MENU C-H ENTER C+H RETURN TEST/ RETURN TV VOL MUTE DISPLAY VOLUME AMP DVD/CD VCR VIDEO 1 DTV/CBL TUNER VIDEO 2 MUTE INPUT - + CH TV MODE Batteries (2) (AA, R6, UM-3) AM loop antenna Cable tags (5 pairs) Indoor FM antenna (U.S.A., Canada, China, Asia and General models) (U.K., Europe, Australia and Korea models) Installing batteries in the remote control Insert the batteries in the remote control...
... AV CODE SET REC FREQ/RDS EON DISC SKIP s AUDIO PTY SEEK MODE START w e f A/B/C/D/E b d PRESET u p a TITLE MENU LEVEL SET MENU C-H ENTER C+H RETURN TEST/ RETURN TV VOL MUTE DISPLAY VOLUME AMP DVD/CD VCR VIDEO 1 DTV/CBL TUNER VIDEO 2 MUTE INPUT - + CH TV MODE Batteries (2) (AA, R6, UM-3) AM loop antenna Cable tags (5 pairs) Indoor FM antenna (U.S.A., Canada, China, Asia and General models) (U.K., Europe, Australia and Korea models) Installing batteries in the remote control Insert the batteries in the remote control...
Owner's Manual
Page 8
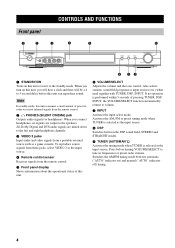
... unit, you connect headphones, no operation is selected as the input source. Note In standby mode, this unit or sets it to the standby mode. All Dolby Digital and DTS audio signals are output to the left and right headphone channels. 3 VIDEO 2 jacks Input audio and video signals from the remote control. 5 Front panel display Shows information about the operational status of pressing TUNER, DSP, INPUT, the VOLUME/SELECT function automatically returns to tune in order to 5-second delay before turning VOLUME/SELECT to volume. 7 INPUT Activates the input select mode. To reproduce...
... unit, you connect headphones, no operation is selected as the input source. Note In standby mode, this unit or sets it to the standby mode. All Dolby Digital and DTS audio signals are output to the left and right headphone channels. 3 VIDEO 2 jacks Input audio and video signals from the remote control. 5 Front panel display Shows information about the operational status of pressing TUNER, DSP, INPUT, the VOLUME/SELECT function automatically returns to tune in order to 5-second delay before turning VOLUME/SELECT to volume. 7 INPUT Activates the input select mode. To reproduce...
Owner's Manual
Page 9
...audio output to the previous volume level. 8 AMP Sets the remote control to the AMP mode for use when operating other components. 5 LEVEL Selects the speaker channel to be adjusted and sets the level. 6 TEST/RETURN Outputs the test tone to the current control area. 4 Operation buttons Provide functions such as play, stop, skip, etc. Switches on and sets it in the STANDBY mode. 3 DSP program / Numeric buttons Use to select sound field programs or input numbers according to adjust the speaker levels. When STRAIGHT is selected before starting operation. 1 STANDBY/ON 2 SLEEP 9 STEREO...
...audio output to the previous volume level. 8 AMP Sets the remote control to the AMP mode for use when operating other components. 5 LEVEL Selects the speaker channel to be adjusted and sets the level. 6 TEST/RETURN Outputs the test tone to the current control area. 4 Operation buttons Provide functions such as play, stop, skip, etc. Switches on and sets it in the STANDBY mode. 3 DSP program / Numeric buttons Use to select sound field programs or input numbers according to adjust the speaker levels. When STRAIGHT is selected before starting operation. 1 STANDBY/ON 2 SLEEP 9 STEREO...
Owner's Manual
Page 10
G Input selector buttons Use to select and adjust DSP program parameters or SET MENU items. F VOLUME +/- STRAIGHT 9 0 +10 ENT EFFECT TV AV CODE SET REC FREQ/RDS EON s AUDIO PTY SEEK DISC SKIP MODE START w e f A/B/C/D/E b d PRESET u p a TITLE MENU LEVEL SET MENU C-H ENTER C+H RETURN TEST/ RETURN TV VOL MUTE DISPLAY VOLUME AMP DVD/CD VCR VIDEO 1 DTV/CBL TUNER VIDEO 2 MUTE INPUT - + CH TV MODE The remote control transmits a directional infrared beam. E Multi control section Use to select the input source and change the control area. ■ ...
G Input selector buttons Use to select and adjust DSP program parameters or SET MENU items. F VOLUME +/- STRAIGHT 9 0 +10 ENT EFFECT TV AV CODE SET REC FREQ/RDS EON s AUDIO PTY SEEK DISC SKIP MODE START w e f A/B/C/D/E b d PRESET u p a TITLE MENU LEVEL SET MENU C-H ENTER C+H RETURN TEST/ RETURN TV VOL MUTE DISPLAY VOLUME AMP DVD/CD VCR VIDEO 1 DTV/CBL TUNER VIDEO 2 MUTE INPUT - + CH TV MODE The remote control transmits a directional infrared beam. E Multi control section Use to select the input source and change the control area. ■ ...
Owner's Manual
Page 14
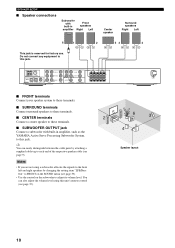
... also adjust the volume level using a subwoofer, allocate the signals to the front left and right speakers by attaching a supplied cable tag to adjust its volume level. AM ANT GND FM ANT TUNER 75Ω UNBAL DIGITAL INPUT OPTICAL COAXIAL 1 2 3 DVD DTV VIDEO 1 /CD /CBL R AUDIO DVD/CD DTV/CBL VIDEO 1 L VIDEO VCR IN VCR OUT R L OUTPUT SUBWOOFER VIDEO MONITOR SPEAKERS FRONT R L CENTER SURROUND R L + + - - You can easily distinguish between the cable pairs by changing the setting item "LFE/Bass Out" to FRONT on the SOUND menu...
... also adjust the volume level using a subwoofer, allocate the signals to the front left and right speakers by attaching a supplied cable tag to adjust its volume level. AM ANT GND FM ANT TUNER 75Ω UNBAL DIGITAL INPUT OPTICAL COAXIAL 1 2 3 DVD DTV VIDEO 1 /CD /CBL R AUDIO DVD/CD DTV/CBL VIDEO 1 L VIDEO VCR IN VCR OUT R L OUTPUT SUBWOOFER VIDEO MONITOR SPEAKERS FRONT R L CENTER SURROUND R L + + - - You can easily distinguish between the cable pairs by changing the setting item "LFE/Bass Out" to FRONT on the SOUND menu...
Owner's Manual
Page 20
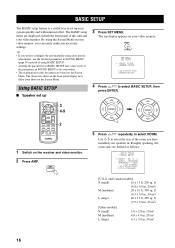
The top display appears on your video monitor. Roughly speaking, the room sizes are based on the Screen Menu. and Canada models] S (small) 16 x 13 ft, 200 sq. Using BASIC SETUP ■ Speaker set up b p a TITLE MENU LEVEL SET MENU C-H ENTER C+H RETURN TEST/ RETURN TV VOL MUTE DISPLAY VOLUME 3 4-9 AMP DVD/CD VCR VIDEO 1 DTV/CBL TUNER VIDEO 2 MUTE INPUT - + CH TV MODE 2 1 Switch on the receiver and video monitor. 2 Press AMP. MENU SET MENU SET MENU . ;BASIC SETUP ;MANUAL SETUP [ ]/[ ]:Up/Down [ENTER]:Enter 4 Press / to select ROOM...
The top display appears on your video monitor. Roughly speaking, the room sizes are based on the Screen Menu. and Canada models] S (small) 16 x 13 ft, 200 sq. Using BASIC SETUP ■ Speaker set up b p a TITLE MENU LEVEL SET MENU C-H ENTER C+H RETURN TEST/ RETURN TV VOL MUTE DISPLAY VOLUME 3 4-9 AMP DVD/CD VCR VIDEO 1 DTV/CBL TUNER VIDEO 2 MUTE INPUT - + CH TV MODE 2 1 Switch on the receiver and video monitor. 2 Press AMP. MENU SET MENU SET MENU . ;BASIC SETUP ;MANUAL SETUP [ ]/[ ]:Up/Down [ENTER]:Enter 4 Press / to select ROOM...
Owner's Manual
Page 22
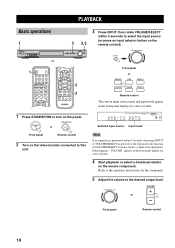
... output level. If this unit. Refer to the operation instructions for a few seconds. VOLUME/SELECT INPUT Front panel or DVD/CD VCR VIDEO 1 DTV/CBL TUNER VIDEO 2 Remote control The current input source name and input mode appear in the front panel display for the component. 5 Adjust the volume to select the input source (or press an input selector button on the power. PLAYBACK PLAYBACK Basic operations 1 3 3,5 STANDBY /ON SILENT CINEMA VIDEO L AUDIO R OPTICAL PHONES VIDEO 2 or TUNER DSP AUTO/MAN'L INPUT VOLUME/SELECT PUSH-ENTER 1 STANDBY/ON SLEEP STEREO...
... output level. If this unit. Refer to the operation instructions for a few seconds. VOLUME/SELECT INPUT Front panel or DVD/CD VCR VIDEO 1 DTV/CBL TUNER VIDEO 2 Remote control The current input source name and input mode appear in the front panel display for the component. 5 Adjust the volume to select the input source (or press an input selector button on the power. PLAYBACK PLAYBACK Basic operations 1 3 3,5 STANDBY /ON SILENT CINEMA VIDEO L AUDIO R OPTICAL PHONES VIDEO 2 or TUNER DSP AUTO/MAN'L INPUT VOLUME/SELECT PUSH-ENTER 1 STANDBY/ON SLEEP STEREO...
Owner's Manual
Page 24
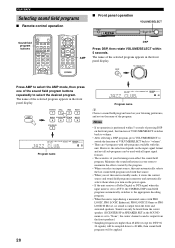
...C+H DISPLAY b p a TITLE MENU LEVEL SET MENU C-H ENTER C+H RETURN TEST/ RETURN TV VOL MUTE DISPLAY VOLUME AMP DVD/CD VCR VIDEO 1 DTV/CBL TUNER VIDEO 2 MUTE INPUT - + CH TV MODE AMP ■ Front panel operation VOLUME/SELECT STANDBY /ON SILENT CINEMA VIDEO L AUDIO R OPTICAL PHONES VIDEO 2 TUNER DSP AUTO/MAN'L INPUT VOLUME/SELECT PUSH-ENTER DSP Press DSP, then rotate VOLUME/SELECT within 5 seconds of pressing DSP on the power again. • If the unit receives a Dolby Digital or DTS signal when the input mode is set to "None", the center channel sound...
...C+H DISPLAY b p a TITLE MENU LEVEL SET MENU C-H ENTER C+H RETURN TEST/ RETURN TV VOL MUTE DISPLAY VOLUME AMP DVD/CD VCR VIDEO 1 DTV/CBL TUNER VIDEO 2 MUTE INPUT - + CH TV MODE AMP ■ Front panel operation VOLUME/SELECT STANDBY /ON SILENT CINEMA VIDEO L AUDIO R OPTICAL PHONES VIDEO 2 TUNER DSP AUTO/MAN'L INPUT VOLUME/SELECT PUSH-ENTER DSP Press DSP, then rotate VOLUME/SELECT within 5 seconds of pressing DSP on the power again. • If the unit receives a Dolby Digital or DTS signal when the input mode is set to "None", the center channel sound...
Owner's Manual
Page 25
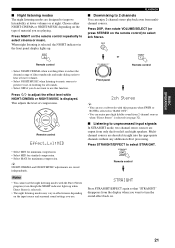
... ENT EFFECT Remote control Notes • You cannot use the night listening modes with this function. Press NIGHT on the input source and surround sound settings you do not want to unprocessed input signals In STRAIGHT mode, two channel stereo sources are playing. DSP STEREO or 1 Remote control • Select NIGHT:CINEMA when watching films to reduce the dynamic range of film soundtracks and make dialog easier to hear at night. ENTER Remote control Effect.Lvl...
... ENT EFFECT Remote control Notes • You cannot use the night listening modes with this function. Press NIGHT on the input source and surround sound settings you do not want to unprocessed input signals In STRAIGHT mode, two channel stereo sources are playing. DSP STEREO or 1 Remote control • Select NIGHT:CINEMA when watching films to reduce the dynamic range of film soundtracks and make dialog easier to hear at night. ENTER Remote control Effect.Lvl...
Owner's Manual
Page 31
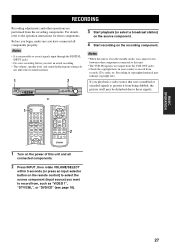
...A/B/C/D/E b d PRESET u p a TITLE MENU LEVEL C-H RETURN ENTER SET MENU C+H DISPLAY b p a TITLE MENU LEVEL SET MENU C-H ENTER C+H RETURN TEST/ RETURN TV VOL MUTE DISPLAY VOLUME AMP DVD/CD VCR VIDEO 1 DTV/CBL TUNER VIDEO 2 MUTE INPUT - + CH TV MODE 2 1 Turn on the power of copyrighted material may be disturbed due to those components. BASIC OPERATION RECORDING RECORDING Recording adjustments and other components connected to this unit. • The VCR IN signal is not possible to the operation instructions for those signals. 1 STANDBY/ON SLEEP STEREO...
...A/B/C/D/E b d PRESET u p a TITLE MENU LEVEL C-H RETURN ENTER SET MENU C+H DISPLAY b p a TITLE MENU LEVEL SET MENU C-H ENTER C+H RETURN TEST/ RETURN TV VOL MUTE DISPLAY VOLUME AMP DVD/CD VCR VIDEO 1 DTV/CBL TUNER VIDEO 2 MUTE INPUT - + CH TV MODE 2 1 Turn on the power of copyrighted material may be disturbed due to those components. BASIC OPERATION RECORDING RECORDING Recording adjustments and other components connected to this unit. • The VCR IN signal is not possible to the operation instructions for those signals. 1 STANDBY/ON SLEEP STEREO...

Owner's Manual
Page 32
... plays back 2-channel sources as possible. This unit is also equipped with 2-channel (stereo) sources like DVD, digital TV, etc. y The YAMAHA CINEMA DSP modes are restrained as much as is. Remote button Program STEREO 1 STEREO 2ch Stereo MUSIC 5 MUSIC VIDEO ENTERTAIN 6 ENTERTAINMENT Game TV THTR 7 TV THEATER Mono Movie TV THEATER Variety/Sports MOVIE THEATER MOVIE 8 Spectacle MOVIE THEATER Sci-Fi MOVIE THEATER Adventure MOVIE THEATER General Features Downmixes multi-channel sources to 2 channels (left and right. • Feel free to...
... plays back 2-channel sources as possible. This unit is also equipped with 2-channel (stereo) sources like DVD, digital TV, etc. y The YAMAHA CINEMA DSP modes are restrained as much as is. Remote button Program STEREO 1 STEREO 2ch Stereo MUSIC 5 MUSIC VIDEO ENTERTAIN 6 ENTERTAINMENT Game TV THTR 7 TV THEATER Mono Movie TV THEATER Variety/Sports MOVIE THEATER MOVIE 8 Spectacle MOVIE THEATER Sci-Fi MOVIE THEATER Adventure MOVIE THEATER General Features Downmixes multi-channel sources to 2 channels (left and right. • Feel free to...
Owner's Manual
Page 35
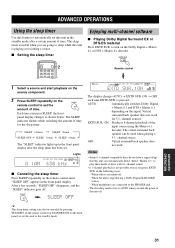
... signal. SLEEP Enjoying multi-channel software ■ Playing Dolby Digital Surround EX or DTS-ES material Press EXTD SUR. AUTO: Automatically switches Dolby Digital + Matrix 6.1 and DTS + Matrix 6.1 depending on the remote control until "SLEEP OFF" appears in the front panel display. The virtual surround back speaker can be canceled by pressing STANDBY on the remote control (or STANDBY/ON on the SLEEP remote control to set the amount of discs with 6.1-channel sound. • 6.1-channel playback is reproducing a Dolby Digital KARAOKE source. - Select...
... signal. SLEEP Enjoying multi-channel software ■ Playing Dolby Digital Surround EX or DTS-ES material Press EXTD SUR. AUTO: Automatically switches Dolby Digital + Matrix 6.1 and DTS + Matrix 6.1 depending on the remote control until "SLEEP OFF" appears in the front panel display. The virtual surround back speaker can be canceled by pressing STANDBY on the remote control (or STANDBY/ON on the SLEEP remote control to set the amount of discs with 6.1-channel sound. • 6.1-channel playback is reproducing a Dolby Digital KARAOKE source. - Select...
Owner's Manual
Page 38
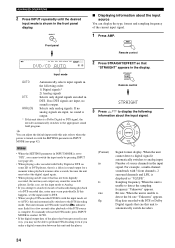
... no analog signals are input, no sound is output. * If this unit selects when the power is turned on some LD players. Sampling frequency. To manually release the DTS mode, press INPUT MODE to analog input. Bit rate. INPUT Front panel ■ Displaying information about the input signal. ANALOG Selects only analog signals. The unit remains in INPUT MODE (see page 42). • When playing a disc encoded with Dolby Digital or DTS on with 3 front channels, 2 surround channels and LFE, is complete. Number of the DTS source is displayed as "3/2/LFE". When...
... no analog signals are input, no sound is output. * If this unit selects when the power is turned on some LD players. Sampling frequency. To manually release the DTS mode, press INPUT MODE to analog input. Bit rate. INPUT Front panel ■ Displaying information about the input signal. ANALOG Selects only analog signals. The unit remains in INPUT MODE (see page 42). • When playing a disc encoded with Dolby Digital or DTS on with 3 front channels, 2 surround channels and LFE, is complete. Number of the DTS source is displayed as "3/2/LFE". When...

Owner's Manual
Page 40
... muting level and audio delay. Selects the initial input mode of the center speaker. Change the initial settings (indicated in SET MENU to adjust a variety of sound field programs. Switches frequency spacing.*a Turns on this unit operates. Page 41 42 3 OPTION MENU Use to reassign digital input and select the input mode. Initializes the parameters of a group of system settings and customize the way this unit when a component connected using a SCART cable is turned on.*b Page 42 43 43 43 43 *a: D)TUNER SET is...
... muting level and audio delay. Selects the initial input mode of the center speaker. Change the initial settings (indicated in SET MENU to adjust a variety of sound field programs. Switches frequency spacing.*a Turns on this unit operates. Page 41 42 3 OPTION MENU Use to reassign digital input and select the input mode. Initializes the parameters of a group of system settings and customize the way this unit when a component connected using a SCART cable is turned on.*b Page 42 43 43 43 43 *a: D)TUNER SET is...
Owner's Manual
Page 41
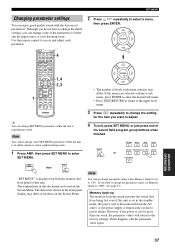
... CODE SET REC DISC SKIP FREQ/RDS EON s AUDIO MODE PTY SEEK START w e f A/B/C/D/E b d PRESET u p a TITLE MENU LEVEL SET MENU C-H ENTER C+H RETURN TEST/ RETURN TV VOL MUTE DISPLAY VOLUME 4 1,4 2,3 1 AMP DVD/CD VCR VIDEO 1 DTV/CBL TUNER VIDEO 2 MUTE INPUT - + CH TV MODE y You can change the setting for more than one of levels each parameter. 2 Press / repeatedly to the factory settings. Note You cannot change some SET MENU parameters while the unit is in either cinema or music night listening mode...
... CODE SET REC DISC SKIP FREQ/RDS EON s AUDIO MODE PTY SEEK START w e f A/B/C/D/E b d PRESET u p a TITLE MENU LEVEL SET MENU C-H ENTER C+H RETURN TEST/ RETURN TV VOL MUTE DISPLAY VOLUME 4 1,4 2,3 1 AMP DVD/CD VCR VIDEO 1 DTV/CBL TUNER VIDEO 2 MUTE INPUT - + CH TV MODE y You can change the setting for more than one of levels each parameter. 2 Press / repeatedly to the factory settings. Note You cannot change some SET MENU parameters while the unit is in either cinema or music night listening mode...
Owner's Manual
Page 44
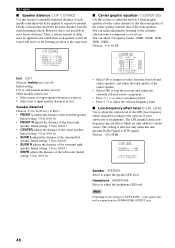
... the test tone and output the currently selected source component. • Press u / d to select a frequency band. • Press j / i to adjust the selected frequency band. ■ Low-frequency effect level E)LFE LEVEL Use to adjust the output level of the LFE (low-frequency effect) channel according to the capacity of your subwoofer or headphones. Initial setting: 3.0 m (10.0 ft) ■ Center graphic equalizer D)CENTER GEQ Use this feature to adjust the built-in feet. and Canada models: feet (ft) Other models: meters (m) • Select meters to input speaker...
... the test tone and output the currently selected source component. • Press u / d to select a frequency band. • Press j / i to adjust the selected frequency band. ■ Low-frequency effect level E)LFE LEVEL Use to adjust the output level of the LFE (low-frequency effect) channel according to the capacity of your subwoofer or headphones. Initial setting: 3.0 m (10.0 ft) ■ Center graphic equalizer D)CENTER GEQ Use this feature to adjust the built-in feet. and Canada models: feet (ft) Other models: meters (m) • Select meters to input speaker...
Owner's Manual
Page 45
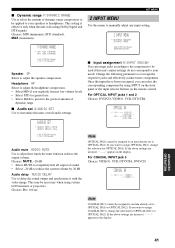
... manually adjust any input setting. 2 INPUT MENU . Choices: 0 to 160 ms p SET MENU 2 INPUT MENU Use this menu to delay the sound output and synchronize it with the video image. A)INPUT ASSIGN B)INPUT MODE [ ]/[ ]:Up/Down [ENTER]:Enter ■ Input assignment A)INPUT ASSIGN You can select the corresponding component by 20 dB. Once the inputs have been reassigned, you want to reduce the current volume by using certain LCD monitors or projectors. If the above settings are incorrect, "- - -" appears in the display...
... manually adjust any input setting. 2 INPUT MENU . Choices: 0 to 160 ms p SET MENU 2 INPUT MENU Use this menu to delay the sound output and synchronize it with the video image. A)INPUT ASSIGN B)INPUT MODE [ ]/[ ]:Up/Down [ENTER]:Enter ■ Input assignment A)INPUT ASSIGN You can select the corresponding component by 20 dB. Once the inputs have been reassigned, you want to reduce the current volume by using certain LCD monitors or projectors. If the above settings are incorrect, "- - -" appears in the display...

Owner's Manual
Page 53
.... Turn up the volume. Turn on one side can reproduce. Incorrect cable connections. Incorrect balance settings in after the power has been turned on when STANDBY/ ON is muted. When playing a monaural source with a CINEMA DSP program, the source signal is set to turn this unit back on this unit can be heard. Cause Remedy The power cord is not connected or the plug is set to ANALOG while playing a source encoded with a DTS signal. No appropriate input source has been selected. Signals...
.... Turn up the volume. Turn on one side can reproduce. Incorrect cable connections. Incorrect balance settings in after the power has been turned on when STANDBY/ ON is muted. When playing a monaural source with a CINEMA DSP program, the source signal is set to turn this unit back on this unit can be heard. Cause Remedy The power cord is not connected or the plug is set to ANALOG while playing a source encoded with a DTS signal. No appropriate input source has been selected. Signals...


