
Owner's Manual
Page 5
... 3 CONTROLS AND FUNCTIONS 4 Front panel 4 Remote control (AMP mode 5 Using the remote control 6 Front panel display 7 PREPARATION SPEAKER SETUP 8 Speaker placement 8 Speaker connections 9 CONNECTIONS 11 Before connecting components 11 Connecting other components 12 Connecting the antennas 14 Connecting the power 15... Turning on the power 15 BASIC SETUP 16 Using BASIC setup 16 BASIC OPERATION PLAYBACK 18 Basic operations 18 Selecting sound field programs 20 TUNING 22 Automatic and manual...
... 3 CONTROLS AND FUNCTIONS 4 Front panel 4 Remote control (AMP mode 5 Using the remote control 6 Front panel display 7 PREPARATION SPEAKER SETUP 8 Speaker placement 8 Speaker connections 9 CONNECTIONS 11 Before connecting components 11 Connecting other components 12 Connecting the antennas 14 Connecting the power 15... Turning on the power 15 BASIC SETUP 16 Using BASIC setup 16 BASIC OPERATION PLAYBACK 18 Basic operations 18 Selecting sound field programs 20 TUNING 22 Automatic and manual...

Owner's Manual
Page 12
...side of the video monitor should be placed at between the front speakers and as close to the monitor as possible, such as the YAMAHA Active Servo Processing Subwoofer System, is effective not only for reinforcing bass frequencies from the central listening position. * ITU-R: for the ...main source sound plus effect sounds. SPEAKER SETUP SPEAKER SETUP Speaker placement You can enjoy this unit with the following speaker setup to use of a subwoofer, such as directly over or under it . Turn it is not practical ...
...side of the video monitor should be placed at between the front speakers and as close to the monitor as possible, such as the YAMAHA Active Servo Processing Subwoofer System, is effective not only for reinforcing bass frequencies from the central listening position. * ITU-R: for the ...main source sound plus effect sounds. SPEAKER SETUP SPEAKER SETUP Speaker placement You can enjoy this unit with the following speaker setup to use of a subwoofer, such as directly over or under it . Turn it is not practical ...

Owner's Manual
Page 13
... this unit. Connect the striped (grooved, etc.) cable to the "+" (colored) terminals on this unit and/or speakers. • Use magnetically shielded speakers. PREPARATION SPEAKER SETUP Speaker connections Be sure to connect the left speaker cable To make sure that the power of this unit is incorrect, the sound will be...
... this unit. Connect the striped (grooved, etc.) cable to the "+" (colored) terminals on this unit and/or speakers. • Use magnetically shielded speakers. PREPARATION SPEAKER SETUP Speaker connections Be sure to connect the left speaker cable To make sure that the power of this unit is incorrect, the sound will be...
Owner's Manual
Page 14
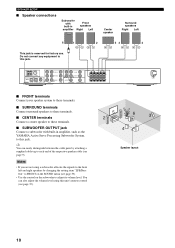
... Connect a center speaker to these terminals. ■ SUBWOOFER OUTPUT jack Connect a subwoofer with built-in amplifier, such as the YAMAHA Active Servo Processing Subwoofer System, to each end of the respective speaker cable (see page 9). y You can also adjust the ... SUBWOOFER VIDEO MONITOR SPEAKERS FRONT R L CENTER SURROUND R L + + - - Do not connect any equipment to adjust its volume level. SPEAKER SETUP ■ Speaker connections Subwoofer with built-in Front speakers amplifier Right Left Center speaker Surround speakers Right Left 6 1 2 53 4 This jack is...
... Connect a center speaker to these terminals. ■ SUBWOOFER OUTPUT jack Connect a subwoofer with built-in amplifier, such as the YAMAHA Active Servo Processing Subwoofer System, to each end of the respective speaker cable (see page 9). y You can also adjust the ... SUBWOOFER VIDEO MONITOR SPEAKERS FRONT R L CENTER SURROUND R L + + - - Do not connect any equipment to adjust its volume level. SPEAKER SETUP ■ Speaker connections Subwoofer with built-in Front speakers amplifier Right Left Center speaker Surround speakers Right Left 6 1 2 53 4 This jack is...
Owner's Manual
Page 20
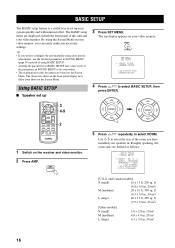
... (6.3 x 5.0 m, 30 m2) L (large) 26 x 19 ft, 450 sq. By using more precise adjustments, use the detailed parameters in . p p ENTER ENTER 5 Press / repeatedly to select BASIC SETUP, then press ENTER. ft (7.9 x 5.8 m, 45 m2) [Other models] S (small) M (medium) L (large) 3.6 x 2.8 m, 10 m2 4.8 x 4.0 m, 20 m2 6.3 x 5.0 m, ...video monitor. 2 Press AMP. and Canada models] S (small) 16 x 13 ft, 200 sq. MENU SET MENU SET MENU . ;BASIC SETUP ;MANUAL SETUP [ ]/[ ]:Up/Down [ENTER]:Enter 4 Press / to select ROOM. Roughly speaking, the room sizes are based on your video monitor, you ...
... (6.3 x 5.0 m, 30 m2) L (large) 26 x 19 ft, 450 sq. By using more precise adjustments, use the detailed parameters in . p p ENTER ENTER 5 Press / repeatedly to select BASIC SETUP, then press ENTER. ft (7.9 x 5.8 m, 45 m2) [Other models] S (small) M (medium) L (large) 3.6 x 2.8 m, 10 m2 4.8 x 4.0 m, 20 m2 6.3 x 5.0 m, ...video monitor. 2 Press AMP. and Canada models] S (small) 16 x 13 ft, 200 sq. MENU SET MENU SET MENU . ;BASIC SETUP ;MANUAL SETUP [ ]/[ ]:Up/Down [ENTER]:Enter 4 Press / to select ROOM. Roughly speaking, the room sizes are based on your video monitor, you ...
Owner's Manual
Page 21
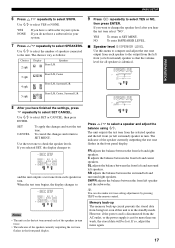
... on the remote control. If you do not have finished the settings, press repeatedly to select SPEAKERS. To cancel the changes and return to : ; BASIC SETUP PREPARATION 6 Press / repeatedly to : ; BASIC SETUP ROOM : )S M L SWFR : )YES NONE SPEAKERS;;;;5spk . BASIC SETUP ROOM : )S M L SWFR : )YES NONE SPEAKERS;;;;5spk .
... on the remote control. If you do not have finished the settings, press repeatedly to select SPEAKERS. To cancel the changes and return to : ; BASIC SETUP PREPARATION 6 Press / repeatedly to : ; BASIC SETUP ROOM : )S M L SWFR : )YES NONE SPEAKERS;;;;5spk . BASIC SETUP ROOM : )S M L SWFR : )YES NONE SPEAKERS;;;;5spk .
Owner's Manual
Page 39
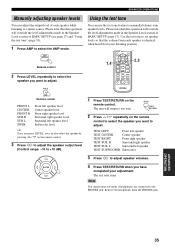
Please note that this operation will override the level adjustments made in the Speaker Level section of BASIC SETUP (page 17). RETURN TEST/ RETURN 2 Press / repeatedly on the remote control to select the speaker you have completed your speaker levels. ENTER 4 Press TEST... the speaker output level (Control range: -10 to adjust speaker volumes. ADVANCED OPERATIONS Manually adjusting speaker levels You can adjust the output level of BASIC SETUP (see page 17) and "Using the test tone" (page 35). 1 Press AMP to select the AMP mode. ADVANCED OPERATION 35 TEST LEFT Front left...
Please note that this operation will override the level adjustments made in the Speaker Level section of BASIC SETUP (page 17). RETURN TEST/ RETURN 2 Press / repeatedly on the remote control to select the speaker you have completed your speaker levels. ENTER 4 Press TEST... the speaker output level (Control range: -10 to adjust speaker volumes. ADVANCED OPERATIONS Manually adjusting speaker levels You can adjust the output level of BASIC SETUP (see page 17) and "Using the test tone" (page 35). 1 Press AMP to select the AMP mode. ADVANCED OPERATION 35 TEST LEFT Front left...

Owner's Manual
Page 40
... F)D. RANGE G)AUDIO SET Features Selects the size of each parameter) to reflect the needs of your listening environment. ■ BASIC SETUP Use to quickly setup basic system parameters (see page 16). Customizes the muting level and audio delay. Initializes the parameters of a group of the sound ... DTS signals. Adjusts the delay time of the parameters described in SOUND MENU are set automatically when you perform "BASIC SETUP" (see page 16). ■ MANUAL SETUP Use to manually adjust speaker and system parameters. 1 SOUND MENU Use to reassign digital input and select the input mode...
... F)D. RANGE G)AUDIO SET Features Selects the size of each parameter) to reflect the needs of your listening environment. ■ BASIC SETUP Use to quickly setup basic system parameters (see page 16). Customizes the muting level and audio delay. Initializes the parameters of a group of the sound ... DTS signals. Adjusts the delay time of the parameters described in SOUND MENU are set automatically when you perform "BASIC SETUP" (see page 16). ■ MANUAL SETUP Use to manually adjust speaker and system parameters. 1 SOUND MENU Use to reassign digital input and select the input mode...
Owner's Manual
Page 49
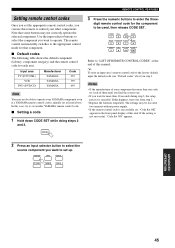
...the default code (see "Default codes" above) in the front panel display of your component has more than 10 seconds during step 3, the setup process is initially set as listed above. Notes • If the manufacturer of this remote to operate your other components. Input area TV (...DTV/CBL) VCR DVD (DVD/CD) Manufacturer YAMAHA YAMAHA YAMAHA Code 299 399 699 Note You may be lost after two minutes without power supply. • If the remote control code is not successful,...
...the default code (see "Default codes" above) in the front panel display of your component has more than 10 seconds during step 3, the setup process is initially set as listed above. Notes • If the manufacturer of this remote to operate your other components. Input area TV (...DTV/CBL) VCR DVD (DVD/CD) Manufacturer YAMAHA YAMAHA YAMAHA Code 299 399 699 Note You may be lost after two minutes without power supply. • If the remote control code is not successful,...


