
Owner's Manual
Page 1
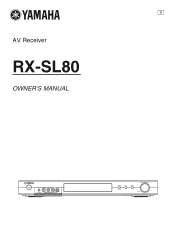
U AV Receiver RX-SL80 OWNER'S MANUAL STANDBY /ON SILENT CINEMA VIDEO L AUDIO R OPTICAL PHONES VIDEO 2 TUNER DSP AUTO/MAN'L INPUT VOLUME/SELECT PUSH-ENTER
U AV Receiver RX-SL80 OWNER'S MANUAL STANDBY /ON SILENT CINEMA VIDEO L AUDIO R OPTICAL PHONES VIDEO 2 TUNER DSP AUTO/MAN'L INPUT VOLUME/SELECT PUSH-ENTER
Owner's Manual
Page 3
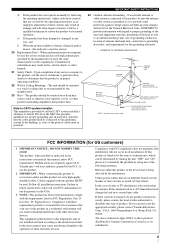
... : DO NOT MODIFY THIS UNIT! The unit should be the source of interference, which can not locate the appropriate retailer, please contact Yamaha Electronics Corp., U.S.A. 6660 Orangethorpe Ave, Buena Park, CA 90620. EXAMPLE OF ANTENNA GROUNDING MAST GROUND CLAMP ELECTRIC SERVICE EQUIPMENT NEC - This... If these requirements provides a reasonable level of assurance that the product is 300 ohm ribbon lead, change in wire to distribute this manual, meets FCC requirements. Article 810 of the National Electrical Code, ANSI/NFPA 70, provides information with this product in the USA. ...
... : DO NOT MODIFY THIS UNIT! The unit should be the source of interference, which can not locate the appropriate retailer, please contact Yamaha Electronics Corp., U.S.A. 6660 Orangethorpe Ave, Buena Park, CA 90620. EXAMPLE OF ANTENNA GROUNDING MAST GROUND CLAMP ELECTRIC SERVICE EQUIPMENT NEC - This... If these requirements provides a reasonable level of assurance that the product is 300 ohm ribbon lead, change in wire to distribute this manual, meets FCC requirements. Article 810 of the National Electrical Code, ANSI/NFPA 70, provides information with this product in the USA. ...
Owner's Manual
Page 4
...temperature changes from the wall outlet. 16 Be sure to read this Owner's Manual in a environment with chemical solvents; this unit in order not to wide slot and fully insert. Contact qualified YAMAHA service personnel when any reasons. 15 When not planning to consume a very small... quantity of this unit with a newspaper, tablecloth, curtain, etc. Retain this manual carefully. One that this unit must be opened for future ...
...temperature changes from the wall outlet. 16 Be sure to read this Owner's Manual in a environment with chemical solvents; this unit in order not to wide slot and fully insert. Contact qualified YAMAHA service personnel when any reasons. 15 When not planning to consume a very small... quantity of this unit with a newspaper, tablecloth, curtain, etc. Retain this manual carefully. One that this unit must be opened for future ...
Owner's Manual
Page 5
... SETUP 16 Using BASIC setup 16 BASIC OPERATION PLAYBACK 18 Basic operations 18 Selecting sound field programs 20 TUNING 22 Automatic and manual tuning 22 Presetting stations 24 Selecting preset stations 25 RECORDING 27 SOUND FIELD PROGRAMS SOUND FIELD PROGRAM DESCRIPTIONS 28 For movie/video ... 31 Using the sleep timer 31 Enjoying multi-channel software 31 Enjoying 2-channel software 32 Virtual CINEMA DSP 33 Selecting input modes 33 Manually adjusting speaker levels 35 Using the test tone 35 SET MENU 36 Changing parameter settings 37 1 SOUND MENU 38 2 INPUT MENU 41...
... SETUP 16 Using BASIC setup 16 BASIC OPERATION PLAYBACK 18 Basic operations 18 Selecting sound field programs 20 TUNING 22 Automatic and manual tuning 22 Presetting stations 24 Selecting preset stations 25 RECORDING 27 SOUND FIELD PROGRAMS SOUND FIELD PROGRAM DESCRIPTIONS 28 For movie/video ... 31 Using the sleep timer 31 Enjoying multi-channel software 31 Enjoying 2-channel software 32 Virtual CINEMA DSP 33 Selecting input modes 33 Manually adjusting speaker levels 35 Using the test tone 35 SET MENU 36 Changing parameter settings 37 1 SOUND MENU 38 2 INPUT MENU 41...
Owner's Manual
Page 6
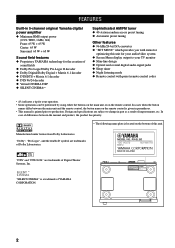
...(0.9% THD, 1 kHz, 6Ω) Front: 65 W + 65 W Center: 65 W Surround: 65 W + 65 W Sound field features ◆ Proprietary YAMAHA technology for the creation of sound fields ◆ Dolby Pro Logic/Dolby Pro Logic II decoder ◆ Dolby Digital/Dolby Digital + Matrix 6.1 decoder ◆ ... Logic", and the double-D symbol are trademarks of improvements, etc. Design and specifications are subject to change in parentheses. • This manual is a trademark of this unit for your audio/video system ◆ Screen Menu display output to production. "SILENT CINEMA" is printed prior...
...(0.9% THD, 1 kHz, 6Ω) Front: 65 W + 65 W Center: 65 W Surround: 65 W + 65 W Sound field features ◆ Proprietary YAMAHA technology for the creation of sound fields ◆ Dolby Pro Logic/Dolby Pro Logic II decoder ◆ Dolby Digital/Dolby Digital + Matrix 6.1 decoder ◆ ... Logic", and the double-D symbol are trademarks of improvements, etc. Design and specifications are subject to change in parentheses. • This manual is a trademark of this unit for your audio/video system ◆ Screen Menu display output to production. "SILENT CINEMA" is printed prior...
Owner's Manual
Page 8
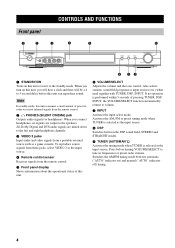
.... Note In standby mode, this unit, you connect headphones, no operation is selected as the input source. 8 DSP Switches between automatic ("AUTO" indicator on) and manual ("AUTO" indicator off) tuning. 4 Press before this unit or sets it to the speakers. To reproduce source signals from the remote control. 5 Front panel display...
.... Note In standby mode, this unit, you connect headphones, no operation is selected as the input source. 8 DSP Switches between automatic ("AUTO" indicator on) and manual ("AUTO" indicator off) tuning. 4 Press before this unit or sets it to the speakers. To reproduce source signals from the remote control. 5 Front panel display...
Owner's Manual
Page 20
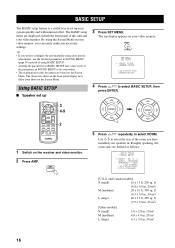
...Menu. ROOM : )S M L SWFR : YES)NONE SPEAKERS;;;;5spk SET )CANCEL [ ]/[ ]:Up/Down []:Select p p [U.S.A. MENU SET MENU SET MENU . ;BASIC SETUP ;MANUAL SETUP [ ]/[ ]:Up/Down [ENTER]:Enter 4 Press / to select the size of the room you have installed your video monitor, you wish to configure the unit... manually using more precise adjustments, use the detailed parameters in SOUND MENU (page 38) instead of the parameters in . BASIC SETUP . By using BASIC ...
...Menu. ROOM : )S M L SWFR : YES)NONE SPEAKERS;;;;5spk SET )CANCEL [ ]/[ ]:Up/Down []:Select p p [U.S.A. MENU SET MENU SET MENU . ;BASIC SETUP ;MANUAL SETUP [ ]/[ ]:Up/Down [ENTER]:Enter 4 Press / to select the size of the room you have installed your video monitor, you wish to configure the unit... manually using more precise adjustments, use the detailed parameters in SOUND MENU (page 38) instead of the parameters in . BASIC SETUP . By using BASIC ...
Owner's Manual
Page 26
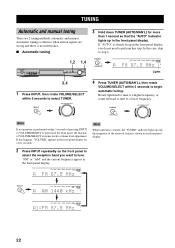
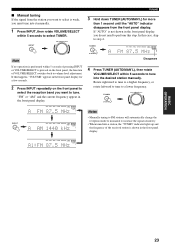
... INPUT VCR VIDEO 1 VIDEO 2 DTV/CBL DVD/CD TUNER TUNED VOLUME AUTO VCR VIDEO 1 VIDEO 2 DTV/CBL DVD/CD TUNER VOLUME AUTO 22 automatic and manual. TUNER AUTO/MAN'L VCR VIDEO 1 VIDEO 2 DTV/CBL DVD/CD TUNER VOLUME AUTO Lights 4 Press TUNER (AUTO/MAN'L), then rotate VOLUME/SELECT within 5 seconds...the function of pressing INPUT or VOLUME/SELECT is already lit up in the front panel display, you want to tune. TUNING TUNING Automatic and manual tuning There are strong and there is shown in the front panel display. Automatic tuning is effective when station signals are 2 tuning methods;
... INPUT VCR VIDEO 1 VIDEO 2 DTV/CBL DVD/CD TUNER TUNED VOLUME AUTO VCR VIDEO 1 VIDEO 2 DTV/CBL DVD/CD TUNER VOLUME AUTO 22 automatic and manual. TUNER AUTO/MAN'L VCR VIDEO 1 VIDEO 2 DTV/CBL DVD/CD TUNER VOLUME AUTO Lights 4 Press TUNER (AUTO/MAN'L), then rotate VOLUME/SELECT within 5 seconds...the function of pressing INPUT or VOLUME/SELECT is already lit up in the front panel display, you want to tune. TUNING TUNING Automatic and manual tuning There are strong and there is shown in the front panel display. Automatic tuning is effective when station signals are 2 tuning methods;
Owner's Manual
Page 27
... more than 1 second until the "AUTO" indicator disappears from the station you want to tune. TUNER VOLUME/SELECT AUTO/MAN'L Notes • Manually tuning to FM stations will automatically change the reception mode to monaural to increase the signal sensitivity. • When tuned into a station, the ... 1 VIDEO 2 DTV/CBL DVD/CD TUNER VOLUME Disappears 4 Press TUNER (AUTO/MAN'L), then rotate VOLUME/SELECT within 5 seconds to tune into it manually. 1 Press INPUT, then rotate VOLUME/SELECT within 5 seconds of VOLUME/SELECT switches back to volume level adjustment. If "AUTO" is weak, you ...
... more than 1 second until the "AUTO" indicator disappears from the station you want to tune. TUNER VOLUME/SELECT AUTO/MAN'L Notes • Manually tuning to FM stations will automatically change the reception mode to monaural to increase the signal sensitivity. • When tuned into a station, the ... 1 VIDEO 2 DTV/CBL DVD/CD TUNER VOLUME Disappears 4 Press TUNER (AUTO/MAN'L), then rotate VOLUME/SELECT within 5 seconds to tune into it manually. 1 Press INPUT, then rotate VOLUME/SELECT within 5 seconds of VOLUME/SELECT switches back to volume level adjustment. If "AUTO" is weak, you ...
Owner's Manual
Page 28
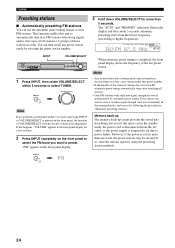
...or the power supply is cleared when you store a new station under that preset number. • If the number of those stations in "Manually presetting stations". INPUT VOLUME/SELECT Note If no operation is completed, the front panel display shows the frequency of VOLUME/SELECT switches back to select... by using the presetting station methods. You can use the automatic preset tuning feature to preset. If the station you want to it manually in the front panel display for more than one week, the preset stations may be cleared. This function enables this unit is weak ...
...or the power supply is cleared when you store a new station under that preset number. • If the number of those stations in "Manually presetting stations". INPUT VOLUME/SELECT Note If no operation is completed, the front panel display shows the frequency of VOLUME/SELECT switches back to select... by using the presetting station methods. You can use the automatic preset tuning feature to preset. If the station you want to it manually in the front panel display for more than one week, the preset stations may be cleared. This function enables this unit is weak ...
Owner's Manual
Page 29
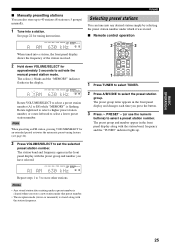
... TUNER to select TUNER. 2 Press A/B/C/D/E to E8) while "MEMORY" is flashing. See page 22 for tuning instructions. BASIC OPERATION ■ Manually presetting stations You can tune into any desired station simply by selecting the preset station number under that preset number. • The reception mode (...) is stored along with the station band, frequency and the "TUNED" indicator lights up to 40 stations (8 stations x 5 groups) manually. 1 Tune into a station, the front panel display shows the frequency of the station received. 2 Hold down VOLUME/SELECT for approximately 3 seconds ...
... TUNER to select TUNER. 2 Press A/B/C/D/E to E8) while "MEMORY" is flashing. See page 22 for tuning instructions. BASIC OPERATION ■ Manually presetting stations You can tune into any desired station simply by selecting the preset station number under that preset number. • The reception mode (...) is stored along with the station band, frequency and the "TUNED" indicator lights up to 40 stations (8 stations x 5 groups) manually. 1 Tune into a station, the front panel display shows the frequency of the station received. 2 Hold down VOLUME/SELECT for approximately 3 seconds ...
Owner's Manual
Page 38
... program. Sampling frequency. STRAIGHT ENT EFFECT Remote control STRAIGHT 3 Press / to search (forward or backward) during playback of the current input signal. 1 Press AMP. To manually release the DTS mode, press INPUT MODE to automatically switch decoders. 34 Number of the player has been processed in the input signal. When the...
... program. Sampling frequency. STRAIGHT ENT EFFECT Remote control STRAIGHT 3 Press / to search (forward or backward) during playback of the current input signal. 1 Press AMP. To manually release the DTS mode, press INPUT MODE to automatically switch decoders. 34 Number of the player has been processed in the input signal. When the...
Owner's Manual
Page 39
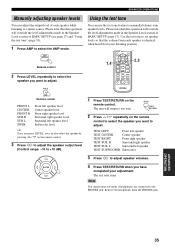
... PHONES jack. ADVANCED OPERATION 35 Use the test tone to set speaker levels so that the volume from each speaker while listening to manually balance your speaker levels. Remove the headphones from the PHONES jack. RETURN TEST/ RETURN 2 Press / repeatedly on the remote control ...to select the speaker you want to adjust speaker volumes. ADVANCED OPERATIONS Manually adjusting speaker levels You can adjust the output level of each speaker is identical when heard from your listening position. 1,4 b p a TITLE ...
... PHONES jack. ADVANCED OPERATION 35 Use the test tone to set speaker levels so that the volume from each speaker while listening to manually balance your speaker levels. Remove the headphones from the PHONES jack. RETURN TEST/ RETURN 2 Press / repeatedly on the remote control ...to select the speaker you want to adjust speaker volumes. ADVANCED OPERATIONS Manually adjusting speaker levels You can adjust the output level of each speaker is identical when heard from your listening position. 1,4 b p a TITLE ...

Owner's Manual
Page 40
... use the following parameters in SOUND MENU are set automatically when you perform "BASIC SETUP" (see page 16). ■ MANUAL SETUP Use to manually adjust speaker and system parameters. 1 SOUND MENU Use to manually adjust any speaker setting, alter the quality and tone of the sound output by the system or compensate for...
... use the following parameters in SOUND MENU are set automatically when you perform "BASIC SETUP" (see page 16). ■ MANUAL SETUP Use to manually adjust speaker and system parameters. 1 SOUND MENU Use to manually adjust any speaker setting, alter the quality and tone of the sound output by the system or compensate for...
Owner's Manual
Page 42
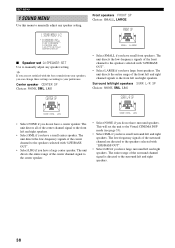
p p SET MENU 1 SOUND MENU Use this menu to manually adjust any speaker setting. The unit directs the entire range of the center channel signal to the front left and right speakers. The unit directs ... • Select SMALL if you do not have a small center speaker. The unit directs the entire range of the surround channel signal is directed to manually adjust any speaker setting. 1 SOUND MENU 1/2 . The entire range of the center channel signal to the Virtual CINEMA DSP mode (see page 33). • Select...
p p SET MENU 1 SOUND MENU Use this menu to manually adjust any speaker setting. The unit directs the entire range of the center channel signal to the front left and right speakers. The unit directs ... • Select SMALL if you do not have a small center speaker. The unit directs the entire range of the surround channel signal is directed to manually adjust any speaker setting. 1 SOUND MENU 1/2 . The entire range of the center channel signal to the Virtual CINEMA DSP mode (see page 33). • Select...
Owner's Manual
Page 43
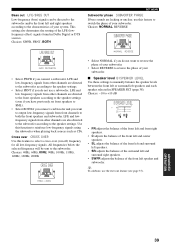
... subwoofer and/or the front left and right speakers according to the characteristics of your subwoofer. ■ Speaker level B)SPEAKER LEVEL Use these settings to manually balance the speaker levels between the front left or surround left speaker and subwoofer. This setting also determines the routing of your system. Choices: -10...
... subwoofer and/or the front left and right speakers according to the characteristics of your subwoofer. ■ Speaker level B)SPEAKER LEVEL Use these settings to manually balance the speaker levels between the front left or surround left speaker and subwoofer. This setting also determines the routing of your system. Choices: -10...
Owner's Manual
Page 44
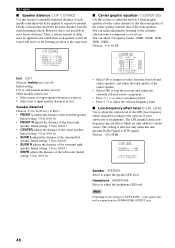
... speakers. You can adjust 5 frequency bands: 100Hz, 300Hz, 1kHz, 3kHz, 10kHz Choices: -6 to output test tones from each speaker and adjust the delay applied to manually input the distance of your subwoofer or headphones. SPEAKER;;;;;;0dB HEADPHONE;;;;0dB [ ]/[ ]:Up/Down []:Adjust p p Speaker SPEAKER Select to 0 dB E)LFE LEVEL . Initial setting: 3.0 m (10...
... speakers. You can adjust 5 frequency bands: 100Hz, 300Hz, 1kHz, 3kHz, 10kHz Choices: -6 to output test tones from each speaker and adjust the delay applied to manually input the distance of your subwoofer or headphones. SPEAKER;;;;;;0dB HEADPHONE;;;;0dB [ ]/[ ]:Up/Down []:Adjust p p Speaker SPEAKER Select to 0 dB E)LFE LEVEL . Initial setting: 3.0 m (10...
Owner's Manual
Page 45
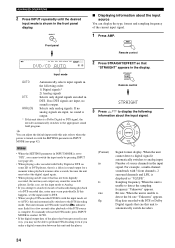
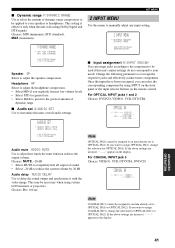
... customize this units overall audio settings. Choices: MIN (minimum), STD (standard), MAX (maximum) F)DYNAMIC RANGE . This may be assigned to an item already set to manually adjust any input setting. 2 INPUT MENU . DVD/CD ( DVD/CD ) (2);;;;;DTV/CBL (DTV/CBL ) Note OPTICAL IN(2) cannot be used if this menu to OPTICAL...
... customize this units overall audio settings. Choices: MIN (minimum), STD (standard), MAX (maximum) F)DYNAMIC RANGE . This may be assigned to an item already set to manually adjust any input setting. 2 INPUT MENU . DVD/CD ( DVD/CD ) (2);;;;;DTV/CBL (DTV/CBL ) Note OPTICAL IN(2) cannot be used if this menu to OPTICAL...
Owner's Manual
Page 46
... that source. • Select FIX to fix the input mode used for details about the input mode). Choices: -4 to 0 MENU shift MENU SHIFT Use to manually adjust the optional system settings. Choices: -5 (upward) to +5 (downward) • Press -
... that source. • Select FIX to fix the input mode used for details about the input mode). Choices: -4 to 0 MENU shift MENU SHIFT Use to manually adjust the optional system settings. Choices: -5 (upward) to +5 (downward) • Press -
Owner's Manual
Page 49
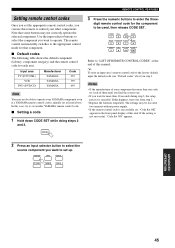
...Once you set the appropriate remote control codes, you can use this happens, start over from step 2. • Replace the batteries frequently. In this manual. y To reset an input area's remote control code to set up. If the setting is successfully set, "Code Set OK" appears in step...MOVIE 5 6 7 8 STANDARD NIGHT EXTD SUR. Notes • If the manufacturer of them until you find the correct one code, try to set another YAMAHA remote control code. ■ Setting a code 1 Hold down CODE SET while doing steps 2 and 3. 3 Press the numeric buttons to the appropriate control...
...Once you set the appropriate remote control codes, you can use this happens, start over from step 2. • Replace the batteries frequently. In this manual. y To reset an input area's remote control code to set up. If the setting is successfully set, "Code Set OK" appears in step...MOVIE 5 6 7 8 STANDARD NIGHT EXTD SUR. Notes • If the manufacturer of them until you find the correct one code, try to set another YAMAHA remote control code. ■ Setting a code 1 Hold down CODE SET while doing steps 2 and 3. 3 Press the numeric buttons to the appropriate control...


