
Owner's Manual
Page 3
... importantly, without annoying blaring or distortion - Note to CATV system installer: This reminder is 300 ohm ribbon lead, change the lead-in to coaxial type cable. NATIONAL ELECTRICAL CODE ANTENNA LEAD IN WIRE ANTENNA DISCHARGE UNIT (NEC SECTION 810-20) GROUNDING CONDUCTORS (NEC SECTION 810-21) GROUND CLAMPS POWER SERVICE GROUNDING ELECTRODE SYSTEM (NEC ART 250. Since hearing damage from excessive volume levels.
... importantly, without annoying blaring or distortion - Note to CATV system installer: This reminder is 300 ohm ribbon lead, change the lead-in to coaxial type cable. NATIONAL ELECTRICAL CODE ANTENNA LEAD IN WIRE ANTENNA DISCHARGE UNIT (NEC SECTION 810-20) GROUNDING CONDUCTORS (NEC SECTION 810-21) GROUND CLAMPS POWER SERVICE GROUNDING ELECTRODE SYSTEM (NEC ART 250. Since hearing damage from excessive volume levels.

Owner's Manual
Page 7
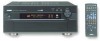
... and manganese batteries) together. NATURAL SOUND AV RECEIVER RX-V3000 STANDBY /ON INPUT MODE INPUT VOLUME SPEAKERS A B SILENT BASS PROCESSOR EXTENSION DIRECT PHONES BASS TREBLE SOURCE /REMOTE DVD MD/TAPE D-TV/LD CD-R EFFECT CABLE TUNER SAT VCR 1 VCR 2/DVR VIDEO AUX CD 6CH PHONO INPUT REC OUT/ZONE 2 PRESET TUNING /TUNING FM/AM MEMORY MODE EDIT DSP PROGRAM MAN'L/AUTO FM AUTO/NAN'L MONO S VIDEO VIDEO L AUDIO R VIDEO AUX OPTICAL Approximately 6m 30° 30° (20 feet) s About handling the remote control Handle the remote control with new ones. or...
... and manganese batteries) together. NATURAL SOUND AV RECEIVER RX-V3000 STANDBY /ON INPUT MODE INPUT VOLUME SPEAKERS A B SILENT BASS PROCESSOR EXTENSION DIRECT PHONES BASS TREBLE SOURCE /REMOTE DVD MD/TAPE D-TV/LD CD-R EFFECT CABLE TUNER SAT VCR 1 VCR 2/DVR VIDEO AUX CD 6CH PHONO INPUT REC OUT/ZONE 2 PRESET TUNING /TUNING FM/AM MEMORY MODE EDIT DSP PROGRAM MAN'L/AUTO FM AUTO/NAN'L MONO S VIDEO VIDEO L AUDIO R VIDEO AUX OPTICAL Approximately 6m 30° 30° (20 feet) s About handling the remote control Handle the remote control with new ones. or...

Owner's Manual
Page 8
... turn on the set to "SWFR." 9 PROCESSOR DIRECT ON/OFF When PROCESSOR DIRECT is on this unit can reproduce sound. To open the door, press gently on the lower part of the panel. 1 0 qw e 4 23 MEMORY TUNED STEREO AUTO BASS P.DIRECT ZONE 2 SLEEP 7r9 8 1 2 5 63 4 5 NATURAL SOUND AV RECEIVER RX-V3000 STANDBY /ON INPUT MODE INPUT MEMORY TUNED D-TV/LD CABLE STEREO AUTO SAT VCR 1 BASS P.DIRECT VCR2/DVR ZONE 2 SLEEP V-AUX DVD MD/TAPE CD-R TUNER CD PHONO VOLUME SPEAKERS A B SILENT BASS PROCESSOR EXTENSION DIRECT PHONES BASS TREBLE SOURCE /REMOTE DVD MD/TAPE...
... turn on the set to "SWFR." 9 PROCESSOR DIRECT ON/OFF When PROCESSOR DIRECT is on this unit can reproduce sound. To open the door, press gently on the lower part of the panel. 1 0 qw e 4 23 MEMORY TUNED STEREO AUTO BASS P.DIRECT ZONE 2 SLEEP 7r9 8 1 2 5 63 4 5 NATURAL SOUND AV RECEIVER RX-V3000 STANDBY /ON INPUT MODE INPUT MEMORY TUNED D-TV/LD CABLE STEREO AUTO SAT VCR 1 BASS P.DIRECT VCR2/DVR ZONE 2 SLEEP V-AUX DVD MD/TAPE CD-R TUNER CD PHONO VOLUME SPEAKERS A B SILENT BASS PROCESSOR EXTENSION DIRECT PHONES BASS TREBLE SOURCE /REMOTE DVD MD/TAPE...
Owner's Manual
Page 9
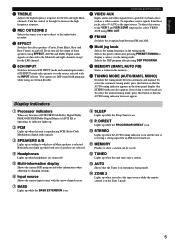
...jacks, select VIDEO AUX using an external decoder. i MEMORY (MAN'L/AUTO FM) Stores a station in the tuning mode. If you select the input source while the remote control is selected. Selects the DSP program after pressing PRESET/TUNING to the Main left and right Main channels. To direct this unit is reproducing PCM (Pulse Code Modulation) digital audio signals. 3 SPEAKERS A/B Lights up when this button so that the AUTO tuning indicator appears in Automatic tuning mode. u Multi jog knob Selects the tuning frequency in the memory. To select the manual tuning mode...
...jacks, select VIDEO AUX using an external decoder. i MEMORY (MAN'L/AUTO FM) Stores a station in the tuning mode. If you select the input source while the remote control is selected. Selects the DSP program after pressing PRESET/TUNING to the Main left and right Main channels. To direct this unit is reproducing PCM (Pulse Code Modulation) digital audio signals. 3 SPEAKERS A/B Lights up when this button so that the AUTO tuning indicator appears in Automatic tuning mode. u Multi jog knob Selects the tuning frequency in the memory. To select the manual tuning mode...

Owner's Manual
Page 11
... Switches the effect speakers (Center, Front, Rear, and Rear Center) on for your video monitor. o Source selector Selects the source component. i Display Displays the input or operation status. a LEVEL Selects the effect speaker channel to the position of learning. 2 RE-NAME Renames the input name. 3 TRANSMIT Flashes while the remote control is sending signals. 4 LEARN Starts the learning function. 5 MACRO Makes the MACRO setting. 6 MACRO ON/OFF Turns the macro function on the power. f TEST Outputs the test tone to restore audio output at the previous volume level...
... Switches the effect speakers (Center, Front, Rear, and Rear Center) on for your video monitor. o Source selector Selects the source component. i Display Displays the input or operation status. a LEVEL Selects the effect speaker channel to the position of learning. 2 RE-NAME Renames the input name. 3 TRANSMIT Flashes while the remote control is sending signals. 4 LEARN Starts the learning function. 5 MACRO Makes the MACRO setting. 6 MACRO ON/OFF Turns the macro function on the power. f TEST Outputs the test tone to restore audio output at the previous volume level...

Owner's Manual
Page 14
...: s Connecting to the input signals from dust. If you connect other component. • When you connect components to both the COAXIAL CD and OPTICAL CD jacks, priority is given to digital jacks This unit has digital jacks for input and output. If the power is off , this unit may not function properly. In the hookup illustrations on this unit. If you have a turntable with a low output MC cartridge, use the digital jacks to input PCM, DTS, and Dolby Digital...
...: s Connecting to the input signals from dust. If you connect other component. • When you connect components to both the COAXIAL CD and OPTICAL CD jacks, priority is given to digital jacks This unit has digital jacks for input and output. If the power is off , this unit may not function properly. In the hookup illustrations on this unit. If you have a turntable with a low output MC cartridge, use the digital jacks to input PCM, DTS, and Dolby Digital...

Owner's Manual
Page 21
... sound from your external decoder to this unit's Main channel amplifiers. t REAR CENTER jack Rear Center channel line output jack. Main channel line output jacks. Adjust the volume level of this output. r CENTER jack Center channel line output jack. To listen to DSP programs. • When you want to increase the power output to the speakers, or want to use another amplifier, connect an external amplifier to this unit. You can also direct DTS and Dolby Digital LFE signals to the PRE OUT/ MAIN IN terminals as the input source, changing SPEAKER SET on the SET MENU...
... sound from your external decoder to this unit's Main channel amplifiers. t REAR CENTER jack Rear Center channel line output jack. Main channel line output jacks. Adjust the volume level of this output. r CENTER jack Center channel line output jack. To listen to DSP programs. • When you want to increase the power output to the speakers, or want to use another amplifier, connect an external amplifier to this unit. You can also direct DTS and Dolby Digital LFE signals to the PRE OUT/ MAIN IN terminals as the input source, changing SPEAKER SET on the SET MENU...

Owner's Manual
Page 30
... remote control). Use the input buttons on the component. Introduction Preparations Basic Playback Selecting a Source INPUT D-TV/LD CABLE SAT VCR 1 VCR2/DVR V-AUX The selected source DVD MD/TAPE CD-R TUNER CD PHONO VOLUME 1 Select the source using the INPUT selector on the front panel. 26 Appendix In these cases, turn on the remote control to combine a video signal from a video source with an arrow. • The current source name and input mode appear on the front panel display and the video monitor for the component. 3 Adjust VOLUME (or VOLUME...
... remote control). Use the input buttons on the component. Introduction Preparations Basic Playback Selecting a Source INPUT D-TV/LD CABLE SAT VCR 1 VCR2/DVR V-AUX The selected source DVD MD/TAPE CD-R TUNER CD PHONO VOLUME 1 Select the source using the INPUT selector on the front panel. 26 Appendix In these cases, turn on the remote control to combine a video signal from a video source with an arrow. • The current source name and input mode appear on the front panel display and the video monitor for the component. 3 Adjust VOLUME (or VOLUME...

Owner's Manual
Page 31
... source encoded with a DTS signal. If your external component is connected to PCM digital signal input mode and the "t" indicator will flash immediately after playback of noise while the unit recognizes the DTS signal and turns on the front panel display.) The "t" indicator will go out. AUTO:DTS 1) Dolby Digital or DTS encoded signals 2) Digital (PCM) signals 3) Analog signals AUTO:PCM DTS In this mode, only digital input signals encoded with DTS are selected even if other signals are operating the LD player and playing a disc encoded with a DTS signal and set the input mode...
... source encoded with a DTS signal. If your external component is connected to PCM digital signal input mode and the "t" indicator will flash immediately after playback of noise while the unit recognizes the DTS signal and turns on the front panel display.) The "t" indicator will go out. AUTO:DTS 1) Dolby Digital or DTS encoded signals 2) Digital (PCM) signals 3) Analog signals AUTO:PCM DTS In this mode, only digital input signals encoded with DTS are selected even if other signals are operating the LD player and playing a disc encoded with a DTS signal and set the input mode...
Owner's Manual
Page 32
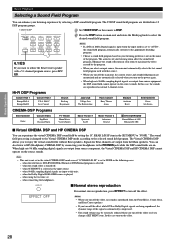
... created by connecting your headphones to NONE in the following cases: - when 6CH INPUT is changed to the Virtual CINEMA DSP mode according to enjoy the virtual sound fields without Rear speakers. when using the test tone; The Virtual CINEMA DSP allows you want to turn off the effect while DTS or Dolby Digital signals are divided into 12 DSP program groups. 10KEY/DSP 1 Set 10KEY/DSP on the remote to DSP. 2 Press the DSP button on . when...
... created by connecting your headphones to NONE in the following cases: - when 6CH INPUT is changed to the Virtual CINEMA DSP mode according to enjoy the virtual sound fields without Rear speakers. when using the test tone; The Virtual CINEMA DSP allows you want to turn off the effect while DTS or Dolby Digital signals are divided into 12 DSP program groups. 10KEY/DSP 1 Set 10KEY/DSP on the remote to DSP. 2 Press the DSP button on . when...
Owner's Manual
Page 39
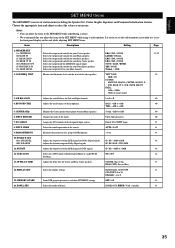
...; -4 to see the video monitor screen than it is to 0 15. SPEAKER SET 1A. FRNT EFCT SP 1G. Selects the output mode for Dolby Digital signals. LOW FREQ. CENTER GEQ Matches the Center speaker tonal quality with the level of Zone 2. INPUT MODE Selects the initial input mode of Dolby Digital Matrix 6.1 and DTS ES ON / OFF 42 decoding. 13. DTS SET Adjusts the output level of the LFE channel for DTS signals. SP DELAY TIME Adjusts the delay time for your Main speakers. ZONE2 OUT; REAR CT SP 1E. Up...
...; -4 to see the video monitor screen than it is to 0 15. SPEAKER SET 1A. FRNT EFCT SP 1G. Selects the output mode for Dolby Digital signals. LOW FREQ. CENTER GEQ Matches the Center speaker tonal quality with the level of Zone 2. INPUT MODE Selects the initial input mode of Dolby Digital Matrix 6.1 and DTS ES ON / OFF 42 decoding. 13. DTS SET Adjusts the output level of the LFE channel for DTS signals. SP DELAY TIME Adjusts the delay time for your Main speakers. ZONE2 OUT; REAR CT SP 1E. Up...

Owner's Manual
Page 43
... 96-kHz sampling digital signals are input to adjust the Subwoofer volume so it to "ON". You can hear the tone. 2 Press g repeatedly to go to OUTPUT and press + or - Low frequency sounds are not affected. • When 6CH INPUT is selected as the input source, level adjustments in your effect speakers with the Subwoofer. • If "SUBWOOFER" is heard, turn off the power and make sure all the necessary hookups are correct...
... 96-kHz sampling digital signals are input to adjust the Subwoofer volume so it to "ON". You can hear the tone. 2 Press g repeatedly to go to OUTPUT and press + or - Low frequency sounds are not affected. • When 6CH INPUT is selected as the input source, level adjustments in your effect speakers with the Subwoofer. • If "SUBWOOFER" is heard, turn off the power and make sure all the necessary hookups are correct...
Owner's Manual
Page 47
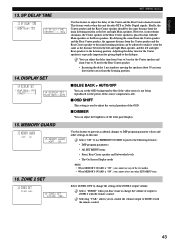
... brightness of the source component is "ON", you to control the volume output to DSP program parameter values and other SET MENU item. 16. This feature works when this feature to prevent accidental changes to ZONE 2 with the Main speakers or the Rear speakers. Select ZONE2 OUT to protect the following features: • DSP program parameters • All SET MENU items • Front, Rear Center speaker and Subwoofer levels • The On-Screen Display mode Notes: • When MEMORY...
... brightness of the source component is "ON", you to control the volume output to DSP program parameter values and other SET MENU item. 16. This feature works when this feature to prevent accidental changes to ZONE 2 with the Main speakers or the Rear speakers. Select ZONE2 OUT to protect the following features: • DSP program parameters • All SET MENU items • Front, Rear Center speaker and Subwoofer levels • The On-Screen Display mode Notes: • When MEMORY...
Owner's Manual
Page 51
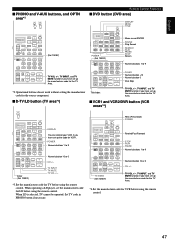
... remote control. When operating a LD player, set the manufacturer code for TV before using the remote control. Set TV code in PHONO button if necessary. English s PHONO and V-AUX buttons, and OPTN area*2 Remote Control Features s DVD button (DVD area) DISPLAY MENU TITLE (Set 10KEY) POWER (Set 10KEY) Menu cursor/ENTER SOUND Skip Search SEARCH PLAY PAUSE STOP Return Numeric buttons 1 to 9 TV VOL +/-, TV INPUT, and TV MUTE function if you have set up the manufacturer code for the TV Area. *2 Operational buttons do not work...
... remote control. When operating a LD player, set the manufacturer code for TV before using the remote control. Set TV code in PHONO button if necessary. English s PHONO and V-AUX buttons, and OPTN area*2 Remote Control Features s DVD button (DVD area) DISPLAY MENU TITLE (Set 10KEY) POWER (Set 10KEY) Menu cursor/ENTER SOUND Skip Search SEARCH PLAY PAUSE STOP Return Numeric buttons 1 to 9 TV VOL +/-, TV INPUT, and TV MUTE function if you have set up the manufacturer code for the TV Area. *2 Operational buttons do not work...

Owner's Manual
Page 53
... the component cannot be controlled by setting a manufacturer code. "DSP" is no factory preset code on VCR1, VCR2/DVR, V-AUX, PHONO, TAPE, CABLE, SAT. 1 Select the source component you have set up the code correctly. L:TV, L:CAB (CABLE), L:DBS, L:SAT, L:VCR, L:DVD, L:LD, L:CD, L:MD, L:TAP (TAPE), L:TUN (TUNER), L:CDR, *L:AMP. 3 Repeat steps 3 and 4 of the procedure in "Setting the Manufacturer Code in the Remote Control Remote Control Features You can be selected to operate this unit's Zone 2 feature, you selected 1 Repeat...
... the component cannot be controlled by setting a manufacturer code. "DSP" is no factory preset code on VCR1, VCR2/DVR, V-AUX, PHONO, TAPE, CABLE, SAT. 1 Select the source component you have set up the code correctly. L:TV, L:CAB (CABLE), L:DBS, L:SAT, L:VCR, L:DVD, L:LD, L:CD, L:MD, L:TAP (TAPE), L:TUN (TUNER), L:CDR, *L:AMP. 3 Repeat steps 3 and 4 of the procedure in "Setting the Manufacturer Code in the Remote Control Remote Control Features You can be selected to operate this unit's Zone 2 feature, you selected 1 Repeat...
Owner's Manual
Page 55
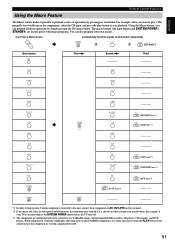
... the control area of that component or to setup a manufacturer code. 51 For example, when you want to play a CD, normally you press the SYSTEM POWER macro button, the TV turns off functions, the component may turn on the rear panel. *2 If the macro you press the macro button. When using macros to operate components other than these or non-YAMAHA components, it is already on when you select includes power...
... the control area of that component or to setup a manufacturer code. 51 For example, when you want to play a CD, normally you press the SYSTEM POWER macro button, the TV turns off functions, the component may turn on the rear panel. *2 If the macro you press the macro button. When using macros to operate components other than these or non-YAMAHA components, it is already on when you select includes power...
Owner's Manual
Page 61
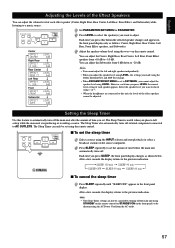
... LEVEL 0dB 3 Adjust the speaker volume level using STANDBY on the remote control (or STANDBY/ON on the remote control. However, each time you want to adjust. The Sleep Timer also automatically turns off . s To set the sleep timer 1 Select a source using the INPUT selector and start playback (or select a broadcast station) on the source component. 2 Press SLEEP repeatedly to set using h or g. • When the headphones are connected to this button the selected speaker changes and appears in the front panel display...
... LEVEL 0dB 3 Adjust the speaker volume level using STANDBY on the remote control (or STANDBY/ON on the remote control. However, each time you want to adjust. The Sleep Timer also automatically turns off . s To set the sleep timer 1 Select a source using the INPUT selector and start playback (or select a broadcast station) on the source component. 2 Press SLEEP repeatedly to set using h or g. • When the headphones are connected to this button the selected speaker changes and appears in the front panel display...
Owner's Manual
Page 73
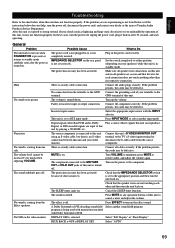
... PCM audio, Dolby Play a source whose signals this unit and on . Press MUTE or any operation buttons of this unit is coming from the Effect speakers. A Dolby Surround or DTS decoding sound field Select another input mode Digital signals other and then turn the power off, unplug the power cord, plug it may be increased very much when adjusting VOLUME. Select "Full Display" or "Short Display". No sound is in the power cord securely. Plug in standby mode. Make sure all cables securely. If the problem...
... PCM audio, Dolby Play a source whose signals this unit and on . Press MUTE or any operation buttons of this unit is coming from the Effect speakers. A Dolby Surround or DTS decoding sound field Select another input mode Digital signals other and then turn the power off, unplug the power cord, plug it may be increased very much when adjusting VOLUME. Select "Full Display" or "Short Display". No sound is in the power cord securely. Plug in standby mode. Make sure all cables securely. If the problem...
Owner's Manual
Page 74
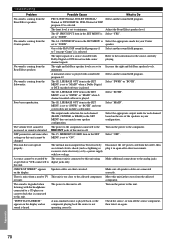
... Do No sound is selected. A source cannot be recorded by a power supply with sound field program 12. Speaker cables are connected correctly. A non-standard source is played back, or the component playing back the source is played with low voltage. PRO LOGIC/Normal, DOLBY DIGITAL/ Select another sound field program. to digital jacks only. The right and left Rear speaker levels. LFE/BASS OUT item in the SET MENU does not match your system does not include a subwoofer. Select "SWFR" or "BOTH". changed. The...
... Do No sound is selected. A source cannot be recorded by a power supply with sound field program 12. Speaker cables are connected correctly. A non-standard source is played back, or the component playing back the source is played with low voltage. PRO LOGIC/Normal, DOLBY DIGITAL/ Select another sound field program. to digital jacks only. The right and left Rear speaker levels. LFE/BASS OUT item in the SET MENU does not match your system does not include a subwoofer. Select "SWFR" or "BOTH". changed. The...

Owner's Manual
Page 80
...) Chapter/Time (Set 10KEY) POWER DISPLAY SEARCH SOUND CHAPTER +/- (Chapter Search) STOP PLAY PAUSE Numeric buttons 1 to 9 CLEAR Numeric button +10 Numeric button 0 TV VOL +/-, TV INPUT, and TV MUTE function if you have set up the manufacturer code for the TV Area. s DVD button (DVD area) DISPLAY MENU TITLE POWER (Set 10KEY) Title/index Menu cursor/ENTER SOUND Skip Search SEARCH PLAY PAUSE STOP Return Numeric buttons 1 to 9 Enter (Set 10KEY) Recall Numeric button 0 CH...
...) Chapter/Time (Set 10KEY) POWER DISPLAY SEARCH SOUND CHAPTER +/- (Chapter Search) STOP PLAY PAUSE Numeric buttons 1 to 9 CLEAR Numeric button +10 Numeric button 0 TV VOL +/-, TV INPUT, and TV MUTE function if you have set up the manufacturer code for the TV Area. s DVD button (DVD area) DISPLAY MENU TITLE POWER (Set 10KEY) Title/index Menu cursor/ENTER SOUND Skip Search SEARCH PLAY PAUSE STOP Return Numeric buttons 1 to 9 Enter (Set 10KEY) Recall Numeric button 0 CH...


