Quick Reference Guide
Page 3
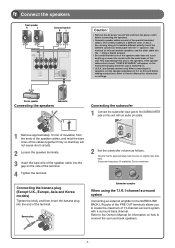
... the ends of the speaker cables, and twist the bare wires of the cables together firmly so that the core of the speaker cable does not touch anything or come into contact with a surround back channel. One of these cables is switched on. • (U.S.A. 1 Connect the speakers Front speaker R L Surround speaker R L SPEAKERS HDMI 3 HDMI 4 FRONT CENTER SURROUND AUDIO OUT SINGLE SURROUND BACK SUBWOOFER PRE OUT Caution: • Remove the AC power cord of this unit and...
... the ends of the speaker cables, and twist the bare wires of the cables together firmly so that the core of the speaker cable does not touch anything or come into contact with a surround back channel. One of these cables is switched on. • (U.S.A. 1 Connect the speakers Front speaker R L Surround speaker R L SPEAKERS HDMI 3 HDMI 4 FRONT CENTER SURROUND AUDIO OUT SINGLE SURROUND BACK SUBWOOFER PRE OUT Caution: • Remove the AC power cord of this unit and...
Quick Reference Guide
Page 4
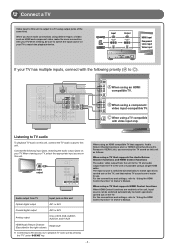
.... DOCK COMPONENT VIDEO PR PB Y VIDEO HDMI HDMI OUT (BD/DVD) HDMI 1 HDMI 2 HD ANTENNA FM GND AM PR PR COMPONENT VIDEO PR 75ǡ PB PB PB Y Y VIDEO V V Y MONITOR OUT V OPTICAL AV 1 COAXIAL AV 2 COAXIAL (CD) AV 3 OPTICAL ( TV ) AV 4 AV 5 AV 6 AV OUT AUDIO 1 AUDIO 2 HDMI HDMI COMPONENT VIDEO PR A When using a component video input-compatible TV. VIDEO C When using a TV that supports the Audio Return Channel functions and HDMI Control functions The audio / video output from the unit to the TV and audio output from TV Input jack on your...
.... DOCK COMPONENT VIDEO PR PB Y VIDEO HDMI HDMI OUT (BD/DVD) HDMI 1 HDMI 2 HD ANTENNA FM GND AM PR PR COMPONENT VIDEO PR 75ǡ PB PB PB Y Y VIDEO V V Y MONITOR OUT V OPTICAL AV 1 COAXIAL AV 2 COAXIAL (CD) AV 3 OPTICAL ( TV ) AV 4 AV 5 AV 6 AV OUT AUDIO 1 AUDIO 2 HDMI HDMI COMPONENT VIDEO PR A When using a component video input-compatible TV. VIDEO C When using a TV that supports the Audio Return Channel functions and HDMI Control functions The audio / video output from the unit to the TV and audio output from TV Input jack on your...
Owners Manual
Page 2
... 4 Part names and functions 5 Front panel 5 Rear panel 6 Front panel display 7 Remote control 8 CONNECTIONS Connecting speakers 9 Speaker channels and functions 9 Speaker layout 10 Connecting speakers and subwoofer 11 Connecting external components 14 Cable plugs and jacks 14 Connecting a TV monitor 15 Connecting BD/DVD players and other devices 17 Connecting video cameras and portable audio players .. 21 Transmitting input A/V to use 57 Setting the sound field program 58 Prohibiting setting changes 58 Setting sound field program parameters 59 CINEMA DSP parameters...
... 4 Part names and functions 5 Front panel 5 Rear panel 6 Front panel display 7 Remote control 8 CONNECTIONS Connecting speakers 9 Speaker channels and functions 9 Speaker layout 10 Connecting speakers and subwoofer 11 Connecting external components 14 Cable plugs and jacks 14 Connecting a TV monitor 15 Connecting BD/DVD players and other devices 17 Connecting video cameras and portable audio players .. 21 Transmitting input A/V to use 57 Setting the sound field program 58 Prohibiting setting changes 58 Setting sound field program parameters 59 CINEMA DSP parameters...

Owners Manual
Page 3
Using with the equalizer Volume control for each speaker...51 - Speaker channels and functions ...9 - Speaker distance settings ...51 - Speaker layout...10 - Speaker cable connection...11 - Yamaha Parametric Room Acoustic Optimizer 23 - and Canada models only) Speaker impedance configuration 12 - Subwoofer cable connection ...13 - Automatic settings for 2- INTRODUCTION Features and capabilities ■ Built-in high-quality, high-power 5-channel amplifier ■ 1-button input/sound field program switching (SCENE function 29 ■ Speaker connections for ...
Using with the equalizer Volume control for each speaker...51 - Speaker channels and functions ...9 - Speaker distance settings ...51 - Speaker layout...10 - Speaker cable connection...11 - Yamaha Parametric Room Acoustic Optimizer 23 - and Canada models only) Speaker impedance configuration 12 - Subwoofer cable connection ...13 - Automatic settings for 2- INTRODUCTION Features and capabilities ■ Built-in high-quality, high-power 5-channel amplifier ■ 1-button input/sound field program switching (SCENE function 29 ■ Speaker connections for ...

Owners Manual
Page 8
... MUSIC STEREO STRAIGHT DIRECT BD DVD SETUP SCENE TV CD RADIO OPTION ENTER VOLUME RETURN DISPLAY TOP MENU REC POP-UP MENU MUTE n o p q r s 1 2 3 4 5 6 7 8 9 INPUT MUTE 0 10 TV TV VOL TV CH ENT a Remote control signal transmitter Transmits infrared signals. b TRANSMIT Lights up when the sleep timer is on and standby mode. c SOURCE A (SOURCE Power) Switches an external component on the front panel display (the name of the currently selected input source, the sound field program, the surround decoder, the FM/AM tuner frequency...
... MUSIC STEREO STRAIGHT DIRECT BD DVD SETUP SCENE TV CD RADIO OPTION ENTER VOLUME RETURN DISPLAY TOP MENU REC POP-UP MENU MUTE n o p q r s 1 2 3 4 5 6 7 8 9 INPUT MUTE 0 10 TV TV VOL TV CH ENT a Remote control signal transmitter Transmits infrared signals. b TRANSMIT Lights up when the sleep timer is on and standby mode. c SOURCE A (SOURCE Power) Switches an external component on the front panel display (the name of the currently selected input source, the sound field program, the surround decoder, the FM/AM tuner frequency...

Owners Manual
Page 9
... to the SURROUND BACK jacks of the screen. When used with 5.1ch sound, sound from surround back speakers is used with 6.1ch sound, arrange these speakers at the rear of a real movie theater or concert hall. When using a TV, place the speaker just above or just under the center of the PRE OUT terminals. When used for bass sounds and low-frequency effect (LFE) sounds included in Dolby Digital and DTS. When using the surround back speakers, connect an external amplifier to...
... to the SURROUND BACK jacks of the screen. When used with 5.1ch sound, sound from surround back speakers is used with 6.1ch sound, arrange these speakers at the rear of a real movie theater or concert hall. When using a TV, place the speaker just above or just under the center of the PRE OUT terminals. When used for bass sounds and low-frequency effect (LFE) sounds included in Dolby Digital and DTS. When using the surround back speakers, connect an external amplifier to...

Owners Manual
Page 11
... the rear panel. Front speaker R L Surround speaker R L SPEAKERS HDMI 3 HDMI 4 FRONT CENTER SURROUND CONNECTIONS Connecting speakers ■ Connecting the surround back speakers Connecting an external amplifier to the SURROUND BACK L/R jacks of the PRE OUT terminals allows you to indicate different polarity. AUDIO OUT SINGLE SURROUND BACK SUBWOOFER PRE OUT Center speaker Subwoofer En 11 To obtain the balanced sound during playback, set the speaker output characteristics in advance using the YPAO (Yamaha Parametric Room Acoustic Optimizer) or "Speaker Setup" of...
... the rear panel. Front speaker R L Surround speaker R L SPEAKERS HDMI 3 HDMI 4 FRONT CENTER SURROUND CONNECTIONS Connecting speakers ■ Connecting the surround back speakers Connecting an external amplifier to the SURROUND BACK L/R jacks of the PRE OUT terminals allows you to indicate different polarity. AUDIO OUT SINGLE SURROUND BACK SUBWOOFER PRE OUT Center speaker Subwoofer En 11 To obtain the balanced sound during playback, set the speaker output characteristics in advance using the YPAO (Yamaha Parametric Room Acoustic Optimizer) or "Speaker Setup" of...

Owners Manual
Page 16
... the receiver's AV4 jack. Connect to AV4 with just a single key operation using a TV that supports the Audio Return Channel function and HDMI Control function When your TV using a TV that you to switch the input source to the COAXIAL jack of the AV5, AV6, AUDIO1, AUDIO2, or V-AUX with a digital audio pin cable. ■ Connecting a video monitor Connect the video pin cable to enjoy the TV sound. Panasonic VIERA Link), if HDMI Control functions are possible using a single HDMI cable. If the TV supports optical digital audio output, we...
... the receiver's AV4 jack. Connect to AV4 with just a single key operation using a TV that supports the Audio Return Channel function and HDMI Control function When your TV using a TV that you to switch the input source to the COAXIAL jack of the AV5, AV6, AUDIO1, AUDIO2, or V-AUX with a digital audio pin cable. ■ Connecting a video monitor Connect the video pin cable to enjoy the TV sound. Panasonic VIERA Link), if HDMI Control functions are possible using a single HDMI cable. If the TV supports optical digital audio output, we...

Owners Manual
Page 28
... the source input, or select a radio station on the front panel repeatedly to obtain desired tone. The name of sounds output from Bluetooth™ components" (☞p. 42) 4 Press rVOLUME +/- TONE Treble VOL. J1 3 Play the external component that you release the key. Adjusting high/low-frequency sound (Tone control) You can change the input source name displayed on the front panel display. En 28 PLAYBACK SOURCE 1 1 5 TRANSMIT CODE SET SLEEP RECEIVER HDMI 2 3 4 AV 2 3 4 AUDIO 6 1 2 V-AUX [ A ] [ B ] DOCK TUNER FM AM PRESET TUNING INFO...
... the source input, or select a radio station on the front panel repeatedly to obtain desired tone. The name of sounds output from Bluetooth™ components" (☞p. 42) 4 Press rVOLUME +/- TONE Treble VOL. J1 3 Play the external component that you release the key. Adjusting high/low-frequency sound (Tone control) You can change the input source name displayed on the front panel display. En 28 PLAYBACK SOURCE 1 1 5 TRANSMIT CODE SET SLEEP RECEIVER HDMI 2 3 4 AV 2 3 4 AUDIO 6 1 2 V-AUX [ A ] [ B ] DOCK TUNER FM AM PRESET TUNING INFO...

Owners Manual
Page 48
... input names and auto power down that make the unit easier to use jCursor B / C to exit the Setup menu. For a few seconds after closing the Setup menu, the remote control keys may not function. Sound Setup Set functions related to find the desired setting and press jENTER. DECODE MUSIC STEREO STRAIGHT DIRECT BD DVD SETUP SCENE TV CD RADIO OPTION Setting various functions (Setup menu) You can change the setting. SOURCE 1 1 5 TRANSMIT CODE SET SLEEP RECEIVER HDMI 2 3 4 AV 2 3 4 AUDIO 6 1 2 V-AUX [ A ] [ B ] DOCK TUNER FM AM PRESET TUNING...
... input names and auto power down that make the unit easier to use jCursor B / C to exit the Setup menu. For a few seconds after closing the Setup menu, the remote control keys may not function. Sound Setup Set functions related to find the desired setting and press jENTER. DECODE MUSIC STEREO STRAIGHT DIRECT BD DVD SETUP SCENE TV CD RADIO OPTION Setting various functions (Setup menu) You can change the setting. SOURCE 1 1 5 TRANSMIT CODE SET SLEEP RECEIVER HDMI 2 3 4 AV 2 3 4 AUDIO 6 1 2 V-AUX [ A ] [ B ] DOCK TUNER FM AM PRESET TUNING...

Owners Manual
Page 51
... measurement selects "PEQ" automatically. Front speaker L Front speaker R Center speaker Surround speaker L Surround speaker R Surround back speaker L Surround back speaker R Surround back speaker Subwoofer SETUP Setting various functions (Setup menu) ■ Adjusting sound quality with jCursor D / E. Use jCursor B / C to adjust sound quality. B L Sur. ■ Controlling the volume of each speaker Level Separately adjusts the volume of tone using a parametric or graphic equalizer. Selecting adjustment units Use jCursor B / C to display "Unit," and then use jCursor D / E to set the...
... measurement selects "PEQ" automatically. Front speaker L Front speaker R Center speaker Surround speaker L Surround speaker R Surround back speaker L Surround back speaker R Surround back speaker Subwoofer SETUP Setting various functions (Setup menu) ■ Adjusting sound quality with jCursor D / E. Use jCursor B / C to adjust sound quality. B L Sur. ■ Controlling the volume of each speaker Level Separately adjusts the volume of tone using a parametric or graphic equalizer. Selecting adjustment units Use jCursor B / C to display "Unit," and then use jCursor D / E to set the...
Owners Manual
Page 53
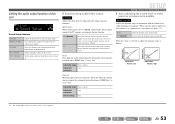
... Manual Manually adjusts the correction time. En 53 Sets the initial volume for Dolby Digital and DTS playback. Select this receiver. When you play audio at night or at low volumes, it adjusts the dynamic range as follows. SW L CR SL SR Sound Setup submenu Lipsync Adaptive DRC D.Range Max Volume Init Volume Adjusts the delay between audio and video output (Lipsync function). Selects the dynamic range adjustment method for when this when the connected monitor does not support the automatic lipsync function or you use...
... Manual Manually adjusts the correction time. En 53 Sets the initial volume for Dolby Digital and DTS playback. Select this receiver. When you play audio at night or at low volumes, it adjusts the dynamic range as follows. SW L CR SL SR Sound Setup submenu Lipsync Adaptive DRC D.Range Max Volume Init Volume Adjusts the delay between audio and video output (Lipsync function). Selects the dynamic range adjustment method for when this when the connected monitor does not support the automatic lipsync function or you use...

Owners Manual
Page 60
... Dolby Pro Logic II Movie) decoder. High (Default) Low Standard effect. SL Level Adjusts the volume of the source are emphasized excessively. Does not bypass the DSP circuit and tone control circuit. 7ch Stereo only CT Level Adjusts the center channel volume. J2 Adjustable range 0 to 100% Default setting 100% J 1 : Surround decoders cannot be added). Sets when the high-frequency signals of the surround L channel. CINEMA DSP parameters Selects a surround decoder to be used with a sound field program in certain sound field programs 2ch Stereo only Direct Automatically...
... Dolby Pro Logic II Movie) decoder. High (Default) Low Standard effect. SL Level Adjusts the volume of the source are emphasized excessively. Does not bypass the DSP circuit and tone control circuit. 7ch Stereo only CT Level Adjusts the center channel volume. J2 Adjustable range 0 to 100% Default setting 100% J 1 : Surround decoders cannot be added). Sets when the high-frequency signals of the surround L channel. CINEMA DSP parameters Selects a surround decoder to be used with a sound field program in certain sound field programs 2ch Stereo only Direct Automatically...
Owners Manual
Page 62
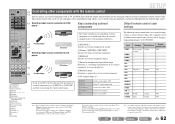
... Switches video inputs of this unit. Switches TV channels. CD player Yamaha 5095 - - - - - - - - - - - - - - - - - - - - - DOCK Yamaha 5089 Tuner Yamaha 5085 J 1 : You can register remote control codes for external components to dInput selector and remote control codes for a device other components with the remote control c You can be convenient to switch external components seamlessly depending on and off TV. SETUP SOURCE 1 1 5 TRANSMIT CODE SET SLEEP RECEIVER HDMI 2 3 4 AV 2 3 4 AUDIO 6 1 2 V-AUX [ A ] [ B ] DOCK TUNER...
... Switches video inputs of this unit. Switches TV channels. CD player Yamaha 5095 - - - - - - - - - - - - - - - - - - - - - DOCK Yamaha 5089 Tuner Yamaha 5085 J 1 : You can register remote control codes for external components to dInput selector and remote control codes for a device other components with the remote control c You can be convenient to switch external components seamlessly depending on and off TV. SETUP SOURCE 1 1 5 TRANSMIT CODE SET SLEEP RECEIVER HDMI 2 3 4 AV 2 3 4 AUDIO 6 1 2 V-AUX [ A ] [ B ] DOCK TUNER...
Owners Manual
Page 63
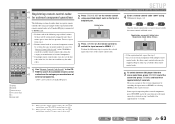
... a remote control code to search the available remote control m codes from the name or model number of an external component cannot be used for approximately 3 seconds. DECODE MUSIC STEREO STRAIGHT DIRECT BD DVD SETUP SCENE TV CD RADIO OPTION ENTER VOLUME RETURN DISPLAY TOP MENU REC POP-UP MENU MUTE 1 2 3 4 5 6 7 8 9 INPUT MUTE 0 10 TV TV VOL TV CH ENT n Registering remote control codes d for approximately 3 seconds. "2064" can operate the external components by switching the input source to HDMI2 jack...
... a remote control code to search the available remote control m codes from the name or model number of an external component cannot be used for approximately 3 seconds. DECODE MUSIC STEREO STRAIGHT DIRECT BD DVD SETUP SCENE TV CD RADIO OPTION ENTER VOLUME RETURN DISPLAY TOP MENU REC POP-UP MENU MUTE 1 2 3 4 5 6 7 8 9 INPUT MUTE 0 10 TV TV VOL TV CH ENT n Registering remote control codes d for approximately 3 seconds. "2064" can operate the external components by switching the input source to HDMI2 jack...
Owners Manual
Page 66
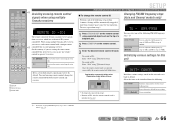
... TRANSMIT CODE SET SLEEP RECEIVER HDMI 2 3 4 AV 2 3 4 AUDIO 6 1 2 V-AUX [ A ] [ B ] DOCK TUNER FM AM PRESET TUNING INFO MEMORY MOVIE ENHANCER SUR. When using lNumeric keys. Receives the remote control signals set for both remote control and receiver by default. AM9/FM50 1 Press nCODE SET on setting FM/AM frequency steps, refer to default factory settings. Initializing various settings for its corresponding receiver. CANCEL Registration successful: blinks twice Registration failed: blinks 6 times SOURCE TRANSMIT SLEEP HDMI CODE SET RECEIVER...
... TRANSMIT CODE SET SLEEP RECEIVER HDMI 2 3 4 AV 2 3 4 AUDIO 6 1 2 V-AUX [ A ] [ B ] DOCK TUNER FM AM PRESET TUNING INFO MEMORY MOVIE ENHANCER SUR. When using lNumeric keys. Receives the remote control signals set for both remote control and receiver by default. AM9/FM50 1 Press nCODE SET on setting FM/AM frequency steps, refer to default factory settings. Initializing various settings for its corresponding receiver. CANCEL Registration successful: blinks twice Registration failed: blinks 6 times SOURCE TRANSMIT SLEEP HDMI CODE SET RECEIVER...

Owners Manual
Page 70
... play the source again. Setup" → "AutoPowerDown"), increase the time until switching to standby mode, or turn on . Check that the speaker with an impedance of a short circuit, etc. En 70 Please contact your nearest Yamaha dealer or service center to request repair. Make sure that the speaker impedance settings are connected properly. The batteries in the remote control Replace all speaker cables between this unit is turned on and "CHECK SP WIRES!" and Canada models...
... play the source again. Setup" → "AutoPowerDown"), increase the time until switching to standby mode, or turn on . Check that the speaker with an impedance of a short circuit, etc. En 70 Please contact your nearest Yamaha dealer or service center to request repair. Make sure that the speaker impedance settings are connected properly. The batteries in the remote control Replace all speaker cables between this unit is turned on and "CHECK SP WIRES!" and Canada models...

Owners Manual
Page 72
... external amplifier to this unit is not turned on . Set "EXTD Surround" other digital or radio frequency equipment. The subwoofer is turned off . • An input source that a subwoofer is output during playback or skip operation Before playing back the DTS-CD, display the Option menu after selecting the input source and set to "Auto." The connected component is not set ''Decoder Mode'' to connect cannot be increased, or the sound is distorted. Consult the manufacturer of audio / video jacks to ''DTS.'' The volume...
... external amplifier to this unit is not turned on . Set "EXTD Surround" other digital or radio frequency equipment. The subwoofer is turned off . • An input source that a subwoofer is output during playback or skip operation Before playing back the DTS-CD, display the Option menu after selecting the input source and set to "Auto." The connected component is not set ''Decoder Mode'' to connect cannot be increased, or the sound is distorted. Consult the manufacturer of audio / video jacks to ''DTS.'' The volume...
Owners Manual
Page 74
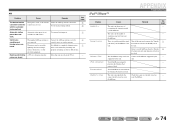
... manual tuning method. 34 with your iPod/iPhone. The iPod/iPhone being used is not Use manual station preset. 34 preset does not available for AM stations. The unit cannot playback the songs currently stored on your iPod/iPhone. Automatic station Automatic station preset is not Connect an iPod/iPhone supported by the supported by the unit. The noises may be caused by installing and properly grounding an outdoor AM antenna...
... manual tuning method. 34 with your iPod/iPhone. The iPod/iPhone being used is not Use manual station preset. 34 preset does not available for AM stations. The unit cannot playback the songs currently stored on your iPod/iPhone. Automatic station Automatic station preset is not Connect an iPod/iPhone supported by the supported by the unit. The noises may be caused by installing and properly grounding an outdoor AM antenna...
Owners Manual
Page 77
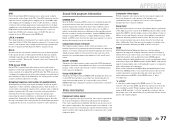
... luminance signal is used in Dolby Digital or DTS 5.1-channel systems. Neo:6 Neo:6 decodes the conventional 2-channel sources for chrominance. Virtual CINEMA DSP Yamaha has developed a Virtual CINEMA DSP algorithm that offered by the RGB or YCbCr color space. The component signal is also called the sampling frequency, while the degree of 120 dB. A monitor with HDCP (High-bandwidth Digital Content Protection), HDMI provides a secure audio/video interface that can be played back...
... luminance signal is used in Dolby Digital or DTS 5.1-channel systems. Neo:6 Neo:6 decodes the conventional 2-channel sources for chrominance. Virtual CINEMA DSP Yamaha has developed a Virtual CINEMA DSP algorithm that offered by the RGB or YCbCr color space. The component signal is also called the sampling frequency, while the degree of 120 dB. A monitor with HDCP (High-bandwidth Digital Content Protection), HDMI provides a secure audio/video interface that can be played back...


