
Owner's Manual
Page 3
... SELECTOR Switch 18 Connecting the Power Supply Cords 18 ADJUSTING THE SPEAKER BALANCE .... 19 Before You Start Adjusting 19 Using the Test Tone 19 BASIC OPERATION PLAYING A SOURCE 21 Input Modes and Indications 23 Selecting a DSP Program 24 Canceling the Sound Effect (turning off the effect speakers 25 TUNING 26 Connecting the Antennas 26 Automatic Tuning 27 Manual Tuning 27 Automatic Preset Tuning (for RDS stations only 28 Manual Preset Tuning 29 To Recall a Preset Station 29 Exchanging Preset Stations 30 RECEIVING RDS STATIONS 31 Description of Each Mode 44 Setting the...
... SELECTOR Switch 18 Connecting the Power Supply Cords 18 ADJUSTING THE SPEAKER BALANCE .... 19 Before You Start Adjusting 19 Using the Test Tone 19 BASIC OPERATION PLAYING A SOURCE 21 Input Modes and Indications 23 Selecting a DSP Program 24 Canceling the Sound Effect (turning off the effect speakers 25 TUNING 26 Connecting the Antennas 26 Automatic Tuning 27 Manual Tuning 27 Automatic Preset Tuning (for RDS stations only 28 Manual Preset Tuning 29 To Recall a Preset Station 29 Exchanging Preset Stations 30 RECEIVING RDS STATIONS 31 Description of Each Mode 44 Setting the...
Owner's Manual
Page 4
...DSP N SILENT CINEMA Sophisticated FM/AM Tuner N 40-Station Random Access Preset Tuning N Automatic Preset Tuning N Preset Station Shifting Capability (Preset Editing) N Multi-Functions for RDS Broadcast Reception Other Features N 96-kHz/24-bit D/A Converter N "SET MENU" which Provides You with 9 Items for Optimizing This Unit for Your Audio/Video System N Test Tone Generator for Easier Speaker Balance Adjustment N 6-Channel External Decoder Input for Other Future Formats N Video Signal Input and Output Capability (Including S Video Connections) N Optical and Coaxial Digital Signal Input Jacks...
...DSP N SILENT CINEMA Sophisticated FM/AM Tuner N 40-Station Random Access Preset Tuning N Automatic Preset Tuning N Preset Station Shifting Capability (Preset Editing) N Multi-Functions for RDS Broadcast Reception Other Features N 96-kHz/24-bit D/A Converter N "SET MENU" which Provides You with 9 Items for Optimizing This Unit for Your Audio/Video System N Test Tone Generator for Easier Speaker Balance Adjustment N 6-Channel External Decoder Input for Other Future Formats N Video Signal Input and Output Capability (Including S Video Connections) N Optical and Coaxial Digital Signal Input Jacks...
Owner's Manual
Page 5
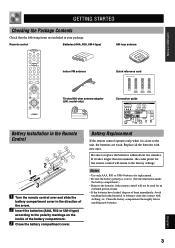
.... 3 Close the battery compartment cover. model only) Connection guide PREPARATION BASIC OPERATION ADVANCED OPERATION APPENDIX Battery Installation in the Remote Control 2 1 3 1 Turn the remote control over and slide the battery compartment cover in your package. Avoid touching the leaked material or letting it takes longer than two minutes, the codes preset for the remote control will not be used for replacement. • Be sure the battery polarity...
.... 3 Close the battery compartment cover. model only) Connection guide PREPARATION BASIC OPERATION ADVANCED OPERATION APPENDIX Battery Installation in the Remote Control 2 1 3 1 Turn the remote control over and slide the battery compartment cover in your package. Avoid touching the leaked material or letting it takes longer than two minutes, the codes preset for the remote control will not be used for replacement. • Be sure the battery polarity...
Owner's Manual
Page 6
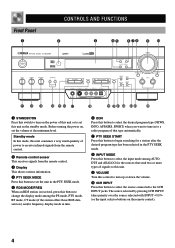
... level. Front Panel 1 CONTROLS AND FUNCTIONS 2 3 45 67 90 8 STANDBY /ON D I G I TA L SURROUND BASS TREBLE BALANCE -+ -+ L R SPEAKERS A B ON OFF D I G I TA L RDS MODE/FREQ EON PTY SEEK MODE START VOLUME PROGRAM EFFECT PRESET/TUNING PHONES S VIDEO VIDEO L AUDIO R OPTICAL A/B/C/D/E PRESET /TUNING FM/AM EDIT MEMORY TUNING MODE MAN'L/AUTO FM AUTO/MAN'L MONO INPUT MODE INPUT 6CH INPUT qwe SILENT r ty u VIDEO AUX i o pa s df g 1 STANDBY/ON Press this switch to turn on the power of this unit or to set this button to select the source connected to turn...
... level. Front Panel 1 CONTROLS AND FUNCTIONS 2 3 45 67 90 8 STANDBY /ON D I G I TA L SURROUND BASS TREBLE BALANCE -+ -+ L R SPEAKERS A B ON OFF D I G I TA L RDS MODE/FREQ EON PTY SEEK MODE START VOLUME PROGRAM EFFECT PRESET/TUNING PHONES S VIDEO VIDEO L AUDIO R OPTICAL A/B/C/D/E PRESET /TUNING FM/AM EDIT MEMORY TUNING MODE MAN'L/AUTO FM AUTO/MAN'L MONO INPUT MODE INPUT 6CH INPUT qwe SILENT r ty u VIDEO AUX i o pa s df g 1 STANDBY/ON Press this switch to turn on the power of this unit or to set this button to select the source connected to turn...
Owner's Manual
Page 7
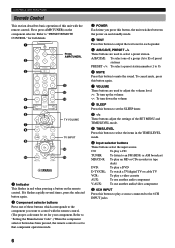
... high-frequency response. t PROGRAM l / h Press l or h to select a DSP program when the effect speakers (center and rear) are directed to the right and left main speakers to turn on or off " z " on the display. The name of the output volume from the right and left main speakers. u PHONES jack Connect the headphones to 8). To reproduce source signals from the display: This button is also used to exchange the assignment of 5 preset station groups (A to switch the tuning mode...
... high-frequency response. t PROGRAM l / h Press l or h to select a DSP program when the effect speakers (center and rear) are directed to the right and left main speakers to turn on or off " z " on the display. The name of the output volume from the right and left main speakers. u PHONES jack Connect the headphones to 8). To reproduce source signals from the display: This button is also used to exchange the assignment of 5 preset station groups (A to switch the tuning mode...
Owner's Manual
Page 8
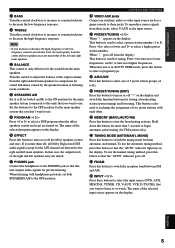
... tape deck) DVD: To play a DVD D-TV/CBL: To watch a TV/digital TV or cable TV VCR: To play a source connected to the 6CH INPUT jacks. 6 First, press AMP(TUNER) on the remote control. q Input selector buttons These buttons select the input source. A/B/C/D/E: To select one of these buttons which corresponds to the component you press this button, the unit switches between the power on and standby mode. 4 TEST Press this button to play a video cassette AUX: To use another audio component V-AUX: To use another audio/video component w 6CH INPUT Press this button to output...
... tape deck) DVD: To play a DVD D-TV/CBL: To watch a TV/digital TV or cable TV VCR: To play a source connected to the 6CH INPUT jacks. 6 First, press AMP(TUNER) on the remote control. q Input selector buttons These buttons select the input source. A/B/C/D/E: To select one of these buttons which corresponds to the component you press this button, the unit switches between the power on and standby mode. 4 TEST Press this button to play a video cassette AUX: To use another audio component V-AUX: To use another audio/video component w 6CH INPUT Press this button to output...
Owner's Manual
Page 10
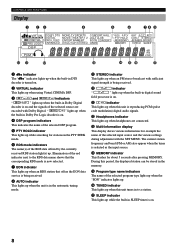
... the signals of the selected DSP program. 5 PTY HOLD indicator This lights up when the built-in Dolby Pro Logic decoder is on . 4 DSP program indicators This indicates the name of the selected source are connected. " o " lights up while searching for stations in the memory. During this unit tunes in SLEEP timer is on . 8 CONTROLS AND FUNCTIONS Display 1 23 4 5 6 78 9 VIRTUAL DIGITAL PRO LOGIC DSP DOLBY DTS DIGITAL PRO LOGIC ENHANCED MONO TV SPORTS MOVIE THEATER...
... the signals of the selected DSP program. 5 PTY HOLD indicator This lights up when the built-in Dolby Pro Logic decoder is on . 4 DSP program indicators This indicates the name of the selected source are connected. " o " lights up while searching for stations in the memory. During this unit tunes in SLEEP timer is on . 8 CONTROLS AND FUNCTIONS Display 1 23 4 5 6 78 9 VIRTUAL DIGITAL PRO LOGIC DSP DOLBY DTS DIGITAL PRO LOGIC ENHANCED MONO TV SPORTS MOVIE THEATER...

Owner's Manual
Page 11
... switch (see page 18). 9 Audio component jacks See pages 12 and 13 for connection information. 0 SUBWOOFER jack See page 17 for connection information. VIDEO SIGNAL DVD D-TV/CBL IN VCR 1OUT MONITOR OUT VIDEO S VIDEO L DIGITAL OUTPUT AUX CD IN(PLAY) OUT(REC) MD/CD-R DVD D-TV/CBL AUDIO SIGNAL R IN OUT VCR 1 SUB WOOFER OUTPUT R+ A SPEAKERS - - +L MAIN B CENTER REAR R (SURROUND) L + - INTRODUCTION PREPARATION Rear Panel 12 3 4 5 CONTROLS AND FUNCTIONS 6 78 DIGITAL INPUT CD AM ANT GND TUNER FM ANT COAXIAL OPTICAL D-TV/CBL DVD 6CH INPUT MAIN SURROUND CENTER...
... switch (see page 18). 9 Audio component jacks See pages 12 and 13 for connection information. 0 SUBWOOFER jack See page 17 for connection information. VIDEO SIGNAL DVD D-TV/CBL IN VCR 1OUT MONITOR OUT VIDEO S VIDEO L DIGITAL OUTPUT AUX CD IN(PLAY) OUT(REC) MD/CD-R DVD D-TV/CBL AUDIO SIGNAL R IN OUT VCR 1 SUB WOOFER OUTPUT R+ A SPEAKERS - - +L MAIN B CENTER REAR R (SURROUND) L + - INTRODUCTION PREPARATION Rear Panel 12 3 4 5 CONTROLS AND FUNCTIONS 6 78 DIGITAL INPUT CD AM ANT GND TUNER FM ANT COAXIAL OPTICAL D-TV/CBL DVD 6CH INPUT MAIN SURROUND CENTER...
Owner's Manual
Page 21
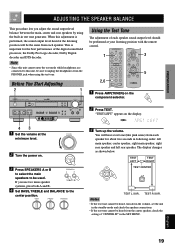
... main speaker, right rear speaker and left rear speaker. Before You Start Adjusting 2 1 STANDBY /ON D I G I TA L SURROUND BASS TREBLE BALANCE -+ -+ L R SPEAKERS A B ON OFF D I G I TA L RDS MODE/FREQ EON PTY SEEK MODE START VOLUME PROGRAM EFFECT PRESET/TUNING PHONES S VIDEO VIDEO L AUDIO R OPTICAL A/B/C/D/E PRESET /TUNING FM/AM EDIT MEMORY TUNING MODE MAN'L/AUTO FM AUTO/MAN'L MONO INPUT MODE INPUT 6CH INPUT SILENT VIDEO AUX 43 1 Set the volume at your listening position with the remote control. 1 3 5 2,6 1 Press AMP(TUNER) on the display. 3 Turn...
... main speaker, right rear speaker and left rear speaker. Before You Start Adjusting 2 1 STANDBY /ON D I G I TA L SURROUND BASS TREBLE BALANCE -+ -+ L R SPEAKERS A B ON OFF D I G I TA L RDS MODE/FREQ EON PTY SEEK MODE START VOLUME PROGRAM EFFECT PRESET/TUNING PHONES S VIDEO VIDEO L AUDIO R OPTICAL A/B/C/D/E PRESET /TUNING FM/AM EDIT MEMORY TUNING MODE MAN'L/AUTO FM AUTO/MAN'L MONO INPUT MODE INPUT 6CH INPUT SILENT VIDEO AUX 43 1 Set the volume at your listening position with the remote control. 1 3 5 2,6 1 Press AMP(TUNER) on the display. 3 Turn...
Owner's Manual
Page 24
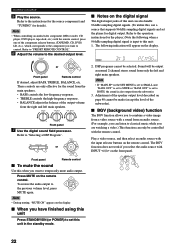
... (or POWER) to set to BOTH, the sound is input to temporarily mute audio output. BASS TREBLE BALANCE -+ -+ L R Front panel 7 Use the digital sound field processor. PROGRAM or I When you want to this unit can only be selected. Refer to the desired output level. Note • When controlling an audio/video component (MD recorder, CD player, DVD player, tape deck, etc.) with the remote control. Refer to "PRESET REMOTE CONTROL". 6 Adjust the volume to the instructions for the source component (and "TUNING" for digital output. DSP programs cannot be controlled...
... (or POWER) to set to BOTH, the sound is input to temporarily mute audio output. BASS TREBLE BALANCE -+ -+ L R Front panel 7 Use the digital sound field processor. PROGRAM or I When you want to this unit can only be selected. Refer to the desired output level. Note • When controlling an audio/video component (MD recorder, CD player, DVD player, tape deck, etc.) with the remote control. Refer to "PRESET REMOTE CONTROL". 6 Adjust the volume to the instructions for the source component (and "TUNING" for digital output. DSP programs cannot be controlled...
Owner's Manual
Page 26
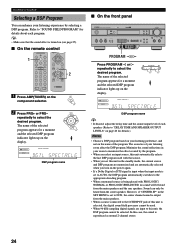
...played with PRO LOGIC/ NORMAL or PRO LOGIC/ENHANCED, no sound will be selected. DSP program name I On the front panel STANDBY /ON D I G I TA L SURROUND BASS TREBLE BALANCE -+ -+ L R SPEAKERS A B ON OFF D I G I On the remote control 1 2 1 Press AMP(TUNER) on (see page 25). The acoustics of this unit, the DSP program cannot be heard from the center speaker. I TA L RDS MODE/FREQ EON PTY SEEK MODE START VOLUME PROGRAM EFFECT PRESET/TUNING PHONES S VIDEO VIDEO L AUDIO R OPTICAL A/B/C/D/E PRESET /TUNING FM/AM EDIT MEMORY TUNING MODE MAN'L/AUTO FM AUTO...
...played with PRO LOGIC/ NORMAL or PRO LOGIC/ENHANCED, no sound will be selected. DSP program name I On the front panel STANDBY /ON D I G I TA L SURROUND BASS TREBLE BALANCE -+ -+ L R SPEAKERS A B ON OFF D I G I On the remote control 1 2 1 Press AMP(TUNER) on (see page 25). The acoustics of this unit, the DSP program cannot be heard from the center speaker. I TA L RDS MODE/FREQ EON PTY SEEK MODE START VOLUME PROGRAM EFFECT PRESET/TUNING PHONES S VIDEO VIDEO L AUDIO R OPTICAL A/B/C/D/E PRESET /TUNING FM/AM EDIT MEMORY TUNING MODE MAN'L/AUTO FM AUTO...
Owner's Manual
Page 36
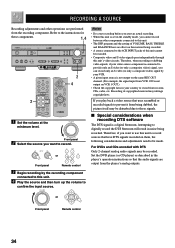
... INPUT MODE INPUT 6CH INPUT SILENT VIDEO AUX 2 4 2 1 Set the volume at the VOLUME minimum level. Set the DVD player (or CD player) as described in the player's operation instructions so that the audio signals are performed from records, CDs, radio, etc. Recording of this unit cannot be made. Refer to record from the recording component. For DVDs and CDs encoded with DTS Only 2-channel analog audio signals may be disturbed due to those signals. RECORDING A SOURCE Recording adjustments and...
... INPUT MODE INPUT 6CH INPUT SILENT VIDEO AUX 2 4 2 1 Set the volume at the VOLUME minimum level. Set the DVD player (or CD player) as described in the player's operation instructions so that the audio signals are performed from records, CDs, radio, etc. Recording of this unit cannot be made. Refer to record from the recording component. For DVDs and CDs encoded with DTS Only 2-channel analog audio signals may be disturbed due to those signals. RECORDING A SOURCE Recording adjustments and...

Owner's Manual
Page 39
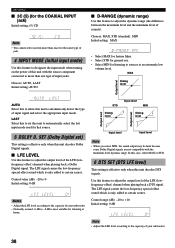
... subwoofer. Low-frequency signals are defined as 90 Hz and below ) from that component. The LFE signals are directed to change the jack assignment and effectively connect more component. BOTH Select this if you do not use a subwoofer. INTRODUCTION PREPARATION BASIC OPERATION ADVANCED OPERATION I BASS OUT (bass out mode) LFE signals carry low-frequency effects when this setting if you cannot match the output level of the center and rear speakers with INPUT l / h (or the input selector buttons). The LFE signals are directed to mix the main channel low-frequency signals...
... subwoofer. Low-frequency signals are defined as 90 Hz and below ) from that component. The LFE signals are directed to change the jack assignment and effectively connect more component. BOTH Select this if you do not use a subwoofer. INTRODUCTION PREPARATION BASIC OPERATION ADVANCED OPERATION I BASS OUT (bass out mode) LFE signals carry low-frequency effects when this setting if you cannot match the output level of the center and rear speakers with INPUT l / h (or the input selector buttons). The LFE signals are directed to mix the main channel low-frequency signals...
Owner's Manual
Page 40
... input mode used for that source. 5 DOLBY D. SET (Dolby Digital set this unit to -8 dB is most suitable for listening at an extremely low volume level. Control range (dB): -10 to +10 Initial setting: 0 dB dB Note • Adjust the LFE level according to sources at home. Use this feature to certain scenes. The LFE signal carries the low-frequency special effect sound which is only added to adjust the output level of the LFE (lowfrequency effect) channel when playing back a DTS signal. I D-RANGE (dynamic range) Use...
... input mode used for that source. 5 DOLBY D. SET (Dolby Digital set this unit to -8 dB is most suitable for listening at an extremely low volume level. Control range (dB): -10 to +10 Initial setting: 0 dB dB Note • Adjust the LFE level according to sources at home. Use this feature to certain scenes. The LFE signal carries the low-frequency special effect sound which is only added to adjust the output level of the LFE (lowfrequency effect) channel when playing back a DTS signal. I D-RANGE (dynamic range) Use...
Owner's Manual
Page 45
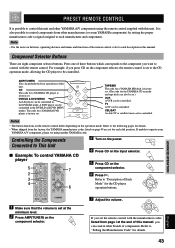
... control YAMAHA CD player 5 7 2 3 4 6 3 Turn on the power. 4 Press CD on the input selector. 5 Press CD on the component selector. 7 Adjust the volume. Component Selector Buttons There are set for each dial position. CD The code for the CD player operation buttons. DVD/LD & DVD MENU An LD player can control other YAMAHA A/V components using another YAMAHA code. For example, if you can be controlled. Controlling the Components Connected to be controlled in the DVD/LD and DVD MENU modes. It is also possible to control components...
... control YAMAHA CD player 5 7 2 3 4 6 3 Turn on the power. 4 Press CD on the input selector. 5 Press CD on the component selector. 7 Adjust the volume. Component Selector Buttons There are set for each dial position. CD The code for the CD player operation buttons. DVD/LD & DVD MENU An LD player can control other YAMAHA A/V components using another YAMAHA code. For example, if you can be controlled. Controlling the Components Connected to be controlled in the DVD/LD and DVD MENU modes. It is also possible to control components...

Owner's Manual
Page 51
... the factory-set codes in each mode 1 Press one of the component selector buttons other than AMP(TUNER). 2 Press both VOLUME buttons (u/d) at the same time for about four seconds. Component selector button TV CBL/SAT VCR DVD/LD CD TAPE/MD Component TV Cable TV VCR DVD player CD player MD recorder Code 0101 0006 0002 0008 (YAMAHA DVD player) 0005 (YAMAHA CD player) 0024 (YAMAHA MD recorder) Set component We recommend that the indicator flashes twice. 3 Enter the code number...
... the factory-set codes in each mode 1 Press one of the component selector buttons other than AMP(TUNER). 2 Press both VOLUME buttons (u/d) at the same time for about four seconds. Component selector button TV CBL/SAT VCR DVD/LD CD TAPE/MD Component TV Cable TV VCR DVD player CD player MD recorder Code 0101 0006 0002 0008 (YAMAHA DVD player) 0005 (YAMAHA CD player) 0024 (YAMAHA MD recorder) Set component We recommend that the indicator flashes twice. 3 Enter the code number...
Owner's Manual
Page 55
... the connections. Select the main speakers with INPUT l / h or 6CH INPUT (or the input selector buttons). Make connections using the same type of jack (between composites, S-VIDEOs, or components) for each other than PCM audio, Dolby Digital or DTS signal which this unit cannot reproduce are not secure. Check the IMPEDANCE SELECTOR switch is set to the left or right position when the unit is in the standby mode, disconnect the power cord and contact...
... the connections. Select the main speakers with INPUT l / h or 6CH INPUT (or the input selector buttons). Make connections using the same type of jack (between composites, S-VIDEOs, or components) for each other than PCM audio, Dolby Digital or DTS signal which this unit cannot reproduce are not secure. Check the IMPEDANCE SELECTOR switch is set to the left or right position when the unit is in the standby mode, disconnect the power cord and contact...
Owner's Manual
Page 56
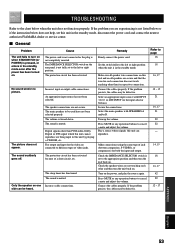
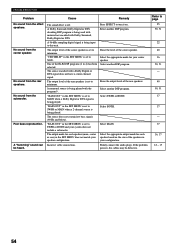
... DSP program. Incorrect cable connections. If the problem persists, the cables may be heard. A "humming" sound can be defective. A Dolby Surround, Dolby Digital or DTS decoding DSP program is being used with material not encoded with Dolby Surround, Dolby Digital or DTS. The source does not contain low bass signals (90 Hz and below). Press EFFECT to minimum. The output level of the rear speakers is being played. The output level of the center speaker is set to SWFR or MAIN when a 2-channel source is set to turn...
... DSP program. Incorrect cable connections. If the problem persists, the cables may be heard. A "humming" sound can be defective. A Dolby Surround, Dolby Digital or DTS decoding DSP program is being used with material not encoded with Dolby Surround, Dolby Digital or DTS. The source does not contain low bass signals (90 Hz and below). Press EFFECT to minimum. The output level of the rear speakers is being played. The output level of the center speaker is set to SWFR or MAIN when a 2-channel source is set to turn...
Owner's Manual
Page 62
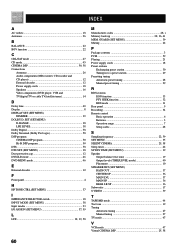
... cords 18 Speakers 16 Video components (DVD player, VCR and TV/digital TV or cable TV/satellite tuner 14 D Delay time 40 Display 8 DISPLAY SET (SET MENU) DIMMER 39 DOLBY D. GUARD (SET MENU 39 Muting 22 P Package contents 3 PCM 59 Playing 21 Power supply cords 18 Preset stations Exchanging preset station 30 Tuning in to a preset station 29 Presetting tuning Automatic preset tuning 28 Manual preset tuning 29 R RDS stations EON function 33 PTY SEEK function 32 RDS mode 31 Rear panel 9 Recording 34 Remote control Basic operation 6 Batteries 3 Operation range 7 Setup codes...
... cords 18 Speakers 16 Video components (DVD player, VCR and TV/digital TV or cable TV/satellite tuner 14 D Delay time 40 Display 8 DISPLAY SET (SET MENU) DIMMER 39 DOLBY D. GUARD (SET MENU 39 Muting 22 P Package contents 3 PCM 59 Playing 21 Power supply cords 18 Preset stations Exchanging preset station 30 Tuning in to a preset station 29 Presetting tuning Automatic preset tuning 28 Manual preset tuning 29 R RDS stations EON function 33 PTY SEEK function 32 RDS mode 31 Rear panel 9 Recording 34 Remote control Basic operation 6 Batteries 3 Operation range 7 Setup codes...

Owner's Manual
Page 69
...AUDIO SIGNAL R IN OUT VCR 1 SUB WOOFER OUTPUT R+ A MAIN B SPEAKERS - - +L CENTER REAR R (SURROUND) L + - * *RX-V520/RX-V520RDS HTR-5450/HTR-5450RDS only VIDEO IN S VIDEO IN S V * Video Monitor Subwoofer system Center speaker R L Rear speakers (U.S.A. DVD player OPTICAL AUDIO OUT L R Connection Guide (when listening to a digital 5.1-channel source) S VIDEO OUT VIDEO OUT Main speakers A Main speakers B OPTICAL OUT AUDIO OUT S VIDEO VIDEO OUT OUT O LR V S R LR L DIGITAL INPUT CD AM ANT GND FM ANT TUNER COAXIAL OPTICAL D-TV/CBL DVD 6CH INPUT...
...AUDIO SIGNAL R IN OUT VCR 1 SUB WOOFER OUTPUT R+ A MAIN B SPEAKERS - - +L CENTER REAR R (SURROUND) L + - * *RX-V520/RX-V520RDS HTR-5450/HTR-5450RDS only VIDEO IN S VIDEO IN S V * Video Monitor Subwoofer system Center speaker R L Rear speakers (U.S.A. DVD player OPTICAL AUDIO OUT L R Connection Guide (when listening to a digital 5.1-channel source) S VIDEO OUT VIDEO OUT Main speakers A Main speakers B OPTICAL OUT AUDIO OUT S VIDEO VIDEO OUT OUT O LR V S R LR L DIGITAL INPUT CD AM ANT GND FM ANT TUNER COAXIAL OPTICAL D-TV/CBL DVD 6CH INPUT...


