
Owner's Manual
Page 3
...Subwoofer .......... 40 Adjusting Method 41 SLEEP TIMER 42 Setting the SLEEP Timer 42 Canceling the SLEEP Timer 42 PRESET REMOTE CONTROL 43 Component Selector Buttons 43 Controlling the Components Connected to the Factory Setting 49 SOUND FIELD PROGRAM 50 Hi... CONTENTS INTRODUCTION FEATURES 2 GETTING STARTED 3 Checking the Package Contents 3 Battery Installation in the Remote Control 3 Battery Replacement 3 CONTROLS AND FUNCTIONS 4 Front Panel 4 Remote Control 6 Using the Remote Control 7 Display 8 Rear Panel 9 PREPARATION SPEAKER SETUP 10 Speakers to Be Used 10 ...
...Subwoofer .......... 40 Adjusting Method 41 SLEEP TIMER 42 Setting the SLEEP Timer 42 Canceling the SLEEP Timer 42 PRESET REMOTE CONTROL 43 Component Selector Buttons 43 Controlling the Components Connected to the Factory Setting 49 SOUND FIELD PROGRAM 50 Hi... CONTENTS INTRODUCTION FEATURES 2 GETTING STARTED 3 Checking the Package Contents 3 Battery Installation in the Remote Control 3 Battery Replacement 3 CONTROLS AND FUNCTIONS 4 Front Panel 4 Remote Control 6 Using the Remote Control 7 Display 8 Rear Panel 9 PREPARATION SPEAKER SETUP 10 Speakers to Be Used 10 ...
Owner's Manual
Page 4
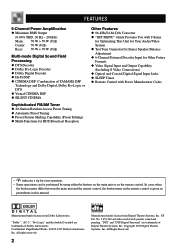
...N Dolby Digital Decoder N Hi-Fi DSP N CINEMA DSP: Combination of Dolby Laboratories. "DTS" and "DTS Digital Surround" are trademarks of YAMAHA DSP Technology and Dolby Digital, Dolby Pro Logic or DTS N Virtual CINEMA DSP N SILENT CINEMA Sophisticated FM/AM Tuner N 40-Station Random ...Future Formats N Video Signal Input and Output Capability (Including S Video Connections) N Optical and Coaxial Digital Signal Input Jacks N SLEEP Timer N Remote Control with Preset Manufacturer Codes • y indicates a tip for your operation. • Some operations can be performed by using either the ...
...N Dolby Digital Decoder N Hi-Fi DSP N CINEMA DSP: Combination of Dolby Laboratories. "DTS" and "DTS Digital Surround" are trademarks of YAMAHA DSP Technology and Dolby Digital, Dolby Pro Logic or DTS N Virtual CINEMA DSP N SILENT CINEMA Sophisticated FM/AM Tuner N 40-Station Random ...Future Formats N Video Signal Input and Output Capability (Including S Video Connections) N Optical and Coaxial Digital Signal Input Jacks N SLEEP Timer N Remote Control with Preset Manufacturer Codes • y indicates a tip for your operation. • Some operations can be performed by using either the ...
Owner's Manual
Page 5
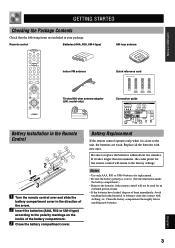
...) Connection guide PREPARATION BASIC OPERATION ADVANCED OPERATION APPENDIX Battery Installation in the Remote Control 2 1 3 1 Turn the remote control over and slide the battery compartment cover in your package. Battery Replacement If the remote control operates only when it takes longer than two minutes, the codes ...preset for replacement. • Be sure the battery polarity is close to replace the batteries within about two minutes. Remote control Batteries (AAA, R03, UM-4 type) AM loop antenna Indoor FM antenna Quick reference card 75-ohm/300-ohm antenna adapter ...
...) Connection guide PREPARATION BASIC OPERATION ADVANCED OPERATION APPENDIX Battery Installation in the Remote Control 2 1 3 1 Turn the remote control over and slide the battery compartment cover in your package. Battery Replacement If the remote control operates only when it takes longer than two minutes, the codes ...preset for replacement. • Be sure the battery polarity is close to replace the batteries within about two minutes. Remote control Batteries (AAA, R03, UM-4 type) AM loop antenna Indoor FM antenna Quick reference card 75-ohm/300-ohm antenna adapter ...
Owner's Manual
Page 6
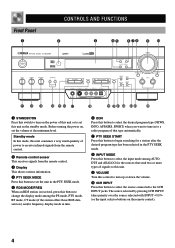
...tune in to a radio program of that send two or more types of signals to this unit. 9 VOLUME Turn this control to turn on the remote control). 4 Before turning the power on, set the unit in the PTY SEEK mode. 5 RDS MODE/FREQ When an RDS station is received, press...the source selected with INPUT l / h (or the input selector buttons on the power of power to receive infrared-signals from the remote control. 2 Remote control sensor This receives signals from the remote control. 3 Display This shows various information. 4 PTY SEEK MODE Press this button to set the volume at the minimum level. ...
...tune in to a radio program of that send two or more types of signals to this unit. 9 VOLUME Turn this control to turn on the remote control). 4 Before turning the power on, set the unit in the PTY SEEK mode. 5 RDS MODE/FREQ When an RDS station is received, press...the source selected with INPUT l / h (or the input selector buttons on the power of power to receive infrared-signals from the remote control. 2 Remote control sensor This receives signals from the remote control. 3 Display This shows various information. 4 PTY SEEK MODE Press this button to set the volume at the minimum level. ...
Owner's Manual
Page 8
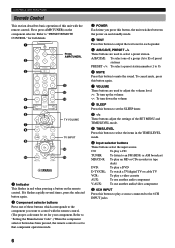
... of the SET MENU and TIME/LEVEL mode. 0 TIME/LEVEL Press this button to mute the sound. First, press AMP(TUNER) on the remote control. A/B/C/D/E: To select one of these buttons which corresponds to the component you press this button, the unit switches between the power on and standby...A/B/C/D/E, PRESET -/+ These buttons are used to select a preset station. To cancel mute, press this button to play a source connected to control with the remote control. Refer to adjust the volume level. CD: To play a CD TUNER: To listen to an FM (RDS) or AM broadcast MD/CD-R: To...
... of the SET MENU and TIME/LEVEL mode. 0 TIME/LEVEL Press this button to mute the sound. First, press AMP(TUNER) on the remote control. A/B/C/D/E: To select one of these buttons which corresponds to the component you press this button, the unit switches between the power on and standby...A/B/C/D/E, PRESET -/+ These buttons are used to select a preset station. To cancel mute, press this button to play a source connected to control with the remote control. Refer to adjust the volume level. CD: To play a CD TUNER: To listen to an FM (RDS) or AM broadcast MD/CD-R: To...
Owner's Manual
Page 9
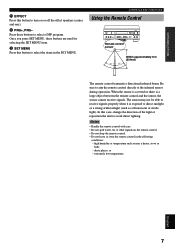
.... In this case, change the direction of the light or reposition the unit to aim the remote control directly at the infrared sensor during operation. Notes • Handle the remote control with care. • Do not spill water, tea or other liquids on or off the...there is exposed to turn on the remote control. • Do not drop the remote control. • Do not leave or store the remote control in the SET MENU. CONTROLS AND FUNCTIONS Using the Remote Control Remote control sensor Within approximately 6 m (20 feet) The remote control transmits a directional infrared beam. ...
.... In this case, change the direction of the light or reposition the unit to aim the remote control directly at the infrared sensor during operation. Notes • Handle the remote control with care. • Do not spill water, tea or other liquids on or off the...there is exposed to turn on the remote control. • Do not drop the remote control. • Do not leave or store the remote control in the SET MENU. CONTROLS AND FUNCTIONS Using the Remote Control Remote control sensor Within approximately 6 m (20 feet) The remote control transmits a directional infrared beam. ...
Owner's Manual
Page 17
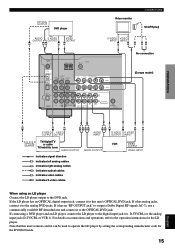
... RF demoduclator and connect it to the OPTICAL DVD jack. If the LD player has an OPTICAL digital output jack, connect it to this unit's remote control can be used to operate the LD player by setting the corresponding manufacturer code for the LD player. VIDEO SIGNAL DVD D-TV/CBL IN...
... RF demoduclator and connect it to the OPTICAL DVD jack. If the LD player has an OPTICAL digital output jack, connect it to this unit's remote control can be used to operate the LD player by setting the corresponding manufacturer code for the LD player. VIDEO SIGNAL DVD D-TV/CBL IN...
Owner's Manual
Page 21
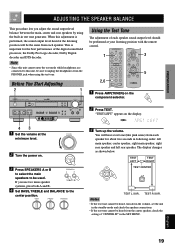
... MODE MAN'L/AUTO FM AUTO/MAN'L MONO INPUT MODE INPUT 6CH INPUT SILENT VIDEO AUX 43 1 Set the volume at your listening position with the remote control. 1 3 5 2,6 1 Press AMP(TUNER) on the component selector. 2 Press TEST. The display changes as shown below. Notes • If the test tone cannot be heard...
... MODE MAN'L/AUTO FM AUTO/MAN'L MONO INPUT MODE INPUT 6CH INPUT SILENT VIDEO AUX 43 1 Set the volume at your listening position with the remote control. 1 3 5 2,6 1 Press AMP(TUNER) on the component selector. 2 Press TEST. The display changes as shown below. Notes • If the test tone cannot be heard...
Owner's Manual
Page 23
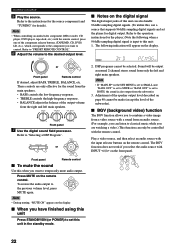
... Notes • An audio source can not be a video image from the video source and the sound from the audio source selected by using the remote control, press AMP(TUNER) on the component selector. 2 1,6 STANDBY /ON D I G I TA L SURROUND BASS TREBLE BALANCE -+ -+ L R SPEAKERS A B ON OFF 63 D I G I TA L... 6CH INPUT to the 6CH INPUT jacks Press 6CH INPUT so that "6CH INPUT" appears on the display. 6CH INPUT or Front panel Remote control 1 Set the volume at the VOLUME minimum level. 2 Turn the power on the display. BASIC OPERATION ADVANCED OPERATION APPENDIX English 21...
... Notes • An audio source can not be a video image from the video source and the sound from the audio source selected by using the remote control, press AMP(TUNER) on the component selector. 2 1,6 STANDBY /ON D I G I TA L SURROUND BASS TREBLE BALANCE -+ -+ L R SPEAKERS A B ON OFF 63 D I G I TA L... 6CH INPUT to the 6CH INPUT jacks Press 6CH INPUT so that "6CH INPUT" appears on the display. 6CH INPUT or Front panel Remote control 1 Set the volume at the VOLUME minimum level. 2 Turn the power on the display. BASIC OPERATION ADVANCED OPERATION APPENDIX English 21...
Owner's Manual
Page 24
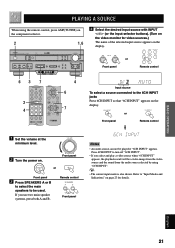
...digital output. Play a video source, and then select an audio source with INPUT l / h on page 40 cannot be controlled with the remote control. PROGRAM or I When you have finished using this unit Press STANDBY/ON (or POWER) to set the player for the sound from the...For example, you want to temporarily mute audio output. Press MUTE on the display. Note • During muting, "MUTE ON" appears on the remote control. I Notes on the digital signal The digital input jacks of the output volume from the subwoofer. 3. Refer to the operation instructions for details...
...digital output. Play a video source, and then select an audio source with INPUT l / h on page 40 cannot be controlled with the remote control. PROGRAM or I When you have finished using this unit Press STANDBY/ON (or POWER) to set the player for the sound from the...For example, you want to temporarily mute audio output. Press MUTE on the display. Note • During muting, "MUTE ON" appears on the remote control. I Notes on the digital signal The digital input jacks of the output volume from the subwoofer. 3. Refer to the operation instructions for details...
Owner's Manual
Page 25
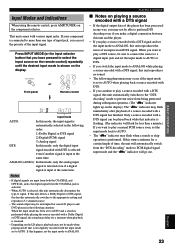
... prevent noise from being generated during subsequent operation. (The "t" indicator lights up on the display. INPUT MODE Front panel or Remote control Input mode AUTO: In this mode, the input signal is automatically selected in the following situation: When the input mode ... DTS: - PLAYING A SOURCE I Notes on the component selector. INTRODUCTION PREPARATION BASIC OPERATION ADVANCED OPERATION Input Modes and Indications When using the remote control, press AMP(TUNER) on playing a source encoded with a DTS signal • If the digital output data of the player has ...
... prevent noise from being generated during subsequent operation. (The "t" indicator lights up on the display. INPUT MODE Front panel or Remote control Input mode AUTO: In this mode, the input signal is automatically selected in the following situation: When the input mode ... DTS: - PLAYING A SOURCE I Notes on the component selector. INTRODUCTION PREPARATION BASIC OPERATION ADVANCED OPERATION Input Modes and Indications When using the remote control, press AMP(TUNER) on playing a source encoded with a DTS signal • If the digital output data of the player has ...
Owner's Manual
Page 26
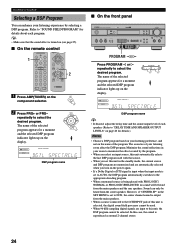
..., the DSP program cannot be selected. DSP program name I On the front panel STANDBY /ON D I G I TA L SURROUND BASS TREBLE BALANCE -+ -+ L R SPEAKERS A B ON OFF D I G I On the remote control 1 2 1 Press AMP(TUNER) on the name of each program. DIGITAL DSP MOVIE THEATER 1 BASS EXT. PROGRAM DSP program name y • If desired, adjust the...
..., the DSP program cannot be selected. DSP program name I On the front panel STANDBY /ON D I G I TA L SURROUND BASS TREBLE BALANCE -+ -+ L R SPEAKERS A B ON OFF D I G I On the remote control 1 2 1 Press AMP(TUNER) on the name of each program. DIGITAL DSP MOVIE THEATER 1 BASS EXT. PROGRAM DSP program name y • If desired, adjust the...
Owner's Manual
Page 27
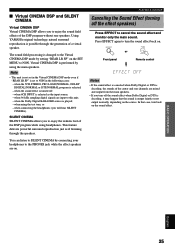
...SILENT CINEMA Virtual CINEMA DSP Virtual CINEMA DSP allows you to cancel the sound effect and monitor only the main sound. EFFECT or Front panel Remote control Notes • If the sound effect is canceled when Dolby Digital or DTS is decoding, the sounds of the DSP program without ...rear speakers. Using YAMAHA original technology, natural surround reproduction is turned off the effect speakers) Press EFFECT to enjoy the sound field effects of the center and rear channels...
...SILENT CINEMA Virtual CINEMA DSP Virtual CINEMA DSP allows you to cancel the sound effect and monitor only the main sound. EFFECT or Front panel Remote control Notes • If the sound effect is canceled when Dolby Digital or DTS is decoding, the sounds of the DSP program without ...rear speakers. Using YAMAHA original technology, natural surround reproduction is turned off the effect speakers) Press EFFECT to enjoy the sound field effects of the center and rear channels...
Owner's Manual
Page 31
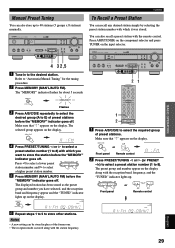
... INPUT 6CH INPUT SILENT VIDEO AUX 4 3 2,5 1 Tune in place of preset stations before the "MEMORY" indicator goes off . A/B/C/D/E or Front panel Remote control 2 Press PRESET/TUNING l or h (or PRESET -/+) to select a preset station number (1 to E) of the former one. • The ...select a higher preset station number. 5 Press MEMORY (MAN'L/AUTO FM) before the "MEMORY" indicator goes off . PRESET/TUNING or Front panel Remote control AUTO STEREO TUNED APPENDIX English 29 Press l to select a lower preset PRESET/TUNING station number and h to 8) with the station frequency....
... INPUT 6CH INPUT SILENT VIDEO AUX 4 3 2,5 1 Tune in place of preset stations before the "MEMORY" indicator goes off . A/B/C/D/E or Front panel Remote control 2 Press PRESET/TUNING l or h (or PRESET -/+) to select a preset station number (1 to E) of the former one. • The ...select a higher preset station number. 5 Press MEMORY (MAN'L/AUTO FM) before the "MEMORY" indicator goes off . PRESET/TUNING or Front panel Remote control AUTO STEREO TUNED APPENDIX English 29 Press l to select a lower preset PRESET/TUNING station number and h to 8) with the station frequency....
Owner's Manual
Page 36
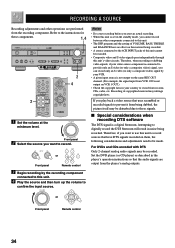
...as described in the standby mode, you play back a video source that the audio signals are performed from the recording component. INPUT or Front panel Remote control Notes • Do a test recording before you start an actual recording. • When this unit is connected to provide only an S ...MAN'L MONO INPUT MODE INPUT 6CH INPUT SILENT VIDEO AUX 2 4 2 1 Set the volume at the VOLUME minimum level. VOLUME or Front panel Remote control 34 Attempting to digitally record the DTS bitstream will result in your VCR. • A given input source is not output on the same ...
...as described in the standby mode, you play back a video source that the audio signals are performed from the recording component. INPUT or Front panel Remote control Notes • Do a test recording before you start an actual recording. • When this unit is connected to provide only an S ...MAN'L MONO INPUT MODE INPUT 6CH INPUT SILENT VIDEO AUX 2 4 2 1 Set the volume at the VOLUME minimum level. VOLUME or Front panel Remote control 34 Attempting to digitally record the DTS bitstream will result in your VCR. • A given input source is not output on the same ...
Owner's Manual
Page 37
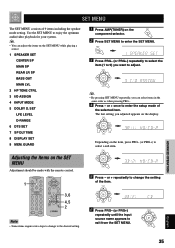
... 7 SP DLY TIME 8 DISPLAY SET 9 MEM. y • By pressing SET MENU repeatedly, you adjusted appears on the SET MENU Adjustment should be made with the remote control. 1 5 Press -
... 7 SP DLY TIME 8 DISPLAY SET 9 MEM. y • By pressing SET MENU repeatedly, you adjusted appears on the SET MENU Adjustment should be made with the remote control. 1 5 Press -
Owner's Manual
Page 43
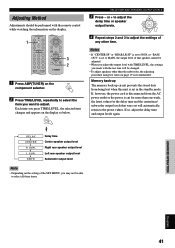
... for the delay time and the center/rear/ subwoofer output levels that speaker cannot be adjusted. • When you adjust the output level with the remote control while watching the information on the display. 1 3 2 1 Press AMP(TUNER) on the component selector. 2 Press TIME/LEVEL repeatedly to MAIN, the output level of...
... for the delay time and the center/rear/ subwoofer output levels that speaker cannot be adjusted. • When you adjust the output level with the remote control while watching the information on the display. 1 3 2 1 Press AMP(TUNER) on the component selector. 2 Press TIME/LEVEL repeatedly to MAIN, the output level of...

Owner's Manual
Page 44
... rear panel of this unit. • The SLEEP timer is useful when you are going to sleep. 2 Press SLEEP repeatedly to automatically set with the remote control. BASS EXT. Notes • First press AMP(TUNER), TAPE/MD, CD or DVD/LD on the display after the SLEEP timer has been set... change as below: 120 90 60 30 The SLEEP timer is pressed.) Canceling the SLEEP Timer Press SLEEP repeatedly until "SLEEP OFF" appears on the remote control (or STANDBY/ON), or by disconnecting the AC power cord from the AC power outlet. Each time you press SLEEP, the SLEEP time will...
... rear panel of this unit. • The SLEEP timer is useful when you are going to sleep. 2 Press SLEEP repeatedly to automatically set with the remote control. BASS EXT. Notes • First press AMP(TUNER), TAPE/MD, CD or DVD/LD on the display after the SLEEP timer has been set... change as below: 120 90 60 30 The SLEEP timer is pressed.) Canceling the SLEEP Timer Press SLEEP repeatedly until "SLEEP OFF" appears on the remote control (or STANDBY/ON), or by disconnecting the AC power cord from the AC power outlet. Each time you press SLEEP, the SLEEP time will...
Owner's Manual
Page 45
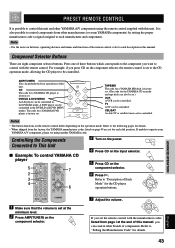
... player is factory set at the end of this manual. For example, if you set . If unable to operate your YAMAHA A/V component, please try using the remote control supplied with this manual, you want to control with the manufacturer codes listed from page i at the minimum level. 2 Press ...on the operation mode. DVD/LD & DVD MENU An LD player can be controlled. TAPE/MD The code for a YAMAHA MD deck is factory set the remote control with the remote control. BASIC OPERATION ADVANCED OPERATION APPENDIX English 1 Make sure that the volume is set .) VCR A VCR can be ...
... player is factory set at the end of this manual. For example, if you set . If unable to operate your YAMAHA A/V component, please try using the remote control supplied with this manual, you want to control with the manufacturer codes listed from page i at the minimum level. 2 Press ...on the operation mode. DVD/LD & DVD MENU An LD player can be controlled. TAPE/MD The code for a YAMAHA MD deck is factory set the remote control with the remote control. BASIC OPERATION ADVANCED OPERATION APPENDIX English 1 Make sure that the volume is set .) VCR A VCR can be ...
Owner's Manual
Page 46
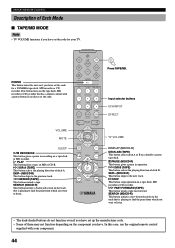
... CD recorder. e PAUSE (MD/CD-R) This button gives a pause in recording on the tape deck, MD recorder or CD recorder that has a remote control with your TV. PRESET REMOTE CONTROL Description of Each Mode I TAPE/MD MODE Note • TV VOLUME functions if you have set the code. w REWIND (TAPE) This button... stops operation on a double-cassette tape deck. This button turns on a tape deck or MD recorder. POWER This button turns this case, use the original remote control supplied with a power button if you have set the code for a YAMAHA tape deck, MD recorder or CD recorder.
... CD recorder. e PAUSE (MD/CD-R) This button gives a pause in recording on the tape deck, MD recorder or CD recorder that has a remote control with your TV. PRESET REMOTE CONTROL Description of Each Mode I TAPE/MD MODE Note • TV VOLUME functions if you have set the code. w REWIND (TAPE) This button... stops operation on a double-cassette tape deck. This button turns on a tape deck or MD recorder. POWER This button turns this case, use the original remote control supplied with a power button if you have set the code for a YAMAHA tape deck, MD recorder or CD recorder.


