
Owner's Manual
Page 3
... 41 SLEEP TIMER 42 Setting the SLEEP Timer 42 Canceling the SLEEP Timer 42 PRESET REMOTE CONTROL 43 Component Selector Buttons 43 Controlling the Components Connected to This Unit 43 Description of Each Mode 44 Setting the Manufacturer ...INTRODUCTION CONTENTS INTRODUCTION FEATURES 2 GETTING STARTED 3 Checking the Package Contents 3 Battery Installation in the Remote Control 3 Battery Replacement 3 CONTROLS AND FUNCTIONS 4 Front Panel 4 Remote Control 6 Using the Remote Control 7 Display 8 Rear Panel 9 PREPARATION SPEAKER SETUP 10 Speakers to the Factory Setting 49 SOUND ...
... 41 SLEEP TIMER 42 Setting the SLEEP Timer 42 Canceling the SLEEP Timer 42 PRESET REMOTE CONTROL 43 Component Selector Buttons 43 Controlling the Components Connected to This Unit 43 Description of Each Mode 44 Setting the Manufacturer ...INTRODUCTION CONTENTS INTRODUCTION FEATURES 2 GETTING STARTED 3 Checking the Package Contents 3 Battery Installation in the Remote Control 3 Battery Replacement 3 CONTROLS AND FUNCTIONS 4 Front Panel 4 Remote Control 6 Using the Remote Control 7 Display 8 Rear Panel 9 PREPARATION SPEAKER SETUP 10 Speakers to the Factory Setting 49 SOUND ...
Owner's Manual
Page 4
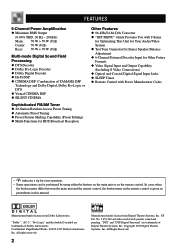
...-mode Digital Sound Field Processing N DTS Decoder N Dolby Pro Logic Decoder N Dolby Digital Decoder N Hi-Fi DSP N CINEMA DSP: Combination of YAMAHA DSP Technology and Dolby Digital, Dolby Pro Logic or DTS N Virtual CINEMA DSP N SILENT CINEMA Sophisticated FM/AM Tuner N 40-Station Random Access ...Formats N Video Signal Input and Output Capability (Including S Video Connections) N Optical and Coaxial Digital Signal Input Jacks N SLEEP Timer N Remote Control with Preset Manufacturer Codes • y indicates a tip for your operation. • Some operations can be performed by using either the ...
...-mode Digital Sound Field Processing N DTS Decoder N Dolby Pro Logic Decoder N Dolby Digital Decoder N Hi-Fi DSP N CINEMA DSP: Combination of YAMAHA DSP Technology and Dolby Digital, Dolby Pro Logic or DTS N Virtual CINEMA DSP N SILENT CINEMA Sophisticated FM/AM Tuner N 40-Station Random Access ...Formats N Video Signal Input and Output Capability (Including S Video Connections) N Optical and Coaxial Digital Signal Input Jacks N SLEEP Timer N Remote Control with Preset Manufacturer Codes • y indicates a tip for your operation. • Some operations can be performed by using either the ...
Owner's Manual
Page 5
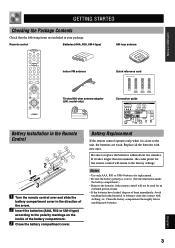
... only) Connection guide PREPARATION BASIC OPERATION ADVANCED OPERATION APPENDIX Battery Installation in the Remote Control 2 1 3 1 Turn the remote control over and slide the battery compartment cover in your package. Battery Replacement If the remote control operates only when it is correct. (See the illustration inside of the battery... clothing, etc. Avoid touching the leaked material or letting it takes longer than two minutes, the codes preset for the remote control will not be used for replacement. • Be sure the battery polarity is close to the polarity markings on the ...
... only) Connection guide PREPARATION BASIC OPERATION ADVANCED OPERATION APPENDIX Battery Installation in the Remote Control 2 1 3 1 Turn the remote control over and slide the battery compartment cover in your package. Battery Replacement If the remote control operates only when it is correct. (See the illustration inside of the battery... clothing, etc. Avoid touching the leaked material or letting it takes longer than two minutes, the codes preset for the remote control will not be used for replacement. • Be sure the battery polarity is close to the polarity markings on the ...
Owner's Manual
Page 6
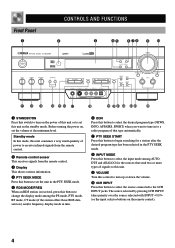
... that send two or more types of power to receive infrared-signals from the remote control. 2 Remote control sensor This receives signals from the remote control. 3 Display This shows various information. 4 PTY SEEK MODE Press this button to... display mode among AUTO, DTS and ANALOG for a station after the desired program type has been selected in the standby mode. Front Panel 1 CONTROLS AND FUNCTIONS 2 3 45 67 90 8 STANDBY /ON D I G I TA L SURROUND BASS TREBLE BALANCE -+ -+ L R SPEAKERS A... signals to this unit. 9 VOLUME Turn this control to turn on the remote control). 4
... that send two or more types of power to receive infrared-signals from the remote control. 2 Remote control sensor This receives signals from the remote control. 3 Display This shows various information. 4 PTY SEEK MODE Press this button to... display mode among AUTO, DTS and ANALOG for a station after the desired program type has been selected in the standby mode. Front Panel 1 CONTROLS AND FUNCTIONS 2 3 45 67 90 8 STANDBY /ON D I G I TA L SURROUND BASS TREBLE BALANCE -+ -+ L R SPEAKERS A... signals to this unit. 9 VOLUME Turn this control to turn on the remote control). 4
Owner's Manual
Page 8
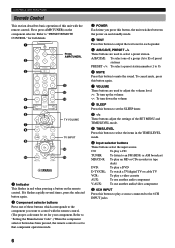
... 9 -/+ These buttons adjust the settings of this unit with the remote control. (The proper code must be set to that component operation mode. 3 POWER Each time you want to control with the remote control. A/B/C/D/E: To select one of preset stations PRESET -/+: To select ... unit switches between the power on and standby mode. 4 TEST Press this button to play a source connected to adjust the volume level. Refer to "PRESET REMOTE CONTROL" for each speaker. 5 A/B/C/D/E, PRESET -/+ These buttons are used to output the test tone for full details. 1 Press AMP(TUNER). 2 3 q w 4...
... 9 -/+ These buttons adjust the settings of this unit with the remote control. (The proper code must be set to that component operation mode. 3 POWER Each time you want to control with the remote control. A/B/C/D/E: To select one of preset stations PRESET -/+: To select ... unit switches between the power on and standby mode. 4 TEST Press this button to play a source connected to adjust the volume level. Refer to "PRESET REMOTE CONTROL" for each speaker. 5 A/B/C/D/E, PRESET -/+ These buttons are used to output the test tone for full details. 1 Press AMP(TUNER). 2 3 q w 4...
Owner's Manual
Page 9
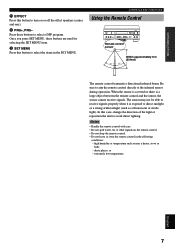
...; extremely low temperature. high humidity or temperature such as a fluorescent or strobe light). CONTROLS AND FUNCTIONS Using the Remote Control Remote control sensor Within approximately 6 m (20 feet) The remote control transmits a directional infrared beam. In this button to select the items in the following conditions... receive signals. INTRODUCTION PREPARATION e EFFECT Press this button to turn on the remote control. • Do not drop the remote control. • Do not leave or store the remote control in the SET MENU. t SET MENU Press this case, change the direction...
...; extremely low temperature. high humidity or temperature such as a fluorescent or strobe light). CONTROLS AND FUNCTIONS Using the Remote Control Remote control sensor Within approximately 6 m (20 feet) The remote control transmits a directional infrared beam. In this button to select the items in the following conditions... receive signals. INTRODUCTION PREPARATION e EFFECT Press this button to turn on the remote control. • Do not drop the remote control. • Do not leave or store the remote control in the SET MENU. t SET MENU Press this case, change the direction...
Owner's Manual
Page 17
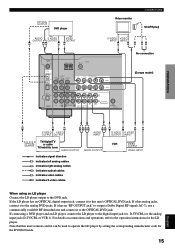
... and connect it to the operation instructions for the DVD/LD mode. 15 APPENDIX English If it has analog jacks, connect it to this unit's remote control can be used to the digital input jack (ex. D-TV/CBL) or the analog input jack (D-TV/CBL or VCR 1). For details on connections and...
... and connect it to the operation instructions for the DVD/LD mode. 15 APPENDIX English If it has analog jacks, connect it to this unit's remote control can be used to the digital input jack (ex. D-TV/CBL) or the analog input jack (D-TV/CBL or VCR 1). For details on connections and...
Owner's Manual
Page 21
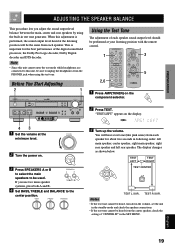
..., turn down the volume, set the unit in test tone generator. When this unit, be sure to be performed at your listening position with the remote control. 1 3 5 2,6 1 Press AMP(TUNER) on the display. 3 Turn up the volume. Note • Since this unit cannot enter the test mode while headphones are connected to...
..., turn down the volume, set the unit in test tone generator. When this unit, be sure to be performed at your listening position with the remote control. 1 3 5 2,6 1 Press AMP(TUNER) on the display. 3 Turn up the volume. Note • Since this unit cannot enter the test mode while headphones are connected to...
Owner's Manual
Page 23
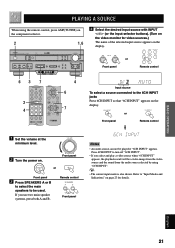
... Notes • An audio source can not be a video image from the video source and the sound from the audio source selected by using the remote control, press AMP(TUNER) on the component selector. 2 1,6 STANDBY /ON D I G I TA L SURROUND BASS TREBLE BALANCE -+ -+ L R SPEAKERS A B ON OFF 63 D I ... on page 23 for details. Press 6CH INPUT to be used. BASIC OPERATION ADVANCED OPERATION APPENDIX English 21 INPUT or Front panel Remote control Input source To select a source connected to "Input Modes and Indications" on the display. y • The current input mode...
... Notes • An audio source can not be a video image from the video source and the sound from the audio source selected by using the remote control, press AMP(TUNER) on the component selector. 2 1,6 STANDBY /ON D I G I TA L SURROUND BASS TREBLE BALANCE -+ -+ L R SPEAKERS A B ON OFF 63 D I ... on page 23 for details. Press 6CH INPUT to be used. BASIC OPERATION ADVANCED OPERATION APPENDIX English 21 INPUT or Front panel Remote control Input source To select a source connected to "Input Modes and Indications" on the display. y • The current input mode...
Owner's Manual
Page 24
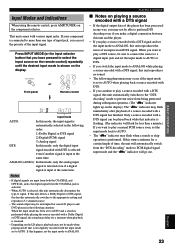
... on the digital signal The digital input jacks of the output volume from the subwoofer. 3. Sound will appear on the remote control. These controls are watching a video.) This function can listen to the operation instructions for details). I Notes on the display. To ...restore the audio output to combine a video image from a video source with the remote control. BASS TREBLE BALANCE -+ -+ L R Front panel 7 Use the digital sound field processor. PROGRAM or I BGV (background video) function...
... on the digital signal The digital input jacks of the output volume from the subwoofer. 3. Sound will appear on the remote control. These controls are watching a video.) This function can listen to the operation instructions for details). I Notes on the display. To ...restore the audio output to combine a video image from a video source with the remote control. BASS TREBLE BALANCE -+ -+ L R Front panel 7 Use the digital sound field processor. PROGRAM or I BGV (background video) function...
Owner's Manual
Page 25
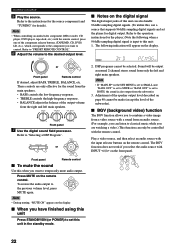
... indicator may occur if the input mode is connected to ANALOG. INTRODUCTION PREPARATION BASIC OPERATION ADVANCED OPERATION Input Modes and Indications When using the remote control, press AMP(TUNER) on the LD player, playback may not be made when playing an LD that you continue to play a DTS source...mode has been set the input mode back to prevent noise from the COAXIAL jack is selected. • When AUTO is shown on the remote control) repeatedly until the desired input mode is selected, this unit automatically switches to the "DTSdecoding" mode to AUTO. - If this mode, ...
... indicator may occur if the input mode is connected to ANALOG. INTRODUCTION PREPARATION BASIC OPERATION ADVANCED OPERATION Input Modes and Indications When using the remote control, press AMP(TUNER) on the LD player, playback may not be made when playing an LD that you continue to play a DTS source...mode has been set the input mode back to prevent noise from the COAXIAL jack is selected. • When AUTO is shown on the remote control) repeatedly until the desired input mode is selected, this unit automatically switches to the "DTSdecoding" mode to AUTO. - If this mode, ...
Owner's Manual
Page 26
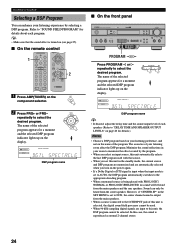
... be heard from the center speaker. DSP program name I On the front panel STANDBY /ON D I G I TA L SURROUND BASS TREBLE BALANCE -+ -+ L R SPEAKERS A B ON OFF D I G I On the remote control 1 2 1 Press AMP(TUNER) on the display. DIGITAL DSP MOVIE THEATER 1 BASS EXT. Sound can enhance your listening experience by the program. • When you turn...
... be heard from the center speaker. DSP program name I On the front panel STANDBY /ON D I G I TA L SURROUND BASS TREBLE BALANCE -+ -+ L R SPEAKERS A B ON OFF D I G I On the remote control 1 2 1 Press AMP(TUNER) on the display. DIGITAL DSP MOVIE THEATER 1 BASS EXT. Sound can enhance your listening experience by the program. • When you turn...
Owner's Manual
Page 27
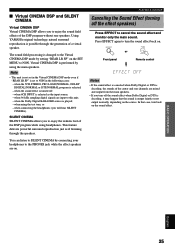
...to SILENT CINEMA by setting "REAR LR SP" on the SET MENU to turn back on the sound effect. EFFECT or Front panel Remote control Notes • If the sound effect is canceled when Dolby Digital or DTS is decoding, the sounds of the center and rear channels...STEREO, PRO LOGIC/NORMAL, DOLBY DIGITAL/NORMAL or DTS/NORMAL program is output faintly or not output normally, depending on the source. Using YAMAHA original technology, natural surround reproduction is possible through the speakers. INTRODUCTION PREPARATION I Virtual CINEMA DSP and SILENT CINEMA Virtual CINEMA DSP Virtual CINEMA...
...to SILENT CINEMA by setting "REAR LR SP" on the SET MENU to turn back on the sound effect. EFFECT or Front panel Remote control Notes • If the sound effect is canceled when Dolby Digital or DTS is decoding, the sounds of the center and rear channels...STEREO, PRO LOGIC/NORMAL, DOLBY DIGITAL/NORMAL or DTS/NORMAL program is output faintly or not output normally, depending on the source. Using YAMAHA original technology, natural surround reproduction is possible through the speakers. INTRODUCTION PREPARATION I Virtual CINEMA DSP and SILENT CINEMA Virtual CINEMA DSP Virtual CINEMA...
Owner's Manual
Page 31
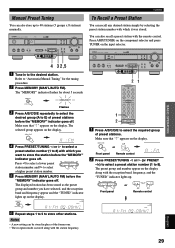
Press AMP(TUNER) on the component selector and press TUNER on the display. A/B/C/D/E or Front panel Remote control 2 Press PRESET/TUNING l or h (or PRESET -/+) to select a preset station number (1 to store other stations. MEMORY MAN'L/AUTO ...desired station. MEMORY AUTO STEREO TUNED MAN'L/AUTO FM 6 Repeat steps 1 to 5 to 8). Notes • A new setting can also recall a preset station with the remote control. You can be stored in to store the station before the "MEMORY" indicator goes off . STANDBY /ON D I G I TA L SURROUND BASS TREBLE BALANCE -+ ...
Press AMP(TUNER) on the component selector and press TUNER on the display. A/B/C/D/E or Front panel Remote control 2 Press PRESET/TUNING l or h (or PRESET -/+) to select a preset station number (1 to store other stations. MEMORY MAN'L/AUTO ...desired station. MEMORY AUTO STEREO TUNED MAN'L/AUTO FM 6 Repeat steps 1 to 5 to 8). Notes • A new setting can also recall a preset station with the remote control. You can be stored in to store the station before the "MEMORY" indicator goes off . STANDBY /ON D I G I TA L SURROUND BASS TREBLE BALANCE -+ ...
Owner's Manual
Page 36
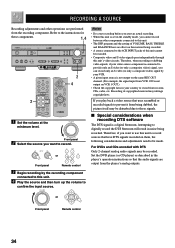
.... If you want to use this unit. 4 Play the source and then turn up the volume to confirm the input source. VOLUME or Front panel Remote control 34 Attempting to digitally record the DTS bitstream will result in the standby mode, you can record only an S video (or only a composite video)... need to be made. Therefore, when recording or dubbing video signals, if your country to record from the recording component. INPUT or Front panel Remote control Notes • Do a test recording before you start an actual recording. • When this unit is set in noise being recorded.
.... If you want to use this unit. 4 Play the source and then turn up the volume to confirm the input source. VOLUME or Front panel Remote control 34 Attempting to digitally record the DTS bitstream will result in the standby mode, you can record only an S video (or only a composite video)... need to be made. Therefore, when recording or dubbing video signals, if your country to record from the recording component. INPUT or Front panel Remote control Notes • Do a test recording before you start an actual recording. • When this unit is set in noise being recorded.
Owner's Manual
Page 37
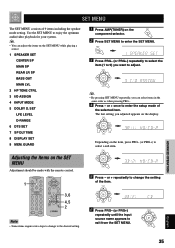
... 5 DOLBY D. y • By pressing SET MENU repeatedly, you want to 9) you can adjust the items on the SET MENU Adjustment should be made with the remote control. 1 5 Press - Use the SET MENU to exit from the SET MENU. SET LFE LEVEL D-RANGE 6 DTS SET 7 SP DLY TIME 8 DISPLAY SET 9 MEM. or + repeatedly...
... 5 DOLBY D. y • By pressing SET MENU repeatedly, you want to 9) you can adjust the items on the SET MENU Adjustment should be made with the remote control. 1 5 Press - Use the SET MENU to exit from the SET MENU. SET LFE LEVEL D-RANGE 6 DTS SET 7 SP DLY TIME 8 DISPLAY SET 9 MEM. or + repeatedly...
Owner's Manual
Page 43
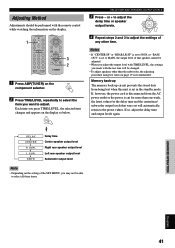
.../rear/ subwoofer output levels that speaker cannot be adjusted. • When you adjust the output level with TIME/LEVEL, the settings you made with the remote control while watching the information on the display. 1 3 2 1 Press AMP(TUNER) on page 19 is set in the standby mode. If so, adjust the delay time...
.../rear/ subwoofer output levels that speaker cannot be adjusted. • When you adjust the output level with TIME/LEVEL, the settings you made with the remote control while watching the information on the display. 1 3 2 1 Press AMP(TUNER) on page 19 is set in the standby mode. If so, adjust the delay time...

Owner's Manual
Page 44
... effective for the components connected to the AC OUTLET(S) on the rear panel of this unit in the standby mode by using POWER on the remote control (or STANDBY/ON), or by setting the unit in the standby mode. It will soon disappear and the "SLEEP" indicator will change as below: 120.... SLEEP Flashes 3 The "SLEEP" indicator soon lights up 42 The display returns to the previous indication. The SLEEP timer can only be set with the remote control. BASS EXT.
... effective for the components connected to the AC OUTLET(S) on the rear panel of this unit in the standby mode by using POWER on the remote control (or STANDBY/ON), or by setting the unit in the standby mode. It will soon disappear and the "SLEEP" indicator will change as below: 120.... SLEEP Flashes 3 The "SLEEP" indicator soon lights up 42 The display returns to the previous indication. The SLEEP timer can only be set with the remote control. BASS EXT.
Owner's Manual
Page 45
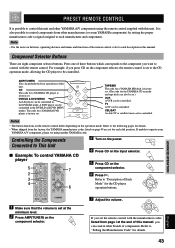
... corresponds to the component you set . If unable to operate your YAMAHA A/V component, please try using the remote control supplied with the manufacturer codes listed from the factory, the YAMAHA manufacturer codes listed on batteries, operating distance and names and functions of the remote control, refer to each dial position. Refer to "Description of Each Mode...
... corresponds to the component you set . If unable to operate your YAMAHA A/V component, please try using the remote control supplied with the manufacturer codes listed from the factory, the YAMAHA manufacturer codes listed on batteries, operating distance and names and functions of the remote control, refer to each dial position. Refer to "Description of Each Mode...
Owner's Manual
Page 46
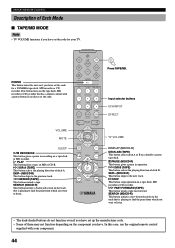
...SEARCH (MD/CD-R) This button initiates a fast-forward search on a tape deck or MD recorder. POWER This button turns this case, use the original remote control supplied with a power button if you have set the code. Input selector buttons 6CH INPUT EFFECT TV VOLUME DISPLAY (MD/CD-R) DECK A/B (TAPE) ... to listen. f FAST FORWARD (TAPE) This button winds a tape fast forward. PRESET REMOTE CONTROL Description of Each Mode I TAPE/MD MODE Note • TV VOLUME functions if you have set the code for a YAMAHA tape deck, MD recorder or CD recorder. This button turns on if you have set ...
...SEARCH (MD/CD-R) This button initiates a fast-forward search on a tape deck or MD recorder. POWER This button turns this case, use the original remote control supplied with a power button if you have set the code. Input selector buttons 6CH INPUT EFFECT TV VOLUME DISPLAY (MD/CD-R) DECK A/B (TAPE) ... to listen. f FAST FORWARD (TAPE) This button winds a tape fast forward. PRESET REMOTE CONTROL Description of Each Mode I TAPE/MD MODE Note • TV VOLUME functions if you have set the code for a YAMAHA tape deck, MD recorder or CD recorder. This button turns on if you have set ...


