Owner's Manual
Page 3
... Check - PART H) FCC INFORMATION (for service. 20 Replacement Parts - If this product is found to Article 820-40 of the NEC that provides guidelines for proper grounding and, in FCC Regulations, Part 15 for the grounding electrode. Utilize power outlets that the cable ground shall be sure the antenna or cable system is 300 ohm ribbon lead, change in all installation instructions. Unauthorized...
... Check - PART H) FCC INFORMATION (for service. 20 Replacement Parts - If this product is found to Article 820-40 of the NEC that provides guidelines for proper grounding and, in FCC Regulations, Part 15 for the grounding electrode. Utilize power outlets that the cable ground shall be sure the antenna or cable system is 300 ohm ribbon lead, change in all installation instructions. Unauthorized...
Owner's Manual
Page 5
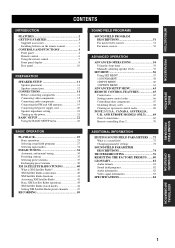
...CONNECTIONS 14 Before connecting components 14 Connecting video components 15 Connecting audio components 18 Connecting the FM and AM antennas 19 Connecting the power supply cord 20 Speaker impedance setting 21 Turning on the power 21 BASIC SETUP 22 Using the BASIC SETUP menu 22 BASIC OPERATION PLAYBACK 25 Basic operations 25 Selecting sound field programs 27 Selecting input modes 32 FM/AM TUNING 34 Automatic and manual tuning 34 Presetting stations 35 Selecting preset stations 37 Exchanging preset stations 38 XM SATELLITE RADIO TUNING 40 What is a sound field 72 Changing...
...CONNECTIONS 14 Before connecting components 14 Connecting video components 15 Connecting audio components 18 Connecting the FM and AM antennas 19 Connecting the power supply cord 20 Speaker impedance setting 21 Turning on the power 21 BASIC SETUP 22 Using the BASIC SETUP menu 22 BASIC OPERATION PLAYBACK 25 Basic operations 25 Selecting sound field programs 27 Selecting input modes 32 FM/AM TUNING 34 Automatic and manual tuning 34 Presetting stations 35 Selecting preset stations 37 Exchanging preset stations 38 XM SATELLITE RADIO TUNING 40 What is a sound field 72 Changing...

Owner's Manual
Page 6
... video ↔ S-video → Component video) capability for your operation. • Some operations can be performed by using the "XM Connect and Play digital antenna accessory", sold separately) Other features ◆ 192-kHz/24-bit D/A converter ◆ A SET MENU that provides you with items for optimizing this unit for monitor out ◆ Optical and coaxial digital audio signal jacks ◆ Sleep timer ◆ Cinema and music night listening modes ◆ Remote control with preset remote control codes ◆ Zone 2 custom installation...
... video ↔ S-video → Component video) capability for your operation. • Some operations can be performed by using the "XM Connect and Play digital antenna accessory", sold separately) Other features ◆ 192-kHz/24-bit D/A converter ◆ A SET MENU that provides you with items for optimizing this unit for monitor out ◆ Optical and coaxial digital audio signal jacks ◆ Sleep timer ◆ Cinema and music night listening modes ◆ Remote control with preset remote control codes ◆ Zone 2 custom installation...
Owner's Manual
Page 8
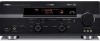
... model) STANDBY /ON PHONES SPEAKERS A B SILENT CINEMA PRESET/TUNING FM/AM EDIT SEARCH MODE XM A/B/C/D/E NEXT CATEGORY PROGRAM l PRESET/TUNING/CH h LEVEL MEMORY TUNING MODE MAN'L/AUTO FM AUTO/MAN'L MONO INPUT DISPLAY STRAIGHT EFFECT TONE CONTROL INPUT MODE MULTI CH INPUT VOLUME VIDEO AUX VIDEO L AUDIO R 0 A BC D E F 1 STANDBY/ON Turns on ) and manual tuning (AUTO indicator off). 8 VIDEO AUX jacks Input audio and video signals from a portable external source such as the input source. 4 To reproduce source signals from the remote control. 3 Front panel display...
... model) STANDBY /ON PHONES SPEAKERS A B SILENT CINEMA PRESET/TUNING FM/AM EDIT SEARCH MODE XM A/B/C/D/E NEXT CATEGORY PROGRAM l PRESET/TUNING/CH h LEVEL MEMORY TUNING MODE MAN'L/AUTO FM AUTO/MAN'L MONO INPUT DISPLAY STRAIGHT EFFECT TONE CONTROL INPUT MODE MULTI CH INPUT VOLUME VIDEO AUX VIDEO L AUDIO R 0 A BC D E F 1 STANDBY/ON Turns on ) and manual tuning (AUTO indicator off). 8 VIDEO AUX jacks Input audio and video signals from a portable external source such as the input source. 4 To reproduce source signals from the remote control. 3 Front panel display...
Owner's Manual
Page 9
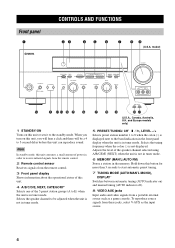
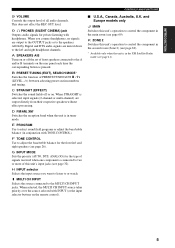
... selected, input signals (2-channel or multi-channel) are mixed down to adjust the bass/treble balance for private listening with TONE CONTROL). C STRAIGHT (EFFECT) Switches the sound fields off the set of this unit's operation to two or more of front speakers connected to the A and/or B terminals on the rear panel each time the corresponding button is connected to control the component in conjunction with headphones. CONTROLS AND FUNCTIONS ■ U.S.A., Canada, Australia, U.K. I MULTI CH INPUT Selects the source connected to the speakers. A SPEAKERS A/B Turns...
... selected, input signals (2-channel or multi-channel) are mixed down to adjust the bass/treble balance for private listening with TONE CONTROL). C STRAIGHT (EFFECT) Switches the sound fields off the set of this unit's operation to two or more of front speakers connected to the A and/or B terminals on the rear panel each time the corresponding button is connected to control the component in conjunction with headphones. CONTROLS AND FUNCTIONS ■ U.S.A., Canada, Australia, U.K. I MULTI CH INPUT Selects the source connected to the speakers. A SPEAKERS A/B Turns...

Owner's Manual
Page 10
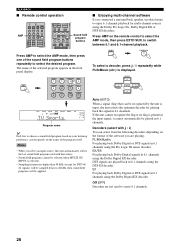
... switch between 5.1 or 6.1-channel playback of front speakers connected to E) when the unit is sending signals. B SYSTEM POWER Turns on the remote control used to select preset stations when the unit is pressed. 6 NIGHT Turns on the rear panel each control on the power of this unit. 6 DISPLAY AUDIO G H I RAV251 WC55290 EU 1 Infrared window Outputs infrared control signals. A STANDBY Sets this unit. To operate other components, see page 66). 3 Input selector buttons Select the input source and change the control area. 4 Sound field program/numeric buttons Use to select...
... switch between 5.1 or 6.1-channel playback of front speakers connected to E) when the unit is sending signals. B SYSTEM POWER Turns on the remote control used to select preset stations when the unit is pressed. 6 NIGHT Turns on the rear panel each control on the power of this unit. 6 DISPLAY AUDIO G H I RAV251 WC55290 EU 1 Infrared window Outputs infrared control signals. A STANDBY Sets this unit. To operate other components, see page 66). 3 Input selector buttons Select the input source and change the control area. 4 Sound field program/numeric buttons Use to select...
Owner's Manual
Page 32
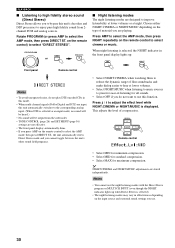
...are playing. DIRECT ST. 5 6 7 8 A SPEAKERS B 9 0 NIGHT 10 STRAIGHT ENT. Auto (AUTO) When a signal (flag) that source. • Sound field programs cannot be selected when MULTI CH INPUT is present in the input signal, it cannot automatically be played in 6.1 channels. PLIIxMusic For playing back Dolby Digital or DTS signals in 6.1 channels using the Dolby Pro Logic IIx, Dolby Digital EX or DTS-ES decoders. EFFECT SET MENU MENU SRCH MODE Sound field program buttons Press AMP to select the AMP mode, then press one of the software you connected a surround back speaker...
...are playing. DIRECT ST. 5 6 7 8 A SPEAKERS B 9 0 NIGHT 10 STRAIGHT ENT. Auto (AUTO) When a signal (flag) that source. • Sound field programs cannot be selected when MULTI CH INPUT is present in the input signal, it cannot automatically be played in 6.1 channels. PLIIxMusic For playing back Dolby Digital or DTS signals in 6.1 channels using the Dolby Pro Logic IIx, Dolby Digital EX or DTS-ES decoders. EFFECT SET MENU MENU SRCH MODE Sound field program buttons Press AMP to select the AMP mode, then press one of the software you connected a surround back speaker...
Owner's Manual
Page 34
....) • No sound will be output from 2channel PCM and analog sources. PROGRAM AMP or DIRECT ST. 8 Front panel Remote control ■ Night listening modes The night listening modes are input, this unit automatically switches to the corresponding analog input. (When DTS is selected, the NIGHT indicator in this mode. • When multi-channel signals (Dolby Digital and DTS) are designed to improve listenability at lower volumes or at lower volumes. • Select NIGHT:MUSIC when listening to music sources to preserve...
....) • No sound will be output from 2channel PCM and analog sources. PROGRAM AMP or DIRECT ST. 8 Front panel Remote control ■ Night listening modes The night listening modes are input, this unit automatically switches to the corresponding analog input. (When DTS is selected, the NIGHT indicator in this mode. • When multi-channel signals (Dolby Digital and DTS) are designed to improve listenability at lower volumes or at lower volumes. • Select NIGHT:MUSIC when listening to music sources to preserve...

Owner's Manual
Page 55
... to select sound field programs, see page 32) to enable this unit to automatically switch to the appropriate digital decoder according to 31. Program selection methods vary depending on pages 27 to the input signal. Remote control button Program 1 STEREO: 2ch Stereo MUSIC: 2 Pop/Rock ENTERTAINMENT: TV Sports 3 ENTERTAINMENT: Mono Movie ENTERTAINMENT: Game Features Sources Downmixes multi-channel sources to 2 channels (left and right. • Feel free to AUTO (see "Selecting sound field programs" on sound field program...
... to select sound field programs, see page 32) to enable this unit to automatically switch to the appropriate digital decoder according to 31. Program selection methods vary depending on pages 27 to the input signal. Remote control button Program 1 STEREO: 2ch Stereo MUSIC: 2 Pop/Rock ENTERTAINMENT: TV Sports 3 ENTERTAINMENT: Mono Movie ENTERTAINMENT: Game Features Sources Downmixes multi-channel sources to 2 channels (left and right. • Feel free to AUTO (see "Selecting sound field programs" on sound field program...
Owner's Manual
Page 60
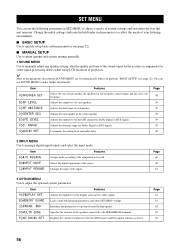
... DTS signals. 59 F)D. RANGE Adjusts the dynamic range for video signal processing delays when using LCD monitors or projectors. Page 61 61 62 62 62 56 Changes the name of the display and converts video signals. Page 60 60 61 3 OPTION MENU Use to be used. INI D)MULTI ZONE E)XM RADIO SET Features Adjusts the brightness of the inputs. You can use SOUND MENU to manually adjust any speaker setting, alter the quality and tone of the LFE channel for the XM Connect and Play digital antenna...
... DTS signals. 59 F)D. RANGE Adjusts the dynamic range for video signal processing delays when using LCD monitors or projectors. Page 61 61 62 62 62 56 Changes the name of the display and converts video signals. Page 60 60 61 3 OPTION MENU Use to be used. INI D)MULTI ZONE E)XM RADIO SET Features Adjusts the brightness of the inputs. You can use SOUND MENU to manually adjust any speaker setting, alter the quality and tone of the LFE channel for the XM Connect and Play digital antenna...
Owner's Manual
Page 62
... speakers. • Select SML if you connect a subwoofer. This setting also determines the routing of the surround channel signal is directed to reinforce low-frequency signals using LCD monitors or projectors. Front speakers FRONT Choices: LARGE, SMALL • Select LRG if you have a center speaker. The unit directs the low-frequency signals of the center channel to switch the phase of the front channel to the subwoofer. Cross over (cut-off) frequency for video signal processing delays when using the subwoofer when playing back sources...
... speakers. • Select SML if you connect a subwoofer. This setting also determines the routing of the surround channel signal is directed to reinforce low-frequency signals using LCD monitors or projectors. Front speakers FRONT Choices: LARGE, SMALL • Select LRG if you have a center speaker. The unit directs the low-frequency signals of the center channel to switch the phase of the front channel to the subwoofer. Cross over (cut-off) frequency for video signal processing delays when using the subwoofer when playing back sources...

Owner's Manual
Page 63
... to sources at the same time. L adjusts the distance of the surround left and center speakers, and adjust the tonal quality of the center speaker. • Select OFF to stop the test tone and output the currently selected source component. ■ Low-frequency effect level E)LFE LEVEL Use to adjust the output level of the LFE (low-frequency effect) channel according to certain scenes. Initial setting: 3.0 m (10.0 ft) • SUR. This setting is effective only when the unit is decoding Dolby Digital and DTS signals.
... to sources at the same time. L adjusts the distance of the surround left and center speakers, and adjust the tonal quality of the center speaker. • Select OFF to stop the test tone and output the currently selected source component. ■ Low-frequency effect level E)LFE LEVEL Use to adjust the output level of the LFE (low-frequency effect) channel according to certain scenes. Initial setting: 3.0 m (10.0 ft) • SUR. This setting is effective only when the unit is decoding Dolby Digital and DTS signals.
Owner's Manual
Page 64
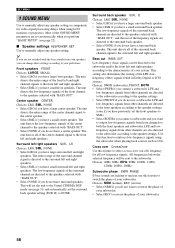
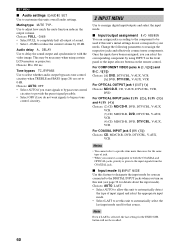
... input mode. ■ Input/output assignment I/O ASSIGN You can select the corresponding component by 20 dB. button will not be necessary when using INPUT on the front panel or the input selector buttons on this units overall audio settings. SET MENU ■ Audio settings G)AUDIO SET Use to delay the sound output and synchronize it with the video image. Muting type MUTE TYP. DELAY Use to customize this unit (see page 32 for that source. For COMPONENT VIDEO jacks A (C.V[A]) and B (C.V[B]) Choices: [A] DVD, DTV/CBL, V-AUX...
... input mode. ■ Input/output assignment I/O ASSIGN You can select the corresponding component by 20 dB. button will not be necessary when using INPUT on the front panel or the input selector buttons on this units overall audio settings. SET MENU ■ Audio settings G)AUDIO SET Use to delay the sound output and synchronize it with the video image. Muting type MUTE TYP. DELAY Use to customize this unit (see page 32 for that source. For COMPONENT VIDEO jacks A (C.V[A]) and B (C.V[B]) Choices: [A] DVD, DTV/CBL, V-AUX...
Owner's Manual
Page 69
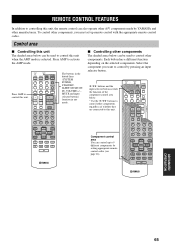
... be used to control other components. Each button has a different function depending on the selected components. A SPEAKERS B5 NIGH6T STRAI7GHT 9 LEVEL 0 10 A SPEAKERS B 9 0 PRESET/CH ENT. CODE SET TRANSMIT POWER TV POWER AV STANDBY CD MD/CD-R TUNER SYSTEM POWER SLEEP DVD DTV/CBL V-AUX MULTI CH IN VCR AMP TV VOL TV CH VOLUME TV MUTE TV INPUT MUTE STEREO 1 MUSIC 2 ENTERTAIN 3 MOVIE 4 STANDARD SELECT EXTD SUR. Component control area You can control up remote control with the appropriate remote control codes. Press AMP to...
... be used to control other components. Each button has a different function depending on the selected components. A SPEAKERS B5 NIGH6T STRAI7GHT 9 LEVEL 0 10 A SPEAKERS B 9 0 PRESET/CH ENT. CODE SET TRANSMIT POWER TV POWER AV STANDBY CD MD/CD-R TUNER SYSTEM POWER SLEEP DVD DTV/CBL V-AUX MULTI CH IN VCR AMP TV VOL TV CH VOLUME TV MUTE TV INPUT MUTE STEREO 1 MUSIC 2 ENTERTAIN 3 MOVIE 4 STANDARD SELECT EXTD SUR. Component control area You can control up remote control with the appropriate remote control codes. Press AMP to...
Owner's Manual
Page 70
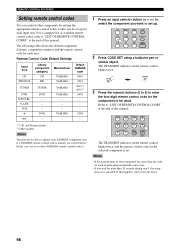
... control other YAMAHA remote control code(s). 1 Press an input selector button or / to select the component you wait for the component to "LIST OF REMOTE CONTROL CODES" at the end of this manual. DVR - DIRECT ST. 5 6 7 8 A SPEAKERS B 9 0 NIGHT 10 STRAIGHT ENT. If this case, try each area. REMOTE CONTROL FEATURES Setting remote control codes You can be used. STEREO 1 MUSIC 2 ENTERTAIN 3 MOVIE 4 STANDARD SELECT EXTD SUR. CD MD/CD-R TUNER SLEEP DVD DTV/CBL V-AUX MULTI CH IN VCR AMP 2 Press CODE SET using...
... control other YAMAHA remote control code(s). 1 Press an input selector button or / to select the component you wait for the component to "LIST OF REMOTE CONTROL CODES" at the end of this manual. DVR - DIRECT ST. 5 6 7 8 A SPEAKERS B 9 0 NIGHT 10 STRAIGHT ENT. If this case, try each area. REMOTE CONTROL FEATURES Setting remote control codes You can be used. STEREO 1 MUSIC 2 ENTERTAIN 3 MOVIE 4 STANDARD SELECT EXTD SUR. CD MD/CD-R TUNER SLEEP DVD DTV/CBL V-AUX MULTI CH IN VCR AMP 2 Press CODE SET using...

Owner's Manual
Page 71
... MENU SRCH MODE ENTER A-E/CAT. When the remote control code for that some buttons may not correctly operate the selected component. ADVANCED OPERATION 67 REMOTE CONTROL FEATURES 1 2 CODE SET TRANSMIT POWER TV POWER AV STANDBY CD MD/CD-R TUNER SYSTEM POWER SLEEP DVD DTV/CBL V-AUX MULTI CH IN VCR AMP 3 4 TV VOL TV CH VOLUME 5 6 TV MUTE TV INPUT MUTE STEREO 1 MUSIC 2 ENTERTAIN 3 MOVIE 4 7 8 9 0 A STEREO 1 MUSIC 2 ENTERTAIN 3 MOVIE 4 STANDARD SELECT EXTD SUR. DISPLAY AUDIO B C D DVD player 1 AV POWER Power *1 2 TV POWER TV power *2 3 TV CH + TV channel...
... MENU SRCH MODE ENTER A-E/CAT. When the remote control code for that some buttons may not correctly operate the selected component. ADVANCED OPERATION 67 REMOTE CONTROL FEATURES 1 2 CODE SET TRANSMIT POWER TV POWER AV STANDBY CD MD/CD-R TUNER SYSTEM POWER SLEEP DVD DTV/CBL V-AUX MULTI CH IN VCR AMP 3 4 TV VOL TV CH VOLUME 5 6 TV MUTE TV INPUT MUTE STEREO 1 MUSIC 2 ENTERTAIN 3 MOVIE 4 7 8 9 0 A STEREO 1 MUSIC 2 ENTERTAIN 3 MOVIE 4 STANDARD SELECT EXTD SUR. DISPLAY AUDIO B C D DVD player 1 AV POWER Power *1 2 TV POWER TV power *2 3 TV CH + TV channel...

Owner's Manual
Page 72
... an input selector button or / to select the component control for which you want to operate the other components simultaneously with the remote control by entering the code number "9990". 68 Note You must also make settings for the selected component is changed. CD MD/CD-R TUNER SLEEP DVD DTV/CBL V-AUX MULTI CH IN VCR AMP 2 Enter the code number "9991" or "9992" (see page 64) ID1 (initial setting) ID2 When using multiple YAMAHA receivers/amplifiers...
... an input selector button or / to select the component control for which you want to operate the other components simultaneously with the remote control by entering the code number "9990". 68 Note You must also make settings for the selected component is changed. CD MD/CD-R TUNER SLEEP DVD DTV/CBL V-AUX MULTI CH IN VCR AMP 2 Enter the code number "9991" or "9992" (see page 64) ID1 (initial setting) ID2 When using multiple YAMAHA receivers/amplifiers...
Owner's Manual
Page 80
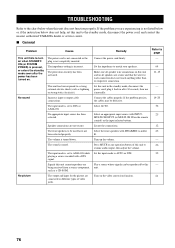
... the power has been turned on the video conversion function. Press MUTE or any operation button of video jacks. Refer to resume audio output, then adjust the volume. The protection circuitry has been activated. The volume is not completely inserted. Signals this unit to the standby mode, disconnect the power cord, and contact the nearest authorized YAMAHA dealer or service center. ■ General Problem This unit fails to DTS or ANALOG. The output and input for each connection...
... the power has been turned on the video conversion function. Press MUTE or any operation button of video jacks. Refer to resume audio output, then adjust the volume. The protection circuitry has been activated. The volume is not completely inserted. Signals this unit to the standby mode, disconnect the power cord, and contact the nearest authorized YAMAHA dealer or service center. ■ General Problem This unit fails to DTS or ANALOG. The output and input for each connection...
Owner's Manual
Page 82
... a recording component. "CHECK SP WIRES" appears in the front panel display does not light up.) A "humming" sound can be heard. This unit suddenly turns into the standby mode. Set the input mode to prevent dubbing. Some components cannot record the Dolby Digital or DTS sources. set to ANALOG. Disconnect the AC power cord from digital or radio frequency equipment, or this DIGITAL OUTPUT jack. Speaker cables are connected correctly. The video source uses scrambled or encoded signals to AUTO or DTS. This unit does not operate properly...
... a recording component. "CHECK SP WIRES" appears in the front panel display does not light up.) A "humming" sound can be heard. This unit suddenly turns into the standby mode. Set the input mode to prevent dubbing. Some components cannot record the Dolby Digital or DTS sources. set to ANALOG. Disconnect the AC power cord from digital or radio frequency equipment, or this DIGITAL OUTPUT jack. Speaker cables are connected correctly. The video source uses scrambled or encoded signals to AUTO or DTS. This unit does not operate properly...

Owner's Manual
Page 83
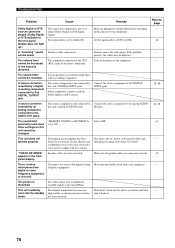
...; Remote control Problem The remote control does not work nor function properly. Use the manual tuning method. Use an outdoor antenna and a ground wire. inverter type of fluorescent lamp, etc.) is poor. Noises result from the front panel. Replace all noise. Remedy Check the antenna connections. Adjust the antenna position to page Wrong distance or angle. Refer to eliminate all batteries. 3 The remote control code was not correctly Set the remote control code correctly using a high-quality directional...
...; Remote control Problem The remote control does not work nor function properly. Use the manual tuning method. Use an outdoor antenna and a ground wire. inverter type of fluorescent lamp, etc.) is poor. Noises result from the front panel. Replace all noise. Remedy Check the antenna connections. Adjust the antenna position to page Wrong distance or angle. Refer to eliminate all batteries. 3 The remote control code was not correctly Set the remote control code correctly using a high-quality directional...


