

RX-V581 Owner s Manual
Page 9
... device (p.63). H AUX jack For connecting devices, such as preset stations (p.55). A DIRECT key Enables/disables the direct playback mode (p.53). Also, turns on /off (standby) the unit. 2 Standby indicator Lights up when the unit is in standby mode under any of the unit and the supplied remote...AM TUNING INPUT BD DVD SCENE TV NET RADIO TONE CONTROL PROGRAM STRAIGHT (CONNECT) AUX AUDIO USB 5V 1A DIRECT VOLUME B 1 z (power) key Turns on the unit when it is in standby mode (p.48). B PHONES jack For connecting headphones. C INPUT keys Select an input source. D TONE CONTROL...
... device (p.63). H AUX jack For connecting devices, such as preset stations (p.55). A DIRECT key Enables/disables the direct playback mode (p.53). Also, turns on /off (standby) the unit. 2 Standby indicator Lights up when the unit is in standby mode under any of the unit and the supplied remote...AM TUNING INPUT BD DVD SCENE TV NET RADIO TONE CONTROL PROGRAM STRAIGHT (CONNECT) AUX AUDIO USB 5V 1A DIRECT VOLUME B 1 z (power) key Turns on the unit when it is in standby mode (p.48). B PHONES jack For connecting headphones. C INPUT keys Select an input source. D TONE CONTROL...

RX-V581 Owner s Manual
Page 12
... to Zone A or Zone B (p.74). 4 SCENE keys Select the registered input source and sound program with one touch. A z (receiver power) key Turns on the unit when it is selected as the input source (p.54). B VOLUME keys Adjust the volume. D OPTION key Displays the option menu (p.78). Remote...signals. 2 SLEEP key Pressing this key repeatedly will specify the time (120 min, 90 min, 60 min, 30 min, off (standby) the unit. Also, turn on /off ), in standby mode (p.48). 5 Sound mode keys Select a sound mode (p.49). 6 Input selection keys Select an input source for playback. PRESET...
... to Zone A or Zone B (p.74). 4 SCENE keys Select the registered input source and sound program with one touch. A z (receiver power) key Turns on the unit when it is selected as the input source (p.54). B VOLUME keys Adjust the volume. D OPTION key Displays the option menu (p.78). Remote...signals. 2 SLEEP key Pressing this key repeatedly will specify the time (120 min, 90 min, 60 min, 30 min, off (standby) the unit. Also, turn on /off ), in standby mode (p.48). 5 Sound mode keys Select a sound mode (p.49). 6 Input selection keys Select an input source for playback. PRESET...
RX-V581 Owner s Manual
Page 21
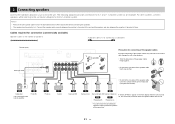
...systems, connect speakers while referring to the unit. Notice ▪ Remove the unit's power cable from an AC wall outlet and turn off the subwoofer before connecting the speakers. ▪ The speaker has the polarity (+/-). Connect the speaker cable correctly between the ... Surround (L) 7 6 Surround back (R) Surround back (L) R Presence (R) E Presence (L) If "Check SP Wires" appear on the front display when the unit is turned on, turn off the unit, and then check the speaker cables short circuit. * You cannot use the surround back speakers and the presence speakers at the same...
...systems, connect speakers while referring to the unit. Notice ▪ Remove the unit's power cable from an AC wall outlet and turn off the subwoofer before connecting the speakers. ▪ The speaker has the polarity (+/-). Connect the speaker cable correctly between the ... Surround (L) 7 6 Surround back (R) Surround back (L) R Presence (R) E Presence (L) If "Check SP Wires" appear on the front display when the unit is turned on, turn off the unit, and then check the speaker cables short circuit. * You cannot use the surround back speakers and the presence speakers at the same...

RX-V581 Owner s Manual
Page 26
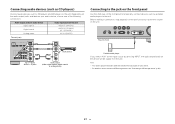
... to AV 2 (VIDEO) and AUDIO 1 (OPTICAL) jack of the unit, change the combination setting as a TV and playback devices) and power cable of the unit, turn on the unit does not match your video device, change its combination according to select "Audio In" and press ENTER. n Changing the combination of video...
... to AV 2 (VIDEO) and AUDIO 1 (OPTICAL) jack of the unit, change the combination setting as a TV and playback devices) and power cable of the unit, turn on the unit does not match your video device, change its combination according to select "Audio In" and press ENTER. n Changing the combination of video...
RX-V581 Owner s Manual
Page 27
... stereo) Connecting to the jack on the front panel Use the AUX jack on the unit. Before making a connection, stop playback on the device and turn down the volume on the front panel to temporarily connect devices such as portable audio players to the unit. Depending on the audio output jacks...
... stereo) Connecting to the jack on the front panel Use the AUX jack on the unit. Before making a connection, stop playback on the device and turn down the volume on the front panel to temporarily connect devices such as portable audio players to the unit. Depending on the audio output jacks...

RX-V581 Owner s Manual
Page 31
... the front display is connected to the unit via HDMI. If not, carry out operations while viewing the front display. ▪ If you turn on the unit. 2 Turn on the TV and switch the TV input to display video from the menu, press SETUP. To continue the language setup, press RETURN. 3 Press... TV is provided in English only. 31 En 7 Selecting an on-screen menu language Select the desired on-screen menu language. 1 Press z (receiver power) to turn on the unit for the first time, the message regarding the network setup appears.
... the front display is connected to the unit via HDMI. If not, carry out operations while viewing the front display. ▪ If you turn on the unit. 2 Turn on the TV and switch the TV input to display video from the menu, press SETUP. To continue the language setup, press RETURN. 3 Press... TV is provided in English only. 31 En 7 Selecting an on-screen menu language Select the desired on-screen menu language. 1 Press z (receiver power) to turn on the unit for the first time, the message regarding the network setup appears.

RX-V581 Owner s Manual
Page 32
...(Virtual CINEMA FRONT) (p.17) • Using the presence speakers for Dolby Atmos or DTS:X playback (p.19) 1 Press z (receiver power) to turn on the TV and switch the TV input to select "Configuration" and press ENTER. 6 Configure the corresponding speaker settings. ▪ When using surround back...using the presence speakers for the first time, the message regarding the network setup appears. 8 Configuring the necessary speaker settings If you turn on the unit. 2 Turn on the unit for Dolby Atmos or DTS:X playback, select "Layout" (p.87), then select your presence speaker layout. 7 To ...
...(Virtual CINEMA FRONT) (p.17) • Using the presence speakers for Dolby Atmos or DTS:X playback (p.19) 1 Press z (receiver power) to turn on the TV and switch the TV input to select "Configuration" and press ENTER. 6 Configure the corresponding speaker settings. ▪ When using surround back...using the presence speakers for the first time, the message regarding the network setup appears. 8 Configuring the necessary speaker settings If you turn on the unit. 2 Turn on the unit for Dolby Atmos or DTS:X playback, select "Layout" (p.87), then select your presence speaker layout. 7 To ...
RX-V581 Owner s Manual
Page 33
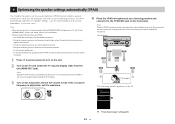
9 Optimizing the speaker settings automatically (YPAO) The Yamaha Parametric room Acoustic Optimizer (YPAO) function detects speaker connections, measures ...the speakers and the YPAO microphone during the measurement process (about 3 minutes). 1 Press z (receiver power) to turn on the unit. 2 Turn on the subwoofer and set "Virtual CINEMA FRONT" (p.88) in the "Setup" menu to the unit. -... TV screen are output at your room. If not, carry out operations while viewing the front display. 3 Turn on the TV and switch the TV input to display video from them to your listening position(s), and then...
9 Optimizing the speaker settings automatically (YPAO) The Yamaha Parametric room Acoustic Optimizer (YPAO) function detects speaker connections, measures ...the speakers and the YPAO microphone during the measurement process (about 3 minutes). 1 Press z (receiver power) to turn on the unit. 2 Turn on the subwoofer and set "Virtual CINEMA FRONT" (p.88) in the "Setup" menu to the unit. -... TV screen are output at your room. If not, carry out operations while viewing the front display. 3 Turn on the TV and switch the TV input to display video from them to your listening position(s), and then...

RX-V581 Owner s Manual
Page 35
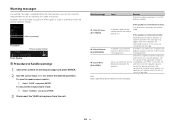
.... Surround back speakers are connected, but no surround speakers are not detected. A surround back speaker is too loud. Exit YPAO, turn off the unit, and then reconnect the speakers. Connect the YPAO microphone to the R side only. If this error occurs repeatedly,...cursor keys (q/w) to the SINGLE jack (L side). Keep the room quiet and retry YPAO. If this error occurs repeatedly, contact the nearest authorized Yamaha dealer or service center. Error messages If any noise detected. To proceed with the current YPAO measurement (for E-5 and E-9 only): 1 Select ...
.... Surround back speakers are connected, but no surround speakers are not detected. A surround back speaker is too loud. Exit YPAO, turn off the unit, and then reconnect the speakers. Connect the YPAO microphone to the R side only. If this error occurs repeatedly,...cursor keys (q/w) to the SINGLE jack (L side). Keep the room quiet and retry YPAO. If this error occurs repeatedly, contact the nearest authorized Yamaha dealer or service center. Error messages If any noise detected. To proceed with the current YPAO measurement (for E-5 and E-9 only): 1 Select ...
RX-V581 Owner s Manual
Page 36
... you can ignore the message. However, we recommend you perform YPAO again in parentheses denote indicators on -screen instructions. Turn off the unit, differences between the and then reconnect speaker cable or speakers. If the speaker is connected incorrectly: A ... correctly. If there is placed more than 24 m (80 ft) from the unit. ADAPTIVE DRC VIRTUAL n Procedure to select the desired operation. Exit YPAO, turn off the unit, reconnect the speaker cable. correct the speaker positions. Auto Setup Measurement Finished Result 3 / 2 / 0.1 ch 3.0 / 10.5 m -3.0 ...
... you can ignore the message. However, we recommend you perform YPAO again in parentheses denote indicators on -screen instructions. Turn off the unit, differences between the and then reconnect speaker cable or speakers. If the speaker is connected incorrectly: A ... correctly. If there is placed more than 24 m (80 ft) from the unit. ADAPTIVE DRC VIRTUAL n Procedure to select the desired operation. Exit YPAO, turn off the unit, reconnect the speaker cable. correct the speaker positions. Auto Setup Measurement Finished Result 3 / 2 / 0.1 ch 3.0 / 10.5 m -3.0 ...
RX-V581 Owner s Manual
Page 38
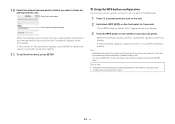
... default settings for the following. ▪ Network settings ▪ NET presets ▪ Bluetooth settings ▪ Music streaming service accounts 1 Press z (receiver power) to turn on the unit. 2 Turn on the TV and switch the TV input to display video from the unit, and then press ENTER. 9 On the iOS device, select the...
... default settings for the following. ▪ Network settings ▪ NET presets ▪ Bluetooth settings ▪ Music streaming service accounts 1 Press z (receiver power) to turn on the unit. 2 Turn on the TV and switch the TV input to display video from the unit, and then press ENTER. 9 On the iOS device, select the...
RX-V581 Owner s Manual
Page 39
...-Fi Protected Setup) is automatically connected to set up a wireless connection with the WPS button. If "Not shared" or "Not connected" appears, press ENTER to turn on the unit. 2 Hold down INFO (WPS) on the wireless router (access point). If "Not connected" appears, repeat from the menu, press SETUP. Tap here...
...-Fi Protected Setup) is automatically connected to set up a wireless connection with the WPS button. If "Not shared" or "Not connected" appears, press ENTER to turn on the unit. 2 Hold down INFO (WPS) on the wireless router (access point). If "Not connected" appears, repeat from the menu, press SETUP. Tap here...

RX-V581 Owner s Manual
Page 40
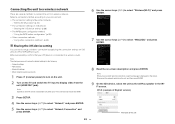
... (access point) does not support WPS button configuration method, follow the procedure below to configure the wireless network settings. 1 Press z (receiver power) to turn on the unit. 2 Turn on the TV and switch the TV input to the next step. 40 En Follow the instructions displayed on settings, see "Searching for an...
... (access point) does not support WPS button configuration method, follow the procedure below to configure the wireless network settings. 1 Press z (receiver power) to turn on the unit. 2 Turn on the TV and switch the TV input to the next step. 40 En Follow the instructions displayed on settings, see "Searching for an...
RX-V581 Owner s Manual
Page 43
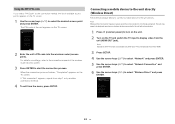
... operation on wireless devices connected to the unit without going through home network. Note Operations with device, without permission. 1 Press z (receiver power) to turn on the unit. 2 Turn on the TV and switch the TV input to start the connection process. RETURN Back 2 Enter the unit's PIN code into the access point...
... operation on wireless devices connected to the unit without going through home network. Note Operations with device, without permission. 1 Press z (receiver power) to turn on the unit. 2 Turn on the TV and switch the TV input to start the connection process. RETURN Back 2 Enter the unit's PIN code into the access point...
RX-V581 Owner s Manual
Page 45
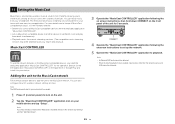
...9642; When the direct playback mode is a brand new wireless musical solution from Yamaha, allowing you to share music among all of your rooms with a variety of MusicCast compatible products, visit the Yamaha website. • Seamlessly control all MusicCast compatible devices with one easy-to-...use the network features on the MusicCast compatible device, you have already connected other than the network sources and USB cannot be needed. 1 Press z (receiver power) to turn on the unit...
...9642; When the direct playback mode is a brand new wireless musical solution from Yamaha, allowing you to share music among all of your rooms with a variety of MusicCast compatible products, visit the Yamaha website. • Seamlessly control all MusicCast compatible devices with one easy-to-...use the network features on the MusicCast compatible device, you have already connected other than the network sources and USB cannot be needed. 1 Press z (receiver power) to turn on the unit...
RX-V581 Owner s Manual
Page 46
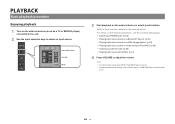
PLAYBACK Basic playback procedure Enjoying playback 1 Turn on the external devices (such as a TV or BD/DVD player) connected to the unit. 2 Use the input selection keys to unmute. ▪ To adjust ...
PLAYBACK Basic playback procedure Enjoying playback 1 Turn on the external devices (such as a TV or BD/DVD player) connected to the unit. 2 Use the input selection keys to unmute. ▪ To adjust ...

RX-V581 Owner s Manual
Page 48
Selecting the input source and favorite settings with one touch (SCENE) The SCENE function allows you to automatically turn on the TV or start playback of an external device connected to the unit via HDMI, in conjunction with just one touch. Complete ADAPTIVE DRC ... in the "Setup" menu to the corresponding scene are registered for each scene. The input source and settings registered to "On". 48 En The unit turns on the front display. CHARGE OUT ECO SET ENHANCER STEREO TUNED SLEEP MUTE VOL. ZONEA ZONE B SLEEP BD DVD SCENE TV NET RADIO STRAIGHT DIRECT...
Selecting the input source and favorite settings with one touch (SCENE) The SCENE function allows you to automatically turn on the TV or start playback of an external device connected to the unit via HDMI, in conjunction with just one touch. Complete ADAPTIVE DRC ... in the "Setup" menu to the corresponding scene are registered for each scene. The input source and settings registered to "On". 48 En The unit turns on the front display. CHARGE OUT ECO SET ENHANCER STEREO TUNED SLEEP MUTE VOL. ZONEA ZONE B SLEEP BD DVD SCENE TV NET RADIO STRAIGHT DIRECT...
RX-V581 Owner s Manual
Page 54
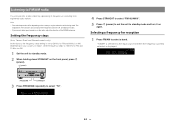
The explanation of the FM/AM antennas. z (power) 4 Press STRAIGHT to select "FM100/AM10". 5 Press z (power) to set the unit to standby mode and turn it on the radio, adjust the direction of this section uses a display with frequencies used . "TUNER" is selected as the input source and then the ...
The explanation of the FM/AM antennas. z (power) 4 Press STRAIGHT to select "FM100/AM10". 5 Press z (power) to set the unit to standby mode and turn it on the radio, adjust the direction of this section uses a display with frequencies used . "TUNER" is selected as the input source and then the ...

RX-V581 Owner s Manual
Page 61
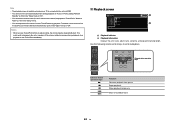
... and select the unit (network name of iTunes/iPod music contents Follow the procedure below to play back iTunes/iPod music contents on the unit. 1 Turn on the unit, and start playback. If the iTunes/iPod recognizes the unit, the AirPlay icon ( ) appears. iTunes (example) iOS 9 (example) Note If the icon...
... and select the unit (network name of iTunes/iPod music contents Follow the procedure below to play back iTunes/iPod music contents on the unit. 1 Turn on the unit, and start playback. If the iTunes/iPod recognizes the unit, the AirPlay icon ( ) appears. iTunes (example) iOS 9 (example) Note If the icon...
RX-V581 Owner s Manual
Page 62
... "Option" menu to "Off". Note ▪ The playback screen is available only when your TV is connected to the unit via HDMI. ▪ You can turn on the unit automatically when starting playback on iTunes or iPod by setting "Network Standby" (p.100) in the "Setup" menu to "On". ▪ You can...
... "Option" menu to "Off". Note ▪ The playback screen is available only when your TV is connected to the unit via HDMI. ▪ You can turn on the unit automatically when starting playback on iTunes or iPod by setting "Network Standby" (p.100) in the "Setup" menu to "On". ▪ You can...

