
Owner's Manual
Page 5
... AND FUNCTIONS 4 Front panel 4 Remote control 6 Using the remote control 7 Front panel display 8 Rear panel 10 PREPARATION SPEAKER SETUP 11 Speaker placement 11 Speaker connections 12 CONNECTIONS 15 Before connecting components 15 Connecting video components 16 Connecting audio components 19 Connecting the ...Connecting the power supply cord 22 Speaker impedance setting 23 Turning on the power 23 AUTO SETUP 24 Introduction 24 Optimizer microphone setup 24 Starting the setup 25 BASIC OPERATION PLAYBACK 30 Basic operations 30 Selecting sound field programs 32 Selecting input ...
... AND FUNCTIONS 4 Front panel 4 Remote control 6 Using the remote control 7 Front panel display 8 Rear panel 10 PREPARATION SPEAKER SETUP 11 Speaker placement 11 Speaker connections 12 CONNECTIONS 15 Before connecting components 15 Connecting video components 16 Connecting audio components 19 Connecting the ...Connecting the power supply cord 22 Speaker impedance setting 23 Turning on the power 23 AUTO SETUP 24 Introduction 24 Optimizer microphone setup 24 Starting the setup 25 BASIC OPERATION PLAYBACK 30 Basic operations 30 Selecting sound field programs 32 Selecting input ...

Owner's Manual
Page 6
...;) Front: 100 W + 100 W Center: 100 W Surround: 100 W + 100 W Surround back: 100 W + 100 W Sound field features ◆ Proprietary YAMAHA technology for the creation of sound fields ◆ Dolby Digital/Dolby Digital EX decoder ◆ DTS/DTS-ES Matrix 6.1, Discrete 6.1, DTS Neo:6, DTS 96/24...can be performed by using the "XM connect and Play digital antenna accessory", sold separately) Other features ◆ YPAO: YAMAHA Parametric Room Acoustic Optimizer for automatic speaker setup ◆ 192-kHz/24-bit D/A converter ◆ A SET MENU that provides you with items for optimizing this ...
...;) Front: 100 W + 100 W Center: 100 W Surround: 100 W + 100 W Surround back: 100 W + 100 W Sound field features ◆ Proprietary YAMAHA technology for the creation of sound fields ◆ Dolby Digital/Dolby Digital EX decoder ◆ DTS/DTS-ES Matrix 6.1, Discrete 6.1, DTS Neo:6, DTS 96/24...can be performed by using the "XM connect and Play digital antenna accessory", sold separately) Other features ◆ YPAO: YAMAHA Parametric Room Acoustic Optimizer for automatic speaker setup ◆ 192-kHz/24-bit D/A converter ◆ A SET MENU that provides you with items for optimizing this ...

Owner's Manual
Page 8
... the unit is not in tuner mode. 7 MEMORY (MAN'L/AUTO FM) Stores a station in tuner mode. Hold down this button for use with the AUTO SETUP function (see page 24). 3 Remote control sensor Receives signals from the supplied microphone for more than 3 seconds to the standby mode. Selects the tuning frequency...
... the unit is not in tuner mode. 7 MEMORY (MAN'L/AUTO FM) Stores a station in tuner mode. Hold down this button for use with the AUTO SETUP function (see page 24). 3 Remote control sensor Receives signals from the supplied microphone for more than 3 seconds to the standby mode. Selects the tuning frequency...

Owner's Manual
Page 12
... MUTE function is active (see page 34). F NIGHT indicator Lights up when a decoder is lit. Both indicators light up during the auto setup procedure and when the auto setup speaker settings are connected. C VOLUME level indication Indicates the current volume level. Presence DSP sound field Listening position Left surround DSP sound field...
... MUTE function is active (see page 34). F NIGHT indicator Lights up when a decoder is lit. Both indicators light up during the auto setup procedure and when the auto setup speaker settings are connected. C VOLUME level indication Indicates the current volume level. Presence DSP sound field Listening position Left surround DSP sound field...

Owner's Manual
Page 15
... and as directly over or under it . You can do without it . 11 They should be positioned at the same width as the YAMAHA Active Servo Processing Subwoofer System, is the radio communication sector of your listening position, facing slightly inwards, about 1.8 m (6 ft) above ... 1.8 m (6 ft) above the floor. Turn it slightly toward the center of the video monitor should be the same. PREPARATION SPEAKER SETUP SPEAKER SETUP Speaker placement The speaker layout below shows the standard ITU-R* speaker setting. Ideally, they should be positioned at least 30 cm (12 in...
... and as directly over or under it . You can do without it . 11 They should be positioned at the same width as the YAMAHA Active Servo Processing Subwoofer System, is the radio communication sector of your listening position, facing slightly inwards, about 1.8 m (6 ft) above ... 1.8 m (6 ft) above the floor. Turn it slightly toward the center of the video monitor should be the same. PREPARATION SPEAKER SETUP SPEAKER SETUP Speaker placement The speaker layout below shows the standard ITU-R* speaker setting. Ideally, they should be positioned at least 30 cm (12 in...

Owner's Manual
Page 16
... with the PRESENCE/ZONE 2 and PRESENCE speaker terminals. Connect the plain cable to secure the wire. ■ Banana plug connections (With the exception of U.K. SPEAKER SETUP Speaker connections Be sure to close the tabs after connecting the banana plugs. 12 Do not attempt to connect the left channel (L), right channel (R), "+" (red...
... with the PRESENCE/ZONE 2 and PRESENCE speaker terminals. Connect the plain cable to secure the wire. ■ Banana plug connections (With the exception of U.K. SPEAKER SETUP Speaker connections Be sure to close the tabs after connecting the banana plugs. 12 Do not attempt to connect the left channel (L), right channel (R), "+" (red...

Owner's Manual
Page 17
... surround back and presence speakers to this unit, but they do not output sound when other sound fields are selected. 13 PREPARATION Subwoofer system 1 SPEAKER SETUP Presence speakers Right Left Surround speakers Right Left 2 34 5 PRE OUT CENTER SINGLE SUB SURROUND FRONT SURROUND WOOFER BACK A B FRONT PRESENCE/ ZONE 2 SPEAKERS SURROUND CENTER...
... surround back and presence speakers to this unit, but they do not output sound when other sound fields are selected. 13 PREPARATION Subwoofer system 1 SPEAKER SETUP Presence speakers Right Left Surround speakers Right Left 2 34 5 PRE OUT CENTER SINGLE SUB SURROUND FRONT SURROUND WOOFER BACK A B FRONT PRESENCE/ ZONE 2 SPEAKERS SURROUND CENTER...

Owner's Manual
Page 18
... Connect surround speakers (4, 5) to these terminals. ■ SUBWOOFER jack Connect a subwoofer with built-in amplifier (1), such as the YAMAHA Active Servo Processing Subwoofer System, to this jack. ■ SURROUND BACK terminals Connect surround back speakers (9, 10) to these terminals.... 8 7 1 4 9 10 5 Speaker layout 14 or Europe model, you are using either the U.S.A., Canada, Australia, U.K. SPEAKER SETUP ■ FRONT terminals Connect one speaker system, connect it to the left (L) terminals. ■ PRESENCE terminals Connect presence speakers (2, 3) to these terminals....
... Connect surround speakers (4, 5) to these terminals. ■ SUBWOOFER jack Connect a subwoofer with built-in amplifier (1), such as the YAMAHA Active Servo Processing Subwoofer System, to this jack. ■ SURROUND BACK terminals Connect surround back speakers (9, 10) to these terminals.... 8 7 1 4 9 10 5 Speaker layout 14 or Europe model, you are using either the U.S.A., Canada, Australia, U.K. SPEAKER SETUP ■ FRONT terminals Connect one speaker system, connect it to the left (L) terminals. ■ PRESENCE terminals Connect presence speakers (2, 3) to these terminals....

Owner's Manual
Page 28
...in your listening position. SIZE: Checks the speakers frequency response and sets the crossover/high cut frequency for each speaker. Optimizer microphone setup 1 Connect the supplied optimizer microphone to heat. - model) OPTIMIZER MIC STANDBY /ON PHONES SPEAKERS A B SILENT CINEMA PRESET/TUNING...level and Q factor) for the subwoofer to provide highly precise automatic adjustment of frequency characteristics. AUTO SETUP AUTO SETUP Introduction This receiver employs YAMAHA Parametric Room Acoustic Optimizer (YPAO) technology which speakers are seated in your system.
...in your listening position. SIZE: Checks the speakers frequency response and sets the crossover/high cut frequency for each speaker. Optimizer microphone setup 1 Connect the supplied optimizer microphone to heat. - model) OPTIMIZER MIC STANDBY /ON PHONES SPEAKERS A B SILENT CINEMA PRESET/TUNING...level and Q factor) for the subwoofer to provide highly precise automatic adjustment of frequency characteristics. AUTO SETUP AUTO SETUP Introduction This receiver employs YAMAHA Parametric Room Acoustic Optimizer (YPAO) technology which speakers are seated in your system.

Owner's Manual
Page 29
...If your subwoofer has adjustable volume and crossover/high cut frequency controls, set the volume between 9 and 11 o'clock (as follows. 1 AUTO:MENU SETUP;;;;;;;AUTO . Make sure the OSD is set the crossover/high cut frequency to select the desired setting. 1 AUTO:MENU . To restore the factory ...preset (default) setup parameters. The screen changes as viewed on this unit and your video monitor. AMP 3 Press SET MENU. WIRING . SIZE/DISTANCE . VOLUME CROSSOVER...
...If your subwoofer has adjustable volume and crossover/high cut frequency controls, set the volume between 9 and 11 o'clock (as follows. 1 AUTO:MENU SETUP;;;;;;;AUTO . Make sure the OSD is set the crossover/high cut frequency to select the desired setting. 1 AUTO:MENU . To restore the factory ...preset (default) setup parameters. The screen changes as viewed on this unit and your video monitor. AMP 3 Press SET MENU. WIRING . SIZE/DISTANCE . VOLUME CROSSOVER...

Owner's Manual
Page 30
... SP : 5/4/0.1 DIST: 10.0/ 12.0ft LVL : -9.0/ +6.5dB . >SET CANCEL [ ]/[ ]:Up/Down [ENTER]:Enter SET CANCEL To apply the auto setup (YPAO) settings. Don't operate . Notes • If E-10 appears during testing, restart the procedure from step 3. • To cancel the auto... setup procedure before completion, press u. 26 p p p p AUTO SETUP The results displayed in the RESULT:EXIT screen are as follows: SP DIST LVL The number of connected speakers displayed in the...
... SP : 5/4/0.1 DIST: 10.0/ 12.0ft LVL : -9.0/ +6.5dB . >SET CANCEL [ ]/[ ]:Up/Down [ENTER]:Enter SET CANCEL To apply the auto setup (YPAO) settings. Don't operate . Notes • If E-10 appears during testing, restart the procedure from step 3. • To cancel the auto... setup procedure before completion, press u. 26 p p p p AUTO SETUP The results displayed in the RESULT:EXIT screen are as follows: SP DIST LVL The number of connected speakers displayed in the...
Owner's Manual
Page 31
... you are finished, press ENTER to return to REVERSE. Notes • If you change the SUBWOOFER PHASE parameter in the SETMENU (see page 29. AUTO SETUP 27 WARNING (3) RESULT SP : 5/4/0.1 DIST: 10.0/ 12.0ft LVL : -9.0/ +6.5dB . >SET CANCEL [ ]/[ ]:Up/Down [ENTER]:Enter p WARNING...:W-1 . . To select the desired setting, change speakers, speaker positions, or the layout of your listening environment, perform auto setup again to the right of your system. • Depending on listening environments, SWFR PHASE:REV appears in AUTO:CHECK and SUBWOOFER PHASE parameter ...
... you are finished, press ENTER to return to REVERSE. Notes • If you change the SUBWOOFER PHASE parameter in the SETMENU (see page 29. AUTO SETUP 27 WARNING (3) RESULT SP : 5/4/0.1 DIST: 10.0/ 12.0ft LVL : -9.0/ +6.5dB . >SET CANCEL [ ]/[ ]:Up/Down [ENTER]:Enter p WARNING...:W-1 . . To select the desired setting, change speakers, speaker positions, or the layout of your listening environment, perform auto setup again to the right of your system. • Depending on listening environments, SWFR PHASE:REV appears in AUTO:CHECK and SUBWOOFER PHASE parameter ...

Owner's Manual
Page 32
... the presence speaker connections. tones. • Check the speaker connections and placement. Do not adjust VOLUME (etc.) during auto setup Error message E-1:NO FRONT SP E-2:NO SURR. Remedy • Connect the supplied optimizer microphone to the LEFT SURROUND BACK SPEAKERS terminal...one surround back speaker. A DSP communication error or hangup occurred. • Perform the auto setup procedure again. AUTO SETUP ■ Troubleshooting for auto setup procedure Before auto setup Error message Connect MIC Cause Optimizer microphone is (are) connected, though surround L/R speakers are not...
... the presence speaker connections. tones. • Check the speaker connections and placement. Do not adjust VOLUME (etc.) during auto setup Error message E-1:NO FRONT SP E-2:NO SURR. Remedy • Connect the supplied optimizer microphone to the LEFT SURROUND BACK SPEAKERS terminal...one surround back speaker. A DSP communication error or hangup occurred. • Perform the auto setup procedure again. AUTO SETUP ■ Troubleshooting for auto setup procedure Before auto setup Error message Connect MIC Cause Optimizer microphone is (are) connected, though surround L/R speakers are not...

Owner's Manual
Page 33
... of similar quality and efficiency. • If the ERROR or WARNING screens appears, check the cause of the problem, then perform the auto setup procedure again. • If warning W-1 appears, corrections are made, but they may appear depending on the speakers even when the speakers are... made. • If error E-10 occurs repeatedly, please contact a qualified YAMAHA service center. PREPARATION 29 The distance between the speaker and the listening position is not correct. This message may not be optimal. •...
... of similar quality and efficiency. • If the ERROR or WARNING screens appears, check the cause of the problem, then perform the auto setup procedure again. • If warning W-1 appears, corrections are made, but they may appear depending on the speakers even when the speakers are... made. • If error E-10 occurs repeatedly, please contact a qualified YAMAHA service center. PREPARATION 29 The distance between the speaker and the listening position is not correct. This message may not be optimal. •...
Owner's Manual
Page 64
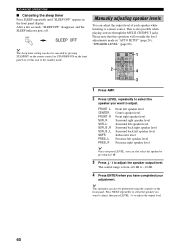
... when playing sources through the MULTI CH INPUT jacks. ADVANCED OPERATIONS ■ Canceling the sleep timer Press SLEEP repeatedly until "SLEEP OFF" appears in "AUTO SETUP" (page 24), "SPEAKER LEVEL" (page 66).
... when playing sources through the MULTI CH INPUT jacks. ADVANCED OPERATIONS ■ Canceling the sleep timer Press SLEEP repeatedly until "SLEEP OFF" appears in "AUTO SETUP" (page 24), "SPEAKER LEVEL" (page 66).

Owner's Manual
Page 65
...delay time of each jack. Item Features A)I/O ASSIGNMENT Assigns jacks according to the component to make further adjustments, but we recommend running auto setup first. Page 69 70 70 70 ADVANCED OPERATION 61 y Most of the parameters described in bold under each parameter) to reflect the ...when using LCD monitors or projectors. Change the initial settings (indicated in SOUND MENU are set automatically when you run auto setup (see page 24). ■ MANUAL SETUP Use to manually adjust speaker and system parameters. 1 SOUND MENU Use to reassign digital input/outputs, select the input ...
...delay time of each jack. Item Features A)I/O ASSIGNMENT Assigns jacks according to the component to make further adjustments, but we recommend running auto setup first. Page 69 70 70 70 ADVANCED OPERATION 61 y Most of the parameters described in bold under each parameter) to reflect the ...when using LCD monitors or projectors. Change the initial settings (indicated in SOUND MENU are set automatically when you run auto setup (see page 24). ■ MANUAL SETUP Use to manually adjust speaker and system parameters. 1 SOUND MENU Use to reassign digital input/outputs, select the input ...
Owner's Manual
Page 67
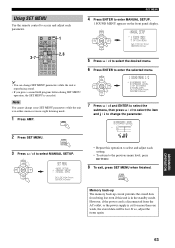
...data will be lost even if this operation to select and adjust each parameter. SET MENU MENU SRCH MODE 3 Press u / d to enter MANUAL SETUP. 1 SOUND MENU appears on the front panel display. However, if the power cord is disconnected from being lost . CH RETURN MEMORY STEREO 1 TV... VOL ON SCREEN STRAIGHT DISPLAY EFFECT MUSIC ENTERTAIN MOVIE 2 3 4 STANDARD SELECT EXTD SUR. PRESET/CH TV VOL CH TV MUTE CH ENTER TV VOL p p ;MANUAL SETUP . 1 SOUND MENU 2 INPUT MENU 3 OPTION MENU [ ]/[ ]:Up/Down [ENTER]:Enter 5 Press u / d to select the desired menu. 6 Press ENTER to enter ...
...data will be lost even if this operation to select and adjust each parameter. SET MENU MENU SRCH MODE 3 Press u / d to enter MANUAL SETUP. 1 SOUND MENU appears on the front panel display. However, if the power cord is disconnected from being lost . CH RETURN MEMORY STEREO 1 TV... VOL ON SCREEN STRAIGHT DISPLAY EFFECT MUSIC ENTERTAIN MOVIE 2 3 4 STANDARD SELECT EXTD SUR. PRESET/CH TV VOL CH TV MUTE CH ENTER TV VOL p p ;MANUAL SETUP . 1 SOUND MENU 2 INPUT MENU 3 OPTION MENU [ ]/[ ]:Up/Down [ENTER]:Enter 5 Press u / d to select the desired menu. 6 Press ENTER to enter ...

Owner's Manual
Page 68
.... The unit directs the low-frequency signals of the surround channel are not satisfied with "LFE/BASS OUT". • Select NONE if you run auto setup (see page 36) and automatically set the unit to your speakers, you have a center speaker. A)SPEAKER SET B)SPEAKER LEVEL C)SP DISTANCE D)EQUALIZER [ ]/[ ]:Up/Down [ENTER...
.... The unit directs the low-frequency signals of the surround channel are not satisfied with "LFE/BASS OUT". • Select NONE if you run auto setup (see page 36) and automatically set the unit to your speakers, you have a center speaker. A)SPEAKER SET B)SPEAKER LEVEL C)SP DISTANCE D)EQUALIZER [ ]/[ ]:Up/Down [ENTER...

Owner's Manual
Page 71
... speaker so that all sound will arrive at the listening position at the same time. However, this is selected, use the equalizer adjusted in auto setup. • Select CNTR GEQ to change the type of the center speaker. Initial setting: 3.0 m (10.0 ft) • CENTER adjusts the distance of equalizer used by...
... speaker so that all sound will arrive at the listening position at the same time. However, this is selected, use the equalizer adjusted in auto setup. • Select CNTR GEQ to change the type of the center speaker. Initial setting: 3.0 m (10.0 ft) • CENTER adjusts the distance of equalizer used by...
Owner's Manual
Page 77
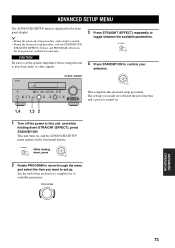
... STRAIGHT TONE CONTROL INPUT MODE MULTI CH INPUT PURE DIRECT EFFECT S VIDEO VIDEO AUX VIDEO L AUDIO R OPTICAL This completes the advanced setup procedure. STRAIGHT EFFECT While holding down , press STANDBY /ON 2 Rotate PROGRAM to set the speaker impedance before using this unit, and...the item you made are available for a complete list of available parameters. y • During the advanced setup procedure, audio output is muted. • During the advanced setup procedure, only the STANDBY/ON, STRAIGHT (EFFECT) buttons, and PROGRAM selector on the front panel are reflected...
... STRAIGHT TONE CONTROL INPUT MODE MULTI CH INPUT PURE DIRECT EFFECT S VIDEO VIDEO AUX VIDEO L AUDIO R OPTICAL This completes the advanced setup procedure. STRAIGHT EFFECT While holding down , press STANDBY /ON 2 Rotate PROGRAM to set the speaker impedance before using this unit, and...the item you made are available for a complete list of available parameters. y • During the advanced setup procedure, audio output is muted. • During the advanced setup procedure, only the STANDBY/ON, STRAIGHT (EFFECT) buttons, and PROGRAM selector on the front panel are reflected...


