
RX-V681/RX-V781 Owner s Manual
Page 1
EN AV Receiver Owner's Manual Read the supplied booklet "Safety Brochure" before using the unit.
EN AV Receiver Owner's Manual Read the supplied booklet "Safety Brochure" before using the unit.
RX-V681/RX-V781 Owner s Manual
Page 3
... Configuring sound programs/surround decoders (DSP Program menu 105 DSP Program menu items ...106 Configuring various functions (Setup menu 108 Setup menu items...109 Speaker (Manual Setup) ...111 Sound ...114 Video...116 HDMI ...117 Network...119 Bluetooth ...121 Multi Zone ...122 Function ...123 ECO ...125 Language...126 Viewing information about the...
... Configuring sound programs/surround decoders (DSP Program menu 105 DSP Program menu items ...106 Configuring various functions (Setup menu 108 Setup menu items...109 Speaker (Manual Setup) ...111 Sound ...114 Video...116 HDMI ...117 Network...119 Bluetooth ...121 Multi Zone ...122 Function ...123 ECO ...125 Language...126 Viewing information about the...
RX-V681/RX-V781 Owner s Manual
Page 5
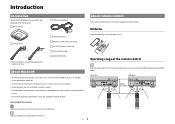
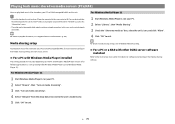
...Remote control ☐ Batteries (AAA, R03, UM-4) (x2) ☐ CD-ROM (Owner's Manual) ☐ Easy Setup Guide ☐ Safety Brochure About this book • The illustrations of the RX-V781 (U.S.A. X indicates supplementary explanations for use of the above is supplied depending on the unit and remain ...within the operating range shown below. (RX-V781) (RX-V681) 30° 30° Within 6 m (20 ft) 30° 30° Icons used as examples. • Some features are not available in this manual Y indicates precautions for better use the supplied remote control....
...Remote control ☐ Batteries (AAA, R03, UM-4) (x2) ☐ CD-ROM (Owner's Manual) ☐ Easy Setup Guide ☐ Safety Brochure About this book • The illustrations of the RX-V781 (U.S.A. X indicates supplementary explanations for use of the above is supplied depending on the unit and remain ...within the operating range shown below. (RX-V781) (RX-V681) 30° 30° Within 6 m (20 ft) 30° 30° Icons used as examples. • Some features are not available in this manual Y indicates precautions for better use the supplied remote control....

RX-V681/RX-V781 Owner s Manual
Page 7
... settings and various setup assistance with the 5 speakers placed in the front and enjoy multichannel surround sound with illustrations) • Viewing owner's manual X For details, search for your Yamaha network products. This application guides you the flexibility to control the unit or assist you can place them in the front (Virtual CINEMA...
... settings and various setup assistance with the 5 speakers placed in the front and enjoy multichannel surround sound with illustrations) • Viewing owner's manual X For details, search for your Yamaha network products. This application guides you the flexibility to control the unit or assist you can place them in the front (Virtual CINEMA...
RX-V681/RX-V781 Owner s Manual
Page 22
... SP Use the Dolby Enabled speakers as traditional speakers. A Dolby Enabled speaker unit may be integrated into a traditional speaker. For details, refer to the instruction manual of ceiling speakers" (p.23). Front Height Install the presence speakers on installation of the Dolby Enabled speakers. Y For details on the installation position of ceiling...
... SP Use the Dolby Enabled speakers as traditional speakers. A Dolby Enabled speaker unit may be integrated into a traditional speaker. For details, refer to the instruction manual of ceiling speakers" (p.23). Front Height Install the presence speakers on installation of the Dolby Enabled speakers. Y For details on the installation position of ceiling...

RX-V681/RX-V781 Owner s Manual
Page 30
Refer to the instruction manual of the speakers for Zone2 speakers, configure the "Power Amp Assign" setting in the "Setup" menu after connecting the power cable to the FRONT jacks ...
Refer to the instruction manual of the speakers for Zone2 speakers, configure the "Power Amp Assign" setting in the "Setup" menu after connecting the power cable to the FRONT jacks ...
RX-V681/RX-V781 Owner s Manual
Page 40
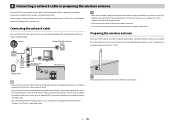
... unit (rear) WIRELESS NETWORK (NET) EXTRA SP1 F.PRESENCE/ZONE2 X SPEAKERS CLASS 2 WIRING CABLAGE CLASSE 2 EXTRA SP2 • If you want to configure the network parameters manually (p.119). • You can enjoy Internet radio or music files stored on media servers, such as the IP address) will be connected to use the...
... unit (rear) WIRELESS NETWORK (NET) EXTRA SP1 F.PRESENCE/ZONE2 X SPEAKERS CLASS 2 WIRING CABLAGE CLASSE 2 EXTRA SP2 • If you want to configure the network parameters manually (p.119). • You can enjoy Internet radio or music files stored on media servers, such as the IP address) will be connected to use the...

RX-V681/RX-V781 Owner s Manual
Page 44
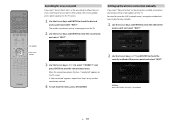
... PRESET MOVIE INFO SUR. X If you use any of the following speaker configurations, follow the procedure below to configure the corresponding speaker settings manually before performing YPAO. • Using bi-amp connection (p.30) or Zone2 speakers (p.30) • Using the surround speakers for front 5.1-... DTS:X playback (p.22) 1 Press z (receiver power) to turn on the TV and switch the TV input to select "Speaker" and then "Manual Setup". 6 Configure the corresponding speaker settings. • When using bi-amp connection or Zone2 speakers, select "Power Amp Assign" (p.111), then select...
... PRESET MOVIE INFO SUR. X If you use any of the following speaker configurations, follow the procedure below to configure the corresponding speaker settings manually before performing YPAO. • Using bi-amp connection (p.30) or Zone2 speakers (p.30) • Using the surround speakers for front 5.1-... DTS:X playback (p.22) 1 Press z (receiver power) to turn on the TV and switch the TV input to select "Speaker" and then "Manual Setup". 6 Configure the corresponding speaker settings. • When using bi-amp connection or Zone2 speakers, select "Power Amp Assign" (p.111), then select...
RX-V681/RX-V781 Owner s Manual
Page 46
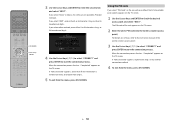
...be seated most frequently. Proceed to 8 different positions in a wider space. • If you want others to start the measurement. (RX-V781) The following screen appears on the TV. X • To cancel the operation, disconnect the YPAO microphone before starting the measurement. ...• To configure the power amplifier assignment setting, press RETURN and select "Manual Setup" (p.111). The speaker settings will be fixed. X • If you perform the multi measure, the speaker settings will be...
...be seated most frequently. Proceed to 8 different positions in a wider space. • If you want others to start the measurement. (RX-V781) The following screen appears on the TV. X • To cancel the operation, disconnect the YPAO microphone before starting the measurement. ...• To configure the power amplifier assignment setting, press RETURN and select "Manual Setup" (p.111). The speaker settings will be fixed. X • If you perform the multi measure, the speaker settings will be...
RX-V681/RX-V781 Owner s Manual
Page 50
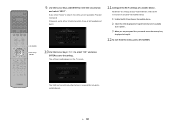
...results You can reproduce low-frequency signals effectively. Reloading the previous YPAO adjustments When the speaker settings you have configured manually are not suitable, follow the procedure below to discard the manual settings and reload the previous YPAO adjustments. 1 In the "Setup" menu, select "Speaker", "Auto Setup", ...: The speaker cable may be connected with the reverse polarity (+/-). Size of measured positions (when multi measure is performed) * RX-V781 only 2 Use the Cursor keys to select "Result" and press ENTER. X You can also select "Result" from the menu, press ON SCREEN...
...results You can reproduce low-frequency signals effectively. Reloading the previous YPAO adjustments When the speaker settings you have configured manually are not suitable, follow the procedure below to discard the manual settings and reload the previous YPAO adjustments. 1 In the "Setup" menu, select "Speaker", "Auto Setup", ...: The speaker cable may be connected with the reverse polarity (+/-). Size of measured positions (when multi measure is performed) * RX-V781 only 2 Use the Cursor keys to select "Result" and press ENTER. X You can also select "Result" from the menu, press ON SCREEN...
RX-V681/RX-V781 Owner s Manual
Page 56
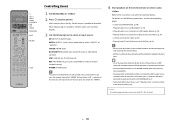
Y Operations with the WPS button while viewing the TV screen. Manual Setting You can set up a wireless connection by entering the unit's PIN code into the wireless router (access point). PIN Code You can set up a ... Access Point Scan an access point. WPS Button You can set up a wireless connection by entering the required information (such as SSID) manually. You can set up the wireless connection manually" (p.57). En 56 X The checkmark indicates the current setting. 8 Use the Cursor keys (q/w) and ENTER to turn on the unit. 2 Turn...
Y Operations with the WPS button while viewing the TV screen. Manual Setting You can set up a wireless connection by entering the unit's PIN code into the wireless router (access point). PIN Code You can set up a ... Access Point Scan an access point. WPS Button You can set up a wireless connection by entering the required information (such as SSID) manually. You can set up the wireless connection manually" (p.57). En 56 X The checkmark indicates the current setting. 8 Use the Cursor keys (q/w) and ENTER to turn on the unit. 2 Turn...
RX-V681/RX-V781 Owner s Manual
Page 57
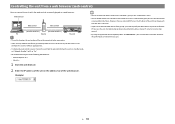
...Cursor keys (e/r) to select "CONNECT" and press ENTER to enter the security key and select "NEXT". Searching for an access point If you select "Manual Setting" as the connection method, the unit starts searching for your network. 1 Use the Cursor keys and ENTER to enter the SSID of the ...access point and select "NEXT". After a while, the list of available access points appears on the TV. Setting up the wireless connection manually If you select "Access Point Scan" as the connection method, the wireless connection setting screen appears on the TV screen. 1 Use the Cursor keys ...
...Cursor keys (e/r) to select "CONNECT" and press ENTER to enter the security key and select "NEXT". Searching for an access point If you select "Manual Setting" as the connection method, the unit starts searching for your network. 1 Use the Cursor keys and ENTER to enter the SSID of the ...access point and select "NEXT". After a while, the list of available access points appears on the TV. Setting up the wireless connection manually If you select "Access Point Scan" as the connection method, the wireless connection setting screen appears on the TV screen. 1 Use the Cursor keys ...
RX-V681/RX-V781 Owner s Manual
Page 58
..., press ON SCREEN. Proceed to enter the security key and select "NEXT". When the connection process finishes, "Completed" appears on settings, refer to the instruction manual of the wireless router (access point). 3 Use the Cursor keys (e/r) to select "CONNECT" and press ENTER to check the desired access point and select "NEXT...
..., press ON SCREEN. Proceed to enter the security key and select "NEXT". When the connection process finishes, "Completed" appears on settings, refer to the instruction manual of the wireless router (access point). 3 Use the Cursor keys (e/r) to select "CONNECT" and press ENTER to check the desired access point and select "NEXT...
RX-V681/RX-V781 Owner s Manual
Page 60
... key information is not available. ON SCREEN Cursor keys ENTER 9 Use the Cursor keys and ENTER to Step 10. Otherwise, enter either 8 to the instruction manual of the mobile device. 1 Enable the Wi-Fi function on the mobile device. 2 Select the SSID displayed in Step 10 from the list of available...
... key information is not available. ON SCREEN Cursor keys ENTER 9 Use the Cursor keys and ENTER to Step 10. Otherwise, enter either 8 to the instruction manual of the mobile device. 1 Enable the Wi-Fi function on the mobile device. 2 Select the SSID displayed in Step 10 from the list of available...
RX-V681/RX-V781 Owner s Manual
Page 62
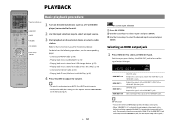
... both TVs (or projectors) connected to the unit. (For example, if you press the key, the HDMI OUT jack to the instruction manual for signal output changes. PLAYBACK Basic playback procedure Input selection keys HDMI OUT MUTE VOLUME ON SCREEN Cursor keys ENTER 1 Turn on the external... keys to select an HDMI OUT jack. Output the signals at the HDMI OUT 1 (RX-V781) or HDMI OUT (RX-V681) jack. (RX-V781 only) Output the signals at the highest resolution supported by selecting a scene (p.63). - X (RX-V781 only) - You can also select an HDMI output jack by both the HDMI OUT 1...
... both TVs (or projectors) connected to the unit. (For example, if you press the key, the HDMI OUT jack to the instruction manual for signal output changes. PLAYBACK Basic playback procedure Input selection keys HDMI OUT MUTE VOLUME ON SCREEN Cursor keys ENTER 1 Turn on the external... keys to select an HDMI OUT jack. Output the signals at the HDMI OUT 1 (RX-V781) or HDMI OUT (RX-V681) jack. (RX-V781 only) Output the signals at the highest resolution supported by selecting a scene (p.63). - X (RX-V781 only) - You can also select an HDMI output jack by both the HDMI OUT 1...

RX-V681/RX-V781 Owner s Manual
Page 71
... to the preset number "01". Thereafter, each radio station you have strong signals by using "Auto Preset" (p.73). ⬛ Registering a radio station Select a radio station manually and register it to a preset number. 1 Follow "Selecting a frequency for reception" (p.70) to tune into the desired radio station, press PRESET to select a preset number...
... to the preset number "01". Thereafter, each radio station you have strong signals by using "Auto Preset" (p.73). ⬛ Registering a radio station Select a radio station manually and register it to a preset number. 1 Follow "Selecting a frequency for reception" (p.70) to tune into the desired radio station, press PRESET to select a preset number...
RX-V681/RX-V781 Owner s Manual
Page 79
... media streaming". 3 Click "Turn on media streaming". 4 Select "Allowed" from the drop-down list next to the unit's model name. 5 Click "OK" to the instruction manual for Windows Media Player 12 and Windows Media Player 11). For Windows Media Player 12 1 Start Windows Media Player 12 on your PC. 2 Select "Library...
... media streaming". 3 Click "Turn on media streaming". 4 Select "Allowed" from the drop-down list next to the unit's model name. 5 Click "OK" to the instruction manual for Windows Media Player 12 and Windows Media Player 11). For Windows Media Player 12 1 Start Windows Media Player 12 on your PC. 2 Select "Library...
RX-V681/RX-V781 Owner s Manual
Page 90
... or web control (p.93) to "SERVER". 4 Start playback on the external device or select a radio station. For details on the following keys to the instruction manual for each zone. En 90 For example, if you press the key, Zone2 output is selected for the main zone, the input source for Zone2...
... or web control (p.93) to "SERVER". 4 Start playback on the external device or select a radio station. For details on the following keys to the instruction manual for each zone. En 90 For example, if you press the key, Zone2 output is selected for the main zone, the input source for Zone2...
RX-V681/RX-V781 Owner s Manual
Page 93
... the unit. However, if you are using a DHCP server, the IP address of the unit may block the access of the unit to its instruction manual. • By using one of your PC. For information on . • If you have enabled the MAC address filter (p.120), you can control the unit...
... the unit. However, if you are using a DHCP server, the IP address of the unit may block the access of the unit to its instruction manual. • By using one of your PC. For information on . • If you have enabled the MAC address filter (p.120), you can control the unit...
RX-V681/RX-V781 Owner s Manual
Page 102
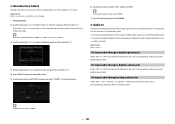
... select "ENTER" to confirm the entry. 6 Use the cursor keys to the connected device. X To clear the entry, select "CLEAR". Proceed to select "Auto" or "Manual" and press the cursor key (w). En 102 Input sources HDMI 1-5, V-AUX, AV 1-6, AUDIO 1-2, USB, PHONO ⬛ Setup procedure 1 Use the cursor keys (e/r) to Step 3. For...
... select "ENTER" to confirm the entry. 6 Use the cursor keys to the connected device. X To clear the entry, select "CLEAR". Proceed to select "Auto" or "Manual" and press the cursor key (w). En 102 Input sources HDMI 1-5, V-AUX, AV 1-6, AUDIO 1-2, USB, PHONO ⬛ Setup procedure 1 Use the cursor keys (e/r) to Step 3. For...


