
MCXSP10 Manual
Page 5
... OPERATION SOUND FIELD PROGRAMS CONTENTS INTRODUCTION FEATURES 2 GETTING STARTED 3 Supplied accessories 3 Installing batteries in the remote control 3 CONTROLS AND FUNCTIONS 4 Front panel 4 Remote control 6 Front panel display 9 Rear panel 11 PREPARATION CONNECTIONS 12 Placing speakers 12 Connecting speakers 13...DVD player, a DVD recorder, a VCR or an STB 19 Connecting a CD player, an MD player or a tape deck 21 Connecting a YAMAHA iPod universal dock ........ 22 Connecting a multi-format player or an external decoder 23 Connecting a game console, a video camera or a portable ...
... OPERATION SOUND FIELD PROGRAMS CONTENTS INTRODUCTION FEATURES 2 GETTING STARTED 3 Supplied accessories 3 Installing batteries in the remote control 3 CONTROLS AND FUNCTIONS 4 Front panel 4 Remote control 6 Front panel display 9 Rear panel 11 PREPARATION CONNECTIONS 12 Placing speakers 12 Connecting speakers 13...DVD player, a DVD recorder, a VCR or an STB 19 Connecting a CD player, an MD player or a tape deck 21 Connecting a YAMAHA iPod universal dock ........ 22 Connecting a multi-format player or an external decoder 23 Connecting a game console, a video camera or a portable ...

MCXSP10 Manual
Page 6
...; Optical and coaxial digital audio signal jacks ◆ Sleep timer ◆ Cinema and music night listening modes ◆ Remote control with preset remote control codes, backlighting input selector buttons, and an iPod (stationed in a YAMAHA iPod universal dock connected to the DOCK terminal) controlling capability ◆ Zone 2 custom installation facility ◆ Zone switching...
...; Optical and coaxial digital audio signal jacks ◆ Sleep timer ◆ Cinema and music night listening modes ◆ Remote control with preset remote control codes, backlighting input selector buttons, and an iPod (stationed in a YAMAHA iPod universal dock connected to the DOCK terminal) controlling capability ◆ Zone 2 custom installation facility ◆ Zone switching...

MCXSP10 Manual
Page 7
... the following conditions: - Read the packaging carefully as alkaline and manganese batteries) together. dispose of them immediately. Remote control CODE SET TRANSMIT POWER TV POWER AV STANDBY POWER CD DVD MD CD-R CBL DTV SLEEP XM TUNER MULTI CH IN V-AUX DVR TV VOL TV...; Do not throw away batteries with your local regulations. • If the remote control is cleared, insert new batteries, set up the remote control code and program any acquired functions that you received all of the batteries if you notice the following parts. INTRODUCTION GETTING STARTED GETTING...
... the following conditions: - Read the packaging carefully as alkaline and manganese batteries) together. dispose of them immediately. Remote control CODE SET TRANSMIT POWER TV POWER AV STANDBY POWER CD DVD MD CD-R CBL DTV SLEEP XM TUNER MULTI CH IN V-AUX DVR TV VOL TV...; Do not throw away batteries with your local regulations. • If the remote control is cleared, insert new batteries, set up the remote control code and program any acquired functions that you received all of the batteries if you notice the following parts. INTRODUCTION GETTING STARTED GETTING...

MCXSP10 Manual
Page 8
...is selected as the input source. Notes • In the standby mode, this unit consumes a small amount of power in order to receive infrared signals from the remote control (see page 8). 4 Front panel display Shows information about the operational status of this unit can reproduce sound. • This ...button is operational only when MASTER ON/OFF is pressed inward to the ON position. 3 Remote control sensor Receives signals from the remote control. • When you want to adjust when "TUNER" is not selected as the input source (see page 35). 6 ...
...is selected as the input source. Notes • In the standby mode, this unit consumes a small amount of power in order to receive infrared signals from the remote control (see page 8). 4 Front panel display Shows information about the operational status of this unit can reproduce sound. • This ...button is operational only when MASTER ON/OFF is pressed inward to the ON position. 3 Remote control sensor Receives signals from the remote control. • When you want to adjust when "TUNER" is not selected as the input source (see page 35). 6 ...

MCXSP10 Manual
Page 9
... page 96). Notes • The audio signals input at the PORTABLE mini jack take priority over the ones input at the DOCK terminal on the remote control). I INPUT MODE Selects either digital or analog input signals exclusively or sets this unit to control between FM and AM when "TUNER" is connected...
... page 96). Notes • The audio signals input at the PORTABLE mini jack take priority over the ones input at the DOCK terminal on the remote control). I INPUT MODE Selects either digital or analog input signals exclusively or sets this unit to control between FM and AM when "TUNER" is connected...

MCXSP10 Manual
Page 10
... ENTER A-E/CAT. to the U.S.A. DISPLAY AUDIO G H I J K 3 Input selector buttons Select the input source you press any buttons on the remote control, showing which source component is selected as the input source. to switch between 5.1 and 6.1-channel playback of multi-channel sources (see page 38).... 0 NIGHT 10 PRESET/CH STRAIGHT ENT. Press this button repeatedly to toggle as the input source. 1 2 3 CODE SET TRANSMIT POWER TV POWER AV STANDBY POWER CD DVD MD CD-R CBL DTV SLEEP XM TUNER MULTI CH IN 0 A B C D ■ Controlling this unit. 1 Infrared window...
... ENTER A-E/CAT. to the U.S.A. DISPLAY AUDIO G H I J K 3 Input selector buttons Select the input source you press any buttons on the remote control, showing which source component is selected as the input source. to switch between 5.1 and 6.1-channel playback of multi-channel sources (see page 38).... 0 NIGHT 10 PRESET/CH STRAIGHT ENT. Press this button repeatedly to toggle as the input source. 1 2 3 CODE SET TRANSMIT POWER TV POWER AV STANDBY POWER CD DVD MD CD-R CBL DTV SLEEP XM TUNER MULTI CH IN 0 A B C D ■ Controlling this unit. 1 Infrared window...
MCXSP10 Manual
Page 11
... page 33). A STANDBY Sets this unit (see page 33). CONTROLS AND FUNCTIONS F Component selector switch Selects the operation mode of the remote control buttons in the shaded area. SOURCE Operates the component selected with an input selector button (see page 77). Press again to restore ...the audio output to the previous menu level when adjusting the "SET MENU" parameters. 0 TRANSMIT indicator Flashes while the remote control is sending infrared signals. H STRAIGHT (EFFECT) Turns the sound field programs off the night listening modes (see page 27). B POWER ...
... page 33). A STANDBY Sets this unit (see page 33). CONTROLS AND FUNCTIONS F Component selector switch Selects the operation mode of the remote control buttons in the shaded area. SOURCE Operates the component selected with an input selector button (see page 77). Press again to restore ...the audio output to the previous menu level when adjusting the "SET MENU" parameters. 0 TRANSMIT indicator Flashes while the remote control is sending infrared signals. H STRAIGHT (EFFECT) Turns the sound field programs off the night listening modes (see page 27). B POWER ...

MCXSP10 Manual
Page 12
...DISPLAY STRAIGHT TONE CONTROL INPUT MODE MULTI CH INPUT EFFECT VIDEO VIDEO AUX L AUDIO R PORTABLE 30 30 CODE SET TRANSMIT POWER TV POWER AV STANDBY POWER MD SLEEP CD CD-R XM CBL MULTI CH IN DVD DTV TUNER V-AUX DVR TV VOL TV CH AMP VOLUME SOURCE TV... group (A to E) and u / d to select a preset station number (1 to aim the remote control directly at the remote control sensor on the remote control. • Do not drop the remote control. • Do not leave or store the remote control in the following types of high temperatures, such as near a heater or stove...
...DISPLAY STRAIGHT TONE CONTROL INPUT MODE MULTI CH INPUT EFFECT VIDEO VIDEO AUX L AUDIO R PORTABLE 30 30 CODE SET TRANSMIT POWER TV POWER AV STANDBY POWER MD SLEEP CD CD-R XM CBL MULTI CH IN DVD DTV TUNER V-AUX DVR TV VOL TV CH AMP VOLUME SOURCE TV... group (A to E) and u / d to select a preset station number (1 to aim the remote control directly at the remote control sensor on the remote control. • Do not drop the remote control. • Do not leave or store the remote control in the following types of high temperatures, such as near a heater or stove...

MCXSP10 Manual
Page 15
... DVR OUT S VIDEO FRONT MONITOR OUT SPEAKERS A SURROUND REMOTE CONTROL OUT +12V IN OUT 15mA MAX. model) E 9 DOCK terminal Use to your iPod can be stationed. C Antenna terminals See page 24 for connection information. (U.S.A. E AC OUTLET(S) Use to supply power to connect a YAMAHA iPod universal dock (such as YDS-10 sold separately...
... DVR OUT S VIDEO FRONT MONITOR OUT SPEAKERS A SURROUND REMOTE CONTROL OUT +12V IN OUT 15mA MAX. model) E 9 DOCK terminal Use to your iPod can be stationed. C Antenna terminals See page 24 for connection information. (U.S.A. E AC OUTLET(S) Use to supply power to connect a YAMAHA iPod universal dock (such as YDS-10 sold separately...

MCXSP10 Manual
Page 26
... playback of your iPod using its dedicated cable compatible with the DOCK terminal of this unit. • Once your iPod is stationed in the YAMAHA iPod universal dock. CAUTION Do not connect this unit fails, a status message appears in the front panel display. Notes • Only iPod ...AC power supply until all connections between components are supported. • You need to insert one of this unit using the supplied remote control. CONNECTIONS Connecting a YAMAHA iPod universal dock This unit is equipped with the DOCK terminal on the rear panel that allows you to connect...
... playback of your iPod using its dedicated cable compatible with the DOCK terminal of this unit. • Once your iPod is stationed in the YAMAHA iPod universal dock. CAUTION Do not connect this unit fails, a status message appears in the front panel display. Notes • Only iPod ...AC power supply until all connections between components are supported. • You need to insert one of this unit using the supplied remote control. CONNECTIONS Connecting a YAMAHA iPod universal dock This unit is equipped with the DOCK terminal on the rear panel that allows you to connect...

MCXSP10 Manual
Page 31
MASTER ON/OFF (U.S.A. model) CODE SET TRANSMIT POWER TV POWER AV STANDBY POWER CD DVD MD CD-R CBL DTV SLEEP XM TUNER MULTI CH IN V-AUX ...mode. MASTER ON OFF Front panel • Press MAIN ZONE ON/OFF on the front panel (or STANDBY on the remote control) to set the main zone to turn off this unit. PREPARATION Turning on and off the power When all ... off this unit. MAIN ZONE ON/OFF or POWER Front panel Remote control Note MAIN ZONE ON/OFF on the front panel as well as POWER and STANDBY on the remote control are complete, turn on the front panel again to release ...
MASTER ON/OFF (U.S.A. model) CODE SET TRANSMIT POWER TV POWER AV STANDBY POWER CD DVD MD CD-R CBL DTV SLEEP XM TUNER MULTI CH IN V-AUX ...mode. MASTER ON OFF Front panel • Press MAIN ZONE ON/OFF on the front panel (or STANDBY on the remote control) to set the main zone to turn off this unit. PREPARATION Turning on and off the power When all ... off this unit. MAIN ZONE ON/OFF or POWER Front panel Remote control Note MAIN ZONE ON/OFF on the front panel as well as POWER and STANDBY on the remote control are complete, turn on the front panel again to release ...

MCXSP10 Manual
Page 32
... MOVIE 2 3 4 STANDARD SELECT EXTD SUR. DISPLAY AUDIO 2,13 3-12 4 Press ENTER to the previous menu level. 1 CODE SET TRANSMIT POWER TV POWER AV STANDBY POWER CD DVD MD CD-R CBL DTV SLEEP XM TUNER MULTI CH IN V-AUX DVR TV VOL TV CH AMP VOLUME SOURCE TV (U.S.A. SET...page 78). • Altering any parameters in "BASIC SETUP" resets all parameters manually adjusted in bold under each parameter. • Press RETURN on the remote control to return to enter "BASIC SETUP". BASIC SETUP BASIC SETUP The "BASIC SETUP" feature is a useful way to set up your speakers. ENTER...
... MOVIE 2 3 4 STANDARD SELECT EXTD SUR. DISPLAY AUDIO 2,13 3-12 4 Press ENTER to the previous menu level. 1 CODE SET TRANSMIT POWER TV POWER AV STANDBY POWER CD DVD MD CD-R CBL DTV SLEEP XM TUNER MULTI CH IN V-AUX DVR TV VOL TV CH AMP VOLUME SOURCE TV (U.S.A. SET...page 78). • Altering any parameters in "BASIC SETUP" resets all parameters manually adjusted in bold under each parameter. • Press RETURN on the remote control to return to enter "BASIC SETUP". BASIC SETUP BASIC SETUP The "BASIC SETUP" feature is a useful way to set up your speakers. ENTER...

MCXSP10 Manual
Page 35
... DISPLAY STRAIGHT TONE CONTROL INPUT MODE MULTI CH INPUT EFFECT VIDEO VIDEO AUX L AUDIO R PORTABLE 2 6,7 6 3 3 2 CODE SET TRANSMIT POWER TV POWER AV STANDBY POWER CD DVD MD CD-R CBL DTV SLEEP XM TUNER MULTI CH IN V-AUX DVR TV VOL TV CH AMP VOLUME SOURCE TV TV... turned on the front panel (or press one of your CD player supports CDs encoded in DTS. SPEAKERS A B AMP SOURCE TV Front panel or SPEAKERS 9 Remote control 3 Rotate the INPUT selector on or off. model) 2 5 TV MUTE TV INPUT MUTE STEREO 1 MUSIC ENTERTAIN MOVIE 2 3 4 STANDARD SELECT EXTD ...
... DISPLAY STRAIGHT TONE CONTROL INPUT MODE MULTI CH INPUT EFFECT VIDEO VIDEO AUX L AUDIO R PORTABLE 2 6,7 6 3 3 2 CODE SET TRANSMIT POWER TV POWER AV STANDBY POWER CD DVD MD CD-R CBL DTV SLEEP XM TUNER MULTI CH IN V-AUX DVR TV VOL TV CH AMP VOLUME SOURCE TV TV... turned on the front panel (or press one of your CD player supports CDs encoded in DTS. SPEAKERS A B AMP SOURCE TV Front panel or SPEAKERS 9 Remote control 3 Rotate the INPUT selector on or off. model) 2 5 TV MUTE TV INPUT MUTE STEREO 1 MUSIC ENTERTAIN MOVIE 2 3 4 STANDARD SELECT EXTD ...

MCXSP10 Manual
Page 36
... sampled down to 48 kHz and then sound field programs are applied. • To display information about sound field programs. Front panel Remote control PROGRAM 6 Press TONE CONTROL on the front panel (or press VOLUME +/- DIRECT ST. 5 6 7 8 SPEAKERS 9 ENHANCER 0 NIGHT 10 STRAIGHT ...page 37). • Sampling frequencies higher than 48 kHz (except for details. 32 The name of the sound field program selector buttons on the remote control) to adjust the volume to the desired output level. PLAYBACK 5 Rotate VOLUME on the front panel repeatedly to select "TREBLE" or "...
... sampled down to 48 kHz and then sound field programs are applied. • To display information about sound field programs. Front panel Remote control PROGRAM 6 Press TONE CONTROL on the front panel (or press VOLUME +/- DIRECT ST. 5 6 7 8 SPEAKERS 9 ENHANCER 0 NIGHT 10 STRAIGHT ...page 37). • Sampling frequencies higher than 48 kHz (except for details. 32 The name of the sound field program selector buttons on the remote control) to adjust the volume to the desired output level. PLAYBACK 5 Rotate VOLUME on the front panel repeatedly to select "TREBLE" or "...
MCXSP10 Manual
Page 37
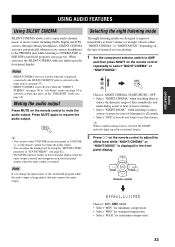
... mode SILENT CINEMA allows you to CINEMA DSP or HiFi DSP sound field programs (see page 64). Press MUTE again to mute the audio output. Remote control Effect.Lvl:MID Choices: MIN, MID, MAX • Select "MIN" for minimum compression. • Select "MID" for standard compression. • Select ...films to reduce the dynamic range of -listening for maximum compression. 33 y When a night listening mode is being muted, this feature. on the remote control to adjust the effect level while "NIGHT:CINEMA" or "NIGHT:MUSIC" is displayed in the front panel display. Note If you are designed...
... mode SILENT CINEMA allows you to CINEMA DSP or HiFi DSP sound field programs (see page 64). Press MUTE again to mute the audio output. Remote control Effect.Lvl:MID Choices: MIN, MID, MAX • Select "MIN" for minimum compression. • Select "MID" for standard compression. • Select ...films to reduce the dynamic range of -listening for maximum compression. 33 y When a night listening mode is being muted, this feature. on the remote control to adjust the effect level while "NIGHT:CINEMA" or "NIGHT:MUSIC" is displayed in the front panel display. Note If you are designed...

MCXSP10 Manual
Page 38
... input jacks. Using the sleep timer Use this feature to automatically set this unit by using a digital audio connection, be performed correctly depending on the remote control to select the type of time. USING AUDIO FEATURES y "NIGHT:CINEMA" and "NIGHT:MUSIC" adjustments are stored independently.
... input jacks. Using the sleep timer Use this feature to automatically set this unit by using a digital audio connection, be performed correctly depending on the remote control to select the type of time. USING AUDIO FEATURES y "NIGHT:CINEMA" and "NIGHT:MUSIC" adjustments are stored independently.

MCXSP10 Manual
Page 39
... y This operation can adjust the output level of time. RETURN DISPLAY XM MEMORY REC AUDIO DISC SKIP (U.S.A. y Once you press LEVEL on the remote control, you want to adjust and then press LEVEL +/- on the front panel to adjust the surround right speaker output level. • Select ...CAT. B" to adjust the surround back speaker output level. • Select "SUR. BASIC OPERATION USING AUDIO FEATURES 3 Press SLEEP on the remote control repeatedly to set the amount of each speaker while listening to a music source. SLEEP SLEEP 120min SLEEP 90min SLEEP OFF SLEEP 30min SLEEP ...
... y This operation can adjust the output level of time. RETURN DISPLAY XM MEMORY REC AUDIO DISC SKIP (U.S.A. y Once you press LEVEL on the remote control, you want to adjust and then press LEVEL +/- on the front panel to adjust the surround right speaker output level. • Select ...CAT. B" to adjust the surround back speaker output level. • Select "SUR. BASIC OPERATION USING AUDIO FEATURES 3 Press SLEEP on the remote control repeatedly to set the amount of each speaker while listening to a music source. SLEEP SLEEP 120min SLEEP 90min SLEEP OFF SLEEP 30min SLEEP ...
MCXSP10 Manual
Page 40
...back, "Not Available" appears in the front panel display and in 2-channel or 6-channel stereo. ENTER A-E/CAT. 3 Press ENTER on the remote control when you have completed your listening experience by a lossy compression scheme where the audio is selected. 36 USING AUDIO FEATURES 2 Press j / i... on the remote control to adjust the speaker output level. • Press i to increase the value. • Press j to +10 dB PRESET/CH A-E/CAT....
...back, "Not Available" appears in the front panel display and in 2-channel or 6-channel stereo. ENTER A-E/CAT. 3 Press ENTER on the remote control when you have completed your listening experience by a lossy compression scheme where the audio is selected. 36 USING AUDIO FEATURES 2 Press j / i... on the remote control to adjust the speaker output level. • Press i to increase the value. • Press j to +10 dB PRESET/CH A-E/CAT....
MCXSP10 Manual
Page 41
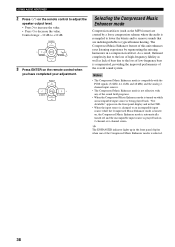
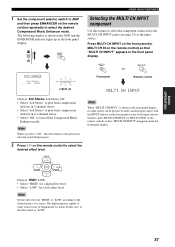
...effect level to "HIGH" or "LOW" according to the characteristics of the input selector buttons), press MULTI CH INPUT (or MULTI CH IN on the remote control) so that "MULTI CH INPUT" appears in 6.1-channel stereo. • Select "Off " to turn off the Compressed Music Enhancer mode. PRESET/CH... A-E/CAT. MULTI CH INPUT Front panel MULTI CH IN or Remote control MULTI CH INPUT Choices: 2ch Stereo, 6ch Stereo, Off • Select "2ch Stereo" to play back compression artifacts in 2-channel stereo. • ...
...effect level to "HIGH" or "LOW" according to the characteristics of the input selector buttons), press MULTI CH INPUT (or MULTI CH IN on the remote control) so that "MULTI CH INPUT" appears in 6.1-channel stereo. • Select "Off " to turn off the Compressed Music Enhancer mode. PRESET/CH... A-E/CAT. MULTI CH INPUT Front panel MULTI CH IN or Remote control MULTI CH INPUT Choices: 2ch Stereo, 6ch Stereo, Off • Select "2ch Stereo" to play back compression artifacts in 2-channel stereo. • ...
MCXSP10 Manual
Page 42
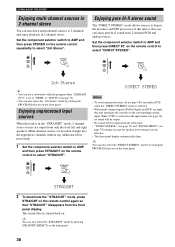
...-channel sources to select "STRAIGHT". AMP SOURCE TV STRAIGHT ENT. Set the component selector switch to AMP and then press STEREO on the remote control to 2 channels and enjoy playback in 2-channel stereo. y You can also select the "2ch Stereo" mode by rotating the PROGRAM...decoded straight into the appropriate channels without any additional effect processing. 1 Set the component selector switch to AMP and then press STRAIGHT on the remote control repeatedly to "SWFR" or "BOTH" (see page 78) settings (except for speaker level settings) are output from the front panel display...
...-channel sources to select "STRAIGHT". AMP SOURCE TV STRAIGHT ENT. Set the component selector switch to AMP and then press STEREO on the remote control to 2 channels and enjoy playback in 2-channel stereo. y You can also select the "2ch Stereo" mode by rotating the PROGRAM...decoded straight into the appropriate channels without any additional effect processing. 1 Set the component selector switch to AMP and then press STRAIGHT on the remote control repeatedly to "SWFR" or "BOTH" (see page 78) settings (except for speaker level settings) are output from the front panel display...

