
Owner's Manual
Page 9
... 17). FRONT TRIGGER OUT CENTER SPEAKERS EXTRA SP ZONE2/PRESENCE SINGLE CENTER SURROUND SINGLE SURROUND BACK/ BI-AMP CENTER OPTICAL ( TV ) AV 1 COAXIAL AV 2 COAXIAL (CD) AV 3 OPTICAL AV 4 AV 5 AV 6 AV OUT AUDIO1 AUDIO2 FRONT SURROUND SUR.BACK SUBWOOFER MULTI CH INPUT AUDIO OUT ZONE2 OUT FRONT SURROUND ...left, center, surround and surround back speakers (see page 20). b DOCK jack For connecting a Yamaha iPod universal dock (YDS-11, sold separately) or a Bluetooth wireless audio receiver (YBA-10, sold separately) (see page 15). f REMOTE IN/OUT jacks For connecting an...
... 17). FRONT TRIGGER OUT CENTER SPEAKERS EXTRA SP ZONE2/PRESENCE SINGLE CENTER SURROUND SINGLE SURROUND BACK/ BI-AMP CENTER OPTICAL ( TV ) AV 1 COAXIAL AV 2 COAXIAL (CD) AV 3 OPTICAL AV 4 AV 5 AV 6 AV OUT AUDIO1 AUDIO2 FRONT SURROUND SUR.BACK SUBWOOFER MULTI CH INPUT AUDIO OUT ZONE2 OUT FRONT SURROUND ...left, center, surround and surround back speakers (see page 20). b DOCK jack For connecting a Yamaha iPod universal dock (YDS-11, sold separately) or a Bluetooth wireless audio receiver (YBA-10, sold separately) (see page 15). f REMOTE IN/OUT jacks For connecting an...
Owner's Manual
Page 15
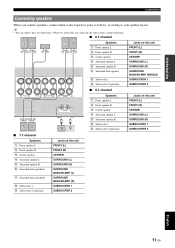
... d Surround speaker L e Surround speaker R f Surround back speaker L g Surround back speaker R h Subwoofer 1 i Subwoofer 2 (optional) Jacks on this unit FRONT (L) FRONT (R) CENTER SURROUND (L) SURROUND (R) SURROUND BACK/BI-AMP (L) SURROUND BACK/BI-AMP (R) SUBWOOFER 1 SUBWOOFER 2 ADVANCED OPERATION ADDITIONAL INFORMATION APPENDIX English 11 En INTRODUCTION PREPARATION BASIC OPERATION Connections Connecting speakers When you connect speakers, connect them . ■...
... d Surround speaker L e Surround speaker R f Surround back speaker L g Surround back speaker R h Subwoofer 1 i Subwoofer 2 (optional) Jacks on this unit FRONT (L) FRONT (R) CENTER SURROUND (L) SURROUND (R) SURROUND BACK/BI-AMP (L) SURROUND BACK/BI-AMP (R) SUBWOOFER 1 SUBWOOFER 2 ADVANCED OPERATION ADDITIONAL INFORMATION APPENDIX English 11 En INTRODUCTION PREPARATION BASIC OPERATION Connections Connecting speakers When you connect speakers, connect them . ■...
Owner's Manual
Page 16
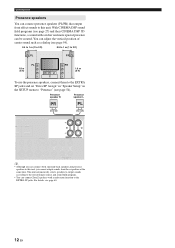
... and presence speakers to this unit. Presence speaker R Presence speaker L PR PL DMI 3 HDMI 4 SPEAKERS EXTRA SP ZONE2/PRESENCE SINGLE FRONT CENTER SURROUND SURROUND BACK/ BI-AMP y • Although you cannot output sounds from those speakers at the same time. With CINEMA DSP sound field programs (see page 27) and their CINEMA...
... and presence speakers to this unit. Presence speaker R Presence speaker L PR PL DMI 3 HDMI 4 SPEAKERS EXTRA SP ZONE2/PRESENCE SINGLE FRONT CENTER SURROUND SURROUND BACK/ BI-AMP y • Although you cannot output sounds from those speakers at the same time. With CINEMA DSP sound field programs (see page 27) and their CINEMA...
Owner's Manual
Page 17
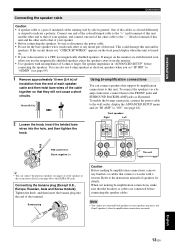
...short circuits. 10 mm (0.4 in "ADVANCED SETUP" before connecting the speaker cables. If the circuit shorts out, "CHECK SP WIRES!" To enable the bi-amp connection, connect the power cable to the wall outlet, display the ADVANCED SETUP menu and set "SP IMP." Refer to indicate a polarity. ADVANCED ...can also use magnetically shielded speakers. To connect the speakers via a biamp connection, connect them to the FRONT jacks and SURROUND BACK/BI-AMP jacks as the front speakers when you use the magnetically shielded speakers, place the speakers away from the end of each speaker cable and...
...short circuits. 10 mm (0.4 in "ADVANCED SETUP" before connecting the speaker cables. If the circuit shorts out, "CHECK SP WIRES!" To enable the bi-amp connection, connect the power cable to the wall outlet, display the ADVANCED SETUP menu and set "SP IMP." Refer to indicate a polarity. ADVANCED ...can also use magnetically shielded speakers. To connect the speakers via a biamp connection, connect them to the FRONT jacks and SURROUND BACK/BI-AMP jacks as the front speakers when you use the magnetically shielded speakers, place the speakers away from the end of each speaker cable and...

Owner's Manual
Page 64
... feature with minimum speaker impedance information for the Zone2 speakers, you to "Zone2" (see page 54). Infrared signal receiver This unit Yamaha component Connect the speakers in the main zone. Set "Extra SP Assign" to set this unit as the front speaker... BACK/ BI-AMP CENTER OPTICAL ( TV ) AV 1 COAXIAL AV 2 COAXIAL (CD) AV 3 OPTICAL AV 4 AV 5 AV 6 AV OUT AUDIO1 AUDIO2 FRONT SURROUND SUR.BACK SUBWOOFER MULTI CH INPUT AUDIO OUT ZONE2 OUT FRONT SURROUND SUR. BACK PRE OUT 1 SUBWOOFER 2 This unit Main zone y • You can connect the amplifier/receiver in ...
... feature with minimum speaker impedance information for the Zone2 speakers, you to "Zone2" (see page 54). Infrared signal receiver This unit Yamaha component Connect the speakers in the main zone. Set "Extra SP Assign" to set this unit as the front speaker... BACK/ BI-AMP CENTER OPTICAL ( TV ) AV 1 COAXIAL AV 2 COAXIAL (CD) AV 3 OPTICAL AV 4 AV 5 AV 6 AV OUT AUDIO1 AUDIO2 FRONT SURROUND SUR.BACK SUBWOOFER MULTI CH INPUT AUDIO OUT ZONE2 OUT FRONT SURROUND SUR. BACK PRE OUT 1 SUBWOOFER 2 This unit Main zone y • You can connect the amplifier/receiver in ...

Owner's Manual
Page 68
...remote control by repeating steps 3 and 4. 5 Press AMAIN ZONE ON/OFF, turns off this system, and press AMAIN ZONE ON/OFF again. For bi-amp connection, see page 13. MON.CHK - CANCEL: Initialization. 4 Press PSTRAIGHT a few times to initial factory settings. ADVANCED SETUP 3 Rotate the ...them . 1 Set this unit turns on the front panel display. By setting the receivers to change. SR PIN -XXX Choices: RESET/CANCEL* Resets Parental lock cord when using multiple Yamaha AV receivers, you want to have the same remote control ID. The value selected here becomes effective...
...remote control by repeating steps 3 and 4. 5 Press AMAIN ZONE ON/OFF, turns off this system, and press AMAIN ZONE ON/OFF again. For bi-amp connection, see page 13. MON.CHK - CANCEL: Initialization. 4 Press PSTRAIGHT a few times to initial factory settings. ADVANCED SETUP 3 Rotate the ...them . 1 Set this unit turns on the front panel display. By setting the receivers to change. SR PIN -XXX Choices: RESET/CANCEL* Resets Parental lock cord when using multiple Yamaha AV receivers, you want to have the same remote control ID. The value selected here becomes effective...
Owner's Manual
Page 85
...), troubleshooting 74 Automatic setup 21 AV 1-6 jacks, rear panel 5 AV OUT jacks, rear panel 5 ■B B)Level, speaker setup 56 Basic operation, SETUP menu 54 BI-AMP connection switch, ADVANCED SETUP 64 Bluetooth component playback 44 Bluetooth wireless audio receiver connection 19 Bluetooth, troubleshooting 74 ... Connecting AM antenna 20 Connecting audio and video player 16 Connecting audio player 17 Connecting Bluetooth wireless audio Receiver 19 Connecting external amplifier 18 Connecting external decoder 18 Connecting FM antenna 20 Connecting iPod universal dock 19 ...
...), troubleshooting 74 Automatic setup 21 AV 1-6 jacks, rear panel 5 AV OUT jacks, rear panel 5 ■B B)Level, speaker setup 56 Basic operation, SETUP menu 54 BI-AMP connection switch, ADVANCED SETUP 64 Bluetooth component playback 44 Bluetooth wireless audio receiver connection 19 Bluetooth, troubleshooting 74 ... Connecting AM antenna 20 Connecting audio and video player 16 Connecting audio player 17 Connecting Bluetooth wireless audio Receiver 19 Connecting external amplifier 18 Connecting external decoder 18 Connecting FM antenna 20 Connecting iPod universal dock 19 ...

Hookup Instructions
Page 1
TRIGGER OUT FRONT CENTER SPEAKERS EXTRA SP ZONE2/PRESENCE SINGLE CENTER SURROUND SINGLE SURROUND BACK/ BI-AMP CENTER OPTICAL ( TV ) COAXIAL AV 2 COAXIAL (CD) AV 3 OPTICAL AV 4 AV 5 AV 6 AV OUT AUDIO1 AUDIO2 FRONT SURROUND SUR.BACK SUBWOOFER MULTI CH INPUT AUDIO OUT ZONE2 OUT FRONT SURROUND SUR. BACK PRE...NOTE: To select the Cable/Satellite Box as a source for Zone 2, the Audio 2 input on the receiver must be selected in Zone 2 OUT PB VIDEO Y 12V 0.1A MAX. RX-V765 Zone 2 Hookup Example Zone 2 PREPARATION TV HDMI IN HDMI HDMI HDMI OUT IN 1 IN 2 ...
TRIGGER OUT FRONT CENTER SPEAKERS EXTRA SP ZONE2/PRESENCE SINGLE CENTER SURROUND SINGLE SURROUND BACK/ BI-AMP CENTER OPTICAL ( TV ) COAXIAL AV 2 COAXIAL (CD) AV 3 OPTICAL AV 4 AV 5 AV 6 AV OUT AUDIO1 AUDIO2 FRONT SURROUND SUR.BACK SUBWOOFER MULTI CH INPUT AUDIO OUT ZONE2 OUT FRONT SURROUND SUR. BACK PRE...NOTE: To select the Cable/Satellite Box as a source for Zone 2, the Audio 2 input on the receiver must be selected in Zone 2 OUT PB VIDEO Y 12V 0.1A MAX. RX-V765 Zone 2 Hookup Example Zone 2 PREPARATION TV HDMI IN HDMI HDMI HDMI OUT IN 1 IN 2 ...

Hookup Instructions
Page 2
... the input source of receiver. 1. Adjusting the volume of speakers for 7.1 (Surround Back terminals.) or Bi Amp (Surround Back terminals.) Setting the Extra Speaker Terminals Note: The RX-V765 remote control will...to Zone 2 the following commands will come up on the receiver LED Screen. 5. SP Set, A) Config will come up in a Yamaha iPod universal dock (such as the input source of this...the remote to AV 5-6 or Audio 1-2 by analog connection. Selecting the input source (AV5-6, AUDIO1-2, and V-AUX) of Zone 2. 2. Manual Setup, A) Config will come up on the receiver LED Screen. ...
... the input source of receiver. 1. Adjusting the volume of speakers for 7.1 (Surround Back terminals.) or Bi Amp (Surround Back terminals.) Setting the Extra Speaker Terminals Note: The RX-V765 remote control will...to Zone 2 the following commands will come up on the receiver LED Screen. 5. SP Set, A) Config will come up in a Yamaha iPod universal dock (such as the input source of this...the remote to AV 5-6 or Audio 1-2 by analog connection. Selecting the input source (AV5-6, AUDIO1-2, and V-AUX) of Zone 2. 2. Manual Setup, A) Config will come up on the receiver LED Screen. ...


