
Owner's Manual
Page 4
... iPod menu tree 73 Controlling iPod 74 Using USB and network features 75 USB and network menu tree 75 Navigating USB and network menus 76 Using a USB storage device or a USB portable audio player 77 Using a PC server or Yamaha MCX-2000 77 Using the Internet Radio 78 Using the... Setting the Parental Lock 69 Displaying the SIRIUS Satellite Radio™ information 70 Using Bluetooth™ components 71 Pairing the Bluetooth™ receiver and your headphones 44 Muting the audio output 44 Displaying the input source information 44 Using the sleep timer 45 Sound field programs 46...
... iPod menu tree 73 Controlling iPod 74 Using USB and network features 75 USB and network menu tree 75 Navigating USB and network menus 76 Using a USB storage device or a USB portable audio player 77 Using a PC server or Yamaha MCX-2000 77 Using the Internet Radio 78 Using the... Setting the Parental Lock 69 Displaying the SIRIUS Satellite Radio™ information 70 Using Bluetooth™ components 71 Pairing the Bluetooth™ receiver and your headphones 44 Muting the audio output 44 Displaying the input source information 44 Using the sleep timer 45 Sound field programs 46...
Owner's Manual
Page 6
... adjust the audio/video synchronization automatically. You can adjust the dynamic range for discrete multichannel input If you want to fully mute audio when you receive a call while watching your needs, you can use the adaptive dynamic range control feature to adjust the dynamic range automatically in the GUI screen after...
... adjust the audio/video synchronization automatically. You can adjust the dynamic range for discrete multichannel input If you want to fully mute audio when you receive a call while watching your needs, you can use the adaptive dynamic range control feature to adjust the dynamic range automatically in the GUI screen after...

Owner's Manual
Page 7
...9670; USB port to connect a USB storage device, USB Hard disc drive, or USB portable audio player ◆ NETWORK port to connect a Yamaha iPod universal dock (such as YDS-11, sold separately) HDMI™ (High-Definition Multimedia Interface) ◆ HDMI...tuning ◆ HD Radio™ digital broadcast reception capability (U.S.A. "x.v.Color" video signal transmission capability Supplied accessories Check that allows you received all sources ◆ Adaptive dynamic range controlling capability ◆ Adaptive DSP effect level controlling capability ◆ Remote control with preset ...
...9670; USB port to connect a USB storage device, USB Hard disc drive, or USB portable audio player ◆ NETWORK port to connect a Yamaha iPod universal dock (such as YDS-11, sold separately) HDMI™ (High-Definition Multimedia Interface) ◆ HDMI...tuning ◆ HD Radio™ digital broadcast reception capability (U.S.A. "x.v.Color" video signal transmission capability Supplied accessories Check that allows you received all sources ◆ Adaptive dynamic range controlling capability ◆ Adaptive DSP effect level controlling capability ◆ Remote control with preset ...
Owner's Manual
Page 8
...Fraunhofer IIS and Thomson. All rights reserved. HD Radio™ Technology Manufactured Under License From iBiquity Digital Corp. This receiver supports network connections. Circle Surround II, Dialog Clarity and TruBass technologies are incorporated under license from Dolby Laboratories. The XM name... and the Rhapsody logo are trademarks and logos owned by Neural Audio Corporation and THX Ltd. "SILENT CINEMA" is a trademark of Yamaha Corporation. MPEG Layer-3 audio coding technology licensed from Neural Audio Corporation and THX Ltd. "HDMI", the "HDMI" logo and "High...
...Fraunhofer IIS and Thomson. All rights reserved. HD Radio™ Technology Manufactured Under License From iBiquity Digital Corp. This receiver supports network connections. Circle Surround II, Dialog Clarity and TruBass technologies are incorporated under license from Dolby Laboratories. The XM name... and the Rhapsody logo are trademarks and logos owned by Neural Audio Corporation and THX Ltd. "SILENT CINEMA" is a trademark of Yamaha Corporation. MPEG Layer-3 audio coding technology licensed from Neural Audio Corporation and THX Ltd. "HDMI", the "HDMI" logo and "High...
Owner's Manual
Page 11
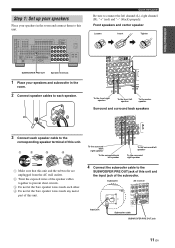
... the bare speaker wires touch any metal part of this unit. 4 Connect the subwoofer cable to the SUBWOOFER PRE OUT jack of this unit. Subwoofer AV receiver Input jack Subwoofer cable SUBWOOFER PRE OUT jack 11 En HDMI IN4 MONITOR OUT/ COMPONENT VIDEO BD/HD DVD DVD ZONE OUT A B Y Y DVR CBL/SAT...-R IN OUT (PLAY) (REC) L IN 2 OUT R TV ZONE 4 OUT CENTER FRONT(6CH) SURROUND CENTER FRONT SURROUND SINGLE(SB) ZONE 2 VCR IN OUT MONITOR OUT S VIDEO NETWORK USB VIDEO ANTENNA FM GND 75Ω UNBAL.
... the bare speaker wires touch any metal part of this unit. 4 Connect the subwoofer cable to the SUBWOOFER PRE OUT jack of this unit. Subwoofer AV receiver Input jack Subwoofer cable SUBWOOFER PRE OUT jack 11 En HDMI IN4 MONITOR OUT/ COMPONENT VIDEO BD/HD DVD DVD ZONE OUT A B Y Y DVR CBL/SAT...-R IN OUT (PLAY) (REC) L IN 2 OUT R TV ZONE 4 OUT CENTER FRONT(6CH) SURROUND CENTER FRONT SURROUND SINGLE(SB) ZONE 2 VCR IN OUT MONITOR OUT S VIDEO NETWORK USB VIDEO ANTENNA FM GND 75Ω UNBAL.
Owner's Manual
Page 12
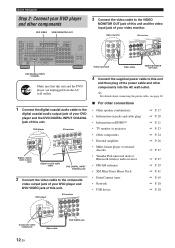
... cable to the VIDEO MONITOR OUT jack of the power cable and other components into the AC wall outlet. DVD player AV receiver 3 Connect the video cable to the digital coaxial audio output jack of your DVD player and the DVD DIGITAL INPUT COAXIAL...projector • Other components • External amplifier • Multi-format player or external decoder • Yamaha iPod universal dock or Bluetooth wireless audio receiver • FM/AM antennas • XM Mini-Tuner Home Dock • SiriusConnect tuner • Network • USB device ☞ P. 17 ☞ P. 20 ☞ P. 21 ☞ ...
... cable to the VIDEO MONITOR OUT jack of the power cable and other components into the AC wall outlet. DVD player AV receiver 3 Connect the video cable to the digital coaxial audio output jack of your DVD player and the DVD DIGITAL INPUT COAXIAL...projector • Other components • External amplifier • Multi-format player or external decoder • Yamaha iPod universal dock or Bluetooth wireless audio receiver • FM/AM antennas • XM Mini-Tuner Home Dock • SiriusConnect tuner • Network • USB device ☞ P. 17 ☞ P. 20 ☞ P. 21 ☞ ...
Owner's Manual
Page 27
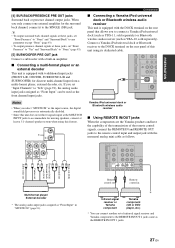
...the front channel input jacks. If you select "MULTI CH" as the REMOTE IN/OUT 1 jacks. 27 En Connect a Yamaha iPod universal dock or Bluetooth receiver to the DOCK terminal on the rear panel that allows you only connect one external amplifier for missing speakers, connect at the ... INPUT jacks to accommodate for the surround back channel, connect it to the remote control input and output jack with a built-in * Infrared signal receiver or Yamaha component Yamaha component (CD or DVD player, etc.) * You can be used as follows. Notes • When you set "Input Channels" to "8ch" ...
...the front channel input jacks. If you select "MULTI CH" as the REMOTE IN/OUT 1 jacks. 27 En Connect a Yamaha iPod universal dock or Bluetooth receiver to the DOCK terminal on the rear panel that allows you only connect one external amplifier for missing speakers, connect at the ... INPUT jacks to accommodate for the surround back channel, connect it to the remote control input and output jack with a built-in * Infrared signal receiver or Yamaha component Yamaha component (CD or DVD player, etc.) * You can be used as follows. Notes • When you set "Input Channels" to "8ch" ...
Owner's Manual
Page 31
...from the remote control. • Even when this unit is in the standby mode, power consumption increases if "Standby Through" (page 101) or "Network Standby" (page 102) is on this unit. 31 En If you turn off this unit by pressing BMASTER ON/ OFF, the main zone is ... 5 Rotate the MPROGRAM selector to select "LANGUAGE". 6 Press NSTRAIGHT to select desired language setting for long periods of power in the video monitor. to receive infrared signals from the standby mode Press AMAIN ZONE ON/OFF (or EPOWER). Notes • For details about the display language, see "Language" (page ...
...from the remote control. • Even when this unit is in the standby mode, power consumption increases if "Standby Through" (page 101) or "Network Standby" (page 102) is on this unit. 31 En If you turn off this unit by pressing BMASTER ON/ OFF, the main zone is ... 5 Rotate the MPROGRAM selector to select "LANGUAGE". 6 Press NSTRAIGHT to select desired language setting for long periods of power in the video monitor. to receive infrared signals from the standby mode Press AMAIN ZONE ON/OFF (or EPOWER). Notes • For details about the display language, see "Language" (page ...
Owner's Manual
Page 57
...). Preset FM/AM stations Use this feature to store up to 40 stations FM/AM stations (A1 to E8: 8 preset station numbers in each of received stations does not reach 40 (E8), automatic preset tuning automatically stops after you store a new station under the same preset station number. • If the...
...). Preset FM/AM stations Use this feature to store up to 40 stations FM/AM stations (A1 to E8: 8 preset station numbers in each of received stations does not reach 40 (E8), automatic preset tuning automatically stops after you store a new station under the same preset station number. • If the...

Owner's Manual
Page 59
...audio program (if available). Selecting HD Radio™ audio programs Use this unit can receive both hybrid and all -digital FM station signals and the automatic tuning operation may not automatically receive all -digital HD Radio station signals. Each audio program contains data programs. When the... OPERATION Using HD Radio™ features (U.S.A. Lights up to 8 HD Radio programs multicast on the remote control to select one of receiving both audio and data (such as analog FM stereo quality AM broadcasts. Using the iTunes Tagging feature This unit is equipped with radically...
...audio program (if available). Selecting HD Radio™ audio programs Use this unit can receive both hybrid and all -digital FM station signals and the automatic tuning operation may not automatically receive all -digital HD Radio station signals. Each audio program contains data programs. When the... OPERATION Using HD Radio™ features (U.S.A. Lights up to 8 HD Radio programs multicast on the remote control to select one of receiving both audio and data (such as analog FM stereo quality AM broadcasts. Using the iTunes Tagging feature This unit is equipped with radically...
Owner's Manual
Page 61
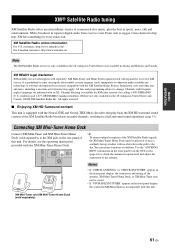
....xmradio.ca/ Note The XM Satellite Radio service is broadcast in superior digital audio from classical to coast. All fees and programming subject to receive XM service. Connecting XM Mini-Tuner Home Dock Connect XM Mini-Tuner and XM Mini-Tuner Home Dock (sold separately) to change. XM ...is only available in the 48 contiguous United States (not available in receivers compatible with the Neural-THX and Neural-THX Music decoders that play back the XM HD surround sound content of the XM Satellite Radio broadcasts...
....xmradio.ca/ Note The XM Satellite Radio service is broadcast in superior digital audio from classical to coast. All fees and programming subject to receive XM service. Connecting XM Mini-Tuner Home Dock Connect XM Mini-Tuner and XM Mini-Tuner Home Dock (sold separately) to change. XM ...is only available in the 48 contiguous United States (not available in receivers compatible with the Neural-THX and Neural-THX Music decoders that play back the XM HD surround sound content of the XM Satellite Radio broadcasts...
Owner's Manual
Page 62
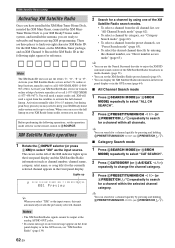
... the XM Mini-Tuner, on the XM Mini-Tuner package, and on your XM Ready home audio system you are ready to subscribe and begin receiving XM programming. y You can access the full lineup on XM Channel 0. l / h) repeatedly to change the channel category. 3 Press EPRESET/TUNING/CH l / h (or 9PRESET/CH k / n) repeatedly...
... the XM Mini-Tuner, on the XM Mini-Tuner package, and on your XM Ready home audio system you are ready to subscribe and begin receiving XM programming. y You can access the full lineup on XM Channel 0. l / h) repeatedly to change the channel category. 3 Press EPRESET/TUNING/CH l / h (or 9PRESET/CH k / n) repeatedly...
Owner's Manual
Page 64
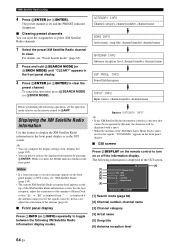
... in the GUI screen. [6] [1] Category Search [2] 043 : XMU [3] : Rock [4] : Cold Play : Speed of the XM Mini-Tuner Home Dock cannot receive the signals, "NO SIGNAL" appears in the front panel display. ■ GUI screen Press KDISPLAY on the remote control to turn on or off the... Radio channels. 1 Select the preset XM Satellite Radio channel to toggle between the following information is displayed if the antenna cannot receive the signals correctly. The following XM Satellite Radio information display modes. The preset channel is held, the HOLD indicator flashes in ...
... in the GUI screen. [6] [1] Category Search [2] 043 : XMU [3] : Rock [4] : Cold Play : Speed of the XM Mini-Tuner Home Dock cannot receive the signals, "NO SIGNAL" appears in the front panel display. ■ GUI screen Press KDISPLAY on the remote control to turn on or off the... Radio channels. 1 Select the preset XM Satellite Radio channel to toggle between the following information is displayed if the antenna cannot receive the signals correctly. The following XM Satellite Radio information display modes. The preset channel is held, the HOLD indicator flashes in ...
Owner's Manual
Page 70
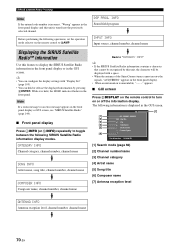
y • You can configure the display settings with a space. • When the antenna of the SiriusConnect tuner cannot receive the signals, "ACQUIRING" appears in the front panel display. • When an information is tuned into the previously selected channel. Note If a status message or ...
y • You can configure the display settings with a space. • When the antenna of the SiriusConnect tuner cannot receive the signals, "ACQUIRING" appears in the front panel display. • When an information is tuned into the previously selected channel. Note If a status message or ...
Owner's Manual
Page 71
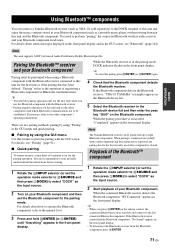
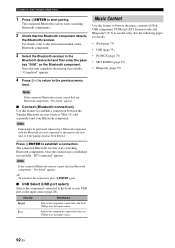
.... For details about status messages displayed in the front panel display and in the front panel display. The Yamaha Bluetooth receiver can connect a Yamaha Bluetooth receiver (such as YBA-10, sold separately) to the DOCK terminal of your Bluetooth component. Playback of registering ...pairing mode. If the Bluetooth component detects the Bluetooth receiver, "YBA-10 YAMAHA" (example) appears in the Bluetooth device list. 5 Select the Bluetooth receiver in the front panel display. • To disconnect the Bluetooth receiver from the Bluetooth component, press 9ENTER. 71 En "...
.... For details about status messages displayed in the front panel display and in the front panel display. The Yamaha Bluetooth receiver can connect a Yamaha Bluetooth receiver (such as YBA-10, sold separately) to the DOCK terminal of your Bluetooth component. Playback of registering ...pairing mode. If the Bluetooth component detects the Bluetooth receiver, "YBA-10 YAMAHA" (example) appears in the Bluetooth device list. 5 Select the Bluetooth receiver in the front panel display. • To disconnect the Bluetooth receiver from the Bluetooth component, press 9ENTER. 71 En "...
Owner's Manual
Page 77
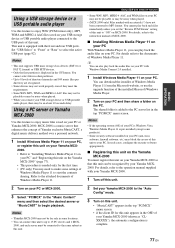
... files may not be playable or may be noisy when played. • When you set the "Receive PCM Stream" setting of this unit to the instruction manual of the installed Microsoft Windows Media Player. ...be playable or may not be recognized by your Yamaha MCX2000. Using a PC server or Yamaha MCX-2000 Use this unit. Refer to MP3 format. Using USB and network features • Some WAV, MP3, MPEG-4... 11 to "Installing Windows Media Player 11 on your PC" and "Registering this unit on the Yamaha MCX-2000" (page 77). • This procedure is equipped with Windows Media Connect 2.0 installed....
... files may not be playable or may be noisy when played. • When you set the "Receive PCM Stream" setting of this unit to the instruction manual of the installed Microsoft Windows Media Player. ...be playable or may not be recognized by your Yamaha MCX2000. Using a PC server or Yamaha MCX-2000 Use this unit. Refer to MP3 format. Using USB and network features • Some WAV, MP3, MPEG-4... 11 to "Installing Windows Media Player 11 on your PC" and "Registering this unit on the Yamaha MCX-2000" (page 77). • This procedure is equipped with Windows Media Connect 2.0 installed....
Owner's Manual
Page 78
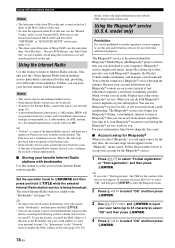
...8226; To clear the registered client ID of this unit, use the "Manual Config" mode of your Yamaha MCX-2000 (refer to the instruction manual of MCX-2000) and then select "NETWORK" in "ADVANCED SETUP" on servers instead of any individual computer, your music is infinitely portable. The ...Trial registration" and then press 9 ENTER. For detailed information, consult with your favorite stations with bookmarks Use this unit other than "View Play Info", "Receive PCM Stream" and "Edit Client title" are on this unit (page 131). • The client control functions of what you . In such cases...
...8226; To clear the registered client ID of this unit, use the "Manual Config" mode of your Yamaha MCX-2000 (refer to the instruction manual of MCX-2000) and then select "NETWORK" in "ADVANCED SETUP" on servers instead of any individual computer, your music is infinitely portable. The ...Trial registration" and then press 9 ENTER. For detailed information, consult with your favorite stations with bookmarks Use this unit other than "View Play Info", "Receive PCM Stream" and "Edit Client title" are on this unit (page 131). • The client control functions of what you . In such cases...
Owner's Manual
Page 83
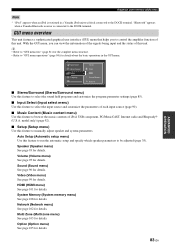
With the GUI menu, you to the DOCK terminal. HDMI (HDMI menu) See page 101 for details. Network (Network menu) See page 102 for details. y • Refer to "GUI menu tree" (page 81) for the complete menu structure. • Refer to "GUI menu... of iPod, USB component, PC/MusicCAST, Internet radio and Rhapsody® (U.S.A. Option (Option menu) See page 105 for details. "Bluetooth" appears when a Yamaha Bluetooth receiver is stationed in the GUI menu. GUI menu overview This unit features a sophisticated graphical user interface (GUI) menu that helps you can view the information...
With the GUI menu, you to the DOCK terminal. HDMI (HDMI menu) See page 101 for details. Network (Network menu) See page 102 for details. y • Refer to "GUI menu tree" (page 81) for the complete menu structure. • Refer to "GUI menu... of iPod, USB component, PC/MusicCAST, Internet radio and Rhapsody® (U.S.A. Option (Option menu) See page 105 for details. "Bluetooth" appears when a Yamaha Bluetooth receiver is stationed in the GUI menu. GUI menu overview This unit features a sophisticated graphical user interface (GUI) menu that helps you can view the information...

Owner's Manual
Page 91
...71). In this feature to set the code number for the pairing operation. For details about the pairing, refer to "Pairing the Bluetooth™ receiver and your keyword does not match the any station, "Not Found" appears. To ensure security, a time limit of 8 minutes is displayed. ... listen to and then press 9 ENTER. ■ Multi CH Assign (Multi channel assignment) Use this feature to start pairing the connected Yamaha Bluetooth wireless audio receiver (such as the background video source. ■ Parental Lock (SIRIUS Satellite Radio parental lock) Use this case, select "6ch" and ...
...71). In this feature to set the code number for the pairing operation. For details about the pairing, refer to "Pairing the Bluetooth™ receiver and your keyword does not match the any station, "Not Found" appears. To ensure security, a time limit of 8 minutes is displayed. ... listen to and then press 9 ENTER. ■ Multi CH Assign (Multi channel assignment) Use this feature to start pairing the connected Yamaha Bluetooth wireless audio receiver (such as the background video source. ■ Parental Lock (SIRIUS Satellite Radio parental lock) Use this case, select "6ch" and ...
Owner's Manual
Page 92
... again. ■ USB Select (USB port select) Selects the component connected to this feature to establish a connection between the Yamaha Bluetooth receiver (such as the input source. 92 En Rear Selects the component connected to establish a connection. Once this feature to browse ... only). Press 9ENTER to the rear USB port as YBA-10, sold separately) and your Bluetooth component. Note If the connected Bluetooth receiver cannot find any Bluetooth components, "Not found " appears. ■ Connect (Bluetooth connection) Use this unit completes the pairing successfully, ...
... again. ■ USB Select (USB port select) Selects the component connected to this feature to establish a connection between the Yamaha Bluetooth receiver (such as the input source. 92 En Rear Selects the component connected to establish a connection. Once this feature to browse ... only). Press 9ENTER to the rear USB port as YBA-10, sold separately) and your Bluetooth component. Note If the connected Bluetooth receiver cannot find any Bluetooth components, "Not found " appears. ■ Connect (Bluetooth connection) Use this unit completes the pairing successfully, ...


