

Data List
Page 4
... 7 (*1) Output when Init Send is transmitted. (*2) When "XG ALL PARAMETER RESET" message is received, generates "XG SYSTEM ON" on the tone generator and generates reinitialization of the tuning value on the panel. (*3) Variation connection is fixed at System. Default value (H) 00 04 00 00 7F 40 MIDI PARAMETER CHANGE TABLE (EFFECT 1) Address (H) Size (H) Data (H) Parameter 02 01 00 2 00 - 7F 00 - 7F REVERB TYPE MSB REVERB TYPE...
... 7 (*1) Output when Init Send is transmitted. (*2) When "XG ALL PARAMETER RESET" message is received, generates "XG SYSTEM ON" on the tone generator and generates reinitialization of the tuning value on the panel. (*3) Variation connection is fixed at System. Default value (H) 00 04 00 00 7F 40 MIDI PARAMETER CHANGE TABLE (EFFECT 1) Address (H) Size (H) Data (H) Parameter 02 01 00 2 00 - 7F 00 - 7F REVERB TYPE MSB REVERB TYPE...

Owner's Manual
Page 5
... panel or keyboard. • (For polish-finished model) Bumping the surface of time at the minimum level. Also, be lost or destroyed. Use caution. • Do not rest your data • Data in order to prevent the possibility of all volume levels to operational errors or malfunction. Before turning the power on the bench at a time, in the instrument's internal memory can scratch the instrument...
... panel or keyboard. • (For polish-finished model) Bumping the surface of time at the minimum level. Also, be lost or destroyed. Use caution. • Do not rest your data • Data in order to prevent the possibility of all volume levels to operational errors or malfunction. Before turning the power on the bench at a time, in the instrument's internal memory can scratch the instrument...
Owner's Manual
Page 8
...20 Selecting Voices...20 Using the Pedals...21 Adding Variations to the Sound - [VARIATION] (CLP-370/340)/[BRILLIANCE]/[REVERB]/ [EFFECT]/[DAMPER RES.] ...22 Touch Sensitivity - [TOUCH]...24 Transposition - [TRANSPOSE] ...25 Combining Two Voices (Dual mode) ...26 Splitting the Keyboard Range and Playing Two Different Voices (Split mode) (CLP-370/340 27 Using the Metronome ...29 Recording Your Performance 30 Recording a performance quickly...30 Playing back a recorded song ...32 Re-recording a previously recorded song 32 Recording to RIGHT/LEFT parts ...33 Changing the Initial Settings (Data...
...20 Selecting Voices...20 Using the Pedals...21 Adding Variations to the Sound - [VARIATION] (CLP-370/340)/[BRILLIANCE]/[REVERB]/ [EFFECT]/[DAMPER RES.] ...22 Touch Sensitivity - [TOUCH]...24 Transposition - [TRANSPOSE] ...25 Combining Two Voices (Dual mode) ...26 Splitting the Keyboard Range and Playing Two Different Voices (Split mode) (CLP-370/340 27 Using the Metronome ...29 Recording Your Performance 30 Recording a performance quickly...30 Playing back a recorded song ...32 Re-recording a previously recorded song 32 Recording to RIGHT/LEFT parts ...33 Changing the Initial Settings (Data...

Owner's Manual
Page 11
...] button.) % [SPLIT] button (CLP-370/340) .......page 27 For playing different voices on an acoustic piano. CLP-370/340/330, CLP-S308/S306 Owner's Manual 11 ENGLISH 1 [POWER] switch page 14 2 [MASTER VOLUME] slider page 15 Adjust the volume level using this instrument, and playing songs from the Internet. ¶ [PEDAL] jack page 83 For connecting a pedal cable. pages 17, 56 For selecting a song to play the keyboard. ( USB [TO DEVICE] terminals page 72 For connecting the instrument to a USB storage device, allowing saving/loading of functions...
...] button.) % [SPLIT] button (CLP-370/340) .......page 27 For playing different voices on an acoustic piano. CLP-370/340/330, CLP-S308/S306 Owner's Manual 11 ENGLISH 1 [POWER] switch page 14 2 [MASTER VOLUME] slider page 15 Adjust the volume level using this instrument, and playing songs from the Internet. ¶ [PEDAL] jack page 83 For connecting a pedal cable. pages 17, 56 For selecting a song to play the keyboard. ( USB [TO DEVICE] terminals page 72 For connecting the instrument to a USB storage device, allowing saving/loading of functions...

Owner's Manual
Page 16
... playing, re-adjust the [MASTER VOLUME] slider to the "Piano Voice Demo Description" on . (In case the power is a status under which you can demo the piano voices with various effects. 16 CLP-370/340/330, CLP-S308/S306 Owner's Manual You cannot use the part cancel function (page 18) or the song A-B repeat function (page 19) in sequence. 3. The voice button indicators will flash in Demo mode. Refer to the most comfortable listening level. 2. NOTE MIDI...
... playing, re-adjust the [MASTER VOLUME] slider to the "Piano Voice Demo Description" on . (In case the power is a status under which you can demo the piano voices with various effects. 16 CLP-370/340/330, CLP-S308/S306 Owner's Manual You cannot use the part cancel function (page 18) or the song A-B repeat function (page 19) in sequence. 3. The voice button indicators will flash in Demo mode. Refer to the most comfortable listening level. 2. NOTE MIDI...

Owner's Manual
Page 17
...the voice playing on the selected song. How to preset song playback. NOTE The default tempo "0" is automatically selected whenever a new preset song is applied to use them for the 50 piano preset songs. 3 2-2 1 4 2-1 ENGLISH CLP- 370 Procedure 1. Press the [SONG SELECT] button a few times until the "PRESET" indicator lights. 2. Adjust the Volume Use the [MASTER VOLUME] control to normal play . Adjust the Tempo You can change the Effect settings (page 23) and Touch sensitivity (page 24) for the Piano" that is selected, or when playback of 50 piano songs...
...the voice playing on the selected song. How to preset song playback. NOTE The default tempo "0" is automatically selected whenever a new preset song is applied to use them for the 50 piano preset songs. 3 2-2 1 4 2-1 ENGLISH CLP- 370 Procedure 1. Press the [SONG SELECT] button a few times until the "PRESET" indicator lights. 2. Adjust the Volume Use the [MASTER VOLUME] control to normal play . Adjust the Tempo You can change the Effect settings (page 23) and Touch sensitivity (page 24) for the Piano" that is selected, or when playback of 50 piano songs...

Owner's Manual
Page 22
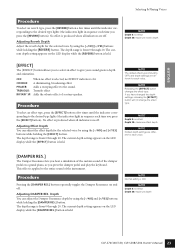
... tone Procedure To select a brilliance type, press the [BRILLIANCE] button a few times until the indicator corresponding to create a realistic acoustic ambience. For a truly spacious reverb sound, use the HALL 1 setting. NOTE The default reverb type (including OFF) and depth settings are lit, the brilliance setting between the two indicated types is selected. Brilliance can be slightly louder. If so, lower the MASTER VOLUME level. [REVERB] This control enables you to select various digital reverb effects...
... tone Procedure To select a brilliance type, press the [BRILLIANCE] button a few times until the indicator corresponding to create a realistic acoustic ambience. For a truly spacious reverb sound, use the HALL 1 setting. NOTE The default reverb type (including OFF) and depth settings are lit, the brilliance setting between the two indicated types is selected. Brilliance can be slightly louder. If so, lower the MASTER VOLUME level. [REVERB] This control enables you to select various digital reverb effects...
Owner's Manual
Page 23
... changed the depth settings, releasing the [EFFECT] button will not change the effect type. Adjusting DAMPER RES. NOTE Normal setting = ON NOTE Depth 0: no effect Depth 20: maximum reverb depth [EFFECT] The [EFFECT] button allows you to select an effect to give your sound greater depth and animation. The current depth setting appears on a grand piano, as you press the damper pedal and play the keyboard. Depth You can adjust the effect depth for the selected voice by using...
... changed the depth settings, releasing the [EFFECT] button will not change the effect type. Adjusting DAMPER RES. NOTE Normal setting = ON NOTE Depth 0: no effect Depth 20: maximum reverb depth [EFFECT] The [EFFECT] button allows you to select an effect to give your sound greater depth and animation. The current depth setting appears on a grand piano, as you press the damper pedal and play the keyboard. Depth You can adjust the effect depth for the selected voice by using...
Owner's Manual
Page 29
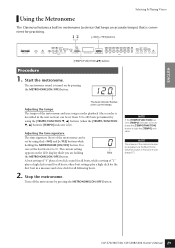
...] button. Turn off the metronome by pressing the METRONOME [ON/OFF] button. Adjusting the time signature The time signature (beat) of the metronome can be adjusted via the Metronome Volume function in a measure and a low click for practicing. 12 [-/NO] [+/YES] buttons CLP- 370 [TEMPO/FUNCTION ▲▼] buttons Procedure 1. Stop the metronome. CLP-370/340/330, CLP-S308/S306 Owner's Manual 29 NOTE The volume of the metronome can be set from 0 to 280 beats per minute by using...
...] button. Turn off the metronome by pressing the METRONOME [ON/OFF] button. Adjusting the time signature The time signature (beat) of the metronome can be adjusted via the Metronome Volume function in a measure and a low click for practicing. 12 [-/NO] [+/YES] buttons CLP- 370 [TEMPO/FUNCTION ▲▼] buttons Procedure 1. Stop the metronome. CLP-370/340/330, CLP-S308/S306 Owner's Manual 29 NOTE The volume of the metronome can be set from 0 to 280 beats per minute by using...

Owner's Manual
Page 30
..., CLP-S308/S306 Owner's Manual The two-part Song Recorder on the Clavinova may be saved to the instrument. Therefore, recording on the instrument allows the recording of performance data recorded on a cassette tape differs from that recording new data on the saved information. A cassette tape records audio signals. The recorded songs are saved to the instrument automatically. ENGLISH Recording Your Performance Recording Your Performance The ability to record and play back recorded songs, the Clavinova produces sound based on this part will erase the existing data. Saving...
..., CLP-S308/S306 Owner's Manual The two-part Song Recorder on the Clavinova may be saved to the instrument. Therefore, recording on the instrument allows the recording of performance data recorded on a cassette tape differs from that recording new data on the saved information. A cassette tape records audio signals. The recorded songs are saved to the instrument automatically. ENGLISH Recording Your Performance Recording Your Performance The ability to record and play back recorded songs, the Clavinova produces sound based on this part will erase the existing data. Saving...

Owner's Manual
Page 31
... be recorded. NOTE If the memory becomes full during a file operation, Record mode cannot be retained.) CLP-370/340/330, CLP-S308/S306 Owner's Manual 31 You can record up to a maximum three songs, or up to the instrument automatically. Recording does not actually start recording via the "Left Pedal Mode" function described on page 66. Stop recording. Press the [REC] button to set the volume. ENGLISH Recording Your Performance Procedure 1. Make all song data in...
... be recorded. NOTE If the memory becomes full during a file operation, Record mode cannot be retained.) CLP-370/340/330, CLP-S308/S306 Owner's Manual 31 You can record up to a maximum three songs, or up to the instrument automatically. Recording does not actually start recording via the "Left Pedal Mode" function described on page 66. Stop recording. Press the [REC] button to set the volume. ENGLISH Recording Your Performance Procedure 1. Make all song data in...

Owner's Manual
Page 33
... select a song. CLP-370/340/330, CLP-S308/S306 Owner's Manual 33 Press the [REC] button and press the [RIGHT]/[LEFT] button to select a song for recording on the Clavinova. Record Ready mode can record up to a maximum three songs, or up green when you record the right and left part while playing back the right, this part will flash at the current METRONOME tempo setting. Note that its indicator is turned off. Press the [SONG SELECT] button...
... select a song. CLP-370/340/330, CLP-S308/S306 Owner's Manual 33 Press the [REC] button and press the [RIGHT]/[LEFT] button to select a song for recording on the Clavinova. Record Ready mode can record up to a maximum three songs, or up green when you record the right and left part while playing back the right, this part will flash at the current METRONOME tempo setting. Note that its indicator is turned off. Press the [SONG SELECT] button...
Owner's Manual
Page 35
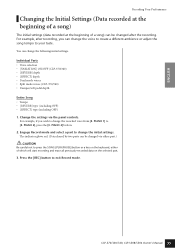
... the panel controls. Press the [REC] button to [E. For example, after the recording. For example, if you can change the initial settings. Engage Record mode and select a part to your taste. Individual Parts • Voice selection • [VARIATION] ON/OFF (CLP-370/340) • [REVERB] depth • [EFFECT] depth • Dual mode voices • Split mode voices (CLP-370/340) • Damper/soft pedal depth Entire Song • Tempo • [REVERB] type (including OFF) • [EFFECT] type (including OFF) 1. PIANO...
... the panel controls. Press the [REC] button to [E. For example, after the recording. For example, if you can change the initial settings. Engage Record mode and select a part to your taste. Individual Parts • Voice selection • [VARIATION] ON/OFF (CLP-370/340) • [REVERB] depth • [EFFECT] depth • Dual mode voices • Split mode voices (CLP-370/340) • Damper/soft pedal depth Entire Song • Tempo • [REVERB] type (including OFF) • [EFFECT] type (including OFF) 1. PIANO...

Owner's Manual
Page 41
... the instrument off or plugging/unplugging the USB cable to the owner's manual of the computer (such as in USB [TO DEVICE] terminal. CAUTION • Use an AB type USB cable of less than about the handling of USB devices, refer to /from any power-saving mode of the USB device. nal, exit from the USB [TO HOST] terminal. - Quit any previously existing data. CLP-370/340/330, CLP-S308/S306 Owner's Manual...
... the instrument off or plugging/unplugging the USB cable to the owner's manual of the computer (such as in USB [TO DEVICE] terminal. CAUTION • Use an AB type USB cable of less than about the handling of USB devices, refer to /from any power-saving mode of the USB device. nal, exit from the USB [TO HOST] terminal. - Quit any previously existing data. CLP-370/340/330, CLP-S308/S306 Owner's Manual...

Owner's Manual
Page 43
.... NOTE If the REVERB type is a common format used with many of Yamaha's MIDI devices, including the Clavinova series instruments. This is changed via the panel controls during playback, the metronome will play back songs recorded using the Musicsoft Downloader software (refer to "1&2" (page 66). NOTE If the song cannot be recognized up to exchange song data between different sequencers. Up to 255 songs can be changed via the panel controls during playback, the playback effect may not sound...
.... NOTE If the REVERB type is a common format used with many of Yamaha's MIDI devices, including the Clavinova series instruments. This is changed via the panel controls during playback, the metronome will play back songs recorded using the Musicsoft Downloader software (refer to "1&2" (page 66). NOTE If the song cannot be recognized up to exchange song data between different sequencers. Up to 255 songs can be changed via the panel controls during playback, the playback effect may not sound...

Owner's Manual
Page 48
..., CLP-S308/S306 Owner's Manual Once the instrument is successfully connected to make settings on the instrument. For information about how to the Internet, currently selected channel will be made on the instrument. If you select the "INTERNET" lamp with the [SONG SELECT] button. You can play back the songs on the Internet using the service. settings cannot be shown on the display when you are using a wireless LAN (using a USB wireless LAN adaptor): You...
..., CLP-S308/S306 Owner's Manual Once the instrument is successfully connected to make settings on the instrument. For information about how to the Internet, currently selected channel will be made on the instrument. If you select the "INTERNET" lamp with the [SONG SELECT] button. You can play back the songs on the Internet using the service. settings cannot be shown on the display when you are using a wireless LAN (using a USB wireless LAN adaptor): You...

Owner's Manual
Page 67
...). In Split mode (CLP-370/340), right voice data is not transmitted via the MIDI connections depending on its specified channel. NOTE Song data is transmitted on the Song Channel Selection setting (page 66). Use this function to the metronome functions (CLP-370/ 340)/ (CLP-S308/S306, CLP-330) by pressing the [TEMPO/ FUNCTION] button while holding the METRONOME [ON/OFF] button. Detailed Settings - [FUNCTION] F7. (CLP-370/340) / F6. (CLP-S308/S306, CLP-330) MIDI Functions You can change the volume of Disklavier Piano Soft songs, and...
...). In Split mode (CLP-370/340), right voice data is not transmitted via the MIDI connections depending on its specified channel. NOTE Song data is transmitted on the Song Channel Selection setting (page 66). Use this function to the metronome functions (CLP-370/ 340)/ (CLP-S308/S306, CLP-330) by pressing the [TEMPO/ FUNCTION] button while holding the METRONOME [ON/OFF] button. Detailed Settings - [FUNCTION] F7. (CLP-370/340) / F6. (CLP-S308/S306, CLP-330) MIDI Functions You can change the volume of Disklavier Piano Soft songs, and...

Owner's Manual
Page 70
.../S306, CLP-330) MIDI The MIDI functions ( / settings) (expect for each voice combination) • Split (CLP-370/340) (ON/OFF, Voice, and Split Func- If the backup function is turned off, the settings in memory are effective. ON/OFF and Depth F8.5 / (CLP-370/340) F7.5 (CLP-S308/S306, CLP-330) Character Code If the song cannot be used. (The factory setting default list is turned on pages 46 - 53, 58. 70 CLP-370/340/330, CLP-S308/S306 Owner's Manual ENGLISH Detailed Settings - [FUNCTION...
.../S306, CLP-330) MIDI The MIDI functions ( / settings) (expect for each voice combination) • Split (CLP-370/340) (ON/OFF, Voice, and Split Func- If the backup function is turned off, the settings in memory are effective. ON/OFF and Depth F8.5 / (CLP-370/340) F7.5 (CLP-S308/S306, CLP-330) Character Code If the song cannot be used. (The factory setting default list is turned on pages 46 - 53, 58. 70 CLP-370/340/330, CLP-S308/S306 Owner's Manual ENGLISH Detailed Settings - [FUNCTION...
Owner's Manual
Page 72
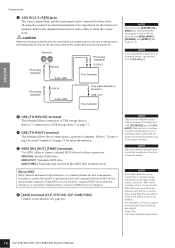
... diagram below and use only the AUX IN [L/L+R] jack. 3 USB [TO DEVICE] terminal This terminal allows connection to access and obtain the Data Format list, see page 46). LINE OUT Tone Generator NOTE The Clavinova's [MASTER VOLUME] slider setting affect the input signal from the AUX IN jacks, but the [BRILLIANCE], [REVERB], and [EFFECT] settings do not. Refer to "Connection to a personal computer. Refer to the MIDI Implementation Chart in the form of performance data and commands between MIDI...
... diagram below and use only the AUX IN [L/L+R] jack. 3 USB [TO DEVICE] terminal This terminal allows connection to access and obtain the Data Format list, see page 46). LINE OUT Tone Generator NOTE The Clavinova's [MASTER VOLUME] slider setting affect the input signal from the AUX IN jacks, but the [BRILLIANCE], [REVERB], and [EFFECT] settings do not. Refer to "Connection to a personal computer. Refer to the MIDI Implementation Chart in the form of performance data and commands between MIDI...

Owner's Manual
Page 97
... [SELECT] switch 73 SMF (Standard MIDI File 36 Soft Pedal 21, 66 Soft Pedal Effect Depth 66 Song 17 SONG [PLAY/PAUSE] button 16, 17, 44 [SONG SELECT] button 17, 44 SONG [STOP] button 17, 44 [SPEAKER] switch 15 Specifications 100 SPLIT (CLP-370/340) (Function 65 [SPLIT] button 27 Split mode 27, 65 Split Point 27, 65 Sustain Sample Depth 66 Sync (Synchronized 45 Sync Start 18 T [TEMPO/FUNCTION] button 29, 60 [TOUCH] button 24 Touch Sensitivity 24 Transporting 6 [TRANSPOSE] button 25 Transposition 25 Troubleshooting 80 U USB Storage...
... [SELECT] switch 73 SMF (Standard MIDI File 36 Soft Pedal 21, 66 Soft Pedal Effect Depth 66 Song 17 SONG [PLAY/PAUSE] button 16, 17, 44 [SONG SELECT] button 17, 44 SONG [STOP] button 17, 44 [SPEAKER] switch 15 Specifications 100 SPLIT (CLP-370/340) (Function 65 [SPLIT] button 27 Split mode 27, 65 Split Point 27, 65 Sustain Sample Depth 66 Sync (Synchronized 45 Sync Start 18 T [TEMPO/FUNCTION] button 29, 60 [TOUCH] button 24 Touch Sensitivity 24 Transporting 6 [TRANSPOSE] button 25 Transposition 25 Troubleshooting 80 U USB Storage...

