
Owner's Manual
Page 3
... and studio use with its needed electric power and incorporates an equalizer for purchasing the Yamaha Silent ViolinTM. Please keep this Owner's Manual in a safe place for later reference. ■ SV250/255 Features The SV250/SV255 Silent Violin™ is a high quality electric violin designed for recording. The instrument's electronics are housed in its exceptional tone quality and playability. 1 The two outputs let you...
... and studio use with its needed electric power and incorporates an equalizer for purchasing the Yamaha Silent ViolinTM. Please keep this Owner's Manual in a safe place for later reference. ■ SV250/255 Features The SV250/SV255 Silent Violin™ is a high quality electric violin designed for recording. The instrument's electronics are housed in its exceptional tone quality and playability. 1 The two outputs let you...
Owner's Manual
Page 4
... to any retailer of knowledge relating to perform the replacement. This equipment generates/uses radio frequencies and, if not installed and used only with both user safe and environmentally friendly. If you to the instructions found in the user's manual, may result in harmful interference with any power supply or adaptor other electronic devices. This product should record the model number, serial number, and the date of purchase in...
... to any retailer of knowledge relating to perform the replacement. This equipment generates/uses radio frequencies and, if not installed and used only with both user safe and environmentally friendly. If you to the instructions found in the user's manual, may result in harmful interference with any power supply or adaptor other electronic devices. This product should record the model number, serial number, and the date of purchase in...
Owner's Manual
Page 5
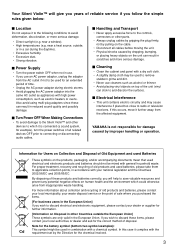
YAMAHA is connected (a sound system, for example), turn the power switches of all related devices OFF prior to connecting or disconnecting audio cables. ■ Handling and Transport • Never apply excessive force to the controls, connectors or other parts. • Always unplug cables by gripping the plug firmly, not by pulling on the cable. • Disconnect all cables before moving the unit. • Physical shocks...
YAMAHA is connected (a sound system, for example), turn the power switches of all related devices OFF prior to connecting or disconnecting audio cables. ■ Handling and Transport • Never apply excessive force to the controls, connectors or other parts. • Always unplug cables by gripping the plug firmly, not by pulling on the cable. • Disconnect all cables before moving the unit. • Physical shocks...
Owner's Manual
Page 6
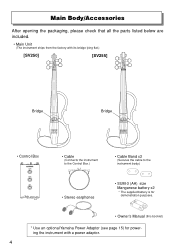
... from the factory with its bridge lying flat.) [SV250] [SV255] Bridge Bridge • Control Box • Cable (Connects the instrument to the Control Box.) • Cable Band x2 (Secures the cable to the instrument body.) • Stereo earphones • SUM-3 (AA) size Manganese battery x2 * The supplied battery is for demonstration purposes. • Owner's Manual (this booklet) * Use an optional Yamaha Power Adaptor (see page 15) for powering the instrument with a power adaptor. 4
... from the factory with its bridge lying flat.) [SV250] [SV255] Bridge Bridge • Control Box • Cable (Connects the instrument to the Control Box.) • Cable Band x2 (Secures the cable to the instrument body.) • Stereo earphones • SUM-3 (AA) size Manganese battery x2 * The supplied battery is for demonstration purposes. • Owner's Manual (this booklet) * Use an optional Yamaha Power Adaptor (see page 15) for powering the instrument with a power adaptor. 4
Owner's Manual
Page 7
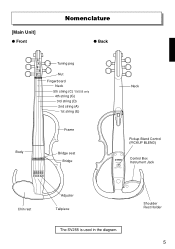
[Main Unit] ● Front Nomenclature ● Back Body Tuning peg Nut Fingerboard Neck 5th string (C) *SV255 only 4th string (G) 3rd string (D) 2nd string (A) 1st string (E) Frame Bridge seat Bridge Neck Pickup Blend Control (PICKUP BLEND) Control Box Instrument Jack Chin rest Adjuster Tailpiece The SV255 is used in the diagram. Shoulder Rest Holder 5
[Main Unit] ● Front Nomenclature ● Back Body Tuning peg Nut Fingerboard Neck 5th string (C) *SV255 only 4th string (G) 3rd string (D) 2nd string (A) 1st string (E) Frame Bridge seat Bridge Neck Pickup Blend Control (PICKUP BLEND) Control Box Instrument Jack Chin rest Adjuster Tailpiece The SV255 is used in the diagram. Shoulder Rest Holder 5
Owner's Manual
Page 8
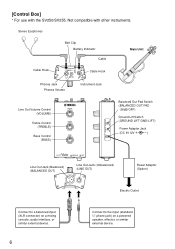
... SV250/SV255. Stereo Earphones Belt Clip Battery Indicator Cable Main Unit Cable Hook Cable Hook Phones Jack Phones Volume Instrument Jack Line Out Volume Control (VOLUME) Treble Control (TREBLE) Bass Control (BASS) Balanced Out Pad Switch (BALANCED OUT PAD -26dB/OFF) Ground Lift Switch (GROUND LIFT GND/LIFT) Power Adaptor Jack (DC IN 12V ) Line Out Jack (Balanced) (BALANCED OUT) Line Out Jack (Unbalanced) (LINE OUT) Power Adaptor (Option) Electric Outlet Connect to a balanced input (XLR connector) on a mixing console, audio interface...
... SV250/SV255. Stereo Earphones Belt Clip Battery Indicator Cable Main Unit Cable Hook Cable Hook Phones Jack Phones Volume Instrument Jack Line Out Volume Control (VOLUME) Treble Control (TREBLE) Bass Control (BASS) Balanced Out Pad Switch (BALANCED OUT PAD -26dB/OFF) Ground Lift Switch (GROUND LIFT GND/LIFT) Power Adaptor Jack (DC IN 12V ) Line Out Jack (Balanced) (BALANCED OUT) Line Out Jack (Unbalanced) (LINE OUT) Power Adaptor (Option) Electric Outlet Connect to a balanced input (XLR connector) on a mixing console, audio interface...
Owner's Manual
Page 9
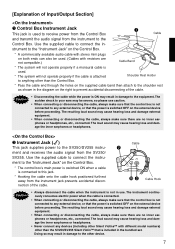
... the instrument to the Control Box. Cable Cable Hook Caution • Always disconnect the cable when the instrument is switched OFF on the Control Box. * A commercially available audio cable with different model numbers) other than the SV250/SV255 Silent Violin™ that is included in use caution. • When connecting or disconnecting the cable, always make sure that the power is not in the bundled set. strument to the "Instrument Jack...
... the instrument to the Control Box. Cable Cable Hook Caution • Always disconnect the cable when the instrument is switched OFF on the Control Box. * A commercially available audio cable with different model numbers) other than the SV250/SV255 Silent Violin™ that is included in use caution. • When connecting or disconnecting the cable, always make sure that the power is not in the bundled set. strument to the "Instrument Jack...
Owner's Manual
Page 10
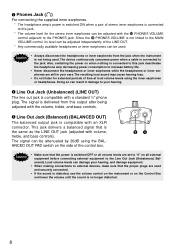
... signal that the proper plugs are set to "0" on all volume levels are used and securely connected. • If the sound is distorted, use the volume control on the instrument or on the Control Box and lower the volume until the sound is no longer distorted. 8 Also, switching the power on when nothing is connected to the jack. Caution • Always disconnect the headphones or inner earphones from...
... signal that the proper plugs are set to "0" on all volume levels are used and securely connected. • If the sound is distorted, use the volume control on the instrument or on the Control Box and lower the volume until the sound is no longer distorted. 8 Also, switching the power on when nothing is connected to the jack. Caution • Always disconnect the headphones or inner earphones from...
Owner's Manual
Page 11
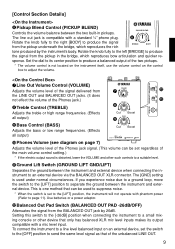
... Out Volume Control (VOLUME) Adjusts the volume level of the two pickups. * The volume control is compatible with phantom power (Refer to the [LIFT] position, the instrument will not operate with a standard ¼" phone plug. The line out jack is not located on the instrument itself, use the volume control on an external device, set to page 11). To connect the instrument to a line level balanced input on the control...
... Out Volume Control (VOLUME) Adjusts the volume level of the two pickups. * The volume control is compatible with phantom power (Refer to the [LIFT] position, the instrument will not operate with a standard ¼" phone plug. The line out jack is not located on the instrument itself, use the volume control on an external device, set to page 11). To connect the instrument to a line level balanced input on the control...
Owner's Manual
Page 12
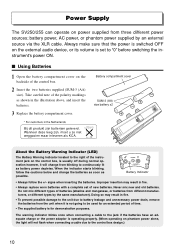
... light will change the batteries as soon as possible. Always make sure that the power is switched OFF on the external audio device, or its volume is set of the control box. 2 Insert the two batteries supplied (SUM-3 (AA) size). Doing so may result in fire. • Always replace worn batteries with a complete set to "0" before switching the instrument's power ON. ■ Using Batteries 1 Open the battery compartment cover on...
... light will change the batteries as soon as possible. Always make sure that the power is switched OFF on the external audio device, or its volume is set of the control box. 2 Insert the two batteries supplied (SUM-3 (AA) size). Doing so may result in fire. • Always replace worn batteries with a complete set to "0" before switching the instrument's power ON. ■ Using Batteries 1 Open the battery compartment cover on...
Owner's Manual
Page 13
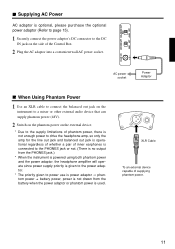
... power adaptor, the headphone amplifier will operate since power supply priority is given to the power adaptor. * The priority given to a mixer or other external audio device that can supply phantom power (48V). 2 Switch on the phantom power on the side of supplying phantom power. 11 AC power socket Power Adaptor ■ When Using Phantom Power 1 Use an XLR cable to connect the balanced out jack on the instrument to power use is power adaptor J phantom power J battery power, power...
... power adaptor, the headphone amplifier will operate since power supply priority is given to the power adaptor. * The priority given to a mixer or other external audio device that can supply phantom power (48V). 2 Switch on the phantom power on the side of supplying phantom power. 11 AC power socket Power Adaptor ■ When Using Phantom Power 1 Use an XLR cable to connect the balanced out jack on the instrument to power use is power adaptor J phantom power J battery power, power...
Owner's Manual
Page 14
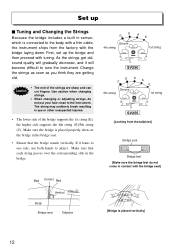
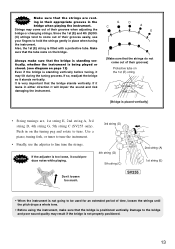
... supports the 4th string (G)/5th string (C). If it will become difficult to adjust. D G Groove 4th string A E 1st string SV250 GD C Groove 5th string A E 1st string SV255 [Looking from the factory with tuning. Make sure that the bridge stands vertically. As the strings get old, sound quality will gradually decrease, and it leans to one side, use both hands to tune the instrument. Use caution when changing strings. • When changing...
... supports the 4th string (G)/5th string (C). If it will become difficult to adjust. D G Groove 4th string A E 1st string SV250 GD C Groove 5th string A E 1st string SV255 [Looking from the factory with tuning. Make sure that the bridge stands vertically. As the strings get old, sound quality will gradually decrease, and it leans to one side, use both hands to tune the instrument. Use caution when changing strings. • When changing...
Owner's Manual
Page 15
... positioned. 13 Use a piano, tuning fork, or tuner to tune the instrument. • Finally, use your fingers to tune. It is very important that the strings do not come out of time, loosen the strings until the pitch drops a whole tone. • Before using the instrument, make sure that the bridge is standing vertically before tuning, it could produce noise while playing. 4th string (G) 5th string (C) 2nd string (A) 1st string (E) Don't loosen...
... positioned. 13 Use a piano, tuning fork, or tuner to tune the instrument. • Finally, use your fingers to tune. It is very important that the strings do not come out of time, loosen the strings until the pitch drops a whole tone. • Before using the instrument, make sure that the bridge is standing vertically before tuning, it could produce noise while playing. 4th string (G) 5th string (C) 2nd string (A) 1st string (E) Don't loosen...
Owner's Manual
Page 16
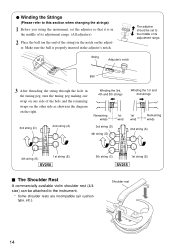
... the hole in the tuning peg, turn the tuning peg making one wrap on one side of its adjustment range. (All adjusters) 2 Place the ball (on the end of the string) in the notch on the right. Shoulder rest 14 ● Winding the Strings (Please refer to this section when changing the strings) 1 Before you string the instrument, set to the middle of...
... the hole in the tuning peg, turn the tuning peg making one wrap on one side of its adjustment range. (All adjusters) 2 Place the ball (on the end of the string) in the notch on the right. Shoulder rest 14 ● Winding the Strings (Please refer to this section when changing the strings) 1 Before you string the instrument, set to the middle of...
Owner's Manual
Page 17
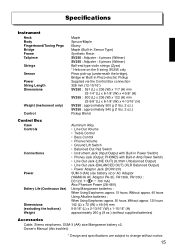
.... 2 oz.) SV255 : approximately 540 g (1 lbs. 3 oz.) Pickup Blend Control Box Case Controls Connections Power Battery Life (Continuous Use) Dimensions (excluding the buttons) Weight Aluminum Alloy • Line Out Volume • Treble Control • Bass Control • Phones Volume • Ground Lift Switch • Balanced Out Pad Switch • Instrument Jack (Input/Output with Built-in Power Switch) • Phones Jack (Output, PHONES with Built-in Amp Power Switch) • Line Out Jack (LINE OUT) (6.3mm Unbalanced Output) • Line Out Jack (BALANCED...
.... 2 oz.) SV255 : approximately 540 g (1 lbs. 3 oz.) Pickup Blend Control Box Case Controls Connections Power Battery Life (Continuous Use) Dimensions (excluding the buttons) Weight Aluminum Alloy • Line Out Volume • Treble Control • Bass Control • Phones Volume • Ground Lift Switch • Balanced Out Pad Switch • Instrument Jack (Input/Output with Built-in Power Switch) • Phones Jack (Output, PHONES with Built-in Amp Power Switch) • Line Out Jack (LINE OUT) (6.3mm Unbalanced Output) • Line Out Jack (BALANCED...


