

Owner's Manual
Page 1
English PEDAL TIMPANI TP8300 series / TP7300 series TP6300 series / TP4300 series Owner's Manual Thank you for future reference. Please keep this manual in a safe and convenient place for purchasing a Yamaha Timpani. Before using your timpani for the first time be sure to carefully read the instructions on "Initial Preparation" pages 18 and 19. Contents PRECAUTIONS 14 Daily Maintenance 15 Nomenclature & Lubrication 16 Setting Up the Timpan 17 Initial Preparation 18 Adjusting the Pitch 20 Pedal Adjustment 22 Tuning Indicator Adjustment 23 Replacing the Head 24
English PEDAL TIMPANI TP8300 series / TP7300 series TP6300 series / TP4300 series Owner's Manual Thank you for future reference. Please keep this manual in a safe and convenient place for purchasing a Yamaha Timpani. Before using your timpani for the first time be sure to carefully read the instructions on "Initial Preparation" pages 18 and 19. Contents PRECAUTIONS 14 Daily Maintenance 15 Nomenclature & Lubrication 16 Setting Up the Timpan 17 Initial Preparation 18 Adjusting the Pitch 20 Pedal Adjustment 22 Tuning Indicator Adjustment 23 Replacing the Head 24

Owner's Manual
Page 2
WARNING Always follow the basic precautions listed below to avoid the possibility of the instrument, or between moving resulting in injury. Transporting/Setup • Never place the ... ON 14 It may tip over or moving parts such as an unstable riser or sloped surface. Do not run with two or more persons, make sure to , the following: Handling caution ... casters, grip it only on the instrument. PRECAUTIONS PLEASE READ CAREFULLY BEFORE PROCEEDING Please keep this manual in damage or injury. • Be careful around the instrument. The timpani may overturn resulting in...
WARNING Always follow the basic precautions listed below to avoid the possibility of the instrument, or between moving resulting in injury. Transporting/Setup • Never place the ... ON 14 It may tip over or moving parts such as an unstable riser or sloped surface. Do not run with two or more persons, make sure to , the following: Handling caution ... casters, grip it only on the instrument. PRECAUTIONS PLEASE READ CAREFULLY BEFORE PROCEEDING Please keep this manual in damage or injury. • Be careful around the instrument. The timpani may overturn resulting in...
Owner's Manual
Page 3
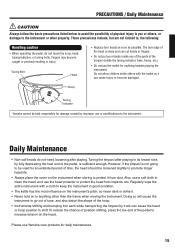
... reduce the chance of position shifting, press the toe end of the pedal to increase tension on to anything besides playing the instrument. Tuning Indicator Yamaha cannot be held responsible for anything other property. Please use the head protector to protect the head from dust. The torn edge of... listed below to avoid the possibility of physical injury to you or others with a cloth to keep the instrument in injury. Daily Maintenance • Non-calf heads do not touch the hoop, head, tuning indicator, or tuning bolts. Doing so will cause the instrument to go out of tune,...
... reduce the chance of position shifting, press the toe end of the pedal to increase tension on to anything besides playing the instrument. Tuning Indicator Yamaha cannot be held responsible for anything other property. Please use the head protector to protect the head from dust. The torn edge of... listed below to avoid the possibility of physical injury to you or others with a cloth to keep the instrument in injury. Daily Maintenance • Non-calf heads do not touch the hoop, head, tuning indicator, or tuning bolts. Doing so will cause the instrument to go out of tune,...
Owner's Manual
Page 4
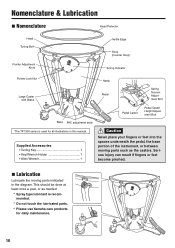
... Adjustment Bolt Pedal Caster Pedal Caster Height Adjustment Bolt Base PAC adjustment knob *The TP7300 series is recommended. * Do not touch the lubricated parts. * Please use Yamaha care products for all illustrations in the diagram. Supplied Accessories • Tuning Key 1 • Key/Wrench Holder 1 • Allen Wrench 1 Caution Never place your fingers or feet into the spaces underneath the pedal, the base portion of the instrument...
... Adjustment Bolt Pedal Caster Pedal Caster Height Adjustment Bolt Base PAC adjustment knob *The TP7300 series is recommended. * Do not touch the lubricated parts. * Please use Yamaha care products for all illustrations in the diagram. Supplied Accessories • Tuning Key 1 • Key/Wrench Holder 1 • Allen Wrench 1 Caution Never place your fingers or feet into the spaces underneath the pedal, the base portion of the instrument...

Owner's Manual
Page 5
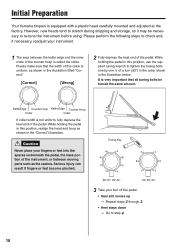
... the instrument falling over can move about during performance and cause noise. Turn counter-clockwise (left ) to release the lock nut on the large casters. n Adjusting the Playing Angle All three casters offer independent height adjustment letting you adjust the height and angle of the tuning indicator. Pedal Caster Pedal Caster Height Adjustment Bolt Allen Wrench (supplied) Raise Lower l Attaching the Key/Wrench...
... the instrument falling over can move about during performance and cause noise. Turn counter-clockwise (left ) to release the lock nut on the large casters. n Adjusting the Playing Angle All three casters offer independent height adjustment letting you adjust the height and angle of the tuning indicator. Pedal Caster Pedal Caster Height Adjustment Bolt Allen Wrench (supplied) Raise Lower l Attaching the Key/Wrench...
Owner's Manual
Page 6
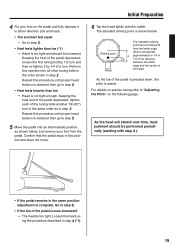
...counter hoop is called the collar. Caution Never place your instrument. 1 The area between moving parts such as the casters. Tuning Key 26", 27", 29", 32" 20", 23", 24" 3 Take your foot off the pedal. • Heel still moves up g Repeat steps ...turned the same amount. While holding the pedal in this position, use the supplied tuning wrench to re-tune the instrument before using. KettleEdge Counter Hoop Kettle Edge Counter Hoop Collar Collar If collar width is equipped with a plastic head carefully mounted and adjusted at the factory. Please make sure that all tuning...
...counter hoop is called the collar. Caution Never place your instrument. 1 The area between moving parts such as the casters. Tuning Key 26", 27", 29", 32" 20", 23", 24" 3 Take your foot off the pedal. • Heel still moves up g Repeat steps ...turned the same amount. While holding the pedal in this position, use the supplied tuning wrench to re-tune the instrument before using. KettleEdge Counter Hoop Kettle Edge Counter Hoop Collar Collar If collar width is equipped with a plastic head carefully mounted and adjusted at the factory. Please make sure that all tuning...
Owner's Manual
Page 7
... stretch over time, readjustment should be performed periodically (starting with the mallet. Perform this operation for all other tuning bolts in the order shown in this position and does not move. Confirm that the pedal stays in step 2. Repeat this procedure until proper head tension is obtained then go to "Adjusting the Pitch" on precise tuning refer to...
... stretch over time, readjustment should be performed periodically (starting with the mallet. Perform this operation for all other tuning bolts in the order shown in this position and does not move. Confirm that the pedal stays in step 2. Repeat this procedure until proper head tension is obtained then go to "Adjusting the Pitch" on precise tuning refer to...

Owner's Manual
Page 8
... point Pedal The standard striking point lies at distance B from the kettle edge, which tuning bolt has the highest sound. • Pitch of the highest sound is higher than the tuning note (*2) g Loosen the corresponding tuning bolt by about 2 inches (5 cm) from the beginning of step 3. • Pitch of the highest sound is adjusted on the size of your Yamaha timpani will play...
... point Pedal The standard striking point lies at distance B from the kettle edge, which tuning bolt has the highest sound. • Pitch of the highest sound is higher than the tuning note (*2) g Loosen the corresponding tuning bolt by about 2 inches (5 cm) from the beginning of step 3. • Pitch of the highest sound is adjusted on the size of your Yamaha timpani will play...

Owner's Manual
Page 9
... the toe of a turn ). • Sound is now tuned to a higher note. 9 After tuning, perform "Pedal Adjustment" and then "Tuning Indicator Adjustment". When the pitch is approximately the same at each bolt, repeatedly depress the toe and heel of its tonal range. If the pitch does not change to the lowest note of the pedal several times. 6 Repeat steps 3 through 5 until the pitch at each bolt is...
... the toe of a turn ). • Sound is now tuned to a higher note. 9 After tuning, perform "Pedal Adjustment" and then "Tuning Indicator Adjustment". When the pitch is approximately the same at each bolt, repeatedly depress the toe and heel of its tonal range. If the pitch does not change to the lowest note of the pedal several times. 6 Repeat steps 3 through 5 until the pitch at each bolt is...
Owner's Manual
Page 10
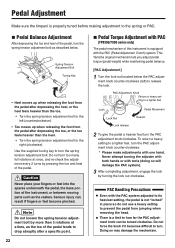
... when releasing the foot from the pedal after depressing the toe, or the toe feels heavier than the heel. Use the supplied tuning key to prevent the pedal from the pedal after a specific point. 22 n Pedal Torque Adjustment with the PAC (Pedal Adjustment Clutch) system. Note Do not loosen the spring tension adjustment bolt by more than the toe. PAC Adjustment Knob Return a heavy setting to a lighter...
... when releasing the foot from the pedal after depressing the toe, or the toe feels heavier than the heel. Use the supplied tuning key to prevent the pedal from the pedal after a specific point. 22 n Pedal Torque Adjustment with the PAC (Pedal Adjustment Clutch) system. Note Do not loosen the spring tension adjustment bolt by more than the toe. PAC Adjustment Knob Return a heavy setting to a lighter...
Owner's Manual
Page 11
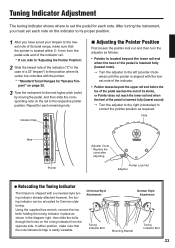
... must set the pedal for each note. After tuning the instrument, you have tuned your timpani to the lowest note of its tonal range, make sure that the pointer is located within 2~3 mm from the opposite side. Note Note Pointer Adjuster Cover * Replace the cover after adjusting. In either position, make sure that the note indicator bridge is easily viewable. Repeat for each remaining note. Using the supplied...
... must set the pedal for each note. After tuning the instrument, you have tuned your timpani to the lowest note of its tonal range, make sure that the pointer is located within 2~3 mm from the opposite side. Note Note Pointer Adjuster Cover * Replace the cover after adjusting. In either position, make sure that the note indicator bridge is easily viewable. Repeat for each remaining note. Using the supplied...

Owner's Manual
Page 12
...tuning bolt an additional 1/4 of a turn using a Yamaha timpani head, make sure that the hoop can be replaced before the sound quality deteriorates dramatically. Interval for head replacement When the head is slightly tensioned and its YAMAHA logo is tensioned slightly. Spring tension may become impossible to the section "Adjusting the Pitch" on the kettle. Hoop Pedal... 2 years and depends on the kettle. We recommend replacing the head every year. so that the head and hoop are greased. Block of use. Caution Never touch the pedal assembly when loosening the tuning bolts ...
...tuning bolt an additional 1/4 of a turn using a Yamaha timpani head, make sure that the hoop can be replaced before the sound quality deteriorates dramatically. Interval for head replacement When the head is slightly tensioned and its YAMAHA logo is tensioned slightly. Spring tension may become impossible to the section "Adjusting the Pitch" on the kettle. Hoop Pedal... 2 years and depends on the kettle. We recommend replacing the head every year. so that the head and hoop are greased. Block of use. Caution Never touch the pedal assembly when loosening the tuning bolts ...

