

Owner's Manual
Page 1
BG TX-396L Natural Sound AM/FM Stereo Tuner Syntonisateur AM/FM stéréo de la série "Natural Sound" OWNER'S MANUAL MODE D'EMPLOI BEDIENUNGSANLEITUNG BRUKSANVISNING MANUALE DI ISTRUZIONI MANUAL DE INSTRUCCIONES GEBRUIKSAANWIJZING
BG TX-396L Natural Sound AM/FM Stereo Tuner Syntonisateur AM/FM stéréo de la série "Natural Sound" OWNER'S MANUAL MODE D'EMPLOI BEDIENUNGSANLEITUNG BRUKSANVISNING MANUALE DI ISTRUZIONI MANUAL DE INSTRUCCIONES GEBRUIKSAANWIJZING
Owner's Manual
Page 3
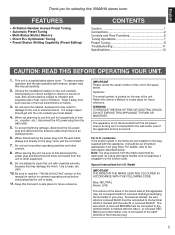
.... 6. To assure proper operation and the best possible performance, please read the "TROUBLESHOOTING" section of the unit. Do not use this YAMAHA stereo tuner FEATURES • 40 Station Random Access Preset Tuning • Automatic Preset Tuning • Multi-Status Station Memory • Direct PLL Synthesizer Tuning • Preset Station Shifting Capability (Preset Editing) CONTENTS Caution 1 Connections 2 Controls and Their Functions 5 Tuning Operations 7 Preset Tuning 8 Troubleshooting 11 Specifications 12 CAUTION: READ THIS BEFORE OPERATING YOUR UNIT. 1. Do...
.... 6. To assure proper operation and the best possible performance, please read the "TROUBLESHOOTING" section of the unit. Do not use this YAMAHA stereo tuner FEATURES • 40 Station Random Access Preset Tuning • Automatic Preset Tuning • Multi-Status Station Memory • Direct PLL Synthesizer Tuning • Preset Station Shifting Capability (Preset Editing) CONTENTS Caution 1 Connections 2 Controls and Their Functions 5 Tuning Operations 7 Preset Tuning 8 Troubleshooting 11 Specifications 12 CAUTION: READ THIS BEFORE OPERATING YOUR UNIT. 1. Do...
Owner's Manual
Page 4
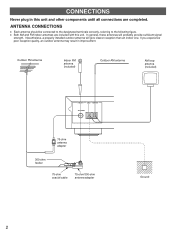
.... 75-ohm antenna adapter 300-ohm feeder 75-ohm coaxial cable 75-ohm/300-ohm antenna adapter Ground 2 CONNECTIONS Never plug in improvement. Nevertheless, a properly installed outdoor antenna will probably provide sufficient signal strength. In general, these antennas will give clearer reception than an indoor one. If you experience poor reception quality, an outdoor antenna may result in this unit and other components until all connections are included...
.... 75-ohm antenna adapter 300-ohm feeder 75-ohm coaxial cable 75-ohm/300-ohm antenna adapter Ground 2 CONNECTIONS Never plug in improvement. Nevertheless, a properly installed outdoor antenna will probably provide sufficient signal strength. In general, these antennas will give clearer reception than an indoor one. If you experience poor reception quality, an outdoor antenna may result in this unit and other components until all connections are included...
Owner's Manual
Page 5
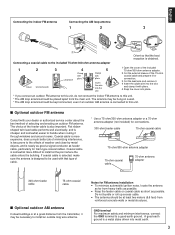
... cable enters the building. The antenna may be necessary to install an outside long wire antenna. English Connecting the indoor FM antenna Connecting the AM loop antenna 1 2 3 2 1 3 Connecting a coaxial cable to the included 75-ohm/300-ohm antenna adapter Orient so that type of cable. * Use a 75-ohm/300-ohm antenna adapter or a 75-ohm antenna adapter (not included) for connections. 300-ohm feeder cable 75-ohm coaxial cable 75-ohm/300-ohm antenna adapter 75-ohm coaxial cable 75-ohm antenna adapter 300-ohm feeder cable 75-ohm coaxial cable...
... cable enters the building. The antenna may be necessary to install an outside long wire antenna. English Connecting the indoor FM antenna Connecting the AM loop antenna 1 2 3 2 1 3 Connecting a coaxial cable to the included 75-ohm/300-ohm antenna adapter Orient so that type of cable. * Use a 75-ohm/300-ohm antenna adapter or a 75-ohm antenna adapter (not included) for connections. 300-ohm feeder cable 75-ohm coaxial cable 75-ohm/300-ohm antenna adapter 75-ohm coaxial cable 75-ohm antenna adapter 300-ohm feeder cable 75-ohm coaxial cable...
Owner's Manual
Page 6
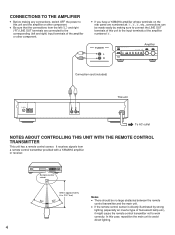
... connect the LINE OUT terminals of this case, reposition the main unit to avoid direct lighting. 4 It receives signals from the left and right) input terminals of the amplifier or other component. q If the remote control sensor is directly illuminated by making any connections, switch OFF the power to this unit and the amplifier or other component. q Be sure that the connections from a remote control transmitter provided with a YAMAHA amplifier or receiver...
... connect the LINE OUT terminals of this case, reposition the main unit to avoid direct lighting. 4 It receives signals from the left and right) input terminals of the amplifier or other component. q If the remote control sensor is directly illuminated by making any connections, switch OFF the power to this unit and the amplifier or other component. q Be sure that the connections from a remote control transmitter provided with a YAMAHA amplifier or receiver...

Owner's Manual
Page 7
... select the automatic tuning mode, press this period, press the desired PRESET STATIONS button to automatic or manual. Press the "UP" button to tune in to higher frequencies, and press the "DOWN" button to tune in to lower frequencies. 6A/B/C/D/E button Press this button to select a desired group (A-E) of two preset stations with a YAMAHA amplifier or receiver. 4 PRESET STATIONS buttons Select a preset station number (1 to switch the power off . 5 Press it again to 8). 5 TUNING DOWN and UP buttons Used for details.) 3 Remote control sensor Receives signals from a remote control...
... select the automatic tuning mode, press this period, press the desired PRESET STATIONS button to automatic or manual. Press the "UP" button to tune in to higher frequencies, and press the "DOWN" button to tune in to lower frequencies. 6A/B/C/D/E button Press this button to select a desired group (A-E) of two preset stations with a YAMAHA amplifier or receiver. 4 PRESET STATIONS buttons Select a preset station number (1 to switch the power off . 5 Press it again to 8). 5 TUNING DOWN and UP buttons Used for details.) 3 Remote control sensor Receives signals from a remote control...

Owner's Manual
Page 8
... in the automatic tuning mode. 4 ST (STEREO) indicator Lights up for about 5 seconds. DISPLAY PANEL 1 2 MEMO 6 3 45 AUTO ST kHz MHz EDIT 7 1 Preset station indicator Display the group (A/B/C/D/E) and the number (1 to 8) of a preset station. 2 Station frequency display Displays the band and frequency or information from the received station. 3 AUTO indicator Lights up when this period, the displayed station can be programmed to the memory by using the A/B/C/D/E button and one of the PRESET STATIONS buttons. 7 EDIT indicator Flashes by the...
... in the automatic tuning mode. 4 ST (STEREO) indicator Lights up for about 5 seconds. DISPLAY PANEL 1 2 MEMO 6 3 45 AUTO ST kHz MHz EDIT 7 1 Preset station indicator Display the group (A/B/C/D/E) and the number (1 to 8) of a preset station. 2 Station frequency display Displays the band and frequency or information from the received station. 3 AUTO indicator Lights up when this period, the displayed station can be programmed to the memory by using the A/B/C/D/E button and one of the PRESET STATIONS buttons. 7 EDIT indicator Flashes by the...

Owner's Manual
Page 9
POWER 2 Select the reception band confirming it on the display. 2 Select the reception band confirming it on . English TUNING OPERATIONS Normally, if station signals are weak, you tune to an FM station manually, it is possible. FM/MW/LW , or FM/MW/LW , or 3 TUNING MODE AUTO/MAN'MONO AUTO 4 TUNING DOWN UP 3 TUNING MODE AUTO/MAN'MONO Turn "AUTO" off. 4 Tune to the MANUAL TUNING method. * To continue tuning search, press and hold the button. To...
POWER 2 Select the reception band confirming it on the display. 2 Select the reception band confirming it on . English TUNING OPERATIONS Normally, if station signals are weak, you tune to an FM station manually, it is possible. FM/MW/LW , or FM/MW/LW , or 3 TUNING MODE AUTO/MAN'MONO AUTO 4 TUNING DOWN UP 3 TUNING MODE AUTO/MAN'MONO Turn "AUTO" off. 4 Tune to the MANUAL TUNING method. * To continue tuning search, press and hold the button. To...

Owner's Manual
Page 10
... of the former one week, the memory may be programmed in step 2. 8 2, 1 3 To recall a preset station 1 Select the group of preset stations. PRESET STATIONS 1 2 3 4 5 6 7 8 AUTO ST MHz Shows the displayed station has been programmed to program the station before "MEMO" goes off or the power plug is disconnected from the display. Up to preset station numbers on the display. A/B/C/D/E 2 Select the preset station number. E) of the reception mode (stereo or monaural) is cut for tuning procedure.) 2 Select a desired group (A -
... of the former one week, the memory may be programmed in step 2. 8 2, 1 3 To recall a preset station 1 Select the group of preset stations. PRESET STATIONS 1 2 3 4 5 6 7 8 AUTO ST MHz Shows the displayed station has been programmed to program the station before "MEMO" goes off or the power plug is disconnected from the display. Up to preset station numbers on the display. A/B/C/D/E 2 Select the preset station number. E) of the reception mode (stereo or monaural) is cut for tuning procedure.) 2 Select a desired group (A -

Owner's Manual
Page 11
... after "NOTHING" flashes for FM stations only. The automatic preset tuning begins from the frequency currently displayed. If the number of received stations is finished The display shows the frequency of the last preset station. MEMO AUTO ST MHz Flashes. To recall a preset station Simply follow the procedure of the section "To recall a preset station" on page 8. English AUTOMATIC PRESET TUNING You can replace a preset station by another FM, MW or LW station manually by following...
... after "NOTHING" flashes for FM stations only. The automatic preset tuning begins from the frequency currently displayed. If the number of received stations is finished The display shows the frequency of the last preset station. MEMO AUTO ST MHz Flashes. To recall a preset station Simply follow the procedure of the section "To recall a preset station" on page 8. English AUTOMATIC PRESET TUNING You can replace a preset station by another FM, MW or LW station manually by following...
Owner's Manual
Page 12
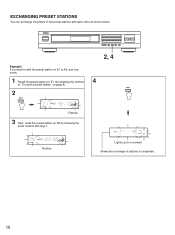
ST MHz EDIT 2, 4 4 EDIT EDIT Lights up for a moment. PRESET Flashes. EXCHANGING PRESET STATIONS You can exchange the places of two preset stations with step 1. Shows the exchange of "To recall a preset station" on page 8). 2 EDIT PRESET ST MHz EDIT Flashes. 3 Next, recall the preset station on E1 (by following the method of stations is completed. 10 Example) If you want to shift the preset station on E1 to A5, and vice versa. 1 Recall the preset station on A5 by following the same method with each other as shown below.
ST MHz EDIT 2, 4 4 EDIT EDIT Lights up for a moment. PRESET Flashes. EXCHANGING PRESET STATIONS You can exchange the places of two preset stations with step 1. Shows the exchange of "To recall a preset station" on page 8). 2 EDIT PRESET ST MHz EDIT Flashes. 3 Next, recall the preset station on E1 (by following the method of stations is completed. 10 Example) If you want to shift the preset station on E1 to A5, and vice versa. 1 Recall the preset station on A5 by following the same method with each other as shown below.

Owner's Manual
Page 13
... YAMAHA dealer or service center for best reception. This is poor. CAUSE Ignition noise from lightning, fluorescent lamps, motors, thermostats and other electrical equipment. No stereo effect even with the received station. A desired station cannot be put up on the display. A desired station cannot be corrected by the simple measures suggested. Try using a high quality directional FM antenna. Insufficient sensitivity. Adjust antenna placement to the manual tuning mode. Use...
... YAMAHA dealer or service center for best reception. This is poor. CAUSE Ignition noise from lightning, fluorescent lamps, motors, thermostats and other electrical equipment. No stereo effect even with the received station. A desired station cannot be put up on the display. A desired station cannot be corrected by the simple measures suggested. Try using a high quality directional FM antenna. Insufficient sensitivity. Adjust antenna placement to the manual tuning mode. Use...

Owner's Manual
Page 14
... dB Harmonic Distortion; 1 kHz 0.3% AUDIO SECTION Output Level FM (100 % mod. 1 kHz) (40 kHz Dev 500 mV AM (30% mod. 1 kHz 200 mV GENERAL Power Supply 230V, 50 Hz Power Consumption 7W Dimensions (W x H x D 435 x 86 x 278 mm (17-1/8" x 3-3/8" x 10-15/16") Weight 3.2 kg (7 lbs. 1 oz.) Accessories Audio connection cord AM loop antenna Indoor FM antenna * Specifications subject to change without notice. 12
... dB Harmonic Distortion; 1 kHz 0.3% AUDIO SECTION Output Level FM (100 % mod. 1 kHz) (40 kHz Dev 500 mV AM (30% mod. 1 kHz 200 mV GENERAL Power Supply 230V, 50 Hz Power Consumption 7W Dimensions (W x H x D 435 x 86 x 278 mm (17-1/8" x 3-3/8" x 10-15/16") Weight 3.2 kg (7 lbs. 1 oz.) Accessories Audio connection cord AM loop antenna Indoor FM antenna * Specifications subject to change without notice. 12


