
Owner's Manual 1
Page 3
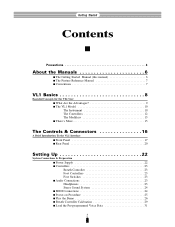
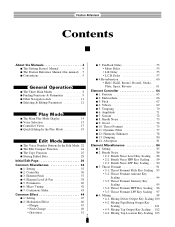
... VL1 Model 10 The Instrument 10 The Controllers 12 The Modifiers 13 s There's More 15 The Controls & Connectors 16 A Brief Introduction To the VL1 Interface s Front Panel 17 s Rear Panel 20 Setting Up 22 System Connections & Preparation s Power Supply 22 s Controllers 23 Breath Controller 23 Foot Controllers 23 Foot Switches 23 s Audio Connections 23 Headphones 23 Stereo Sound System 24 s MIDI Connections 24 s Power-on Procedure 25 s Play the Demo 26 s Breath Controller Calibration 29 s Load the Pre-programmed Voice Data 31...
... VL1 Model 10 The Instrument 10 The Controllers 12 The Modifiers 13 s There's More 15 The Controls & Connectors 16 A Brief Introduction To the VL1 Interface s Front Panel 17 s Rear Panel 20 Setting Up 22 System Connections & Preparation s Power Supply 22 s Controllers 23 Breath Controller 23 Foot Controllers 23 Foot Switches 23 s Audio Connections 23 Headphones 23 Stereo Sound System 24 s MIDI Connections 24 s Power-on Procedure 25 s Play the Demo 26 s Breath Controller Calibration 29 s Load the Pre-programmed Voice Data 31...

Owner's Manual 1
Page 5
.... s Data Backup • The VL1 contains a special long-life battery that can stick to remove stubborn grime and dirt. • Never use cleaners such as electric heaters or ovens. When the backup battery needs to be used to and discolor the surface). s Location Do not expose the instrument to the following conditions to connecting or disconnecting audio and MIDI cables. s Power Supply • Turn the power switch...
.... s Data Backup • The VL1 contains a special long-life battery that can stick to remove stubborn grime and dirt. • Never use cleaners such as electric heaters or ovens. When the backup battery needs to be used to and discolor the surface). s Location Do not expose the instrument to the following conditions to connecting or disconnecting audio and MIDI cables. s Power Supply • Turn the power switch...
Owner's Manual 1
Page 20
MIDI note output data is both velocity and after-touch sensitive for external amplification equipment. ☛ Getting Started page 23. !9 Breath Controller Jack Plug the Yamaha BC2 Breath Controller supplied with the bank buttons to select any of 16 voices each. These buttons select the voice bank from the drive. ☛ Feature Reference page 162. 19 Feature Reference page 15. !3 Voice Number 1 through h Buttons The VL1 has 128 internal voice memory locations arranged in 8 banks of the VL1's 128 internal voice memory locations. Feature Reference page 15. !4 Keyboard The...
MIDI note output data is both velocity and after-touch sensitive for external amplification equipment. ☛ Getting Started page 23. !9 Breath Controller Jack Plug the Yamaha BC2 Breath Controller supplied with the bank buttons to select any of 16 voices each. These buttons select the voice bank from the drive. ☛ Feature Reference page 162. 19 Feature Reference page 15. !3 Voice Number 1 through h Buttons The VL1 has 128 internal voice memory locations arranged in 8 banks of the VL1's 128 internal voice memory locations. Feature Reference page 15. !4 Keyboard The...

Owner's Manual 1
Page 21
...Jacks These jacks accept Yamaha FC7 Foot Controllers which is to control or transmit data to the VL1. The second FC7 foot controller is supplied with the VL1, and this socket before plugging the power cord into the FOOT CONTROLLER 2 jack. Getting Started q The Controls & Connectors YAMAHA MODEL VL1 AC INLET POWER ON / OFF MIDI THRU OUT IN FOOT SWITCH 2 1 FOOT CONTROLLER 2 1 OUTPUT R L @2 POWER Switch @1 AC Power Cord Socket @6 MIDI IN, OUT and THRU Connectors @3 OUTPUT L and R Jacks @4 FOOT CONTROLLER 1 and 2 Jacks @5 FOOT SWITCH 1 and 2 Jacks Rear Panel @1 AC Power Cord...
...Jacks These jacks accept Yamaha FC7 Foot Controllers which is to control or transmit data to the VL1. The second FC7 foot controller is supplied with the VL1, and this socket before plugging the power cord into the FOOT CONTROLLER 2 jack. Getting Started q The Controls & Connectors YAMAHA MODEL VL1 AC INLET POWER ON / OFF MIDI THRU OUT IN FOOT SWITCH 2 1 FOOT CONTROLLER 2 1 OUTPUT R L @2 POWER Switch @1 AC Power Cord Socket @6 MIDI IN, OUT and THRU Connectors @3 OUTPUT L and R Jacks @4 FOOT CONTROLLER 1 and 2 Jacks @5 FOOT SWITCH 1 and 2 Jacks Rear Panel @1 AC Power Cord...
Owner's Manual 1
Page 23
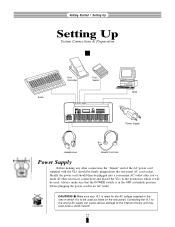
Getting Started q Setting Up Setting Up System Connections & Preparation Audio Foot Controller Foot Switch L R OUTPUT 1 2 FOOT CONTROLLER 1 2 FOOT SWITCH IN OUT THRU MIDI POWER ON / OFF DOWN OCTAVE UP MAX PITCH MIN MODULATION 1 MODULATION 2 PLAY MODE EDIT UTILITY COMPARE COPY STORE VOLUME CS1 CS2 DEC F1 F2 F3 F4 F5 F6 F7 F8 CONT EXIT INC ENTER A B C D E F G H 1 2 3 4 5 E1 E2 ELEMENT SELECT 9 10 E1 E2 ALL ELEMENT ON / OFF 11 12 13 ALL H.E. E.Q. MODIFIER ON...
Getting Started q Setting Up Setting Up System Connections & Preparation Audio Foot Controller Foot Switch L R OUTPUT 1 2 FOOT CONTROLLER 1 2 FOOT SWITCH IN OUT THRU MIDI POWER ON / OFF DOWN OCTAVE UP MAX PITCH MIN MODULATION 1 MODULATION 2 PLAY MODE EDIT UTILITY COMPARE COPY STORE VOLUME CS1 CS2 DEC F1 F2 F3 F4 F5 F6 F7 F8 CONT EXIT INC ENTER A B C D E F G H 1 2 3 4 5 E1 E2 ELEMENT SELECT 9 10 E1 E2 ALL ELEMENT ON / OFF 11 12 13 ALL H.E. E.Q. MODIFIER ON...

Owner's Manual 1
Page 25
... be connected directly to musical instrument amplifiers designed for keyboard use, or to the line inputs of the external MIDI device(s) used with the VL1. q The VL1 transmits and receives the following MIDI data: Note Control Change Program Change Aftertouch Pitch Bend Bulk The played key(s) and velocity value. Pitch bend wheel position. The VL1 OUTPUT L and R jacks can cause data errors. Voice and system parameters transmitted in the utility mode "MIDI Setting" page described on page 154 of the VL1 voices and expressive features. s Make...
... be connected directly to musical instrument amplifiers designed for keyboard use, or to the line inputs of the external MIDI device(s) used with the VL1. q The VL1 transmits and receives the following MIDI data: Note Control Change Program Change Aftertouch Pitch Bend Bulk The played key(s) and velocity value. Pitch bend wheel position. The VL1 OUTPUT L and R jacks can cause data errors. Voice and system parameters transmitted in the utility mode "MIDI Setting" page described on page 154 of the VL1 voices and expressive features. s Make...
Owner's Manual 1
Page 32
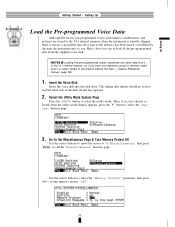
Feature Reference manual, page 166. 1. Use the cursor buttons to select the "Memory Protect" parameter, then press = to call the "Miscellaneous" function page. Here's how you can re-load all or part of the disk should face upward. 2. Insert the Voice Disk Insert the voice disk into the disk drive. Go To the Miscellaneous Page & Turn Memory Protect Off Use the cursor buttons to move the cursor to "6:Miscellaneous", then...
Feature Reference manual, page 166. 1. Use the cursor buttons to select the "Memory Protect" parameter, then press = to call the "Miscellaneous" function page. Here's how you can re-load all or part of the disk should face upward. 2. Insert the Voice Disk Insert the voice disk into the disk drive. Go To the Miscellaneous Page & Turn Memory Protect Off Use the cursor buttons to move the cursor to "6:Miscellaneous", then...
Owner's Manual 1
Page 33
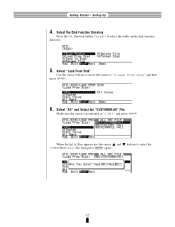
Select "Load From Disk" Use the cursor buttons to move the cursor to select the utility mode disk function directory. 5. Select "All" and Select the "CUSTOMER:All" File Make sure the cursor is positioned at "1:All" and press [. Select the Disk Function Directory Press the £ function button ("Disk") to "2:Load From Disk" and then press [. 6. Getting Started q Setting Up 4. When the list of files appears use the cursor > and < buttons to select the "CUSTOMER:All" file, then press [ again. 32
Select "Load From Disk" Use the cursor buttons to move the cursor to select the utility mode disk function directory. 5. Select "All" and Select the "CUSTOMER:All" File Make sure the cursor is positioned at "1:All" and press [. Select the Disk Function Directory Press the £ function button ("Disk") to "2:Load From Disk" and then press [. 6. Getting Started q Setting Up 4. When the list of files appears use the cursor > and < buttons to select the "CUSTOMER:All" file, then press [ again. 32

Owner's Manual 1
Page 42
... the PLAY mode, function buttons ¡ through ¢ display the assignments for the controller parameters listed in the preceding chart (you can see that the breath controller is assigned to control "Pressure" and "H.Enhancer" (the Harmonic Enhancer). In a voice that uses two elements the "Element2" controllers are independently assignable and are listed in the central "Element1" column. The pitch wheel controls both "Pitch" and "Embouchure", and the modulation wheel (MODULATION 1) controls "Vibrato...
... the PLAY mode, function buttons ¡ through ¢ display the assignments for the controller parameters listed in the preceding chart (you can see that the breath controller is assigned to control "Pressure" and "H.Enhancer" (the Harmonic Enhancer). In a voice that uses two elements the "Element2" controllers are independently assignable and are listed in the central "Element1" column. The pitch wheel controls both "Pitch" and "Embouchure", and the modulation wheel (MODULATION 1) controls "Vibrato...

Owner's Manual 1
Page 44
... MIDI control change number. 5. Press the - When you select a pre-assigned controller the corresponding controller name is shown on the list. corresponding to the 124 controller number provided by using the § function button ("Bpag" stands for "Back page"). Try Out the Edited Voice & Cancel the Vibrato Effect Try operating the " wheel while playing the AltoSax voice. In the same way, the ¶ function button can be used so it does in memory before selecting...
... MIDI control change number. 5. Press the - When you select a pre-assigned controller the corresponding controller name is shown on the list. corresponding to the 124 controller number provided by using the § function button ("Bpag" stands for "Back page"). Try Out the Edited Voice & Cancel the Vibrato Effect Try operating the " wheel while playing the AltoSax voice. In the same way, the ¶ function button can be used so it does in memory before selecting...
Owner's Manual 1
Page 47
... controller envelopes that can have different effects with different voices. Feature Reference manual, page 172. Now that can be used to floppy disk, as described above - the inverse "E"(´) will be gone and the voice will be as it must be done before you 're ready to a string instrument normally doesn't produce instantaneous sound. Getting Started q The Controllers 9. When you edited it. NOTES s The VL1 has a Memory Voice Recall function...
... controller envelopes that can have different effects with different voices. Feature Reference manual, page 172. Now that can be used to floppy disk, as described above - the inverse "E"(´) will be gone and the voice will be as it must be done before you 're ready to a string instrument normally doesn't produce instantaneous sound. Getting Started q The Controllers 9. When you edited it. NOTES s The VL1 has a Memory Voice Recall function...
Owner's Manual 1
Page 48
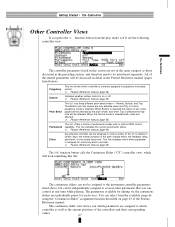
... without MIDI control Portamento capability. All of the pitch change effect, the feedback delay send level, or the reverb send level. Getting Started q The Controllers Other Controller Views If you press the ∞ function button from the available range by using the "Continuous Slider" assignment function described on or off. (≥ Feature Reference manual, page 35) Pitch Bend The VL1 has three different pitch bend modes - When Bottom is selected...
... without MIDI control Portamento capability. All of the pitch change effect, the feedback delay send level, or the reverb send level. Getting Started q The Controllers Other Controller Views If you press the ∞ function button from the available range by using the "Continuous Slider" assignment function described on or off. (≥ Feature Reference manual, page 35) Pitch Bend The VL1 has three different pitch bend modes - When Bottom is selected...
Owner's Manual 1
Page 61
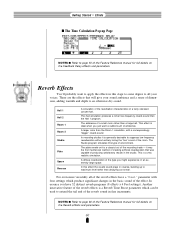
... stage to some degree to all of the reverb effects have 32 distinct reverb programs (8 effects x 4 Feel settings). This effect is a classic tool of the reverb sound in the basic sound of the Feature Reference manual for full details on the Feedback Delay effects and parameters. it is a Reverb Time Boost parameter which produce significant changes in fine increments. NOTES s Refer to page 60 of producing satisfactory...
... stage to some degree to all of the reverb effects have 32 distinct reverb programs (8 effects x 4 Feel settings). This effect is a classic tool of the reverb sound in the basic sound of the Feature Reference manual for full details on the Feedback Delay effects and parameters. it is a Reverb Time Boost parameter which produce significant changes in fine increments. NOTES s Refer to page 60 of producing satisfactory...
Owner's Manual 1
Page 63
...;", and page numbers in the Feature Reference manual are preceded by "ƒ". A Absorption Aftertouch curve Amplitude & filter envelope Amplitude & filter key scaling Amplitude Assign mode B Backup battery Bank buttons Breath attack gain Breath attack time Breath control curve Breath controller calibration Breath controller Breath controller jack Breath noise Breath noise key scaling Bulk dump, MIDI C Common miscellaneous Confirm mode Continuous slider assignment Continuous sliders Controller envelopes Controller search & replace Controller parameters Controller views Controllers ƒ...
...;", and page numbers in the Feature Reference manual are preceded by "ƒ". A Absorption Aftertouch curve Amplitude & filter envelope Amplitude & filter key scaling Amplitude Assign mode B Backup battery Bank buttons Breath attack gain Breath attack time Breath control curve Breath controller calibration Breath controller Breath controller jack Breath noise Breath noise key scaling Bulk dump, MIDI C Common miscellaneous Confirm mode Continuous slider assignment Continuous sliders Controller envelopes Controller search & replace Controller parameters Controller views Controllers ƒ...
Owner's Manual 1
Page 64
...22 Embouchure & pitch envelope ƒ130 Embouchure & pitch envelope key scaling ƒ132-134 Embouchure ƒ66 Enter button ©18 Equalizer auxiliary ƒ119 Equalizer band ƒ122 Equalizer ©55 Equalizer key scaling ƒ120-121 Error messages ƒ180 Exit button ©18 F Feedback delay effects Feedback delay Feedback delay/reverb mode Flanger Floppy disk drive Floppy disks & drive, handling Foot controller 2 assign Foot controller jacks Foot controllers Foot switches Foot switch assign Foot switch jacks Function buttons Functions & parameters, finding...
...22 Embouchure & pitch envelope ƒ130 Embouchure & pitch envelope key scaling ƒ132-134 Embouchure ƒ66 Enter button ©18 Equalizer auxiliary ƒ119 Equalizer band ƒ122 Equalizer ©55 Equalizer key scaling ƒ120-121 Error messages ƒ180 Exit button ©18 F Feedback delay effects Feedback delay Feedback delay/reverb mode Flanger Floppy disk drive Floppy disks & drive, handling Foot controller 2 assign Foot controller jacks Foot controllers Foot switches Foot switch assign Foot switch jacks Function buttons Functions & parameters, finding...
Owner's Manual 2
Page 6
... 84 s The Edit Compare Function 24 s 1: Setting 85 s The Copy Function 25 s 2: Breath Noise 86 s Storing Edited Data 28 • 2-1: Breath Noise Level Key Scaling . . 88 Initial Edit Page 30 Common Miscellanous 34 s 1: Setting 35 s 2: Controller 36 s 3: Element Pitch 37 s 4: Element Level & Pan 38 s 5: Portamento 40 s 6: Micro Tuning 42 s 7: Continuous Slider 43 Common Effect 44 s 1: Setting 45 s 2: Modulation Effect 46 • Flanger 47 • Pitch Change 49 •...
... 84 s The Edit Compare Function 24 s 1: Setting 85 s The Copy Function 25 s 2: Breath Noise 86 s Storing Edited Data 28 • 2-1: Breath Noise Level Key Scaling . . 88 Initial Edit Page 30 Common Miscellanous 34 s 1: Setting 35 s 2: Controller 36 s 3: Element Pitch 37 s 4: Element Level & Pan 38 s 5: Portamento 40 s 6: Micro Tuning 42 s 7: Continuous Slider 43 Common Effect 44 s 1: Setting 45 s 2: Modulation Effect 46 • Flanger 47 • Pitch Change 49 •...
Owner's Manual 2
Page 22
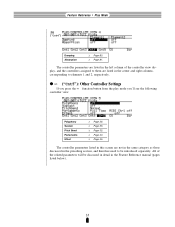
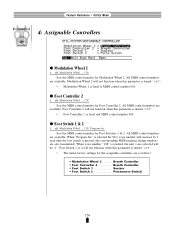
... the center and right columns, corresponding to be discussed in detail in the Feature Reference manual (pages listed below). 18 q ∞ ("Cnt5"): Other Controller Settings If you press the ∞ function button from the play mode you'll see the following controller view: Polyphony Sustain Pitch Bend Portamento Effect ≥ Page 36. ≥ Page 35. ≥ Page 35. ≥ Page 40. ≥ Page...
... the center and right columns, corresponding to be discussed in detail in the Feature Reference manual (pages listed below). 18 q ∞ ("Cnt5"): Other Controller Settings If you press the ∞ function button from the play mode you'll see the following controller view: Polyphony Sustain Pitch Bend Portamento Effect ≥ Page 36. ≥ Page 35. ≥ Page 35. ≥ Page 40. ≥ Page...

Owner's Manual 2
Page 120
... the resonant peak. 116 Adjusts the level of the input signal to a specific frequency between the "wet" (the output of the dynamic filter tracks the note(s) played on the keyboard, offset by the amount ...input level. Determines whether the dynamic filter cutoff frequency is offset from the frequency of the key played, while positive values offset the cutoff frequency above that point. The higher the value the more "wet" the signal, and therefore the more pronounced the dynamic filter effect. q Cutoff Tracking ≤ Fixed, KeyTrack. Feature Reference q Edit Mode q Input...
... the resonant peak. 116 Adjusts the level of the input signal to a specific frequency between the "wet" (the output of the dynamic filter tracks the note(s) played on the keyboard, offset by the amount ...input level. Determines whether the dynamic filter cutoff frequency is offset from the frequency of the key played, while positive values offset the cutoff frequency above that point. The higher the value the more "wet" the signal, and therefore the more pronounced the dynamic filter effect. q Cutoff Tracking ≤ Fixed, KeyTrack. Feature Reference q Edit Mode q Input...
Owner's Manual 2
Page 160
...). Sets the MIDI control number for the assignable controllers are as follows: • Modulation Wheel 2 ...... Foot Switch 1 or 2 will not function when this parameter is pressed (the corresponding MIDI program change numbers are available. Modulation Wheel 2 will increase by 1 each time the foot switch is turned "off , Modulation Wheel ... 119, Program Inc. When "Program Inc" is selected the VL1 voice number will not function when this parameter is turned "off ". • Foot Controller 1 is turned "off ". • The initial factory settings for Foot Controller 2.
...). Sets the MIDI control number for the assignable controllers are as follows: • Modulation Wheel 2 ...... Foot Switch 1 or 2 will not function when this parameter is pressed (the corresponding MIDI program change numbers are available. Modulation Wheel 2 will increase by 1 each time the foot switch is turned "off , Modulation Wheel ... 119, Program Inc. When "Program Inc" is selected the VL1 voice number will not function when this parameter is turned "off ". • Foot Controller 1 is turned "off ". • The initial factory settings for Foot Controller 2.
Owner's Manual 2
Page 183
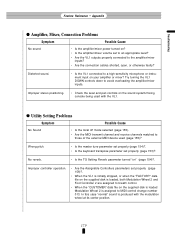
... assigned to breath control. • When the "CUSTOMER" data file on the sound system/mixing console being used (page 155)? Wrong pitch. • Is the master tune parameter set properly (page 154)?. • Is the keyboard transpose parameter set to an appropriate level? • Are the VL1 outputs properly connected to a high-sensitivity microphone or instrument input on ? • Is the amplifier/mixer volume set properly (page 153)?. Distorted sound. • Is the VL1 connected...
... assigned to breath control. • When the "CUSTOMER" data file on the sound system/mixing console being used (page 155)? Wrong pitch. • Is the master tune parameter set properly (page 154)?. • Is the keyboard transpose parameter set to an appropriate level? • Are the VL1 outputs properly connected to a high-sensitivity microphone or instrument input on ? • Is the amplifier/mixer volume set properly (page 153)?. Distorted sound. • Is the VL1 connected...


