
Owner's Manual 1
Page 3
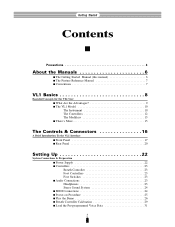
...Contents Precautions 4 About the Manuals 6 s The Getting Started Manual (this manual 6 s The Feature Reference Manual 7 s Conventions 7 VL1 Basics 8 Essential Concepts for the VL1 User s What Are the Advantages 9 s The VL1 Model 10 The Instrument 10 The Controllers 12 The Modifiers 13 s There's More 15 The Controls & Connectors 16 A Brief Introduction To...23 Foot Switches 23 s Audio Connections 23 Headphones 23 Stereo Sound System 24 s MIDI Connections 24 s Power-on Procedure 25 s Play the Demo 26 s Breath Controller Calibration 29 s Load the Pre-programmed Voice Data 31 2
...Contents Precautions 4 About the Manuals 6 s The Getting Started Manual (this manual 6 s The Feature Reference Manual 7 s Conventions 7 VL1 Basics 8 Essential Concepts for the VL1 User s What Are the Advantages 9 s The VL1 Model 10 The Instrument 10 The Controllers 12 The Modifiers 13 s There's More 15 The Controls & Connectors 16 A Brief Introduction To...23 Foot Switches 23 s Audio Connections 23 Headphones 23 Stereo Sound System 24 s MIDI Connections 24 s Power-on Procedure 25 s Play the Demo 26 s Breath Controller Calibration 29 s Load the Pre-programmed Voice Data 31 2
Owner's Manual 1
Page 7
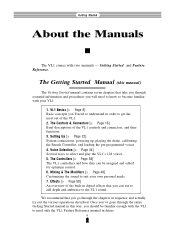
Setting Up [≥ Page 22] System connections, powering up, playing the demo, calibrating the Breath Controller, and loading the pre-programmed voices. 4. Voice Selection [≥ Page 34] Several ways to suit your VL1: 1. Effects [≥ Page 58] An overview of the built-in digital ... Mixing & The Modifiers [≥ Page 48] Customizing the sound to select and play the VL1's 128 voices. 5. VL1 Basics [≥ Page 8] Basic concepts you will need only the VL1 Feature Reference manual in this manual) The Getting Started manual contains seven chapters that you can be...
Setting Up [≥ Page 22] System connections, powering up, playing the demo, calibrating the Breath Controller, and loading the pre-programmed voices. 4. Voice Selection [≥ Page 34] Several ways to suit your VL1: 1. Effects [≥ Page 58] An overview of the built-in digital ... Mixing & The Modifiers [≥ Page 48] Customizing the sound to select and play the VL1's 128 voices. 5. VL1 Basics [≥ Page 8] Basic concepts you will need only the VL1 Feature Reference manual in this manual) The Getting Started manual contains seven chapters that you can be...
Owner's Manual 1
Page 27
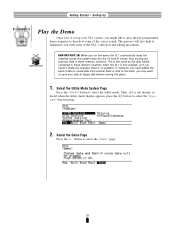
... edited the bank-H data or saved data from another bank or disk to this bank, you may want to save your VL1 system, you might like to play the pre-programmed demo sequence to hear how some of the voices sound. Select the Utility Mode System Page Press the U button to select... the "Demo" page. 26 tem" function page. 2. s When you run the demo the VL1 automatically loads the required voices and system data into the 16 bank-H voices, thus erasing any changes there is no...
... edited the bank-H data or saved data from another bank or disk to this bank, you may want to save your VL1 system, you might like to play the pre-programmed demo sequence to hear how some of the voices sound. Select the Utility Mode System Page Press the U button to select... the "Demo" page. 26 tem" function page. 2. s When you run the demo the VL1 automatically loads the required voices and system data into the 16 bank-H voices, thus erasing any changes there is no...

Owner's Manual 1
Page 28
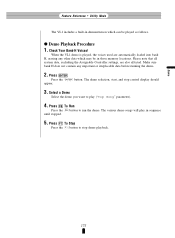
The VL1 will repeat until stopped. 27 The cycle will ask you want to go ahead with the selected song, then all bank-H data. Press [ and Confirm Press the [ button if it's OK to start with the demo - Playback will be played in sequence. to continue or = to run the demo. Run the Demo Press the • button to abort. 4. Setting Up Getting Started q Setting Up 3. Select a Song Use the data dial or = and - and rewrite all other songs will start with. 5. buttons to select the song number you to confirm again: press -
The VL1 will repeat until stopped. 27 The cycle will ask you want to go ahead with the selected song, then all bank-H data. Press [ and Confirm Press the [ button if it's OK to start with the demo - Playback will be played in sequence. to continue or = to run the demo. Run the Demo Press the • button to abort. 4. Setting Up Getting Started q Setting Up 3. Select a Song Use the data dial or = and - and rewrite all other songs will start with. 5. buttons to select the song number you to confirm again: press -

Owner's Manual 1
Page 29
Getting Started q Setting Up 6. Return To the Play Mode When Done Press the MODE P button to stop demo playback. 7. Stop the Demo Press the ¶ button to return the PLAY mode. 28
Getting Started q Setting Up 6. Return To the Play Mode When Done Press the MODE P button to stop demo playback. 7. Stop the Demo Press the ¶ button to return the PLAY mode. 28
Owner's Manual 1
Page 63
...;161 Conventions Copy button Copy function Crossfade speed Cursor buttons ©7 ©17 ƒ25 ƒ85 ©18 D Damping Data dial Decrement & increment buttons Demo playback Device number Disk format Disk status Disk, delete file Disk, load from Disk, rename file Disk, save to Display mode Distortion Dynamic filter Dynamic... ƒ173 ƒ45 ƒ23 ©58 ƒ37 ƒ38 ƒ31 ƒ37 Getting Started q Index Index This index covers both the VL1 Getting Started and Feature Reference manuals for easy cross-referencing.
...;161 Conventions Copy button Copy function Crossfade speed Cursor buttons ©7 ©17 ƒ25 ƒ85 ©18 D Damping Data dial Decrement & increment buttons Demo playback Device number Disk format Disk status Disk, delete file Disk, load from Disk, rename file Disk, save to Display mode Distortion Dynamic filter Dynamic... ƒ173 ƒ45 ƒ23 ©58 ƒ37 ƒ38 ƒ31 ƒ37 Getting Started q Index Index This index covers both the VL1 Getting Started and Feature Reference manuals for easy cross-referencing.
Owner's Manual 2
Page 7
... Level Key Scaling 149 • 5-5: Amplitude & Filter Release Rate Key Scaling 150 Utility Mode System 152 MIDI Bulk Dump 160 Disk 162 Edit Recall 172 Demo 174 Appendix Troubleshooting 178 Error Messages 180 Specifications 184 Index 186 3
... Level Key Scaling 149 • 5-5: Amplitude & Filter Release Rate Key Scaling 150 Utility Mode System 152 MIDI Bulk Dump 160 Disk 162 Edit Recall 172 Demo 174 Appendix Troubleshooting 178 Error Messages 180 Specifications 184 Index 186 3
Owner's Manual 2
Page 8
... you can be familiar enough with your own personal needs. 7. The Controls & Connectors [≥ Page 16] Brief descriptions of the VL1 controls and connectors, and their functions. 3. We recommend that you go through the entire Getting Started manual in digital effects that you ...'ll need only the VL1 Feature Reference manual in sequence and actually try out the various operations described. Setting Up [≥ Page 22] System connections, powering up, playing the demo, calibrating the Breath Controller, and loading the pre-programmed voices...
... you can be familiar enough with your own personal needs. 7. The Controls & Connectors [≥ Page 16] Brief descriptions of the VL1 controls and connectors, and their functions. 3. We recommend that you go through the entire Getting Started manual in digital effects that you ...'ll need only the VL1 Feature Reference manual in sequence and actually try out the various operations described. Setting Up [≥ Page 22] System connections, powering up, playing the demo, calibrating the Breath Controller, and loading the pre-programmed voices...
Owner's Manual 2
Page 155
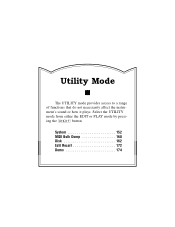
Utility Mode The UTILITY mode provides access to a range of functions that do not necessarity affect the instrument's sound or how it plays. Select the UTILITY mode from either the EDIT or PLAY mode by pressing the U button. System 152 MIDI Bulk Dump 160 Disk 162 Edit Recall 172 Demo 174
Utility Mode The UTILITY mode provides access to a range of functions that do not necessarity affect the instrument's sound or how it plays. Select the UTILITY mode from either the EDIT or PLAY mode by pressing the U button. System 152 MIDI Bulk Dump 160 Disk 162 Edit Recall 172 Demo 174
Owner's Manual 2
Page 162
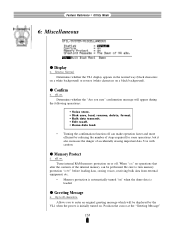
... you sure" confirmation message will be performed. Feature Reference q Utility Mode 6: Miscellaneous q Display ≤ Reverse, Normal. Determines whether the VL1 display appears in the normal way (black characters on a white background) or reverse (white characters on . Be sure to turn memory protection...8226; Voice store. • Disk save, load, rename, delete, format. • Bulk data transmit. • Edit recall. • Demo data load. • Turning the confirmation function off " before loading data, storing voices, receiving bulk data from external equipment, etc. •...
... you sure" confirmation message will be performed. Feature Reference q Utility Mode 6: Miscellaneous q Display ≤ Reverse, Normal. Determines whether the VL1 display appears in the normal way (black characters on a white background) or reverse (white characters on . Be sure to turn memory protection...8226; Voice store. • Disk save, load, rename, delete, format. • Bulk data transmit. • Edit recall. • Demo data load. • Turning the confirmation function off " before loading data, storing voices, receiving bulk data from external equipment, etc. •...
Owner's Manual 2
Page 166
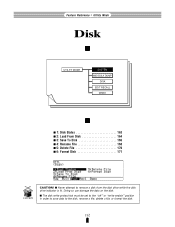
Doing so can damage the data on the disk. s The disk write protect tab must be set to the "off" or "write enable" position in order to save data to remove a disk from the disk drive while the disk drive indicator is lit. s Never attempt to the disk, rename a file, delete a file, or format the disk. 162 CAUTION! Feature Reference q Utility Mode Disk UTILITY MODE SYSTEM MIDI BULK DUMP DISK EDIT RECALL DEMO s 1: Disk Status 163 s 2: Load From Disk 164 s 3: Save To Disk 166 s 4: Rename File 168 s 5: Delete File 170 s 6: Format Disk 171 CAUTION!
Doing so can damage the data on the disk. s The disk write protect tab must be set to the "off" or "write enable" position in order to save data to remove a disk from the disk drive while the disk drive indicator is lit. s Never attempt to the disk, rename a file, delete a file, or format the disk. 162 CAUTION! Feature Reference q Utility Mode Disk UTILITY MODE SYSTEM MIDI BULK DUMP DISK EDIT RECALL DEMO s 1: Disk Status 163 s 2: Load From Disk 164 s 3: Save To Disk 166 s 4: Rename File 168 s 5: Delete File 170 s 6: Format Disk 171 CAUTION!
Owner's Manual 2
Page 179
.... 5. Press ¶ To Stop Press the ¶ button to run the demo. q Demo Playback Procedure 1. Check Your Bank-H Voices! Press [ Press the [ button. Demo Feature Reference q Utility Mode The VL1 includes a built-in demonstration which may be played as follows. When the VL1 demo is played, the voices used are also affected. Make sure bank H does...
.... 5. Press ¶ To Stop Press the ¶ button to run the demo. q Demo Playback Procedure 1. Check Your Bank-H Voices! Press [ Press the [ button. Demo Feature Reference q Utility Mode The VL1 includes a built-in demonstration which may be played as follows. When the VL1 demo is played, the voices used are also affected. Make sure bank H does...
Owner's Manual 2
Page 190
Feature Reference q Appendix Index This index covers both the VL1 Getting Started and Feature Reference manuals for easy cross-referencing. A Absorption 81 Aftertouch curve 157 Amplitude & filter envelope 143 Amplitude & filter key scaling 146-150 ... Copy function 25 Crossfade speed 85 Cursor buttons 18 D Damping 80 Data dial 18, 35. ƒ16 Decrement & increment buttons . . . ©18, 35. ƒ16 Demo playback 26. ƒ175 Device number 155 Disk format 171 Disk status 163 Disk, delete file 170 Disk, load from 164 Disk, rename file 168...
Feature Reference q Appendix Index This index covers both the VL1 Getting Started and Feature Reference manuals for easy cross-referencing. A Absorption 81 Aftertouch curve 157 Amplitude & filter envelope 143 Amplitude & filter key scaling 146-150 ... Copy function 25 Crossfade speed 85 Cursor buttons 18 D Damping 80 Data dial 18, 35. ƒ16 Decrement & increment buttons . . . ©18, 35. ƒ16 Demo playback 26. ƒ175 Device number 155 Disk format 171 Disk status 163 Disk, delete file 170 Disk, load from 164 Disk, rename file 168...


