
XDA-QS5400 Owner s Manual
Page 2
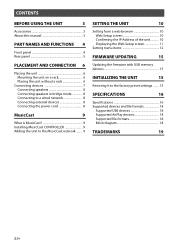
... unit without a rack 6 Connecting devices 7 Connecting speakers 8 Connecting speakers in bridge mode 8 Connecting to a wired network 8 Connecting external devices 8 Connecting the power cord 8 MusicCast 9 What is MusicCast 9 Installing MusicCast CONTROLLER 9 Adding the unit to the MusicCast network ........ 9 SETTING THE UNIT 10 Setting from a web browser 10 Web Setup screen 10 Confirming the IP Address of the unit........... 10 Displaying the Web Setup screen 11 Setting menu items 12 FIRMWARE UPDATING 15 Updating the firmware with USB memory...
... unit without a rack 6 Connecting devices 7 Connecting speakers 8 Connecting speakers in bridge mode 8 Connecting to a wired network 8 Connecting external devices 8 Connecting the power cord 8 MusicCast 9 What is MusicCast 9 Installing MusicCast CONTROLLER 9 Adding the unit to the MusicCast network ........ 9 SETTING THE UNIT 10 Setting from a web browser 10 Web Setup screen 10 Confirming the IP Address of the unit........... 10 Displaying the Web Setup screen 11 Setting menu items 12 FIRMWARE UPDATING 15 Updating the firmware with USB memory...
XDA-QS5400 Owner s Manual
Page 3
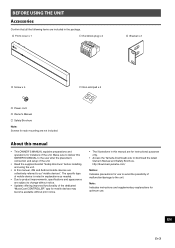
... cover x 1 … Euroblock plug x 4 … Bracket x 2 … Screw x 4 … Non-skid pad x 4 … Power cord … Owner's Manual … Safety Brochure Note: Screws for installers of the unit. About this manual are for instructional purposes only. • Access the Yamaha Downloads site to change without prior notice. • The illustrations in this manual • This OWNER'S MANUAL explains preparations and operations for rack mounting are...
... cover x 1 … Euroblock plug x 4 … Bracket x 2 … Screw x 4 … Non-skid pad x 4 … Power cord … Owner's Manual … Safety Brochure Note: Screws for installers of the unit. About this manual are for instructional purposes only. • Access the Yamaha Downloads site to change without prior notice. • The illustrations in this manual • This OWNER'S MANUAL explains preparations and operations for rack mounting are...

XDA-QS5400 Owner s Manual
Page 4
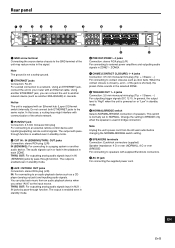
... function means that the audio signals that are independent of each ZONE. b RESET key Resets the unit. c STATUS indicators Indicate the ZONE1 - ZONE4 to on a USB storage device when you select "USB" as the input source. 4 En White Unlit Lit Flashing Standby Power on the standby configuration. The unit is lit or flashing. - The unit's standby power consumption depends on Setting volume or selecting input d STANDBY keys Turn ZONE1 - The 4 ZONEs are input to...
... function means that the audio signals that are independent of each ZONE. b RESET key Resets the unit. c STATUS indicators Indicate the ZONE1 - ZONE4 to on a USB storage device when you select "USB" as the input source. 4 En White Unlit Lit Flashing Standby Power on the standby configuration. The unit is lit or flashing. - The unit's standby power consumption depends on Setting volume or selecting input d STANDBY keys Turn ZONE1 - The 4 ZONEs are input to...
XDA-QS5400 Owner s Manual
Page 5
... AUX : IN jacks by pass-through function. j k f PRE OUT/ZONE1- 4 jacks Connection: stereo RCA plug (L/R) For connecting to an external remote control device and inputting/outputting remote control signals. c IR IN/OUT jack Connection: 3.5 mm monaural mini-plug For connecting to external power amplifiers and outputting audio signals in ZONE1 - OUT jacks Connection: stereo RCA plug (L/R) IN (SENSING): For connecting to a paging system or another XDA-QS5400) in cascade. You can connect the unit to another network device (such as door bells. THRU. This switch...
... AUX : IN jacks by pass-through function. j k f PRE OUT/ZONE1- 4 jacks Connection: stereo RCA plug (L/R) For connecting to an external remote control device and inputting/outputting remote control signals. c IR IN/OUT jack Connection: 3.5 mm monaural mini-plug For connecting to external power amplifiers and outputting audio signals in ZONE1 - OUT jacks Connection: stereo RCA plug (L/R) IN (SENSING): For connecting to a paging system or another XDA-QS5400) in cascade. You can connect the unit to another network device (such as door bells. THRU. This switch...

XDA-QS5400 Owner s Manual
Page 6
PLACEMENT AND CONNECTION Placing the unit „ Mounting the unit on a rack Use the supplied brackets to the unit horizontally. If the unit is mounted in a rack, always observe the following requirements to either side and..., either leave any open spaces uncovered or install appropriate ventilating panels to heat generated from walls or other devices that generate a significant amount of heat, such as a power amplifier, leave more than the XDAQS5400. • When installing brackets, use the brackets for rack mounting are securely fixed. Bottom face Non-skid pads Bottom face ...
PLACEMENT AND CONNECTION Placing the unit „ Mounting the unit on a rack Use the supplied brackets to the unit horizontally. If the unit is mounted in a rack, always observe the following requirements to either side and..., either leave any open spaces uncovered or install appropriate ventilating panels to heat generated from walls or other devices that generate a significant amount of heat, such as a power amplifier, leave more than the XDAQS5400. • When installing brackets, use the brackets for rack mounting are securely fixed. Bottom face Non-skid pads Bottom face ...

XDA-QS5400 Owner s Manual
Page 7
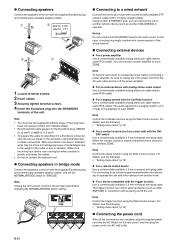
Unplug the unit's power cord from the AC wall outlet before connecting the devices. Audio device Contact closure (such as door bell) Microphone amplifier Remote control device (Infrared signal transmitter) XDA-QS5400 L R L R L R Power amplifier (i.e. Router Remote control device (Infrared signal receiver) Paging system, etc. XDA-AMP5400) L R EN En 7 Connecting devices The following is an example of connecting the devices.
Unplug the unit's power cord from the AC wall outlet before connecting the devices. Audio device Contact closure (such as door bell) Microphone amplifier Remote control device (Infrared signal transmitter) XDA-QS5400 L R L R L R Power amplifier (i.e. Router Remote control device (Infrared signal receiver) Paging system, etc. XDA-AMP5400) L R EN En 7 Connecting devices The following is an example of connecting the devices.
XDA-QS5400 Owner s Manual
Page 8
.../Fade function Use a commercially-available analog stereo pin cable (stereo audio RCA cable). For details, see the following : • "Setting menu items" (p.12) „ For a remote control device Use a commercially-available 3.5 mm monaural mini-plug cable. The trigger function can connect a power amplifier to make connections. Note Control the trigger function using stranded wire to each ZONE. With a Euroblock connection, stranded wires may be sure to your router with a commercially-available STP network cable (CAT-5 or higher straight cable). The audio signals...
.../Fade function Use a commercially-available analog stereo pin cable (stereo audio RCA cable). For details, see the following : • "Setting menu items" (p.12) „ For a remote control device Use a commercially-available 3.5 mm monaural mini-plug cable. The trigger function can connect a power amplifier to make connections. Note Control the trigger function using stranded wire to each ZONE. With a Euroblock connection, stranded wires may be sure to your router with a commercially-available STP network cable (CAT-5 or higher straight cable). The audio signals...
XDA-QS5400 Owner s Manual
Page 9
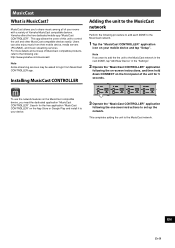
To use the network features on your device. 3 Operate the "MusicCast CONTROLLER" application following the onscreen instructions to set up the network. This completes adding the unit to your mobile device and tap "Setup". EN En 9 Users can also enjoy music from MusicCast CONTROLLER app. Yamaha offers the free dedicated mobile app "MusicCast CONTROLLER". Search for 5 seconds. Note If you want to add...
To use the network features on your device. 3 Operate the "MusicCast CONTROLLER" application following the onscreen instructions to set up the network. This completes adding the unit to your mobile device and tap "Setup". EN En 9 Users can also enjoy music from MusicCast CONTROLLER app. Yamaha offers the free dedicated mobile app "MusicCast CONTROLLER". Search for 5 seconds. Note If you want to add...
XDA-QS5400 Owner s Manual
Page 10
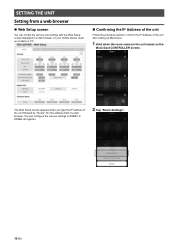
The Web Setup screen appears when you type the IP address of the unit followed by "/Setup" into the address field of the unit after setting up MusicCast. 1 Hold down the room name (or the unit name) on your mobile device (such as a tablet) or PC. „... below to ZONE4 all together. 2 Tap "Room Settings". 10 En You can modify the various unit settings with the Web Setup screen displayed in ZONE1 to confirm the IP Address of a web browser. SETTING THE UNIT Setting from a web browser „ Web Setup screen You can configure the various settings in a web browser on the MusicCast...
The Web Setup screen appears when you type the IP address of the unit followed by "/Setup" into the address field of the unit after setting up MusicCast. 1 Hold down the room name (or the unit name) on your mobile device (such as a tablet) or PC. „... below to ZONE4 all together. 2 Tap "Room Settings". 10 En You can modify the various unit settings with the Web Setup screen displayed in ZONE1 to confirm the IP Address of a web browser. SETTING THE UNIT Setting from a web browser „ Web Setup screen You can configure the various settings in a web browser on the MusicCast...

XDA-QS5400 Owner s Manual
Page 11
The Web Setup screen does not appear without "/Setup". 3 Tap "Information", and check the IP Address of the unit. „ Displaying the Web Setup screen Using the IP Address of a web browser. For example: http://192.168.1.70/Setup Note Be sure not to type only the IP address of the unit into the address field of a web browser on your mobile device (such as a tablet) or PC, and press ENTER. The Web Setup screen for the unit appears. Type the IP Address of the unit followed by "/Setup" into the address field of the unit, you can display the Web Setup screen. EN En 11
The Web Setup screen does not appear without "/Setup". 3 Tap "Information", and check the IP Address of the unit. „ Displaying the Web Setup screen Using the IP Address of a web browser. For example: http://192.168.1.70/Setup Note Be sure not to type only the IP address of the unit into the address field of a web browser on your mobile device (such as a tablet) or PC, and press ENTER. The Web Setup screen for the unit appears. Type the IP Address of the unit followed by "/Setup" into the address field of the unit, you can display the Web Setup screen. EN En 11
XDA-QS5400 Owner s Manual
Page 12
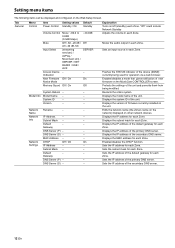
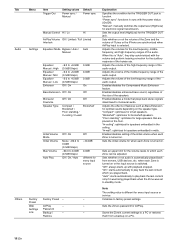
... Menu Control Item Setting values Default Power Control Standby / On Standby Volume Control Mute Input Select Access Device Indication New Firmware Notice Mode Memory Guard Mute / -80.0 to 0.0dB (0.5dB Steps) Off / Att -20 dB / Att -40 dB /On (streaming services) / AirPlay / MusicCast Link / SERVER / NET RADIO / USB / AUX - System ID - - Network Rename - - Default - - Network DHCP Off / On On Settings IP Address - - Gateway DNS Server (P) - - Explanation Turns on/off (standby) each Zone. Flashes...
... Menu Control Item Setting values Default Power Control Standby / On Standby Volume Control Mute Input Select Access Device Indication New Firmware Notice Mode Memory Guard Mute / -80.0 to 0.0dB (0.5dB Steps) Off / Att -20 dB / Att -40 dB /On (streaming services) / AirPlay / MusicCast Link / SERVER / NET RADIO / USB / AUX - System ID - - Network Rename - - Default - - Network DHCP Off / On On Settings IP Address - - Gateway DNS Server (P) - - Explanation Turns on/off (standby) each Zone. Flashes...
XDA-QS5400 Owner s Manual
Page 13
... Cut in/Fade function in each channel. "Fade": mixes the audio signals from the CUT IN jacks instead. It is recommended to set to standby mode automatically if there is enabled, the unit's power consumption increases to a level at the desired master volume levels. Off Disable Note If this is set to 0.0dB (0.5dB Steps) (Sounds) - Sets the preset chime for audio input signal level of the CHIME 1 (/2/3/4) jack are turned off and...
... Cut in/Fade function in each channel. "Fade": mixes the audio signals from the CUT IN jacks instead. It is recommended to set to standby mode automatically if there is enabled, the unit's power consumption increases to a level at the desired master volume levels. Off Disable Note If this is set to 0.0dB (0.5dB Steps) (Sounds) - Sets the preset chime for audio input signal level of the CHIME 1 (/2/3/4) jack are turned off and...
XDA-QS5400 Owner s Manual
Page 14
... input source Factory Factory Preset - - When this is automatically played back from a backup on the floor. Preset Web AirPlay - - Enables/disables a mode that are synchronized when AirPlay input is switched. Sets an upper limit for every input source or service. "On": starts automatically to monaural audio. "Auto": starts automatically to play back the last content which each Zone is different for the volume levels to function. Adjusts the volumes for large speakers that plays back stereo signals...
... input source Factory Factory Preset - - When this is automatically played back from a backup on the floor. Preset Web AirPlay - - Enables/disables a mode that are synchronized when AirPlay input is switched. Sets an upper limit for every input source or service. "On": starts automatically to monaural audio. "Auto": starts automatically to play back the last content which each Zone is different for the volume levels to function. Adjusts the volumes for large speakers that plays back stereo signals...
XDA-QS5400 Owner s Manual
Page 15
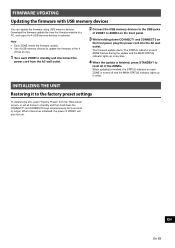
... ZONEs. EN En 15 Download the firmware update file from the Yamaha website to a PC, and copy it to ZONE4 on . Note • Each ZONE needs the firmware update. • Use 4 USB memory devices to the factory preset settings To initialize the unit, select "Factory Preset" from the AC wall outlet. 2 Connect the USB memory devices to the USB jacks of ZONE1 will also turn on the front panel...
... ZONEs. EN En 15 Download the firmware update file from the Yamaha website to a PC, and copy it to ZONE4 on . Note • Each ZONE needs the firmware update. • Use 4 USB memory devices to the factory preset settings To initialize the unit, select "Factory Preset" from the AC wall outlet. 2 Connect the USB memory devices to the USB jacks of ZONE1 will also turn on the front panel...

XDA-QS5400 Owner s Manual
Page 16
... AC 220 to +6.0 dB (0.5 dB Step) • Treble Turnover Frequency 3.5 kHz Maximum Input Signal • AUX IN (1 kHz, 0.9% THD) 2.4 V General Power Supply • [U.S.A. SPECIFICATIONS Specifications The specifications of the unit are as follows. Input jacks Analog Audio • Stereo Audio (RCA) x 2 (CUT IN, AUX) Output jacks Analog Audio • Speaker Out x 4 (L/R) • Stereo Audio (RCA) x 4 (PRE OUT) • Stereo Audio (RCA) x 2 (CUT IN, AUX) Other jacks • USB x 4 (USB2.0) • Network (Wired) x 2 (Internal speed: 100Base-TX/10Base-T, External speed...
... AC 220 to +6.0 dB (0.5 dB Step) • Treble Turnover Frequency 3.5 kHz Maximum Input Signal • AUX IN (1 kHz, 0.9% THD) 2.4 V General Power Supply • [U.S.A. SPECIFICATIONS Specifications The specifications of the unit are as follows. Input jacks Analog Audio • Stereo Audio (RCA) x 2 (CUT IN, AUX) Output jacks Analog Audio • Speaker Out x 4 (L/R) • Stereo Audio (RCA) x 4 (PRE OUT) • Stereo Audio (RCA) x 2 (CUT IN, AUX) Other jacks • USB x 4 (USB2.0) • Network (Wired) x 2 (Internal speed: 100Base-TX/10Base-T, External speed...

XDA-QS5400 Owner s Manual
Page 17
... 18-7/8" 1-3/4" 44 1-3/4" 44 • Table Top Mount-with front cover 437 x 46 x 453 mm (17-1/4" x 1-3/4" x 17-7/8") * The contents of this manual apply to the latest specifications as of the publishing date. To obtain the latest manual, access the Yamaha website then download the manual file. 443 17-3/8" 453 17-7/8" 437 17-1/4" 44 1-3/4" 46 1-3/4" EN En 17
... 18-7/8" 1-3/4" 44 1-3/4" 44 • Table Top Mount-with front cover 437 x 46 x 453 mm (17-1/4" x 1-3/4" x 17-7/8") * The contents of this manual apply to the latest specifications as of the publishing date. To obtain the latest manual, access the Yamaha website then download the manual file. 443 17-3/8" 453 17-7/8" 437 17-1/4" 44 1-3/4" 46 1-3/4" EN En 17
XDA-QS5400 Owner s Manual
Page 18
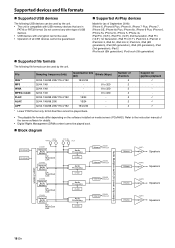
.... Refer to 320 16/24 - 16/24 - 16/24/32 - * Linear PCM format only. 32 bit-float files cannot be played back. „ Block diagram Audio Multiplex switch (for power amp assign) Layer 2 switch ETHERNET ETHERNET AUX THRU. Supported devices and file formats „ Supported USB devices The following file formats can be used . • Operation of all USB devices cannot be guaranteed. „...
.... Refer to 320 16/24 - 16/24 - 16/24/32 - * Linear PCM format only. 32 bit-float files cannot be played back. „ Block diagram Audio Multiplex switch (for power amp assign) Layer 2 switch ETHERNET ETHERNET AUX THRU. Supported devices and file formats „ Supported USB devices The following file formats can be used . • Operation of all USB devices cannot be guaranteed. „...
XDA-QS5400 Owner s Manual
Page 19
AndroidTM Google PlayTM Android and Google Play are trademarks of Yamaha Corporation. You have the right to obtain, duplicate, modify, and redistribute this product, refer to the following. For information on... Yamaha Corporation website. http://download.yamaha.com/sourcecodes/musiccast/ Licenses For information on GPL/ LGPL open -source code only. TRADEMARKS Use of the Works with Apple badge means that an accessory has been designed to work specifically with MusicCast CONTROLLER. Apple, iPad, iPad Air, iPad Pro, and iPhone are trademarks of Apple Inc. MusicCast is a service mark...
AndroidTM Google PlayTM Android and Google Play are trademarks of Yamaha Corporation. You have the right to obtain, duplicate, modify, and redistribute this product, refer to the following. For information on... Yamaha Corporation website. http://download.yamaha.com/sourcecodes/musiccast/ Licenses For information on GPL/ LGPL open -source code only. TRADEMARKS Use of the Works with Apple badge means that an accessory has been designed to work specifically with MusicCast CONTROLLER. Apple, iPad, iPad Air, iPad Pro, and iPhone are trademarks of Apple Inc. MusicCast is a service mark...


