

Owner's Manual
Page 2
... plug has two blades with one wider than the other apparatus (including amplifiers) that may be connected to the grounding system of the building, as practical. IMPORTANT Please record the serial number of cable entry as close to the point of this apparatus during lightning storms or when unused for replacement of time. 14 Refer all instructions. 5 Do not use attachments...
... plug has two blades with one wider than the other apparatus (including amplifiers) that may be connected to the grounding system of the building, as practical. IMPORTANT Please record the serial number of cable entry as close to the point of this apparatus during lightning storms or when unused for replacement of time. 14 Refer all instructions. 5 Do not use attachments...

Owner's Manual
Page 3
... use the product. 2 IMPORTANT: When connecting this product to accessories and/or another product use this product MUST be used according to the instructions found to the operation of assurance that is found to be determined by using one of the following measures: Relocate either this manual, meets FCC requirements. IMPORTANT SAFETY INSTRUCTIONS FCC INFORMATION (for Class "B" digital devices. Modifications not expressly approved by Yamaha may...
... use the product. 2 IMPORTANT: When connecting this product to accessories and/or another product use this product MUST be used according to the instructions found to the operation of assurance that is found to be determined by using one of the following measures: Relocate either this manual, meets FCC requirements. IMPORTANT SAFETY INSTRUCTIONS FCC INFORMATION (for Class "B" digital devices. Modifications not expressly approved by Yamaha may...

Owner's Manual
Page 4
... power plug can be opened for any service is not disconnected from loud sounds is often undetectable until all connections are complete. 8 Do not operate this unit upside-down. Yamaha shall not be liable for any accident caused by improper placement or installation of your equipment by lightning, keep the power cable and outdoor antennas disconnected from the wall outlet. 19 The batteries...
... power plug can be opened for any service is not disconnected from loud sounds is often undetectable until all connections are complete. 8 Do not operate this unit upside-down. Yamaha shall not be liable for any accident caused by improper placement or installation of your equipment by lightning, keep the power cable and outdoor antennas disconnected from the wall outlet. 19 The batteries...

Owner's Manual
Page 5
... the center system and the subwoofer/system control 11 Connecting external components 12 Connecting the Yamaha iPod universal dock 14 Connecting the Yamaha Bluetooth wireless audio receiver 14 Connecting the indoor FM antenna 14 Connecting the power cable 15 BASIC OPERATION BASIC PLAYBACK OPERATION 16 AIR SURROUND XTREME 17 What is printed prior to production. OTHER FUNCTIONS USEFUL OPERATION ADDITIONAL INFORMATION English 1 En Notes contain important information about safety and operating instructions. • This manual is AIR SURROUND XTREME 17 Listening to surround mode...
... the center system and the subwoofer/system control 11 Connecting external components 12 Connecting the Yamaha iPod universal dock 14 Connecting the Yamaha Bluetooth wireless audio receiver 14 Connecting the indoor FM antenna 14 Connecting the power cable 15 BASIC OPERATION BASIC PLAYBACK OPERATION 16 AIR SURROUND XTREME 17 What is printed prior to production. OTHER FUNCTIONS USEFUL OPERATION ADDITIONAL INFORMATION English 1 En Notes contain important information about safety and operating instructions. • This manual is AIR SURROUND XTREME 17 Listening to surround mode...

Owner's Manual
Page 6
Owner's manual UA Front Surround System (CENTER SYSTEM + SUBWOOFER/SYSTEM CONTROL) YAS-71/YAS-81 (YAS-71CU + YAS-71SPX/ YAS-81CU + YAS-81SPX) OWNER'S MANUAL 2 En INTRODUCTION GETTING STARTED Supplied parts This product consists of the following items. Before making connections, make sure you received all of the following items. ■ Units Center system (YAS-71CU/YAS-81CU) Subwoofer/system control (YAS-71SPX/YAS-81SPX) ■ Accessories System control cable Speaker cable (4 m) (4 m) (For US customers only) Speaker cable (4 m) (For Australian customers only) Remote control ...
Owner's manual UA Front Surround System (CENTER SYSTEM + SUBWOOFER/SYSTEM CONTROL) YAS-71/YAS-81 (YAS-71CU + YAS-71SPX/ YAS-81CU + YAS-81SPX) OWNER'S MANUAL 2 En INTRODUCTION GETTING STARTED Supplied parts This product consists of the following items. Before making connections, make sure you received all of the following items. ■ Units Center system (YAS-71CU/YAS-81CU) Subwoofer/system control (YAS-71SPX/YAS-81SPX) ■ Accessories System control cable Speaker cable (4 m) (4 m) (For US customers only) Speaker cable (4 m) (For Australian customers only) Remote control ...
Owner's Manual
Page 8
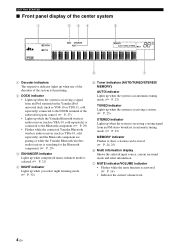
...; Front panel display of the center system 1 Decoder indicators The respective indicator lights up when any of the decoders of the system is functioning. 2 DOCK indicator • Lights up when the system is receiving a signal from an iPod stationed in the Yamaha iPod universal dock (such as YDS-10 or YDS-11, sold separately) connected to the DOCK terminal of the subwoofer/system control. (☞ P. 27) • Lights up while the Yamaha Bluetooth wireless audio receiver...
...; Front panel display of the center system 1 Decoder indicators The respective indicator lights up when any of the decoders of the system is functioning. 2 DOCK indicator • Lights up when the system is receiving a signal from an iPod stationed in the Yamaha iPod universal dock (such as YDS-10 or YDS-11, sold separately) connected to the DOCK terminal of the subwoofer/system control. (☞ P. 27) • Lights up while the Yamaha Bluetooth wireless audio receiver...
Owner's Manual
Page 9
...) 4 PRESET/TUNE, AUTO/MAN'L, MEMORY Control an FM tuner. (☞ P. 22) 5 s/e/p/b/a Control an iPod or a Bluetooth component. (☞ P. 27, 29) 6 BLUETOOTH ON/BLUETOOTH OFF Connects or disconnects a Bluetooth component. (☞ P. 30) 7 STANDBY/ON Turns on the system, or sets it to standby mode. (☞ P. 16) 8 MOVIE/MUSIC/SPORTS/GAME Select surround mode. (☞ P. 18) 9 VOLUME (+/-)/MUTE Control the volume of the system. (☞ P. 16) 0 SW (+/-)/CENTER (+/-)/SUR. (+/-) Adjust the volume balance. (☞ P. 32) A DOCK MODE Switches operation mode of the iPod. (☞...
...) 4 PRESET/TUNE, AUTO/MAN'L, MEMORY Control an FM tuner. (☞ P. 22) 5 s/e/p/b/a Control an iPod or a Bluetooth component. (☞ P. 27, 29) 6 BLUETOOTH ON/BLUETOOTH OFF Connects or disconnects a Bluetooth component. (☞ P. 30) 7 STANDBY/ON Turns on the system, or sets it to standby mode. (☞ P. 16) 8 MOVIE/MUSIC/SPORTS/GAME Select surround mode. (☞ P. 18) 9 VOLUME (+/-)/MUTE Control the volume of the system. (☞ P. 16) 0 SW (+/-)/CENTER (+/-)/SUR. (+/-) Adjust the volume balance. (☞ P. 32) A DOCK MODE Switches operation mode of the iPod. (☞...
Owner's Manual
Page 12
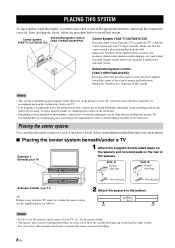
... virtual center channel sounds (dialogue, etc.) and virtual surround channel sounds effectively using the Yamaha front surround system. Be careful when placing or moving the system away from falling. 8 En Main roles: Produces low frequency (LFE) sounds. Notes • Do not cover the remote control sensor of the room to reduce wall reflections. Subwoofer/system control (YAS-71SPX/YAS-81SPX) Place the subwoofer near the center system and turn it to a wall. Side. Make sure...
... virtual center channel sounds (dialogue, etc.) and virtual surround channel sounds effectively using the Yamaha front surround system. Be careful when placing or moving the system away from falling. 8 En Main roles: Produces low frequency (LFE) sounds. Notes • Do not cover the remote control sensor of the room to reduce wall reflections. Subwoofer/system control (YAS-71SPX/YAS-81SPX) Place the subwoofer near the center system and turn it to a wall. Side. Make sure...

Owner's Manual
Page 15
.... PREPARATION CONNECTION • Do not connect the power cable until all connections are completed. • Do not use excessive force when inserting the cable plug. Connect the cable plug to the speaker jack of the same color. y It is possible to connect the center system and the subwoofer/system control. Speaker cable (supplied) y It is possible to route the supplied system control cable behind a wall. (For US customers only) Connecting system control cable System control cable (supplied) Tighten the screws. Connecting the center system and the subwoofer/system control Follow...
.... PREPARATION CONNECTION • Do not connect the power cable until all connections are completed. • Do not use excessive force when inserting the cable plug. Connect the cable plug to the speaker jack of the same color. y It is possible to connect the center system and the subwoofer/system control. Speaker cable (supplied) y It is possible to route the supplied system control cable behind a wall. (For US customers only) Connecting system control cable System control cable (supplied) Tighten the screws. Connecting the center system and the subwoofer/system control Follow...
Owner's Manual
Page 16
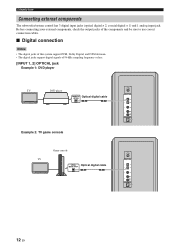
CONNECTION Connecting external components The subwoofer/system control has 3 digital input jacks (optical digital × 2, coaxial digital × 1) and 1 analog input jack. Before connecting your external components, check the output jacks of the components and be sure to use correct connection cables. ■ Digital connection Notes • The digital jacks of this system support PCM, Dolby Digital, and DTS bitstream. • The digital jacks support digital signals of 96 kHz sampling frequency or less. [INPUT 1, 2] OPTICAL jack Example 1: DVD player TV DVD player Optical digital ...
CONNECTION Connecting external components The subwoofer/system control has 3 digital input jacks (optical digital × 2, coaxial digital × 1) and 1 analog input jack. Before connecting your external components, check the output jacks of the components and be sure to use correct connection cables. ■ Digital connection Notes • The digital jacks of this system support PCM, Dolby Digital, and DTS bitstream. • The digital jacks support digital signals of 96 kHz sampling frequency or less. [INPUT 1, 2] OPTICAL jack Example 1: DVD player TV DVD player Optical digital ...
Owner's Manual
Page 18
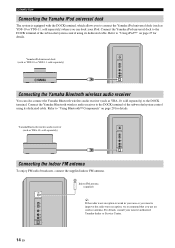
... wireless audio receiver (such as YBA-10, sold separately) where you use an outdoor antenna. Indoor FM antenna (supplied) y If the radio wave reception is equipped with the DOCK terminal, which allows you to the DOCK terminal of the subwoofer/system control using its dedicated cable. Yamaha iPod universal dock (such as YDS-10 or YDS-11, sold separately) to the DOCK terminal of the subwoofer/system control using its dedicated cable. Connect the Yamaha iPod universal dock to connect the Yamaha iPod universal dock...
... wireless audio receiver (such as YBA-10, sold separately) where you use an outdoor antenna. Indoor FM antenna (supplied) y If the radio wave reception is equipped with the DOCK terminal, which allows you to the DOCK terminal of the subwoofer/system control using its dedicated cable. Yamaha iPod universal dock (such as YDS-10 or YDS-11, sold separately) to the DOCK terminal of the subwoofer/system control using its dedicated cable. Connect the Yamaha iPod universal dock to connect the Yamaha iPod universal dock...
Owner's Manual
Page 20
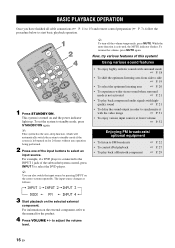
... a DVD player is connected to the INPUT 1 jack of the input buttons to FM broadcasts • To control iPod playback • To play back a Bluetooth component ☞ P. 22 ☞ P. 27 ☞ P. 29 3 Start playback on the center system repeatedly. Using various sound features 1 Press STANDBY/ON. to start basic playback operation. This system is left turned on for the product. 4 Press VOLUME +/- For information on and the power indicator lights up. y This system has the auto-sleep...
... a DVD player is connected to the INPUT 1 jack of the input buttons to FM broadcasts • To control iPod playback • To play back a Bluetooth component ☞ P. 22 ☞ P. 27 ☞ P. 29 3 Start playback on the center system repeatedly. Using various sound features 1 Press STANDBY/ON. to start basic playback operation. This system is left turned on for the product. 4 Press VOLUME +/- For information on and the power indicator lights up. y This system has the auto-sleep...
Owner's Manual
Page 22
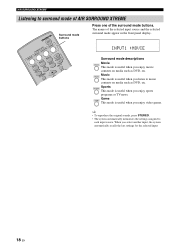
... sounds, press STEREO. • The system automatically memorizes the settings assigned to each input source. Game This mode is useful when you enjoy video games. Music This mode is useful when you listen to music contents on media such as DVD, etc. Surround mode descriptions Movie This mode is useful when you enjoy movie contents on media such as DVD, etc. The names of the surround mode buttons. AIR SURROUND XTREME Listening to surround mode of AIR SURROUND...
... sounds, press STEREO. • The system automatically memorizes the settings assigned to each input source. Game This mode is useful when you enjoy video games. Music This mode is useful when you listen to music contents on media such as DVD, etc. Surround mode descriptions Movie This mode is useful when you enjoy movie contents on media such as DVD, etc. The names of the surround mode buttons. AIR SURROUND XTREME Listening to surround mode of AIR SURROUND...
Owner's Manual
Page 25
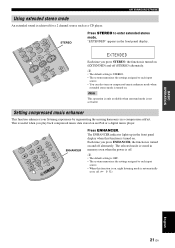
... Each time you play back compressed music data stored on compressed music enhancer mode when extended stereo mode is STEREO. • The system memorizes the settings assigned to enter extended stereo mode. y • The default setting is OFF. • The system memorizes the settings assigned to each input source. • You can also turn on an iPod or a digital music player. This is not activated. Note This operation is only available when surround mode is useful when...
... Each time you play back compressed music data stored on compressed music enhancer mode when extended stereo mode is STEREO. • The system memorizes the settings assigned to enter extended stereo mode. y • The default setting is OFF. • The system memorizes the settings assigned to each input source. • You can also turn on an iPod or a digital music player. This is not activated. Note This operation is only available when surround mode is useful when...
Owner's Manual
Page 31
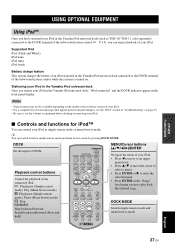
... subwoofer/system control (☞ P. 14), you can switch between simple remote mode and menu browse mode by pressing DOCK MODE. USING OPTIONAL EQUIPMENT Using iPod™ Once you have stationed your iPod in the Yamaha iPod universal dock (such as YDS-10/ YDS-11, sold separately) connected to the DOCK terminal of the subwoofer/system control while this system is turned on page 35. • Be sure to set the volume to play back the selected song. DOCK Set the input to DOCK...
... subwoofer/system control (☞ P. 14), you can switch between simple remote mode and menu browse mode by pressing DOCK MODE. USING OPTIONAL EQUIPMENT Using iPod™ Once you have stationed your iPod in the Yamaha iPod universal dock (such as YDS-10/ YDS-11, sold separately) connected to the DOCK terminal of the subwoofer/system control while this system is turned on page 35. • Be sure to set the volume to play back the selected song. DOCK Set the input to DOCK...

Owner's Manual
Page 32
... menu browse mode The song lists or playback information is displayed in the front panel display so that cannot be displayed in the front panel display are replaced with underscores "_". 1 Press DOCK MODE to enter menu browse mode. 2 Press S/T/W/X repeatedly to select the desired menu, and then press ENTER to play back the selected song. Notes • Operations cannot be done with the controls of your iPod in the Yamaha iPod universal dock...
... menu browse mode The song lists or playback information is displayed in the front panel display so that cannot be displayed in the front panel display are replaced with underscores "_". 1 Press DOCK MODE to enter menu browse mode. 2 Press S/T/W/X repeatedly to select the desired menu, and then press ENTER to play back the selected song. Notes • Operations cannot be done with the controls of your iPod in the Yamaha iPod universal dock...
Owner's Manual
Page 33
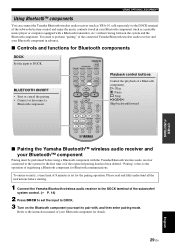
... the subwoofer/ system control. (☞ P. 14) 2 Press DOCK to the system for the pairing operation. Refer to the instruction manual of 8 minutes is set the input to DOCK. 3 Turn on the Bluetooth component you want to pair with the Yamaha Bluetooth wireless audio receiver connected to set for the first time or if the registered pairing data has been deleted. Please read and fully understand all the instructions before using a Bluetooth component with...
... the subwoofer/ system control. (☞ P. 14) 2 Press DOCK to the system for the pairing operation. Refer to the instruction manual of 8 minutes is set the input to DOCK. 3 Turn on the Bluetooth component you want to pair with the Yamaha Bluetooth wireless audio receiver connected to set for the first time or if the registered pairing data has been deleted. Please read and fully understand all the instructions before using a Bluetooth component with...
Owner's Manual
Page 34
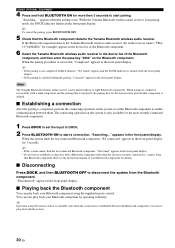
... YAMAHA" for example) appears in the device list of the Bluetooth component. 6 Select the Yamaha Bluetooth wireless audio receiver in the front panel display. y Operation using the supplied remote control. While the Yamaha Bluetooth wireless audio receiver is successful, "Completed" appears in the front panel display. appears in the device list of your Bluetooth component for details. ■ Disconnecting Press DOCK, and then BLUETOOTH OFF to play back your Bluetooth component using the remote control is available only when the connection...
... YAMAHA" for example) appears in the device list of the Bluetooth component. 6 Select the Yamaha Bluetooth wireless audio receiver in the front panel display. y Operation using the supplied remote control. While the Yamaha Bluetooth wireless audio receiver is successful, "Completed" appears in the front panel display. appears in the device list of your Bluetooth component for details. ■ Disconnecting Press DOCK, and then BLUETOOTH OFF to play back your Bluetooth component using the remote control is available only when the connection...

Owner's Manual
Page 38
... system to stereo sounds without surround mode. Make sure all speaker cables are connected properly. Sound is too low on but immediately shuts off and unplug the system, and then consult your nearest authorized Yamaha dealer or Service Center. The volume may be incorrect. Place this system farther away from a lightening bolt or excessive static electricity, or drop in power supply. This system does not operate properly. The input source or input setting may receive...
... system to stereo sounds without surround mode. Make sure all speaker cables are connected properly. Sound is too low on but immediately shuts off and unplug the system, and then consult your nearest authorized Yamaha dealer or Service Center. The volume may be incorrect. Place this system farther away from a lightening bolt or excessive static electricity, or drop in power supply. This system does not operate properly. The input source or input setting may receive...

Owner's Manual
Page 39
... the front panel, check the connection to your iPod back in the Yamaha iPod universal dock (such as YDS-10 or YDS-11, sold separately) connected to direct sunlight or lighting. The batteries may be exposed to the DOCK terminal of this system. Problem The remote control does not operate the system. Only iPod (Click and Wheel), iPod nano, iPod mini, and iPod touch are supported. ADDITIONAL INFORMATION Cause Solution The system may be tuned into...
... the front panel, check the connection to your iPod back in the Yamaha iPod universal dock (such as YDS-10 or YDS-11, sold separately) connected to direct sunlight or lighting. The batteries may be exposed to the DOCK terminal of this system. Problem The remote control does not operate the system. Only iPod (Click and Wheel), iPod nano, iPod mini, and iPod touch are supported. ADDITIONAL INFORMATION Cause Solution The system may be tuned into...


