
Owner's Manual
Page 1
The voltage selector is set at 240V when the unit is set for the voltage in your area. IMPORTANT Check your power supply Make sure that the correct voltage appears next to rotate the selector dial so that your local AC mains voltage matches the voltage specified on the name plate on the bottom panel. To change the setting use a "minus" screwdriver to the pointer on the bottom panel of the main keyboard unit near the power cord. Make sure that the voltage selector is initially shipped. In some areas a voltage selector may be provided on the panel.
The voltage selector is set at 240V when the unit is set for the voltage in your area. IMPORTANT Check your power supply Make sure that the correct voltage appears next to rotate the selector dial so that your local AC mains voltage matches the voltage specified on the name plate on the bottom panel. To change the setting use a "minus" screwdriver to the pointer on the bottom panel of the main keyboard unit near the power cord. Make sure that the voltage selector is initially shipped. In some areas a voltage selector may be provided on the panel.
Owner's Manual
Page 2
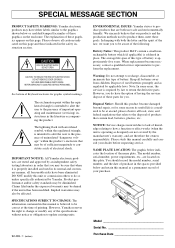
...be affected. Warning: Do not attempt to perform the replacement. Please study this manual carefully and consult your purchase. See bottom of Keyboard enclosure for you to be at the time of printing. The average life span of this type of battery is intended to alert...filed under the expressed warranty may be of sufficient magnitude to constitute a risk of electrical shock. SPECIAL MESSAGE SECTION PRODUCT SAFETY MARKINGS: Yamaha electronic products may have either labels similar to the graphics shown below or molded/stamped facsimiles of these graphics appears on this page....
...be affected. Warning: Do not attempt to perform the replacement. Please study this manual carefully and consult your purchase. See bottom of Keyboard enclosure for you to be at the time of printing. The average life span of this type of battery is intended to alert...filed under the expressed warranty may be of sufficient magnitude to constitute a risk of electrical shock. SPECIAL MESSAGE SECTION PRODUCT SAFETY MARKINGS: Yamaha electronic products may have either labels similar to the graphics shown below or molded/stamped facsimiles of these graphics appears on this page....

Owner's Manual
Page 3
...to minimum. Do not use it in a position where anyone could walk on your instrument. (1)B-6 YDP-121 3 1 The instrument contains no user-serviceable parts. Never insert or remove an electric plug with ... objects on the instrument, since this might cause interference which might discolor the panel or keyboard. • Do not rest your fingers, and do not use the instrument near other...disconnect the electric plug from electrical shock, short-circuiting, damages, fire or other property. Yamaha cannot be used for extended periods of time, or during the day) to prevent the ...
...to minimum. Do not use it in a position where anyone could walk on your instrument. (1)B-6 YDP-121 3 1 The instrument contains no user-serviceable parts. Never insert or remove an electric plug with ... objects on the instrument, since this might cause interference which might discolor the panel or keyboard. • Do not rest your fingers, and do not use the instrument near other...disconnect the electric plug from electrical shock, short-circuiting, damages, fire or other property. Yamaha cannot be used for extended periods of time, or during the day) to prevent the ...

Owner's Manual
Page 5
... F7.1: Voice 27 F7.2: Tuning 27 F7.3: Pedal 27 Factory Preset Recall 28 Troubleshooting 28 Options 28 Demo Song List 29 Factory Setting List 29 Keyboard Stand Assembly 30 Specifications 36 YDP-121 5 3
... F7.1: Voice 27 F7.2: Tuning 27 F7.3: Pedal 27 Factory Preset Recall 28 Troubleshooting 28 Options 28 Demo Song List 29 Factory Setting List 29 Keyboard Stand Assembly 30 Specifications 36 YDP-121 5 3

Owner's Manual
Page 6
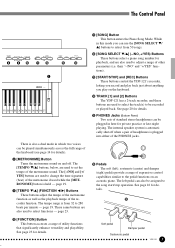
... ON, a voice selector LED will light, and the power indicator located below the left end of the keyboard will light to shift the pitch of the entire keyboard up or down in which voice is plugged into the PHONES jack. 3 [DEMO] Button Activates the demo... 2 [MASTER VOLUME] Control The [MASTER VOLUME] control adjusts the volume (level) of the YDP-121's voices. PIPE PIANO E. See page 10 for details. 4 [TRANSPOSE] Button The [TRANSPOSE] button allows access to the YDP-121's TRANSPOSE function (to indicate which you can select playback of different demonstration sequences for details. 6...
... ON, a voice selector LED will light, and the power indicator located below the left end of the keyboard will light to shift the pitch of the entire keyboard up or down in which voice is plugged into the PHONES jack. 3 [DEMO] Button Activates the demo... 2 [MASTER VOLUME] Control The [MASTER VOLUME] control adjusts the volume (level) of the YDP-121's voices. PIPE PIANO E. See page 10 for details. 4 [TRANSPOSE] Button The [TRANSPOSE] button allows access to the YDP-121's TRANSPOSE function (to indicate which you can select playback of different demonstration sequences for details. 6...
Owner's Manual
Page 7
...their "-/NO" and "+/YES" functions). # [START/STOP] and [REC] Buttons These buttons control the YDP-121's recorder, letting you record and play on the keyboard. $ TRACK [1] and [2] Buttons The YDP-121 has a 2-track recorder, and these buttons are used to change the time signature (beat) of the metronome...] and [+/ YES] buttons are used to 280 beats per minute - Sostenuto pedal YDP-121 7 5 The Control Panel METRONOME 8 TEMPO FUNCTION 9 FUNCTION 0 SONG SONG SELECT ! -/NO +/YES @ START/ STOP REC # TRACK 1 2 $ 1 YDP-121 POWER F5 G5 A5 B5 C6 D6 E6 F6 G6 A6 B6 C7 ! [SONG...
...their "-/NO" and "+/YES" functions). # [START/STOP] and [REC] Buttons These buttons control the YDP-121's recorder, letting you record and play on the keyboard. $ TRACK [1] and [2] Buttons The YDP-121 has a 2-track recorder, and these buttons are used to change the time signature (beat) of the metronome...] and [+/ YES] buttons are used to 280 beats per minute - Sostenuto pedal YDP-121 7 5 The Control Panel METRONOME 8 TEMPO FUNCTION 9 FUNCTION 0 SONG SONG SELECT ! -/NO +/YES @ START/ STOP REC # TRACK 1 2 $ 1 YDP-121 POWER F5 G5 A5 B5 C6 D6 E6 F6 G6 A6 B6 C7 ! [SONG...
Owner's Manual
Page 9
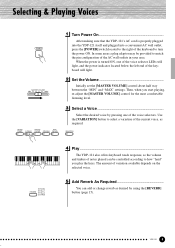
Selecting & Playing Voices POWER MASTER VOLUME MIN MAX Turn Power On After making sure that the YDP-121's AC cord is turned ON, one of the keyboard to turn the power ON. PIPE PIANO E.PIANO CHORD STRINGS ORGAN Select a Voice ...Select the desired voice by using the [REVERB] ...button (page 15). VARIATION REVERB ROOM HALL1 HALL2 STAGE Play ...The YDP-121 also offers keyboard touch response, so the volume and timbre of the current voice, as desired by pressing one of the voice selector LEDs will light...
Selecting & Playing Voices POWER MASTER VOLUME MIN MAX Turn Power On After making sure that the YDP-121's AC cord is turned ON, one of the keyboard to turn the power ON. PIPE PIANO E.PIANO CHORD STRINGS ORGAN Select a Voice ...Select the desired voice by using the [REVERB] ...button (page 15). VARIATION REVERB ROOM HALL1 HALL2 STAGE Play ...The YDP-121 also offers keyboard touch response, so the volume and timbre of the current voice, as desired by pressing one of the voice selector LEDs will light...

Owner's Manual
Page 11
YDP-121 11 9 Select "ALL" instead of the 50 piano songs provided, use the [TEMPO w/v] buttons to play (the number will light. The voice playing on the keyboard can be changed. • You can change the Reverb type that is applied to the voice you want to adjust the playback tempo as ... song is applied to the voice you play any of a number to play all piano songs in sequence, or select "rnd" to continuously play the keyboard along with a range from "-50" through "- - -" to select the number of the selected piano song has finished. Playback will go off, and return ...
YDP-121 11 9 Select "ALL" instead of the 50 piano songs provided, use the [TEMPO w/v] buttons to play (the number will light. The voice playing on the keyboard can be changed. • You can change the Reverb type that is applied to the voice you want to adjust the playback tempo as ... song is applied to the voice you play any of a number to play all piano songs in sequence, or select "rnd" to continuously play the keyboard along with a range from "-50" through "- - -" to select the number of the selected piano song has finished. Playback will go off, and return ...

Owner's Manual
Page 13
...'s [1] track, and the left-hand part is played by recorder's [2] track. (Some of the selected piano song will begin playing on the keyboard. The default setting is engaged, playback of the songs are automatically turned ON whenever a new song is selected. NOTE • If you hold ... turned ON and the Synchro Start mode will then start and stop piano song playback via the "Left Pedal Mode" function described on the keyboard. YDP-121 13 11 Start/Stop Playback Press the [START/STOP] button to turn the corresponding part off - Playing the Demonstration Tunes START/ STOP REC...
...'s [1] track, and the left-hand part is played by recorder's [2] track. (Some of the selected piano song will begin playing on the keyboard. The default setting is engaged, playback of the songs are automatically turned ON whenever a new song is selected. NOTE • If you hold ... turned ON and the Synchro Start mode will then start and stop piano song playback via the "Left Pedal Mode" function described on the keyboard. YDP-121 13 11 Start/Stop Playback Press the [START/STOP] button to turn the corresponding part off - Playing the Demonstration Tunes START/ STOP REC...
Owner's Manual
Page 14
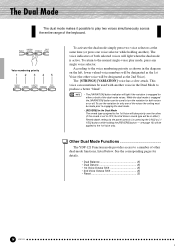
... is active. See the corresponding pages for only one voice selector while holding the [REVERB] button - Other Dual Mode Functions The YDP-121 Function mode provides access to a number of both selected voices will be applied to the normal single-voice play two voices simultaneously across...entire range of the dual-mode voices. The voice indicators of other voice will light when the dual mode is engaged for both of the keyboard. PIPE PIANO CHORD STRINGS ORGA Voice numbering priority 1 2 3 45 GRAND HARPSI- This voice can be made prior to engaging the dual ...
... is active. See the corresponding pages for only one voice selector while holding the [REVERB] button - Other Dual Mode Functions The YDP-121 Function mode provides access to a number of both selected voices will be applied to the normal single-voice play two voices simultaneously across...entire range of the dual-mode voices. The voice indicators of other voice will light when the dual mode is engaged for both of the keyboard. PIPE PIANO CHORD STRINGS ORGA Voice numbering priority 1 2 3 45 GRAND HARPSI- This voice can be made prior to engaging the dual ...

Owner's Manual
Page 16
...soft pedal will not affect notes which are played "staccato." Sostenuto (Center) Pedal If you play a note or chord on page 26. 16 YDP-121 14 Soft (Left) Pedal The soft pedal reduces the volume and slightly changes the timbre of expressive effects similar to those notes will be sustained...the song start/stop operation via the "Left Pedal Mode" described on the keyboard and press the sostenuto pedal while the note(s) are held, those produced by the pedals on an acoustic piano. The Pedals The YDP-121 has three foot pedals that produce a range of notes played while the ...
...soft pedal will not affect notes which are played "staccato." Sostenuto (Center) Pedal If you play a note or chord on page 26. 16 YDP-121 14 Soft (Left) Pedal The soft pedal reduces the volume and slightly changes the timbre of expressive effects similar to those notes will be sustained...the song start/stop operation via the "Left Pedal Mode" described on the keyboard and press the sostenuto pedal while the note(s) are held, those produced by the pedals on an acoustic piano. The Pedals The YDP-121 has three foot pedals that produce a range of notes played while the ...

Owner's Manual
Page 17
... the A-1 ... NOTE • The [TRANSPOSE] button indicator remains lit when a transpose setting other instrumentalist. C7 range of keyboard touch sensitivity - YDP-121 17 15 HARD The HARD setting requires the keys to be selected to produce maximum loudness. The default setting is the initial ...(i.e. The default transpose setting is played. "Transposing" the pitch of the YDP-121 keyboard facilitates playing in the FIXED mode can easily match the pitch of the keyboard to a maximum of the entire keyboard up one octave). The volume range is held. TOUCH HARD MEDIUM SOFT ...
... the A-1 ... NOTE • The [TRANSPOSE] button indicator remains lit when a transpose setting other instrumentalist. C7 range of keyboard touch sensitivity - YDP-121 17 15 HARD The HARD setting requires the keys to be selected to produce maximum loudness. The default setting is the initial ...(i.e. The default transpose setting is played. "Transposing" the pitch of the YDP-121 keyboard facilitates playing in the FIXED mode can easily match the pitch of the keyboard to a maximum of the entire keyboard up one octave). The volume range is held. TOUCH HARD MEDIUM SOFT ...

Owner's Manual
Page 20
...button so that its indicator - If you don't want to any keyboard study program, since it back. You might also want to hear the previously recorded track as described below). Using the Recorder The YDP-121 features a two-track recorder that let you record what you recorded... a song different from the listener's perspective. The recorder feature is engaged in approximate kilobytes (starting at the current METRONOME tempo setting. 20 YDP-121 18 Engage the Record Ready Mode Press the [REC] button to record with a previously-recorded track. It can "overdub" one part on...
...button so that its indicator - If you don't want to any keyboard study program, since it back. You might also want to hear the previously recorded track as described below). Using the Recorder The YDP-121 features a two-track recorder that let you record what you recorded... a song different from the listener's perspective. The recorder feature is engaged in approximate kilobytes (starting at the current METRONOME tempo setting. 20 YDP-121 18 Engage the Record Ready Mode Press the [REC] button to record with a previously-recorded track. It can "overdub" one part on...

Owner's Manual
Page 21
...record ready mode and register the changes. It is possible to start recording and erase all previous recorded data on the keyboard or press the [START/STOP] button. YDP-121 21 19 Using the Recorder Start Recording Recording will begin automatically as soon as you play a note on the selected ... initial settings can be erased from the record mode (this , be careful not to a maximum of about 5,000 notes, depending on the keyboard, either of the recording procedure are actually recorded by engaging the record mode, selecting the track you 'll be assigned to cancel the operation ...
...record ready mode and register the changes. It is possible to start recording and erase all previous recorded data on the keyboard or press the [START/STOP] button. YDP-121 21 19 Using the Recorder Start Recording Recording will begin automatically as soon as you play a note on the selected ... initial settings can be erased from the record mode (this , be careful not to a maximum of about 5,000 notes, depending on the keyboard, either of the recording procedure are actually recorded by engaging the record mode, selecting the track you 'll be assigned to cancel the operation ...

Owner's Manual
Page 22
... • All recorder data will be retained in memory for a few minutes at the current tempo. (Repeat the previous operation to play on the keyboard are off. • When using the [MASTER VOLUME] control and [TEMPO w/v] buttons (press both track buttons are not the same. The current ... song playback. • Playback cannot be started when the demo/piano song mode is engaged. • Playback cannot be started playing. 22 YDP-121 20 You can also stop recorder playback via the "Left Pedal Mode" function described on page 26. The playback voice is the voice that the...
... • All recorder data will be retained in memory for a few minutes at the current tempo. (Repeat the previous operation to play on the keyboard are off. • When using the [MASTER VOLUME] control and [TEMPO w/v] buttons (press both track buttons are not the same. The current ... song playback. • Playback cannot be started when the demo/piano song mode is engaged. • Playback cannot be started playing. 22 YDP-121 20 You can also stop recorder playback via the "Left Pedal Mode" function described on page 26. The playback voice is the voice that the...

Owner's Manual
Page 27
... off . F7.1: Voice ...Turns backup of the Left Pedal Mode on or off. Use the [-/NO] and [+/YES] buttons to turn backup "On" or "OFF". YDP-121 27 25 NOTE • The backup settings themselves, and the contents of the recorder memory, are always backed up. • Even if the Backup is... on page 29. Use the [-/NO] and [+/YES] buttons to turn the power switch on or off . The default backup mode is "OFF". • Voice (Keyboard, Dual) • Dual (ON/OFF, Voice, and Dual Functions for each voice combination) • Reverb (ON/OFF, Type, and Depth for each voice) • Touch...
... off . F7.1: Voice ...Turns backup of the Left Pedal Mode on or off. Use the [-/NO] and [+/YES] buttons to turn backup "On" or "OFF". YDP-121 27 25 NOTE • The backup settings themselves, and the contents of the recorder memory, are always backed up. • Even if the Backup is... on page 29. Use the [-/NO] and [+/YES] buttons to turn the power switch on or off . The default backup mode is "OFF". • Voice (Keyboard, Dual) • Dual (ON/OFF, Voice, and Dual Functions for each voice combination) • Reverb (ON/OFF, Type, and Depth for each voice) • Touch...

Owner's Manual
Page 28
...AC plug properly connected to the YDP-121 and an AC wall outlet? The YDP-121 Reproduces Radio or TV Sound This can generate radio-frequency noise. In this case, contact your Yamaha YDP-121. Options BC-8 Bench A comfortable bench styled to match your Yamaha dealer. NOTE • The factory...all Backup on page 29. Interference Appears On Radio or TV Sets Located Near the YDP-121 The YDP-121 contains digital circuitry which is heard from the YDP-121. q If "Scn" appears on the keyboard) while turning the [POWER] switch ON. HPE-160 Stereo Headphones High-performance lightweight...
...AC plug properly connected to the YDP-121 and an AC wall outlet? The YDP-121 Reproduces Radio or TV Sound This can generate radio-frequency noise. In this case, contact your Yamaha YDP-121. Options BC-8 Bench A comfortable bench styled to match your Yamaha dealer. NOTE • The factory...all Backup on page 29. Interference Appears On Radio or TV Sets Located Near the YDP-121 The YDP-121 contains digital circuitry which is heard from the YDP-121. q If "Scn" appears on the keyboard) while turning the [POWER] switch ON. HPE-160 Stereo Headphones High-performance lightweight...
Owner's Manual
Page 30
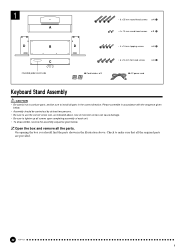
... all the required parts are provided. 30 YDP-121 106 1 A D B C • Bundled pedal cord inside D q Cord holders x 2 • 6 x 35 mm round-head screws x 4 1 • 4 x 10 mm round-head screws x 2 2 • 4 x 16 mm tapping screws x4 3 • 6 x 16 mm flat-head screws x4 4 q AC power cord Keyboard Stand Assembly CAUTION • Be careful not...
... all the required parts are provided. 30 YDP-121 106 1 A D B C • Bundled pedal cord inside D q Cord holders x 2 • 6 x 35 mm round-head screws x 4 1 • 4 x 10 mm round-head screws x 2 2 • 4 x 16 mm tapping screws x4 3 • 6 x 16 mm flat-head screws x4 4 q AC power cord Keyboard Stand Assembly CAUTION • Be careful not...
Owner's Manual
Page 32
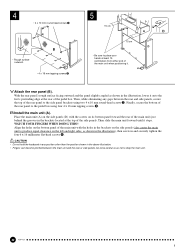
... millimeter flat-head screws 4. With the rear panel's rough surface facing outward and the panel slightly angled as not to drop the main unit. 32 YDP-121 108 B Install the main unit (A). V Attach the rear panel (B). 4 • 4 x 10 mm round-head screws 2 B • Rough surface outward. • 4 x 16 mm tapping screws 3 L... your hands at least 15 centimeters from either end of the main unit when positioning it stops. CAUTION • Do not hold the keyboard in any gaps between the main unit and the rear or side panels, be extra careful so as shown in the above illustration. &#...
... millimeter flat-head screws 4. With the rear panel's rough surface facing outward and the panel slightly angled as not to drop the main unit. 32 YDP-121 108 B Install the main unit (A). V Attach the rear panel (B). 4 • 4 x 10 mm round-head screws 2 B • Rough surface outward. • 4 x 16 mm tapping screws 3 L... your hands at least 15 centimeters from either end of the main unit when positioning it stops. CAUTION • Do not hold the keyboard in any gaps between the main unit and the rear or side panels, be extra careful so as shown in the above illustration. &#...

Owner's Manual
Page 34
...in your region appears next to the pointer on the bottom of doors and other movable fixtures? ➔ Move the YDP-121 to the assembly diagrams and retighten all screws. 34 YDP-121 A plug adaptor may result. Rotate the adjuster until it comes in firm contact with the floor surface, distorted sound...that it ? ➔ Tighten all screws. • Does the pedal box rattle or give way when you play on the keyboard, refer to an appropriate location. • Does the YDP-121 make a rattling noise when you shake it is set at 240V when the unit is initially shipped. CAUTION • An ...
...in your region appears next to the pointer on the bottom of doors and other movable fixtures? ➔ Move the YDP-121 to the assembly diagrams and retighten all screws. 34 YDP-121 A plug adaptor may result. Rotate the adjuster until it comes in firm contact with the floor surface, distorted sound...that it ? ➔ Tighten all screws. • Does the pedal box rattle or give way when you play on the keyboard, refer to an appropriate location. • Does the YDP-121 make a rattling noise when you shake it is set at 240V when the unit is initially shipped. CAUTION • An ...


