
Owner's Manual
Page 2
... heat sources such as power-supply cord or plug is intended to alert you to rain or moisture, does not operate normally, or has been dropped. REFER SERVICING TO QUALIFIED SERVICE PERSONNEL. • Explanation of Graphical Symbols The lightning flash with the manufacturer's instructions. 8 Do not install near water. 6 Clean only with the apparatus. Install in the space below. This Class B digital apparatus...
... heat sources such as power-supply cord or plug is intended to alert you to rain or moisture, does not operate normally, or has been dropped. REFER SERVICING TO QUALIFIED SERVICE PERSONNEL. • Explanation of Graphical Symbols The lightning flash with the manufacturer's instructions. 8 Do not install near water. 6 Clean only with the apparatus. Install in the space below. This Class B digital apparatus...

Owner's Manual
Page 3
... users manual, may void your equipment by playing it is being affected by the FCC, to use the product. 2 IMPORTANT: When connecting this product to the operation of America or its subsidiaries. Follow all installations. Compliance with FCC regulations does not guarantee that lets the sound come through loud and clear without affecting your use only high quality shielded cables. If the antenna...
... users manual, may void your equipment by playing it is being affected by the FCC, to use the product. 2 IMPORTANT: When connecting this product to the operation of America or its subsidiaries. Follow all installations. Compliance with FCC regulations does not guarantee that lets the sound come through loud and clear without affecting your use only high quality shielded cables. If the antenna...
Owner's Manual
Page 4
... unit with chemical solvents; Yamaha will form when the surrounding temperature changes suddenly. Disconnect the power supply cable from the outlet, then leave the unit alone. 19 Install this unit near the wall outlet and where the AC power plug can be reached easily. 20 The batteries shall not be held responsible for long periods of time (i.e. WARNING TO REDUCE THE...
... unit with chemical solvents; Yamaha will form when the surrounding temperature changes suddenly. Disconnect the power supply cable from the outlet, then leave the unit alone. 19 Install this unit near the wall outlet and where the AC power plug can be reached easily. 20 The batteries shall not be held responsible for long periods of time (i.e. WARNING TO REDUCE THE...
Owner's Manual
Page 5
... Basic tuning operation 16 Editing the preset FM station 16 Using optional equipment 18 Connecting dock 18 Using iPod 18 Using Bluetooth™ components 19 USEFUL OPERATION Setup menu 20 Overview 20 Basic procedure 20 Adjusting the volume balance during playback 21 Adjusting high/low frequency sound (tone control 21 Adjusting the audio delay 21 Setting the audio output 21 Switching on/off the HDMI™ control function 21 Changing the brightness of the front panel display 22 Changing the setting of the speaker...
... Basic tuning operation 16 Editing the preset FM station 16 Using optional equipment 18 Connecting dock 18 Using iPod 18 Using Bluetooth™ components 19 USEFUL OPERATION Setup menu 20 Overview 20 Basic procedure 20 Adjusting the volume balance during playback 21 Adjusting high/low frequency sound (tone control 21 Adjusting the audio delay 21 Setting the audio output 21 Switching on/off the HDMI™ control function 21 Changing the brightness of the front panel display 22 Changing the setting of the speaker...
Owner's Manual
Page 6
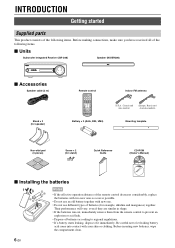
... example, alkaline and manganese) together. INTRODUCTION Getting started Supplied parts This product consists of the following items. Before making connections, make sure you have received all of the following items. ■ Units Subwoofer Integrated Receiver (SR-300) Speaker (NS-BR300) ■ Accessories Speaker cable (3 m) Stand × 2 (for speaker) Remote control Indoor FM antenna (U.S.A., Canada and Asia models) (Europe, Russia and Australia models) Battery × 2 (AAA, R03, UM4) Mounting template Non...
... example, alkaline and manganese) together. INTRODUCTION Getting started Supplied parts This product consists of the following items. Before making connections, make sure you have received all of the following items. ■ Units Subwoofer Integrated Receiver (SR-300) Speaker (NS-BR300) ■ Accessories Speaker cable (3 m) Stand × 2 (for speaker) Remote control Indoor FM antenna (U.S.A., Canada and Asia models) (Europe, Russia and Australia models) Battery × 2 (AAA, R03, UM4) Mounting template Non...

Owner's Manual
Page 7
... the remote control. (☞ P. 9, 12) 6 Front panel display Shows information about the operational status of the system. (☞ P. 14) ■ Rear panel of the subwoofer integrated receiver 7 6 5 43 1 1 Power Cable For connecting an AC wall outlet. (☞ P. 12) 2 HDMI IN 1 - 3/HDMI OUT • HDMI IN 1 - 3 for connecting HDMI compatible external components. (☞ P. 13) • HDMI OUT for connecting an HDMI compatible TV. (☞ P. 13) 3 DIGITAL IN jack For connecting optical digital cable to the TV. (☞ P. 13) 2 4 ANALOG INPUT jack For connecting analog audio cable...
... the remote control. (☞ P. 9, 12) 6 Front panel display Shows information about the operational status of the system. (☞ P. 14) ■ Rear panel of the subwoofer integrated receiver 7 6 5 43 1 1 Power Cable For connecting an AC wall outlet. (☞ P. 12) 2 HDMI IN 1 - 3/HDMI OUT • HDMI IN 1 - 3 for connecting HDMI compatible external components. (☞ P. 13) • HDMI OUT for connecting an HDMI compatible TV. (☞ P. 13) 3 DIGITAL IN jack For connecting optical digital cable to the TV. (☞ P. 13) 2 4 ANALOG INPUT jack For connecting analog audio cable...
Owner's Manual
Page 8
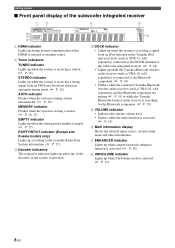
... started ■ Front panel display of the subwoofer integrated receiver 12 3 4 8 7 6 1 HDMI indicator Lights up during normal communication when HDMI is selected as an input source. 2 Tuner indicators TUNED indicator Lights up when the system is receiving a station. (☞ P. 16) STEREO indicator Lights up when the system is receiving a strong signal from an FM stereo broadcast station in automatic tuning mode. (☞ P. 16) AUTO indicator Flashes when the system is tuning station automatically. (☞ P. 16) MEMORY indicator Flashes when the system...
... started ■ Front panel display of the subwoofer integrated receiver 12 3 4 8 7 6 1 HDMI indicator Lights up during normal communication when HDMI is selected as an input source. 2 Tuner indicators TUNED indicator Lights up when the system is receiving a station. (☞ P. 16) STEREO indicator Lights up when the system is receiving a strong signal from an FM stereo broadcast station in automatic tuning mode. (☞ P. 16) AUTO indicator Flashes when the system is tuning station automatically. (☞ P. 16) MEMORY indicator Flashes when the system...
Owner's Manual
Page 9
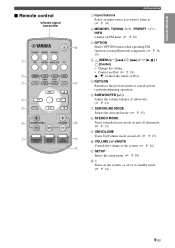
...Control the volume of the system. (☞ P. 14) 8 A SETUP Enters the setup menu. (☞ P. 20) B Turns on the system, or sets it to . (☞ P. 14) 2 MEMORY, TUNING / , PRESET / , INFO Control an FM tuner. (☞ P. 16) 3 OPTION B Enters OPTION menu when operating FM function or using Bluetooth component. (☞ P. 16, 19) 4 (MENU (Center) • Change the setting. • Control an iPod. (☞ P. 18) S / T: Control the wheel of iPod. INTRODUCTION ■ Remote control Infrared signal transmitter 1 2 3 4 5 6 7 Getting started 1 Input buttons Select an input source...
...Control the volume of the system. (☞ P. 14) 8 A SETUP Enters the setup menu. (☞ P. 20) B Turns on the system, or sets it to . (☞ P. 14) 2 MEMORY, TUNING / , PRESET / , INFO Control an FM tuner. (☞ P. 16) 3 OPTION B Enters OPTION menu when operating FM function or using Bluetooth component. (☞ P. 16, 19) 4 (MENU (Center) • Change the setting. • Control an iPod. (☞ P. 18) S / T: Control the wheel of iPod. INTRODUCTION ■ Remote control Infrared signal transmitter 1 2 3 4 5 6 7 Getting started 1 Input buttons Select an input source...
Owner's Manual
Page 14
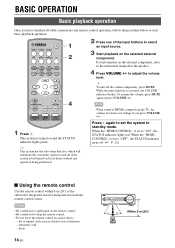
...; Using the remote control Use the remote control within 6 m (20') of the input buttons to select 1 an input source. 2 3 Start playback on the external component, refer to the instruction manual for 24 hours without any operation being performed. to standby mode. While the mute function is set the system to adjust the volume level. When the "HDMI CONTROL" is turned on the remote control. • Be careful not to start basic playback operation. 2 Press one of the subwoofer integrated receiver...
...; Using the remote control Use the remote control within 6 m (20') of the input buttons to select 1 an input source. 2 3 Start playback on the external component, refer to the instruction manual for 24 hours without any operation being performed. to standby mode. While the mute function is set the system to adjust the volume level. When the "HDMI CONTROL" is turned on the remote control. • Be careful not to start basic playback operation. 2 Press one of the subwoofer integrated receiver...
Owner's Manual
Page 15
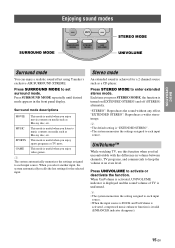
... stereo mode. Press SURROUND MODE to each input source. y • The default setting is achieved for the selected input. Each time you enjoy sports programs or TV news. y The system automatically memorizes the settings assigned to set surround mode. UniVolume™ While watching TV, use this function when you enjoy movie contents on (EXTENDED STEREO) and off (STEREO) alternately. Surround mode descriptions MOVIE This mode is turned on media such as a CD player. Stereo mode An extended sound...
... stereo mode. Press SURROUND MODE to each input source. y • The default setting is achieved for the selected input. Each time you enjoy sports programs or TV news. y The system automatically memorizes the settings assigned to set surround mode. UniVolume™ While watching TV, use this function when you enjoy movie contents on (EXTENDED STEREO) and off (STEREO) alternately. Surround mode descriptions MOVIE This mode is turned on media such as a CD player. Stereo mode An extended sound...
Owner's Manual
Page 17
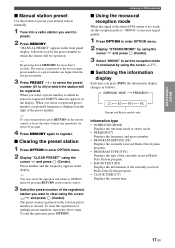
... the operation, press OPTION. The preset station registered to which the station will be registered. Preset number and the frequency appears in the front panel display, followed soon by using the cursor / . ■ Switching the information display Each time you press INFO, the information display changes as follows: Europe and Russia models only Information type • SURROUND MODE Displays the surround mode or stereo mode. • FREQUENCY Displays the frequency and preset number. • PROGRAM SERVICE (PS) Displays...
... the operation, press OPTION. The preset station registered to which the station will be registered. Preset number and the frequency appears in the front panel display, followed soon by using the cursor / . ■ Switching the information display Each time you press INFO, the information display changes as follows: Europe and Russia models only Information type • SURROUND MODE Displays the surround mode or stereo mode. • FREQUENCY Displays the frequency and preset number. • PROGRAM SERVICE (PS) Displays...
Owner's Manual
Page 18
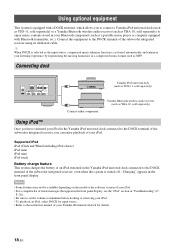
... removing your iPod. • To playback an iPod, select DOCK for input source. • Refer to the instruction manual of your Yamaha iPod universal dock for details. 18 En Connect this system is turned off. Supported iPod iPod (Click and Wheel including iPod classic) iPod nano iPod mini iPod touch Battery charge feature This system charges the battery of an iPod stationed in the Yamaha iPod universal dock connected to enjoy music contents stored in the Yamaha iPod universal dock connected to the DOCK terminal of the subwoofer integrated receiver using its dedicated cable. Using...
... removing your iPod. • To playback an iPod, select DOCK for input source. • Refer to the instruction manual of your Yamaha iPod universal dock for details. 18 En Connect this system is turned off. Supported iPod iPod (Click and Wheel including iPod classic) iPod nano iPod mini iPod touch Battery charge feature This system charges the battery of an iPod stationed in the Yamaha iPod universal dock connected to enjoy music contents stored in the Yamaha iPod universal dock connected to the DOCK terminal of the subwoofer integrated receiver using its dedicated cable. Using...
Owner's Manual
Page 19
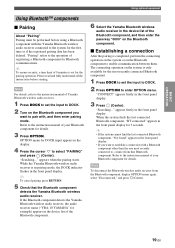
... Yamaha Bluetooth wireless audio receiver. y To cancel pairing, press RETURN. 5 Check that Bluetooth component. While the Yamaha Bluetooth wireless audio receiver is only available for the most recently connected to enter OPTION menu. BASIC OPERATION Using optional equipment Using Bluetooth™ components ■ Pairing About "Pairing" Pairing must be performed before starting. The connecting operation on the system is in pairing mode, the DOCK indicator flashes in the front panel display for the first time...
... Yamaha Bluetooth wireless audio receiver. y To cancel pairing, press RETURN. 5 Check that Bluetooth component. While the Yamaha Bluetooth wireless audio receiver is only available for the most recently connected to enter OPTION menu. BASIC OPERATION Using optional equipment Using Bluetooth™ components ■ Pairing About "Pairing" Pairing must be performed before starting. The connecting operation on the system is in pairing mode, the DOCK indicator flashes in the front panel display for the first time...
Owner's Manual
Page 20
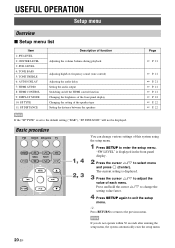
... not be displayed. USEFUL OPERATION Setup menu Overview ■ Setup menu list Item 1: SW LEVEL 2: CENTER LEVEL 3: SUR. LEVEL 4: TONE BASS 5: TONE TREBLE 6: AUDIO DELAY 7: HDMI AUDIO 8: HDMI CONTROL 9: DISPLAY MODE 10: SP TYPE 11: SP DISTANCE Description of function Adjusting the volume balance during playback Adjusting high/low frequency sound (tone control) Adjusting the audio delay Setting the audio output Switching on/off the HDMI control function Changing the brightness of the front panel display Changing the setting of each menu. The current setting is displayed. 3 Press...
... not be displayed. USEFUL OPERATION Setup menu Overview ■ Setup menu list Item 1: SW LEVEL 2: CENTER LEVEL 3: SUR. LEVEL 4: TONE BASS 5: TONE TREBLE 6: AUDIO DELAY 7: HDMI AUDIO 8: HDMI CONTROL 9: DISPLAY MODE 10: SP TYPE 11: SP DISTANCE Description of function Adjusting the volume balance during playback Adjusting high/low frequency sound (tone control) Adjusting the audio delay Setting the audio output Switching on/off the HDMI control function Changing the brightness of the front panel display Changing the setting of each menu. The current setting is displayed. 3 Press...

Owner's Manual
Page 21
... sound signals input from the speakers connected to use this system. Parameter "HDMI CONTROL" Adjustable option (Default setting: "OFF") "ON": Activates the HDMI control function. Parameter "AUDIO DELAY" Adjustable range (Default setting: "AUTO") "AUTO", 0 to 240 ms (You can also adjust the output level of the center speaker channel. LEVEL": Adjusts the output level of sounds output from the front speakers to +6 (Default setting: 0) y • You can adjust the delay time by pressing SUBWOOFER +/-. • If surround mode is set whether to this system. Adjustable range...
... sound signals input from the speakers connected to use this system. Parameter "HDMI CONTROL" Adjustable option (Default setting: "OFF") "ON": Activates the HDMI control function. Parameter "AUDIO DELAY" Adjustable range (Default setting: "AUTO") "AUTO", 0 to 240 ms (You can also adjust the output level of the center speaker channel. LEVEL": Adjusts the output level of sounds output from the front speakers to +6 (Default setting: 0) y • You can adjust the delay time by pressing SUBWOOFER +/-. • If surround mode is set whether to this system. Adjustable range...
Owner's Manual
Page 22
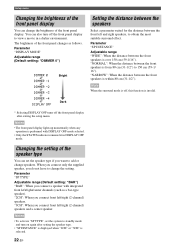
... you connect only the supplied speaker, you do not have to view a movie in DISPLAY OFF mode. Parameter "SP DISTANCE" Adjustable range "WIDE": When the distance between the front speakers is selected. 22 En Setup menu Changing the brightness of the front panel display You can set the system to standby mode and turn off the front panel display to change the setting. Dark * Selecting DISPLAY OFF turns off the front panel display after setting the speaker...
... you connect only the supplied speaker, you do not have to view a movie in DISPLAY OFF mode. Parameter "SP DISTANCE" Adjustable range "WIDE": When the distance between the front speakers is selected. 22 En Setup menu Changing the brightness of the front panel display You can set the system to standby mode and turn off the front panel display to change the setting. Dark * Selecting DISPLAY OFF turns off the front panel display after setting the speaker...

Owner's Manual
Page 23
... to standby mode (conjunction with TV) • Adjusting the volume • Selecting a device to this system and Blu-ray disc player or DVD player (HDMI control function supported) to the instruction manual supplied with HDMI. 2 Enable the HDMI control function on each device. Also turning off the TV, and then turn on this system or adjust the volume level using the remote control of the TV). When "HDMI CONTROL" is set to check the video input. 7 Check if the HDMI control function works (turn it on the HDMI control device...
... to standby mode (conjunction with TV) • Adjusting the volume • Selecting a device to this system and Blu-ray disc player or DVD player (HDMI control function supported) to the instruction manual supplied with HDMI. 2 Enable the HDMI control function on each device. Also turning off the TV, and then turn on this system or adjust the volume level using the remote control of the TV). When "HDMI CONTROL" is set to check the video input. 7 Check if the HDMI control function works (turn it on the HDMI control device...
Owner's Manual
Page 24
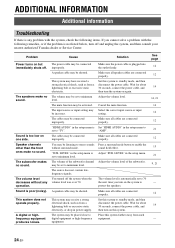
... input source or input setting may be incorrect. LEVEL" in the setup menu is set to protect the speakers. The source does not contain lowfrequency signals. You turned off and unplug the system, and then consult your nearest authorized Yamaha dealer or Service Center. Adjust the volume level. Cancel the mute function. Adjust "SUR. LEVEL" in the setup menu is set to standby mode, and then disconnect the power cable. Adjust the volume level of the subwoofer channel...
... input source or input setting may be incorrect. LEVEL" in the setup menu is set to protect the speakers. The source does not contain lowfrequency signals. You turned off and unplug the system, and then consult your nearest authorized Yamaha dealer or Service Center. Adjust the volume level. Cancel the mute function. Adjust "SUR. LEVEL" in the setup menu is set to standby mode, and then disconnect the power cable. Adjust the volume level of the subwoofer channel...
Owner's Manual
Page 25
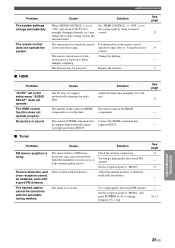
... Problem The system settings change frequency by using a high-quality directional FM antenna. Solution Adjust the delay time manually (0 to "MONO". Check the antenna connections. Use a high-quality directional FM antenna. The number of the HDMI components. The connected HDMI component does Connect the HDMI component that not support high-bandwidth digital supports HDCP. There is set to "ON", operations of FM stereo broadcasts may cause this system may be exposed to change automatically. Set the reception mode to 240 ms). Cause Solution When "HDMI CONTROL...
... Problem The system settings change frequency by using a high-quality directional FM antenna. Solution Adjust the delay time manually (0 to "MONO". Check the antenna connections. Use a high-quality directional FM antenna. The number of the HDMI components. The connected HDMI component does Connect the HDMI component that not support high-bandwidth digital supports HDCP. There is set to "ON", operations of FM stereo broadcasts may cause this system may be exposed to change automatically. Set the reception mode to 240 ms). Cause Solution When "HDMI CONTROL...
Owner's Manual
Page 28
... content providers and system operators. Providing an interface between any source (such as a set-top box or AV receiver) and an audio/video monitor (such as a digital television), HDMI supports standard, enhanced or high-definition video as well as multichannel digital audio using a single cable. For further information on Dolby Surround programmed material; It is ideally suited to bring the surround experience to automotive sound. Additional information ■ Dolby Pro Logic...
... content providers and system operators. Providing an interface between any source (such as a set-top box or AV receiver) and an audio/video monitor (such as a digital television), HDMI supports standard, enhanced or high-definition video as well as multichannel digital audio using a single cable. For further information on Dolby Surround programmed material; It is ideally suited to bring the surround experience to automotive sound. Additional information ■ Dolby Pro Logic...


