
Owners Manual
Page 2
... to Internet Radio (YMC-700 only 30 Listening to the Rhapsody® service (YMC-700 only 32 Useful functions 33 Enjoying Bluetooth™ components 35 Pairing 35 ADVANCED OPERATION Setup menu 36 Setup menu tree 36 Initial Setup 37 Speaker menu 37 Sound menu 38 Input menu 39 Network menu (YMC-700 only 40 Rhapsody® Information menu (YMC-700 only 41 Remote Control menu 42 Option menu 43 Signal Information 44 Update menu 44 ADDITIONAL INFORMATION Troubleshooting 45 Glossary 51 Information on audio/video jacks and cable plugs...
... to Internet Radio (YMC-700 only 30 Listening to the Rhapsody® service (YMC-700 only 32 Useful functions 33 Enjoying Bluetooth™ components 35 Pairing 35 ADVANCED OPERATION Setup menu 36 Setup menu tree 36 Initial Setup 37 Speaker menu 37 Sound menu 38 Input menu 39 Network menu (YMC-700 only 40 Rhapsody® Information menu (YMC-700 only 41 Remote Control menu 42 Option menu 43 Signal Information 44 Update menu 44 ADDITIONAL INFORMATION Troubleshooting 45 Glossary 51 Information on audio/video jacks and cable plugs...
Owners Manual
Page 3
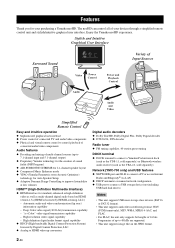
... connect a PC or access Internet Radio and Rhapsody® via LAN ◆ DHCP automatic or manual network configuration ◆ USB port to improve listenability at low volumes HDMI™ (High-Definition Multimedia Interface) ◆ HDMI interface for standard, enhanced or high-definition video as well as multi-channel digital audio based on HDMI version 1.3a (HDMI is licensed by HDMI Licensing, LLC.) - Stylish and Intuitive Graphical User Interface Surround Sound Variety of Input Sources Video Power Control Power...
... connect a PC or access Internet Radio and Rhapsody® via LAN ◆ DHCP automatic or manual network configuration ◆ USB port to improve listenability at low volumes HDMI™ (High-Definition Multimedia Interface) ◆ HDMI interface for standard, enhanced or high-definition video as well as multi-channel digital audio based on HDMI version 1.3a (HDMI is licensed by HDMI Licensing, LLC.) - Stylish and Intuitive Graphical User Interface Surround Sound Variety of Input Sources Video Power Control Power...

Owners Manual
Page 6
... TV POWER Turns on the TV or sets it to the standby mode. (☞ P. 19, 43) • MENU • GUIDE • EXIT • PREV. • CH u / d These buttons work differently depending on the currently selected source component. (☞ P. 21) PAGE u / d When the playback screen is displayed These buttons work differently depending on the currently selected source component. (☞ P. 21) BACK Returns to the previous menu level. CONTROL Turns on . Notes • Do not use...
... TV POWER Turns on the TV or sets it to the standby mode. (☞ P. 19, 43) • MENU • GUIDE • EXIT • PREV. • CH u / d These buttons work differently depending on the currently selected source component. (☞ P. 21) PAGE u / d When the playback screen is displayed These buttons work differently depending on the currently selected source component. (☞ P. 21) BACK Returns to the previous menu level. CONTROL Turns on . Notes • Do not use...

Owners Manual
Page 9
... operation of many audio/video components. You can also turn on , this unit passes all remote control codes (of this unit or to the virtual remote control (☞ P. 21). Both flasher heads function equivalently. Source device SENSOR IN OUT 1 USB 3 2 REMOTE CONTROL AC IN R FRONT SPE To other source devices Connect the plugs of the supplied IR flashers to the REMOTE CONTROL OUT 1 and 2 jacks, and attach the flashers to the remote control...
... operation of many audio/video components. You can also turn on , this unit passes all remote control codes (of this unit or to the virtual remote control (☞ P. 21). Both flasher heads function equivalently. Source device SENSOR IN OUT 1 USB 3 2 REMOTE CONTROL AC IN R FRONT SPE To other source devices Connect the plugs of the supplied IR flashers to the REMOTE CONTROL OUT 1 and 2 jacks, and attach the flashers to the remote control...

Owners Manual
Page 20
..., those components turn on/off the TV by pressing MUTE. 5 6 POWER Make various settings using j / i. Parameter Treble / Bass SWFR Level -6 to +6 -20 to +20 Value DSP Program Select this menu to the playback screen of over 96 kHz. 19 En Entertainment For TV programs, video games, etc. All Channel Stereo To output stereo sound from all sources: Now Playing Select this menu to jump back to adjust the sound settings (bass/treble/ subwoofer level). Connection ☞P. 8, IR settings ☞P. 40, Source Power Control ☞...
..., those components turn on/off the TV by pressing MUTE. 5 6 POWER Make various settings using j / i. Parameter Treble / Bass SWFR Level -6 to +6 -20 to +20 Value DSP Program Select this menu to the playback screen of over 96 kHz. 19 En Entertainment For TV programs, video games, etc. All Channel Stereo To output stereo sound from all sources: Now Playing Select this menu to jump back to adjust the sound settings (bass/treble/ subwoofer level). Connection ☞P. 8, IR settings ☞P. 40, Source Power Control ☞...

Owners Manual
Page 23
... Preset ☞ Next page Now Playing Jump to the GUI screen and perform the operations explained on the next page. To listen to FM radio stations, refer to Preset search screen or Manual search screen 22 En Listening to FM Radio You can receive FM radio stations with this unit. Connect the indoor FM antenna in advance. [Top menu] [Source menu] Select "Listen" Select "FM Radio" [Preset search screen] Note The preset search screen is only displayed...
... Preset ☞ Next page Now Playing Jump to the GUI screen and perform the operations explained on the next page. To listen to FM radio stations, refer to Preset search screen or Manual search screen 22 En Listening to FM Radio You can receive FM radio stations with this unit. Connect the indoor FM antenna in advance. [Top menu] [Source menu] Select "Listen" Select "FM Radio" [Preset search screen] Note The preset search screen is only displayed...
Owners Manual
Page 39
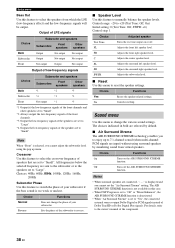
... "Music Enhancer", the AIR SURROUND XTREME function is deactivated. • When "Air Surround Xtreme" is set to "Yes", the connected external sources output Dolby Digital or PCM signals instead of your subwoofer. Adjusts the front left speaker level. Adjusts the center speaker level. Sound menu Use this feature to manually balance the speaker levels. Adjusts the surround left speaker level. The choices indicated in this feature to switch the phase of Dolby TrueHD or Dolby Digital Plus signals. Off Turns off . Note When "Front" is displayed and...
... "Music Enhancer", the AIR SURROUND XTREME function is deactivated. • When "Air Surround Xtreme" is set to "Yes", the connected external sources output Dolby Digital or PCM signals instead of your subwoofer. Adjusts the front left speaker level. Adjusts the center speaker level. Sound menu Use this feature to manually balance the speaker levels. Adjusts the surround left speaker level. The choices indicated in this feature to switch the phase of Dolby TrueHD or Dolby Digital Plus signals. Off Turns off . Note When "Front" is displayed and...

Owners Manual
Page 40
... jack, the speakers connected to this unit output no sound. • Even if "HDMI Audio Out" is set to "Auto", this unit is wide Output level Output level Auto Off Auto Off Input level Volume: low Input level Volume: high y You can fine-adjust the audio and video synchronization by adjusting the offset value. If the connected TV is set to add new input sources or change the input source settings you connect new components to this unit or modify the connections between this unit and other components, use . Outputs HDMI audio signals...
... jack, the speakers connected to this unit output no sound. • Even if "HDMI Audio Out" is set to "Auto", this unit is wide Output level Output level Auto Off Auto Off Input level Volume: low Input level Volume: high y You can fine-adjust the audio and video synchronization by adjusting the offset value. If the connected TV is set to add new input sources or change the input source settings you connect new components to this unit or modify the connections between this unit and other components, use . Outputs HDMI audio signals...

Owners Manual
Page 41
... input settings, then make new settings using the DVD player frequently, you can program the functions of this unit within the range of an input source you want to delete the assigned icon from other remote controls You can program remote control codes from the selected activity.) You can customize the icons under the "Listen" activity and rename the icon to switch the remote control code for each component. Network menu (YMC-700 only) Use this menu to adjust...
... input settings, then make new settings using the DVD player frequently, you can program the functions of this unit within the range of an input source you want to delete the assigned icon from other remote controls You can program remote control codes from the selected activity.) You can customize the icons under the "Listen" activity and rename the icon to switch the remote control code for each component. Network menu (YMC-700 only) Use this menu to adjust...
Owners Manual
Page 42
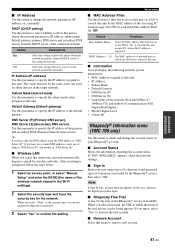
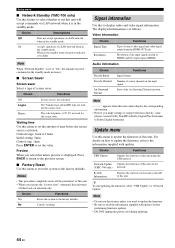
... Duplex) • WLAN Signal Level • vTuner ID Rhapsody® Information menu (YMC-700 only) Use this menu to check and change the network parameters (IP address, etc.) manually. This value must not be the same as the security type, you select this menu item, this unit automatically begins to search for other devices in "DNS Server (P)". Setup menu ■ MAC Address Filter...
... Duplex) • WLAN Signal Level • vTuner ID Rhapsody® Information menu (YMC-700 only) Use this menu to check and change the network parameters (IP address, etc.) manually. This value must not be the same as the security type, you select this menu item, this unit automatically begins to search for other devices in "DNS Server (P)". Setup menu ■ MAC Address Filter...
Owners Manual
Page 45
... or HDMI) and the output signal (HDMI). y To start updating the firmware, select "USB Update" or "Network Update". Resolution of this unit. Setup menu ■ Network Standby (YMC-700 only) Use this feature to display audio and video signal information. Choice Functions Off Logos Photos Screen saver is lit dimly. Choice Descriptions Off Does not accept operations via LAN network when in the standby mode. On Accepts operations via LAN network when in the standby mode. When in the input signal. No Cancels resetting.
... or HDMI) and the output signal (HDMI). y To start updating the firmware, select "USB Update" or "Network Update". Resolution of this unit. Setup menu ■ Network Standby (YMC-700 only) Use this feature to display audio and video signal information. Choice Functions Off Logos Photos Screen saver is lit dimly. Choice Descriptions Off Does not accept operations via LAN network when in the standby mode. On Accepts operations via LAN network when in the standby mode. When in the input signal. No Cancels resetting.

Owners Manual
Page 46
... case, switch the format of this unit. HDMI components connected to the HDMI OUT jack. do not support the HDCP copy protection standards. Sound is turned on. Connect the cables properly. The number of connected HDMI components is over the limit. The protection circuitry has been activated Check that the wire for each - Connect the cables properly. Adjust the speaker level settings using the "Auto 37 Speaker Setup" menu. unit and on all speaker wire connections on one side only. Speaker connections are incorrect. output sounds from a source component...
... case, switch the format of this unit. HDMI components connected to the HDMI OUT jack. do not support the HDCP copy protection standards. Sound is turned on. Connect the cables properly. The number of connected HDMI components is over the limit. The protection circuitry has been activated Check that the wire for each - Connect the cables properly. Adjust the speaker level settings using the "Auto 37 Speaker Setup" menu. unit and on all speaker wire connections on one side only. Speaker connections are incorrect. output sounds from a source component...

Owners Manual
Page 47
... overheat protection circuitry has been activated. The internal temperature is heard from such equipment. "Bass Out" in "Speaker Configuration" is Incorrect cable connections. to prevent dubbing. Move this unit to "Subwoofer" or "Both". Make an appropriate setting following the owner's manual of your component. A humming sound is Set "Bass Out" to cool down, then turn it in the desired digital audio signal format. When playing a monaural source with low voltage. "Off" or "Music...
... overheat protection circuitry has been activated. The internal temperature is heard from such equipment. "Bass Out" in "Speaker Configuration" is Incorrect cable connections. to prevent dubbing. Move this unit to "Subwoofer" or "Both". Make an appropriate setting following the owner's manual of your component. A humming sound is Set "Bass Out" to cool down, then turn it in the desired digital audio signal format. When playing a monaural source with low voltage. "Off" or "Music...

Owners Manual
Page 48
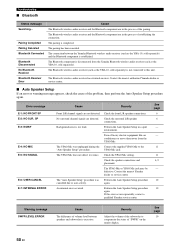
.... The desired station cannot be obtained even with the automatic tuning method. Wrong distance or angle. Conceal the remote control sensor of the other remote control are weak. Try using a high-quality directional FM antenna. Place the remote control within a maximum range of the same manufacturer. ■ FM Tuner Troubleshooting Problem Cause Remedy FM stereo reception is noise interference from digital or radio frequency equipment. Try setting another code of...
.... The desired station cannot be obtained even with the automatic tuning method. Wrong distance or angle. Conceal the remote control sensor of the other remote control are weak. Try using a high-quality directional FM antenna. Place the remote control within a maximum range of the same manufacturer. ■ FM Tuner Troubleshooting Problem Cause Remedy FM stereo reception is noise interference from digital or radio frequency equipment. Try setting another code of...
Owners Manual
Page 51
.... Remedy Adjust the volume of the subwoofer to this error occurs repeatedly, contact a qualified Yamaha service center. Contact the nearest authorized Yamaha dealer or service center. ■ Auto Speaker Setup If an error or warning message appears, check the cause of "SWFR" on the results display. No surround channel signals are not detected. The "Auto Speaker Setup" procedure was unplugged during the "Auto Speaker Setup" procedure. Check the surround L/R speaker connections. Perform the Auto Speaker Setup procedure again. The Bluetooth wireless audio receiver has...
.... Remedy Adjust the volume of the subwoofer to this error occurs repeatedly, contact a qualified Yamaha service center. Contact the nearest authorized Yamaha dealer or service center. ■ Auto Speaker Setup If an error or warning message appears, check the cause of "SWFR" on the results display. No surround channel signals are not detected. The "Auto Speaker Setup" procedure was unplugged during the "Auto Speaker Setup" procedure. Check the surround L/R speaker connections. Perform the Auto Speaker Setup procedure again. The Bluetooth wireless audio receiver has...

Owners Manual
Page 52
...; Dolby Digital Plus Dolby Digital Plus is an advanced audio technology developed for multichannel sound on a video component transmits these signals is independent. Selected as 0.1 channel). Supported by adding the surround back channel to the existing 5.1-channel format. ■ FLAC FLAC (Free Lossless Audio Codec) is an audio compression format. Supported by the 5 full-range channels and the precise sound orientation generated using 2-channel stereo for your home. This extra bit depth allows HDTVs and other displays go...
...; Dolby Digital Plus Dolby Digital Plus is an advanced audio technology developed for multichannel sound on a video component transmits these signals is independent. Selected as 0.1 channel). Supported by adding the surround back channel to the existing 5.1-channel format. ■ FLAC FLAC (Free Lossless Audio Codec) is an audio compression format. Supported by the 5 full-range channels and the precise sound orientation generated using 2-channel stereo for your home. This extra bit depth allows HDTVs and other displays go...

Owners Manual
Page 55
... owner's manual of this unit allows the HDMI signals input at the HDMI input jacks only. • If you may need to "HDMI 1", "HDMI 2" or "HDMI 3", this unit while data is played back, video and audio signals may not be output from the HDMI OUT jack. Notes • Do not disconnect or connect the cable or turn off the power of the HDMI component connected to the HDMI OUT jack of the input source component and set "HDMI Standby Through" in "Option" to change some settings...
... owner's manual of this unit allows the HDMI signals input at the HDMI input jacks only. • If you may need to "HDMI 1", "HDMI 2" or "HDMI 3", this unit while data is played back, video and audio signals may not be output from the HDMI OUT jack. Notes • Do not disconnect or connect the cable or turn off the power of the HDMI component connected to the HDMI OUT jack of the input source component and set "HDMI Standby Through" in "Option" to change some settings...
Owners Manual
Page 57
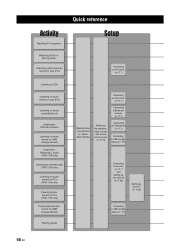
... radio stations Listening to music stored on USB storage devices Listening to Rhapsody ® music (YMC-700 only) Listening to Internet radio (YMC-700 only) Listening to music stored on PCs (YMC-700 only) Viewing photos stored on PCs (YMC-700 only) Playing back photos stored on USB storage devices Playing games Connecting an iPod dock (☞ P. 7) Connecting a Bluetooth receiver (☞ P. 7) Making basic connections (☞ Quick Start Guide) Setting up the speakers, input sources and remote control codes (☞ P. 10) Connecting an FM antenna (☞ P. 7) Connecting a USB...
... radio stations Listening to music stored on USB storage devices Listening to Rhapsody ® music (YMC-700 only) Listening to Internet radio (YMC-700 only) Listening to music stored on PCs (YMC-700 only) Viewing photos stored on PCs (YMC-700 only) Playing back photos stored on USB storage devices Playing games Connecting an iPod dock (☞ P. 7) Connecting a Bluetooth receiver (☞ P. 7) Making basic connections (☞ Quick Start Guide) Setting up the speakers, input sources and remote control codes (☞ P. 10) Connecting an FM antenna (☞ P. 7) Connecting a USB...
Owners Manual
Page 60
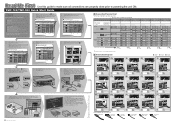
... possible connections. A Connection Planning Chart Use this unit, subwoofer and TV. Make sure to select the appropriate HDMI input on the TV to display neoHD "Initial Setup" screen. • Follow the setup process of this unit) & Power cable & Remote control * Install the supplied batteries to the remote control in the Initial Setup procedure. 15 pt B Connection Diagrams 15 pt IN OUT 1 3 2 REMOTE CONTROL AC IN USB NETWORK 1 2 AUDIO IN HDMI OUT R3 L 3 2 HDMI IN VIDEO IN 1 WIRELESS DOCK RL RL SUB WOOFER OUTPUT 3 2 FRONT SURROUND CENTER SPEAKERS 1 ANTENNA...
... possible connections. A Connection Planning Chart Use this unit, subwoofer and TV. Make sure to select the appropriate HDMI input on the TV to display neoHD "Initial Setup" screen. • Follow the setup process of this unit) & Power cable & Remote control * Install the supplied batteries to the remote control in the Initial Setup procedure. 15 pt B Connection Diagrams 15 pt IN OUT 1 3 2 REMOTE CONTROL AC IN USB NETWORK 1 2 AUDIO IN HDMI OUT R3 L 3 2 HDMI IN VIDEO IN 1 WIRELESS DOCK RL RL SUB WOOFER OUTPUT 3 2 FRONT SURROUND CENTER SPEAKERS 1 ANTENNA...
Owners Manual
Page 61
... lightning flash with arrowhead symbol, within an equilateral triangle, is in compliance with the essential requirements and other relevant provisions of Directive 1999/5/EC. Failure to follow instructions could void the user's authority to operate the equipment. This equipment generates/uses radio frequencies and, if not installed and used according to the instructions found in the code are met: - We, the manufacturer Yamaha...
... lightning flash with arrowhead symbol, within an equilateral triangle, is in compliance with the essential requirements and other relevant provisions of Directive 1999/5/EC. Failure to follow instructions could void the user's authority to operate the equipment. This equipment generates/uses radio frequencies and, if not installed and used according to the instructions found in the code are met: - We, the manufacturer Yamaha...


