

YP211 OWNERS MANUAL
Page 1
YAMAHA VP211 Belt Drive turntable with Cueing lever S-type tonearm * Powerful multipole synchronous motor * Belt drive for low wow and flutter (0.08% wrms) * Auto-return and auto-cut features designed for most high performance cartridges Out9ner's Manual t. * Slim, attractive styling. * Free-setting hinged dust cover * Gold-plated headshell contacts Ideal for optimum operating convenience * Sensitive S-type static balance tone arm Cueing lever and inside force canceler .
YAMAHA VP211 Belt Drive turntable with Cueing lever S-type tonearm * Powerful multipole synchronous motor * Belt drive for low wow and flutter (0.08% wrms) * Auto-return and auto-cut features designed for most high performance cartridges Out9ner's Manual t. * Slim, attractive styling. * Free-setting hinged dust cover * Gold-plated headshell contacts Ideal for optimum operating convenience * Sensitive S-type static balance tone arm Cueing lever and inside force canceler .

YP211 OWNERS MANUAL
Page 2
CONTENTS Cautions 3 The Names and Functions of the Parts 4 Assembly and Adjustments 6 Connections to Your Amplifier or Receiver 11 How to Play Records 11 Changing Cartridge Stylus and Mains Frequency 12 Specifications and Accessories 13 Trouble Shooting 14 2
CONTENTS Cautions 3 The Names and Functions of the Parts 4 Assembly and Adjustments 6 Connections to Your Amplifier or Receiver 11 How to Play Records 11 Changing Cartridge Stylus and Mains Frequency 12 Specifications and Accessories 13 Trouble Shooting 14 2

YP211 OWNERS MANUAL
Page 3
... not provided on 'Trouble Shooting,' which details common operating errors. Keep this is the major single source of the sun, avoiding locations subject to vibration and excessive that it directly in a flat and level place, out of the direct rays of poor sound quality from records....change the drive pulley to be relocated, carry it is set for continental N. Voltages are to get the best from accumulated dirt: this manual in the AC main supply. If the YP-211 ever has to match your local mains voltage before reading the section on models for your local AC main supply frequency...
... not provided on 'Trouble Shooting,' which details common operating errors. Keep this is the major single source of the sun, avoiding locations subject to vibration and excessive that it directly in a flat and level place, out of the direct rays of poor sound quality from records....change the drive pulley to be relocated, carry it is set for continental N. Voltages are to get the best from accumulated dirt: this manual in the AC main supply. If the YP-211 ever has to match your local mains voltage before reading the section on models for your local AC main supply frequency...
YP211 OWNERS MANUAL
Page 4
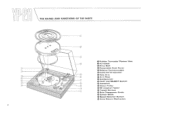
14 O 4 THE NAMES AND FUNCTIONS OF THE PARTS OO e O Rubber TUrntable 'Platter' Mat @Turntable Drive Belt 0 Detachable Dust Cover 0 Balance Counterweight 0 Onside Force Canceler O0 Tone Arm O Arm Rest T ()Cueing Lever (I) PLAY and REJECT Switch (j1 Headshell e) Motor PuHey 10 O EP Adaptor Holder II CI Transit Screws O Belt Changeover Guide gp Center Shaft 0 Speed Selector Switch 0 Auto Return Mechanism
14 O 4 THE NAMES AND FUNCTIONS OF THE PARTS OO e O Rubber TUrntable 'Platter' Mat @Turntable Drive Belt 0 Detachable Dust Cover 0 Balance Counterweight 0 Onside Force Canceler O0 Tone Arm O Arm Rest T ()Cueing Lever (I) PLAY and REJECT Switch (j1 Headshell e) Motor PuHey 10 O EP Adaptor Holder II CI Transit Screws O Belt Changeover Guide gp Center Shaft 0 Speed Selector Switch 0 Auto Return Mechanism
YP211 OWNERS MANUAL
Page 5
... are instantly selected by this lever-type switch. • Auto Return hillechanisnn Simple and reliable, this switch will be removed before the YP-211 is designed to give the precise balance required for accurate stylus tracking force settings. 0 Rubber Ti.grntelble 'Platter' Mat Specially designed to retain its rest at low tracking forces, for the best possible stereo reproduction...
... are instantly selected by this lever-type switch. • Auto Return hillechanisnn Simple and reliable, this switch will be removed before the YP-211 is designed to give the precise balance required for accurate stylus tracking force settings. 0 Rubber Ti.grntelble 'Platter' Mat Specially designed to retain its rest at low tracking forces, for the best possible stereo reproduction...

YP211 OWNERS MANUAL
Page 6
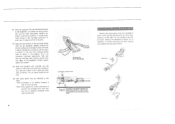
...setting is not available, the nearest above it should be used at will with the dust cover off. use the YP-211. OViNG THE TRANSIT SCREWS The motor assembly is protected from the Yamaha factory... It is wrapped separately in the diagram. 0 GEAR WHEEL SETTING THE ,VOLTAGE SELECTOR All models of these screws before placing the ...turn the auto-return mechanism so that the arrow is in the position shown in the original packing from vibration and damage during transit by two screws which are not removed, they may foul the turntable and prevent free rotation. 6 0 4,4 ARROW CENTER...
...setting is not available, the nearest above it should be used at will with the dust cover off. use the YP-211. OViNG THE TRANSIT SCREWS The motor assembly is protected from the Yamaha factory... It is wrapped separately in the diagram. 0 GEAR WHEEL SETTING THE ,VOLTAGE SELECTOR All models of these screws before placing the ...turn the auto-return mechanism so that the arrow is in the position shown in the original packing from vibration and damage during transit by two screws which are not removed, they may foul the turntable and prevent free rotation. 6 0 4,4 ARROW CENTER...

YP211 OWNERS MANUAL
Page 7
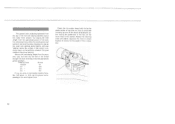
...Belt' should also be free from the rear of the counterweight engages with the accessories: choose the better length to prevent the cartridge moving. 7 Grip the turntable by the finger holes nearer the center, and place the central hole directly over the drive pulley, ... the speed selector switch (at the left-hand front of the tone arm, rotating it at this time. --RUBBER PLATTER MAT TURNTABLE --CENTER SHAFT MOTOR DRIVE PULLEY BELT CHANGEOVER GUIDE. ASSEMBLING THE TONE ARM Fitting the Balance Counterweight (1) Push the separately wrapped balance counterweight onto the rear of the motor ...
...Belt' should also be free from the rear of the counterweight engages with the accessories: choose the better length to prevent the cartridge moving. 7 Grip the turntable by the finger holes nearer the center, and place the central hole directly over the drive pulley, ... the speed selector switch (at the left-hand front of the tone arm, rotating it at this time. --RUBBER PLATTER MAT TURNTABLE --CENTER SHAFT MOTOR DRIVE PULLEY BELT CHANGEOVER GUIDE. ASSEMBLING THE TONE ARM Fitting the Balance Counterweight (1) Push the separately wrapped balance counterweight onto the rear of the motor ...
YP211 OWNERS MANUAL
Page 8
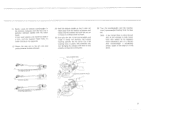
... the coding of the colored leads attached to the headshell: one , and lift the tone arm up off its rest, placing it on the end of the tone arm, and gently turn the lock 'sleeve' until the stylus is an extremely important adjustment. Observe the maker's instructions carefully in the diagram. A small pair of the overhang setting mark...
... the coding of the colored leads attached to the headshell: one , and lift the tone arm up off its rest, placing it on the end of the tone arm, and gently turn the lock 'sleeve' until the stylus is an extremely important adjustment. Observe the maker's instructions carefully in the diagram. A small pair of the overhang setting mark...
YP211 OWNERS MANUAL
Page 9
... the headshell, stylus replacement, etc.), or if the balance counterweight is perfectly balanced, parallel with the motor board. A very small rotation only should be made (movement with respect to top dead center as shown. (4) Now grip the rear of the counterweight, and rotate it slowly and carefully: the number showing opposite the top center line is the...
... the headshell, stylus replacement, etc.), or if the balance counterweight is perfectly balanced, parallel with the motor board. A very small rotation only should be made (movement with respect to top dead center as shown. (4) Now grip the rear of the counterweight, and rotate it slowly and carefully: the number showing opposite the top center line is the...
YP211 OWNERS MANUAL
Page 10
...tone-arm bearing assembly acts as below: Tracking Force 1.5 gram 2.0 2.5 3.0 Groove 1st 2nd 3rd 4th If you are using an intermediate tracking force, like 1.25 grams, or 2.75, use the groove corresponding to ensure freedom of -the-groove tracking. ADJUSTING...-skating weight from its rest to the innermost groove of the record being played, neither fouling the guide-hook at the top, nor the motor board at the bottom. treme cases)...the tone arm from the accessory case, and then slip the end of the thread through the hook and hang it to ride up the outer wall, spoiling stereo balance, and...
...tone-arm bearing assembly acts as below: Tracking Force 1.5 gram 2.0 2.5 3.0 Groove 1st 2nd 3rd 4th If you are using an intermediate tracking force, like 1.25 grams, or 2.75, use the groove corresponding to ensure freedom of -the-groove tracking. ADJUSTING...-skating weight from its rest to the innermost groove of the record being played, neither fouling the guide-hook at the top, nor the motor board at the bottom. treme cases)...the tone arm from the accessory case, and then slip the end of the thread through the hook and hang it to ride up the outer wall, spoiling stereo balance, and...

YP211 OWNERS MANUAL
Page 11
... leftand right-hand PHONO input sockets of your amplifiers, etc. (2) The third lead is attached to PHONO. (2) Put the record of the amplifier (receiver). (3) Plug the turntable main plug into your choice on the turntable. and left-hand channel leads from the back of the YP-211 (clearly identified with the large center hole, use the EP adaptor. (3) Set the cueing lever...
... leftand right-hand PHONO input sockets of your amplifiers, etc. (2) The third lead is attached to PHONO. (2) Put the record of the amplifier (receiver). (3) Plug the turntable main plug into your choice on the turntable. and left-hand channel leads from the back of the YP-211 (clearly identified with the large center hole, use the EP adaptor. (3) Set the cueing lever...

YP211 OWNERS MANUAL
Page 12
... for your stylus in good time. Remember to re-set the cueing lever to the DOWN r. EO2 CHANGING CARTRIDGE STYLUS AND MAINS FREQUENCY =EDF THE CUEING LEVER The cueing lever, located immediately above the PEAY & REJECT switch at the right of the motor board, is convenient when raising and lowering the tone arm and cartridge for...
... for your stylus in good time. Remember to re-set the cueing lever to the DOWN r. EO2 CHANGING CARTRIDGE STYLUS AND MAINS FREQUENCY =EDF THE CUEING LEVER The cueing lever, located immediately above the PEAY & REJECT switch at the right of the motor board, is convenient when raising and lowering the tone arm and cartridge for...

YP211 OWNERS MANUAL
Page 13
iy \SPECIFICATIONS TURNTABLE Motor Turntable Platter Speeds Drive System Signal-to-Noise Ratio Wow and Flutter TONE ARM Type Effective length Overhang Suitable Cartridge Weight Headshell OTHERS Power Supplies Power Consumption Dimensions (WxHxD) Weight Accessories 4-Pole synchronous type 30 cm (121 die-cast aluminum 33'/3 and 45 rpm (2-...Better than 0.08% wrms S-type static balance 215 mm (812/ 1 15 mm 5 to 11 grams HS-800 plug-in type to EIA standards, with gold-plated contacts. 120 V AC, 60 Hz (USA and Canada) 110-130/220-240 V AC, 50/60 Hz (Other areas) 9 Watts 435 x 150 x 361 mm 1714/ ...
iy \SPECIFICATIONS TURNTABLE Motor Turntable Platter Speeds Drive System Signal-to-Noise Ratio Wow and Flutter TONE ARM Type Effective length Overhang Suitable Cartridge Weight Headshell OTHERS Power Supplies Power Consumption Dimensions (WxHxD) Weight Accessories 4-Pole synchronous type 30 cm (121 die-cast aluminum 33'/3 and 45 rpm (2-...Better than 0.08% wrms S-type static balance 215 mm (812/ 1 15 mm 5 to 11 grams HS-800 plug-in type to EIA standards, with gold-plated contacts. 120 V AC, 60 Hz (USA and Canada) 110-130/220-240 V AC, 50/60 Hz (Other areas) 9 Watts 435 x 150 x 361 mm 1714/ ...
YP211 OWNERS MANUAL
Page 14
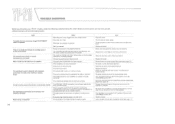
... pulley and turntable drive drum Replace drive belt Check and make good the output lead connections Replace with a cartridge of ) the speakers. Reduce volume Insert the belt into contact with the turntable too close to the amplifier/receiver An unsuitable cartridge has been used so that your amplifier or receiver is turned up too far Extremely high listening levels in a flat, horizontal position...
... pulley and turntable drive drum Replace drive belt Check and make good the output lead connections Replace with a cartridge of ) the speakers. Reduce volume Insert the belt into contact with the turntable too close to the amplifier/receiver An unsuitable cartridge has been used so that your amplifier or receiver is turned up too far Extremely high listening levels in a flat, horizontal position...


