
Owners Manual
Page 5
... the front panel keys 93 Setting the FACTORY PRESET 94 Remote control features 96 Setting remote control codes 96 Controlling other external components 27 Connecting a subwoofer 28 Connecting the FM antenna 29 About the IR IN terminal (U.S.A. Contents INTRODUCTION Overview 2 Features 3 Using this manual 5 Supplied accessories 6 Controls and functions 7 Front panel...
... the front panel keys 93 Setting the FACTORY PRESET 94 Remote control features 96 Setting remote control codes 96 Controlling other external components 27 Connecting a subwoofer 28 Connecting the FM antenna 29 About the IR IN terminal (U.S.A. Contents INTRODUCTION Overview 2 Features 3 Using this manual 5 Supplied accessories 6 Controls and functions 7 Front panel...

Owners Manual
Page 7
... DVD, Blu-Ray, and HD DVD. This improved technology provides an exceptionally stable sound field that employs 2 stereo surround channels, a subwoofer, and a greatly enhanced steering logic. This surround technology delivers high-quality digital audio for up -converts any 2-channel source audio to ...XM Satellite Radio information displaying capability iPod™ Controlling Capability (U.S.A., Canada, and Australia models only) • DOCK terminal to connect a Yamaha iPod universal dock (such as DVD, Blu-Ray, and HD DVD. AUTO SETUP (InteIliBeam) This unit employs the automatic sound beam ...
... DVD, Blu-Ray, and HD DVD. This improved technology provides an exceptionally stable sound field that employs 2 stereo surround channels, a subwoofer, and a greatly enhanced steering logic. This surround technology delivers high-quality digital audio for up -converts any 2-channel source audio to ...XM Satellite Radio information displaying capability iPod™ Controlling Capability (U.S.A., Canada, and Australia models only) • DOCK terminal to connect a Yamaha iPod universal dock (such as DVD, Blu-Ray, and HD DVD. AUTO SETUP (InteIliBeam) This unit employs the automatic sound beam ...
Owners Manual
Page 13
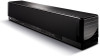
and Canada models) CD ANTENNA jack Connect the PM antenna (see page 29). ® DOCK terminal (U.S.A., Canada, and Australia models only) Connect the Yamaha iPod universal dock (such as YDS10, sold separately) (see page 5 in the Reference Guide). @ IR IN terminal (U.S.A and Canada models only) This... to this unit (see page 21). @ AC power supply cable Connect to display the OSD of this unit (see page 22). ® SUBWOOFER OUT jack Connect your subwoofer (see page 28). (J) AUX 2 COAXIAL DIGITAL INPUT jack Connect an external component via a coaxial digital connection (see page 27). ® ...
and Canada models) CD ANTENNA jack Connect the PM antenna (see page 29). ® DOCK terminal (U.S.A., Canada, and Australia models only) Connect the Yamaha iPod universal dock (such as YDS10, sold separately) (see page 5 in the Reference Guide). @ IR IN terminal (U.S.A and Canada models only) This... to this unit (see page 21). @ AC power supply cable Connect to display the OSD of this unit (see page 22). ® SUBWOOFER OUT jack Connect your subwoofer (see page 28). (J) AUX 2 COAXIAL DIGITAL INPUT jack Connect an external component via a coaxial digital connection (see page 27). ® ...
Owners Manual
Page 23
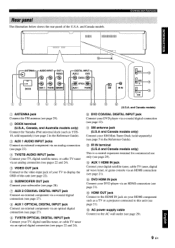
...analog input jacks • 1 universal dock terminal (U.S.A., Canada, and Australia models only) For audio/video input • 2 HDMI input jacks For audio output • 1 subwoofer output jack For audiolvideo output • 1 HDMI output jack For video output • 1 analog output jack Use these jacks/terminal to connect external components such...input jacks • 2 coaxial digital input jacks • 2 sets of external components to this unit. ______ Audio connection ______ Video connection , Further, by connecting a subwoofer to this unit, you can enjoy reinforced low-bass sounds.
...analog input jacks • 1 universal dock terminal (U.S.A., Canada, and Australia models only) For audio/video input • 2 HDMI input jacks For audio output • 1 subwoofer output jack For audiolvideo output • 1 HDMI output jack For video output • 1 analog output jack Use these jacks/terminal to connect external components such...input jacks • 2 coaxial digital input jacks • 2 sets of external components to this unit. ______ Audio connection ______ Video connection , Further, by connecting a subwoofer to this unit, you can enjoy reinforced low-bass sounds.
Owners Manual
Page 24
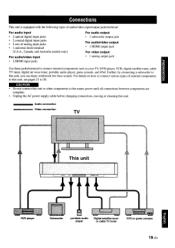
... 1 Audio pin cable (supplied) (White)~~ (White) (Red)~~(Red) 2 Optical cable (supplied) •• 3 Digital audio pin cable (supplied) (Orange) ~~ (Orange) 4 3.5 mm stereo mini plug cable 5 Subwoofer pin cable • Information on HDMITM Audio Signals Input source DVD video DVD audio Blu-ray Disc HDDVD Audio signal type Dolby Digital, DTS, PCM...
... 1 Audio pin cable (supplied) (White)~~ (White) (Red)~~(Red) 2 Optical cable (supplied) •• 3 Digital audio pin cable (supplied) (Orange) ~~ (Orange) 4 3.5 mm stereo mini plug cable 5 Subwoofer pin cable • Information on HDMITM Audio Signals Input source DVD video DVD audio Blu-ray Disc HDDVD Audio signal type Dolby Digital, DTS, PCM...
Owners Manual
Page 32
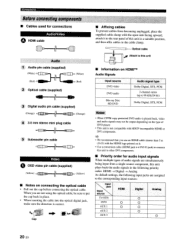
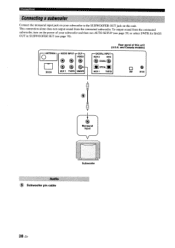
Connections Connecting asubwoofer· Connect the monaural input jack on your subwoofer to the SUBWOOFER OUT jack on the power of your subwoofer and then run AUTO SETUP (see page 35) or select SWFR for BASS OUT in SUBWOOFER SET (see page 78). [OANTENNA] D DOCK AUDIO INPUT "OUT~... VIDEO ~~~ ~ e> @ AUX 1 TVISTB Sth'OOFElI Rear panel of this unit. To output sound from the connected subwoofer. This connection alone does not output sound from the connected subwoofer, turn on this unit (U.S.A. and Canada models) ~ DIGITAL INPUT ~ AUX2 DVD ~ COAXIAL~ bWl ~ OP11CAL AUX 1 TVISTB...
Connections Connecting asubwoofer· Connect the monaural input jack on your subwoofer to the SUBWOOFER OUT jack on the power of your subwoofer and then run AUTO SETUP (see page 35) or select SWFR for BASS OUT in SUBWOOFER SET (see page 78). [OANTENNA] D DOCK AUDIO INPUT "OUT~... VIDEO ~~~ ~ e> @ AUX 1 TVISTB Sth'OOFElI Rear panel of this unit. To output sound from the connected subwoofer. This connection alone does not output sound from the connected subwoofer, turn on this unit (U.S.A. and Canada models) ~ DIGITAL INPUT ~ AUX2 DVD ~ COAXIAL~ bWl ~ OP11CAL AUX 1 TVISTB...
Owners Manual
Page 33
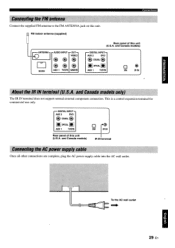
... the FM ANTENNA jack on this unit (U.S.A. DIGITAL INPUT- DIGITAL INPUT AUX2 DVD ((!) COAXIAL (!) ~ ~ OPTICAL _A_U_X_l_ _TV_IS_T_B Rear panel of this unit (U.S.A. OUTVIDEO ((!) ((!) ~ AUXl TVISTB SUBWOOFER Rear panel of this unit. 'i>L FM indoor antenna (supplied) ~8 rrANTENNAl ""- and Canada models) r-- and Canada models only) The IR IN terminal does not support normal...
... the FM ANTENNA jack on this unit (U.S.A. DIGITAL INPUT- DIGITAL INPUT AUX2 DVD ((!) COAXIAL (!) ~ ~ OPTICAL _A_U_X_l_ _TV_IS_T_B Rear panel of this unit (U.S.A. OUTVIDEO ((!) ((!) ~ AUXl TVISTB SUBWOOFER Rear panel of this unit. 'i>L FM indoor antenna (supplied) ~8 rrANTENNAl ""- and Canada models) r-- and Canada models only) The IR IN terminal does not support normal...
Owners Manual
Page 39
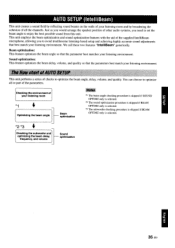
... feature optimizes the beam delay, volume, and quality so that the parameter best matches your listening environment. LBeam Optimizing the beam angle optimization + *2 *3 ~ Checking the subwoofer and Sound optimizing the beam delay, optimization frequency, and volume *1 The beam angle checking procedure is skipped if SOUND OPTIMZ only is selected. *2 The sound...
... feature optimizes the beam delay, volume, and quality so that the parameter best matches your listening environment. LBeam Optimizing the beam angle optimization + *2 *3 ~ Checking the subwoofer and Sound optimizing the beam delay, optimization frequency, and volume *1 The beam angle checking procedure is skipped if SOUND OPTIMZ only is selected. *2 The sound...

Owners Manual
Page 40
...beam output levels using MANUAL SETUP (see page 72) once the AUTO SETUP procedure is completed. ~nYOl.U"E • If a subwoofer with adjustable volume and crossoverlhigh-cut frequency controls is placed in a proper location and that there are no obstacles between the IntelliBeam ...sunlight. - Keep it on a conventional clockface and set R CROSSOYE oHIGHCUT the crossoverlhigh-cut frequency to the maximum. ~ MIN MAX MIN 11.0/ Subwoofer 1 Press STANDBY/ON to turn off the power of this unit. (I ~ or STANDBYION STANDBY/ON ~ Front panel Remote control 2 Connect the...
...beam output levels using MANUAL SETUP (see page 72) once the AUTO SETUP procedure is completed. ~nYOl.U"E • If a subwoofer with adjustable volume and crossoverlhigh-cut frequency controls is placed in a proper location and that there are no obstacles between the IntelliBeam ...sunlight. - Keep it on a conventional clockface and set R CROSSOYE oHIGHCUT the crossoverlhigh-cut frequency to the maximum. ~ MIN MAX MIN 11.0/ Subwoofer 1 Press STANDBY/ON to turn off the power of this unit. (I ~ or STANDBYION STANDBY/ON ~ Front panel Remote control 2 Connect the...

Owners Manual
Page 42
See "Error messages for AUTO SETUP" on the power of the subwoofer. If a subwoofer is connected to this unit, tum on page 41 for appropriate remedies. ~'cj{-:. • The AUTO SETUP procedure takes about three minutes maximum. "\.:" 'HUTI) SETUP .. ... conditions of your listening environment can start the BEAM+SOUND OPTIMZ procedure simply by the AUTO SETUP procedure (see page 42). Open the curtains to YSP. 3 Press MENU. In such cases, run MANUAL SETUP (see page 43). 1 Press STANDBY/ON to turn on the screen. A chime is played when the AUTO...
See "Error messages for AUTO SETUP" on the power of the subwoofer. If a subwoofer is connected to this unit, tum on page 41 for appropriate remedies. ~'cj{-:. • The AUTO SETUP procedure takes about three minutes maximum. "\.:" 'HUTI) SETUP .. ... conditions of your listening environment can start the BEAM+SOUND OPTIMZ procedure simply by the AUTO SETUP procedure (see page 42). Open the curtains to YSP. 3 Press MENU. In such cases, run MANUAL SETUP (see page 43). 1 Press STANDBY/ON to turn on the screen. A chime is played when the AUTO...

Owners Manual
Page 44
...following screen is displayed for AUTO SETUP" on the environment of your listening room, the beam angle of the subwoofer and run the procedure again from step 3. ~UTO SETUP COMPLETE Your YSP unit Ma~ not be set -up , Flashes ~UTO SETUP COMPLETE Please reMove the MIC froM tphoesiYtiSoPna, nd... to the same value even if "5 BEAM" is displayed as a result. Press ENTER to this case, see step 9. If "SUBWOOFER : NOT APPLICABLE" is displayed even though a subwoofer is connected to exit AUTO SETUP and then run the AUTO SETUP procedure again. ENVIRONMENT CHECK[F~ILEDJ BE~M MODE :5 BE...
...following screen is displayed for AUTO SETUP" on the environment of your listening room, the beam angle of the subwoofer and run the procedure again from step 3. ~UTO SETUP COMPLETE Your YSP unit Ma~ not be set -up , Flashes ~UTO SETUP COMPLETE Please reMove the MIC froM tphoesiYtiSoPna, nd... to the same value even if "5 BEAM" is displayed as a result. Press ENTER to this case, see step 9. If "SUBWOOFER : NOT APPLICABLE" is displayed even though a subwoofer is connected to exit AUTO SETUP and then run the AUTO SETUP procedure again. ENVIRONMENT CHECK[F~ILEDJ BE~M MODE :5 BE...
Owners Manual
Page 65
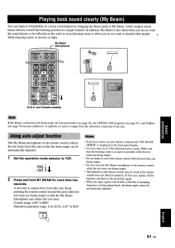
.... In addition, My Beam is also ideal when you do not want the sound beams to be automatically adjusted. 1 Set the operation mode selector to YSP. 2 Press and hold MY BEAM for more than two seconds. My Beam _ - - - - - US,''' Bulll-adJu,' function The My Beam microphone on the remote... control collects the test tones from the subwoofer connected to this unit so that the beam angle can be reflected on the remote control while the test tones are being output. • Do...
.... In addition, My Beam is also ideal when you do not want the sound beams to be automatically adjusted. 1 Set the operation mode selector to YSP. 2 Press and hold MY BEAM for more than two seconds. My Beam _ - - - - - US,''' Bulll-adJu,' function The My Beam microphone on the remote... control collects the test tones from the subwoofer connected to this unit so that the beam angle can be reflected on the remote control while the test tones are being output. • Do...
Owners Manual
Page 76
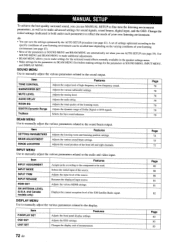
.... Adjusts the various HDMI settings. Item F.DISPLAY SET OSDSET UNIT SET Features Adjusts the front panel display settings. Adjusts the various subwoofer settings. Adjusts the tonal quality of the source. Adjusts the various sound beam settings. Adjusts the sound position of high-frequency or... low-frequency sound. Adjusts the OSD settings. Item TONE CONTROL SUBWOOFER SET MUTE LEVEL AUDIO DELAY ROOM EQ DDIDTS Dynamic Range TruBass Features Adjusts the output level of the front left and right channels....
.... Adjusts the various HDMI settings. Item F.DISPLAY SET OSDSET UNIT SET Features Adjusts the front panel display settings. Adjusts the various subwoofer settings. Adjusts the tonal quality of the source. Adjusts the various sound beam settings. Adjusts the sound position of high-frequency or... low-frequency sound. Adjusts the OSD settings. Item TONE CONTROL SUBWOOFER SET MUTE LEVEL AUDIO DELAY ROOM EQ DDIDTS Dynamic Range TruBass Features Adjusts the output level of the front left and right channels....
Owners Manual
Page 82
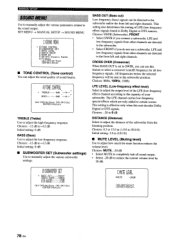
...183;····0dB --~~-- - + BRSS 0dB --~~-- [..J/[TJ:Up/Down [~J/[~J:Sel [ENTERJ:Return TREBLE (Treble) Use to the subwoofer position. LFE and low-frequency signals from the listening position. The LFE channel carries low-frequency special effects which are directed to the...; MUTE LEVEL (Muting level) Use to reduce the current volume level by 20 dB. SET MENU ~ MANUAL SETUP ~ SOUND MENU ~ R)TONE CONTROL B)SUBWOOFER SET C) MUTE LEVEL D)RUDIO DELRY E)ROOM EQ F)DD/DTS DynaMic Range GHruBass ["J/[TJ:Up/Down [ENTERJ:Enter • TONE CONTROL (Tone control) You...
...183;····0dB --~~-- - + BRSS 0dB --~~-- [..J/[TJ:Up/Down [~J/[~J:Sel [ENTERJ:Return TREBLE (Treble) Use to the subwoofer position. LFE and low-frequency signals from the listening position. The LFE channel carries low-frequency special effects which are directed to the...; MUTE LEVEL (Muting level) Use to reduce the current volume level by 20 dB. SET MENU ~ MANUAL SETUP ~ SOUND MENU ~ R)TONE CONTROL B)SUBWOOFER SET C) MUTE LEVEL D)RUDIO DELRY E)ROOM EQ F)DD/DTS DynaMic Range GHruBass ["J/[TJ:Up/Down [ENTERJ:Enter • TONE CONTROL (Tone control) You...
Owners Manual
Page 83
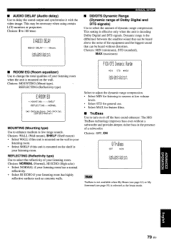
Choices: 0 to delay the sound output and synchronize it with the video image. • AUDIO DELAY (Audio delay) Use to 160 msec D)~UDIO DEL~V RUDIO DELRY·····0Msec [- This may be necessary when using certain LCD monitors or projectors.
Choices: 0 to delay the sound output and synchronize it with the video image. • AUDIO DELAY (Audio delay) Use to 160 msec D)~UDIO DEL~V RUDIO DELRY·····0Msec [- This may be necessary when using certain LCD monitors or projectors.
Owners Manual
Page 88
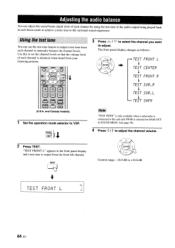
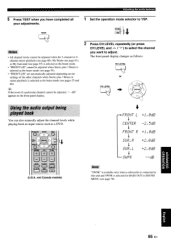
Adjusting the audio balance You can use the test tone feature to output a test tone from your listening position. Use this to -life surround sound experience. Using the test tone You can adjust the sound beam output level of each channel by using the test tone or the audio output being played back in each beam mode to achieve a more true-to set the channel levels so that the volume level of each channel is identical when heard from each channel to manually balance the channel levels.
Adjusting the audio balance You can use the test tone feature to output a test tone from your listening position. Use this to -life surround sound experience. Using the test tone You can adjust the sound beam output level of each channel by using the test tone or the audio output being played back in each beam mode to achieve a more true-to set the channel levels so that the volume level of each channel is identical when heard from each channel to manually balance the channel levels.
Owners Manual
Page 89
.... • "FRONT UR" cannot be adjusted, "- - Adjusting the audio balance 5 Press TEST when you have completed all your adjustments. 1 Set the operation mode selector to YSP.
.... • "FRONT UR" cannot be adjusted, "- - Adjusting the audio balance 5 Press TEST when you have completed all your adjustments. 1 Set the operation mode selector to YSP.
Owners Manual
Page 107
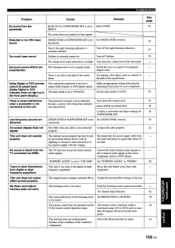
...off the night listening enhancers. The listening room is set Set CROSS OVER correctly. There Is noise Interference when a subwoofer Is not connected to "YSP-3000". Low-frequency sounds are insubstantial. incorrectly. On-screen display does not appear. Disconnect the AC power supply cable ...via HDMI. The original source includes surround effects. The sound reflectivity of the connected components. The volume level of the subwoofer is set to this unit. Make an appropriate setting following the operating instructions for BASS OUT. Thm down the volume ...
...off the night listening enhancers. The listening room is set Set CROSS OVER correctly. There Is noise Interference when a subwoofer Is not connected to "YSP-3000". Low-frequency sounds are insubstantial. incorrectly. On-screen display does not appear. Disconnect the AC power supply cable ...via HDMI. The original source includes surround effects. The sound reflectivity of the connected components. The volume level of the subwoofer is set to this unit. Make an appropriate setting following the operating instructions for BASS OUT. Thm down the volume ...
Owners Manual
Page 109
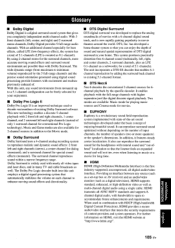
... channels, 1 center channel, and 2 surround left , center, and right) and 2 surround stereo channels, Dolby Digital provides 5 full-range audio channels. I -channels (LFE is counted as a subwoofer, for movies. • EUPHONY Euphony is a revolutionary sound field reproduction system implemented with state-of-the-art sound technologies developed under the basic concept of...
... channels, 1 center channel, and 2 surround left , center, and right) and 2 surround stereo channels, Dolby Digital provides 5 full-range audio channels. I -channels (LFE is counted as a subwoofer, for movies. • EUPHONY Euphony is a revolutionary sound field reproduction system implemented with state-of-the-art sound technologies developed under the basic concept of...
Owners Manual
Page 112
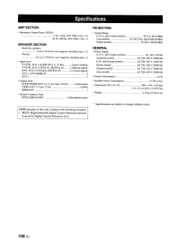
... IN DVD, AUX 2 COAXIAL DIGITAL IN AUX I, DVD HOMI IN AUX3 2 pairs (Analog) 2 (Optical digital) 2 (Coaxial digital) 2 1 • Output Jacks SUBWOOFER OUT (1.5 V, less than 120 Hz) VIDEO OUT (l Vp-p, 75 0) HDMIOUT I (Subwoofer) 1 (OSD) 1 • System Connector Jack INTELLIBEAM MIC 1 (Microphone input) FMSECTION • Tuning Range [U.S.A. and Canada models] [Australia model] [U.K. speakers 4 cm...
... IN DVD, AUX 2 COAXIAL DIGITAL IN AUX I, DVD HOMI IN AUX3 2 pairs (Analog) 2 (Optical digital) 2 (Coaxial digital) 2 1 • Output Jacks SUBWOOFER OUT (1.5 V, less than 120 Hz) VIDEO OUT (l Vp-p, 75 0) HDMIOUT I (Subwoofer) 1 (OSD) 1 • System Connector Jack INTELLIBEAM MIC 1 (Microphone input) FMSECTION • Tuning Range [U.S.A. and Canada models] [Australia model] [U.K. speakers 4 cm...

