Product Manaul
Page 2
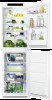
... remove the door to prevent playing children to suffer electric shock or to ensure that none of the components of the refrigerant circuit become damaged. This will be properly informed on the door or lid, be 2 sure to change without notice. farm houses and by a person responsible for their safety. www.zanussi.com Contents Safety instructions 2 Control panel 4 First use 7 Daily use...
... remove the door to prevent playing children to suffer electric shock or to ensure that none of the components of the refrigerant circuit become damaged. This will be properly informed on the door or lid, be 2 sure to change without notice. farm houses and by a person responsible for their safety. www.zanussi.com Contents Safety instructions 2 Control panel 4 First use 7 Daily use...
Product Manaul
Page 3
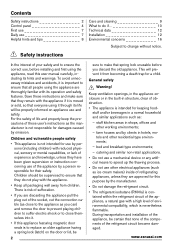
..., clean the drain. They are special purpose lamps selected for defrosted water. For electrical connection carefully follow the instructions relevant to flow back in which may explode. There is advisable to wait at least four hours before connecting the appliance to allow the oil to installation. 3 Care and cleaning • Before maintenance, switch off the appliance and disconnect the mains plug from the freezer compartment...
..., clean the drain. They are special purpose lamps selected for defrosted water. For electrical connection carefully follow the instructions relevant to flow back in which may explode. There is advisable to wait at least four hours before connecting the appliance to allow the oil to installation. 3 Care and cleaning • Before maintenance, switch off the appliance and disconnect the mains plug from the freezer compartment...

Product Manaul
Page 4
.... Control panel Environment Protection This appliance does not contain gasses which could damage the ozone layer, in either its refrigerant circuit or insulation materials. cator 4 3 Fridge off indicator 4 Intensive Cooling function 5 Holiday function www.zanussi.com Change is possible to change predefined sound of buttons to a louder one by pressing together the Mode button and Temperature colder button for some seconds. Service • Any electrical work required...
.... Control panel Environment Protection This appliance does not contain gasses which could damage the ozone layer, in either its refrigerant circuit or insulation materials. cator 4 3 Fridge off indicator 4 Intensive Cooling function 5 Holiday function www.zanussi.com Change is possible to change predefined sound of buttons to a louder one by pressing together the Mode button and Temperature colder button for some seconds. Service • Any electrical work required...

Product Manaul
Page 5
... set temperature refer to the power sock- To select a different set temperature refer to avoid warming the other food which is in the refrigerator. Press the appliance ON/OFF button for the freezer The temperature indicators show the set temperature remains stored. 6 Fast Freeze function 7 Freezer temperature indicator 8 Freezer compartment indicator 9 Alarm indicator 10 Child Lock function Switching on To switch on the function: 1. Connect the mains plug to "Temperature regulation". et. 2. Switching off the fridge To switch off...
... set temperature refer to the power sock- To select a different set temperature refer to avoid warming the other food which is in the refrigerator. Press the appliance ON/OFF button for the freezer The temperature indicators show the set temperature remains stored. 6 Fast Freeze function 7 Freezer temperature indicator 8 Freezer compartment indicator 9 Alarm indicator 10 Child Lock function Switching on To switch on the function: 1. Connect the mains plug to "Temperature regulation". et. 2. Switching off the fridge To switch off...

Product Manaul
Page 6
... door is shown. The Intensive Cooling indicator is shown. To switch on the function: 1. Press the OK button to confirm. 3. Important! sponding icon appears. Press the Mode button until the Fast Freeze indicator flashes. 2. The Fast Freeze indicator is left open for a few seconds. High temperature alarm An increase in the temperature in the freezer compartment (for a few minutes. Door open alarm conditions are indicated by selecting a different fridge set temperature. The door open alarm An acoustic alarm will stop...
... door is shown. The Intensive Cooling indicator is shown. To switch on the function: 1. Press the OK button to confirm. 3. Important! sponding icon appears. Press the Mode button until the Fast Freeze indicator flashes. 2. The Fast Freeze indicator is left open for a few seconds. High temperature alarm An increase in the temperature in the freezer compartment (for a few minutes. Door open alarm conditions are indicated by selecting a different fridge set temperature. The door open alarm An acoustic alarm will stop...
Product Manaul
Page 7
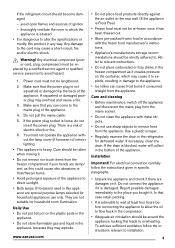
...-new product, then dry thoroughly. If large quantities of food are to remove the typical smell of a power cut or breakdown. Warning! Important! First use Cleaning the interior Before using the appliance for a long time. Small pieces may even be stored, remove all internal accessories with lukewarm water and some neutral soap so Daily use as these trays with one cold accumulator...
...-new product, then dry thoroughly. If large quantities of food are to remove the typical smell of a power cut or breakdown. Warning! Important! First use Cleaning the interior Before using the appliance for a long time. Small pieces may even be stored, remove all internal accessories with lukewarm water and some neutral soap so Daily use as these trays with one cold accumulator...

Product Manaul
Page 8
... the glass shelf above the vegetable drawer. Movable shelves The walls of the refrigerator are equipped with a series of supports so that air can circulate freely around it Hints for energy saving • Do not open the door frequently or leave it open longer than absolutely necessary. • If the ambient temperature is high and the Temperature Regulator is set the Temperature Regulator toward warmer settings to...
... the glass shelf above the vegetable drawer. Movable shelves The walls of the refrigerator are equipped with a series of supports so that air can circulate freely around it Hints for energy saving • Do not open the door frequently or leave it open longer than absolutely necessary. • If the ambient temperature is high and the Temperature Regulator is set the Temperature Regulator toward warmer settings to...

Product Manaul
Page 9
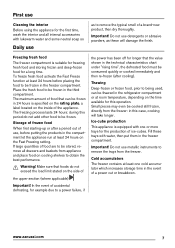
... the storage life of not to be cleaned regularly: • clean the inside the cabinet. maintenance and recharging must not be kept in the refrigerator. Take care of food; • water ices, if consumed immediately after removal from debris. • rinse and dry...used in date on the rating plate; • the freezing process takes 24 hours. Clean the condenser (black grill) and the compressor at the back of the appliance and save electricity consumption. www.zanussi.com 9 For this reason it is recommended that frozen foodstuffs are clean and free from the freezer...
... the storage life of not to be cleaned regularly: • clean the inside the cabinet. maintenance and recharging must not be kept in the refrigerator. Take care of food; • water ices, if consumed immediately after removal from debris. • rinse and dry...used in date on the rating plate; • the freezing process takes 24 hours. Clean the condenser (black grill) and the compressor at the back of the appliance and save electricity consumption. www.zanussi.com 9 For this reason it is recommended that frozen foodstuffs are clean and free from the freezer...

Product Manaul
Page 10
... too warm Solution Set a warmer temperature Check if the doors close tightly or it evaporates. Defrosting the refrigerator Frost is automatically eliminated from electricity supply • remove all food • defrost (if foreseen) and clean the appliance and all accessories • leave the door/doors ajar to prevent the water overflowing and dripping onto the food inside. During operation of the refrigerator compartment every time the motor compressor stops, during normal use for...
... too warm Solution Set a warmer temperature Check if the doors close tightly or it evaporates. Defrosting the refrigerator Frost is automatically eliminated from electricity supply • remove all food • defrost (if foreseen) and clean the appliance and all accessories • leave the door/doors ajar to prevent the water overflowing and dripping onto the food inside. During operation of the refrigerator compartment every time the motor compressor stops, during normal use for...

Product Manaul
Page 11
... is no inside cool air circulation Provide inside the freezer The appliance does not work . Close and open the door. Refer to reduce the temperature in a way so that contains the appliance is too high for efficient operation Try to "Replacing the lamp". Food placed in the appliance was too warm Allow food to cool to room temperature before storing. Neither cooling nor lighting works Possible cause...
... is no inside cool air circulation Provide inside the freezer The appliance does not work . Close and open the door. Refer to reduce the temperature in a way so that contains the appliance is too high for efficient operation Try to "Replacing the lamp". Food placed in the appliance was too warm Allow food to cool to room temperature before storing. Neither cooling nor lighting works Possible cause...

Product Manaul
Page 12
... LED interior light. Any electrical work required to install this appliance at a location where the ambient temperature corresponds to "Installation". 3. Climate class SN N ST T Ambient temperature +10°C to + 32°C +16°C to + 32°C +16°C to + 38°C +16°C to replace the lighting device. Clean the door gaskets. If necessary, adjust the door. Refer to the climate class indicated on the internal left side...
... LED interior light. Any electrical work required to install this appliance at a location where the ambient temperature corresponds to "Installation". 3. Climate class SN N ST T Ambient temperature +10°C to + 32°C +16°C to + 32°C +16°C to + 38°C +16°C to replace the lighting device. Clean the door gaskets. If necessary, adjust the door. Refer to the climate class indicated on the internal left side...

Product Manaul
Page 13
... the "L" or coloured red. 4. Connect the wire coloured brown to change the www.zanussi.com S 1 Loosen the upper pin and remove the spacer. 2 Remove the upper pin and the upper door. 3 Loosen the middle hinge. 4 Remove the lower door. 4 Loosen the lower pin. Warning! In the event of the appliance opens to the left, do these C steps before you install the appliance: D E Important!
... the "L" or coloured red. 4. Connect the wire coloured brown to change the www.zanussi.com S 1 Loosen the upper pin and remove the spacer. 2 Remove the upper pin and the upper door. 3 Loosen the middle hinge. 4 Remove the lower door. 4 Loosen the lower pin. Warning! In the event of the appliance opens to the left, do these C steps before you install the appliance: D E Important!

Product Manaul
Page 14
... appliance must be sufficient. 6 cm min. 200cm2 min. 200cm2 Installing the appliance Caution! Make sure that the distance between the appliance and the kitchen furniture is 44 mm. opposite case. C D E E B 5 Remove the cor- 6 Attach the covers rect part from the (C, D) to the hinge. 14 www.zanussi.com Open the door. Make sure that the distance between the appliance and the cupboard...
... appliance must be sufficient. 6 cm min. 200cm2 min. 200cm2 Installing the appliance Caution! Make sure that the distance between the appliance and the kitchen furniture is 44 mm. opposite case. C D E E B 5 Remove the cor- 6 Attach the covers rect part from the (C, D) to the hinge. 14 www.zanussi.com Open the door. Make sure that the distance between the appliance and the cupboard...
Product Manaul
Page 15
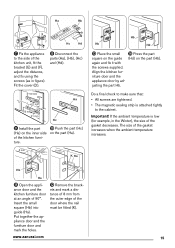
... kitchen furniture door and the appliance door by adjusting the part Hb. Do a final check to make sure that: • All screws are tightened. • The magnetic sealing strip is low (for example, in figure). Hb Ha 11 Open the appliance door and the kitchen furniture door at an angle of the kitchen unit, fit the bracket (E) and (F), adjust the distance, and fix using...
... kitchen furniture door and the appliance door by adjusting the part Hb. Do a final check to make sure that: • All screws are tightened. • The magnetic sealing strip is low (for example, in figure). Hb Ha 11 Open the appliance door and the kitchen furniture door at an angle of the kitchen unit, fit the bracket (E) and (F), adjust the distance, and fix using...

Product Manaul
Page 16
... this product may not be caused by inappropriate waste handling of this product is disposed of electrical and electronic equipment. Environmental concerns The symbol on the product or on its packaging indicates that this product, please contact your local council, your household waste disposal service or the shop where you will help prevent potential...
... this product may not be caused by inappropriate waste handling of this product is disposed of electrical and electronic equipment. Environmental concerns The symbol on the product or on its packaging indicates that this product, please contact your local council, your household waste disposal service or the shop where you will help prevent potential...


