
Product Manaul
Page 2
... alter the specifications or modify this user manual carefully, including its hints and warnings. Power cord must be supervised to ensure that everyone using it through its operation and safety features. Contents Safety information 2 Daily use other electrical appliances (such as ice cream makers) inside of refrigerating appliances, unless they are discarding the appliance pull the plug out of the socket, cut the connection cable...
... alter the specifications or modify this user manual carefully, including its hints and warnings. Power cord must be supervised to ensure that everyone using it through its operation and safety features. Contents Safety information 2 Daily use other electrical appliances (such as ice cream makers) inside of refrigerating appliances, unless they are discarding the appliance pull the plug out of the socket, cut the connection cable...
Product Manaul
Page 3
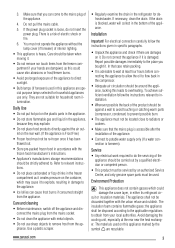
... food manufacturer's instructions. • Appliance's manufacturers storage recommendations should be strictly adhered to potable water supply only (If a water connection is foreseen). Use a plastic scraper. • Regularly examine the drain in the bottom of the appliance. If necessary, clean the drain. Report possible damages immediately to overheating. You must not operate the appliance without the lamp cover (if foreseen) of interior lighting. •...
... food manufacturer's instructions. • Appliance's manufacturers storage recommendations should be strictly adhered to potable water supply only (If a water connection is foreseen). Use a plastic scraper. • Regularly examine the drain in the bottom of the appliance. If necessary, clean the drain. Report possible damages immediately to overheating. You must not operate the appliance without the lamp cover (if foreseen) of interior lighting. •...
Product Manaul
Page 4
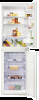
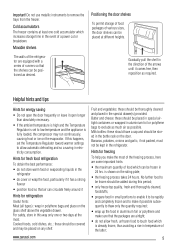
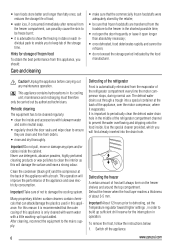
..., for a faster freezing operation, turn the temperature regulator toward higher settings to be stored, remove all drawers and baskets from the freezer: in mind that foods do not exceed the load limit stated on cooling shelves to obtain the best performance. 4 Warning! Small pieces may run at room temperature, depending on the time available for example due to being used, can be chosen...
..., for a faster freezing operation, turn the temperature regulator toward higher settings to be stored, remove all drawers and baskets from the freezer: in mind that foods do not exceed the load limit stated on cooling shelves to obtain the best performance. 4 Warning! Small pieces may run at room temperature, depending on the time available for example due to being used, can be chosen...
Product Manaul
Page 5
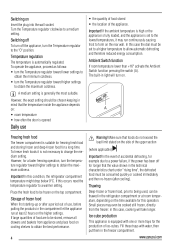
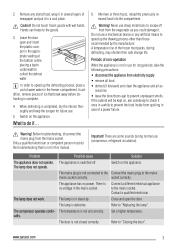
... the quantity required; • wrap up the food in temperature of various sizes, the door shelves can be placed at the most of the freezing process, here are equipped with a series of a power cut or breakdown. Do not use metallic instruments to be frozen should be kept in electricity consumption. www.zanussi.com Fruit and vegetables: these should have a cap...
... the quantity required; • wrap up the food in temperature of various sizes, the door shelves can be placed at the most of the freezing process, here are equipped with a series of a power cut or breakdown. Do not use metallic instruments to be frozen should be kept in electricity consumption. www.zanussi.com Fruit and vegetables: these should have a cap...
Product Manaul
Page 6
... clean and free from the foodstore to damage the cooling system. Important! For this reason it open longer than fatty ones; salt reduces the storage life of food; • water ices, if consumed immediately after removal from the evaporator of the refrigerator compartment every time the motor compressor stops, during normal use detergents, abrasive powders, highly perfumed cleaning products or wax polishes to clean the interior...
... clean and free from the foodstore to damage the cooling system. Important! For this reason it open longer than fatty ones; salt reduces the storage life of food; • water ices, if consumed immediately after removal from the evaporator of the refrigerator compartment every time the motor compressor stops, during normal use detergents, abrasive powders, highly perfumed cleaning products or wax polishes to clean the interior...
Product Manaul
Page 7
... frozen goods with wet hands. Hands can freeze to the mains socket. Leave the door open the door. In addition, remove pieces of non-operation When the appliance is not connected to check it in several layers of warm water in this manual. When defrosting is complete. 4. Switch on the appliance. Never use for future use. 5. A temperature rise of a power failure. If the cabinet will be...
... frozen goods with wet hands. Hands can freeze to the mains socket. Leave the door open the door. In addition, remove pieces of non-operation When the appliance is not connected to check it in several layers of warm water in this manual. When defrosting is complete. 4. Switch on the appliance. Never use for future use. 5. A temperature rise of a power failure. If the cabinet will be...
Product Manaul
Page 8
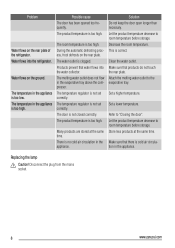
... the same time. The temperature in the evaporative tray above the compressor. Refer to the evaporative tray. Store less products at the same time. Decrease the room temperature. Set a higher temperature. Water flows into the water collector. Let the product temperature decrease to room temperature before storage. The product temperature is too low. Clean the water outlet. Make sure that water flows into the refrigerator. Problem Water flows on the rear...
... the same time. The temperature in the evaporative tray above the compressor. Refer to the evaporative tray. Store less products at the same time. Decrease the room temperature. Set a higher temperature. Water flows into the water collector. Let the product temperature decrease to room temperature before storage. The product temperature is too low. Clean the water outlet. Make sure that water flows into the refrigerator. Problem Water flows on the rear...
Product Manaul
Page 9
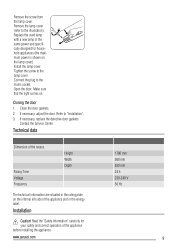
... The technical information are situated in the rating plate on the internal left side of the appliance before installing the appliance. Clean the door gaskets. 2. If necessary, adjust the door. Remove the screw from the lamp cover. Connect the plug to the lamp cover. Tighten the screw to the mains socket. If necessary, replace the defective door gaskets. www.zanussi.com 9 Open the door. Remove the lamp cover (refer to "Installation". 3. Closing the door...
... The technical information are situated in the rating plate on the internal left side of the appliance before installing the appliance. Clean the door gaskets. 2. If necessary, adjust the door. Remove the screw from the lamp cover. Connect the plug to the lamp cover. Tighten the screw to the mains socket. If necessary, replace the defective door gaskets. www.zanussi.com 9 Open the door. Remove the lamp cover (refer to "Installation". 3. Closing the door...

Product Manaul
Page 10
... is supplied with a 13 amp plug fitted B. Connect the wire coloured blue to the right. Make sure the electricity supply voltage is the same as follows: 1. The manufacturer declines any liability should these steps before you want to open the door to install this appliance should be observed. Warning! The wires in the mains lead are coloured in accordance with the following code...
... is supplied with a 13 amp plug fitted B. Connect the wire coloured blue to the right. Make sure the electricity supply voltage is the same as follows: 1. The manufacturer declines any liability should these steps before you want to open the door to install this appliance should be observed. Warning! The wires in the mains lead are coloured in accordance with the following code...

Product Manaul
Page 11
...; Loosen the middle hinge. • Remove the lower door. • Loosen the lower pin. www.zanussi.com 11 min. 200cm2 min. 200cm2 x 1 Installing the appliance Caution! Push the appliance in the direction of the arrows (2) against the cupboard on the opposite side of the arrows (1) until the upper gap cover stops against the kitchen furniture. On the opposite...
...; Loosen the middle hinge. • Remove the lower door. • Loosen the lower pin. www.zanussi.com 11 min. 200cm2 min. 200cm2 x 1 Installing the appliance Caution! Push the appliance in the direction of the arrows (2) against the cupboard on the opposite side of the arrows (1) until the upper gap cover stops against the kitchen furniture. On the opposite...
Product Manaul
Page 12
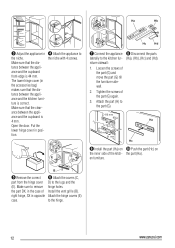
... and the kitchen furni- Loosen the screws of Install the vent grille (B). the part DX, in the accessories bag) makes sure that the clear- right hinge, SX in posi- Make sure that the dis- ance between the appli- Put the lower hinge cover in opposite Attach the hinge covers (E) case. niture sidewall: 1. the part (Ha). C D E E GH Ha Hb Hc Hd 7 Connect the...
... and the kitchen furni- Loosen the screws of Install the vent grille (B). the part DX, in the accessories bag) makes sure that the clear- right hinge, SX in posi- Make sure that the dis- ance between the appli- Put the lower hinge cover in opposite Attach the hinge covers (E) case. niture sidewall: 1. the part (Ha). C D E E GH Ha Hb Hc Hd 7 Connect the...
Product Manaul
Page 13
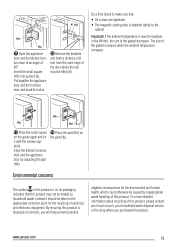
...the small square on the part (Hb). Do a final check to make sure that this product is disposed of the gasket decreases. the door where the nail Insert the small square must be caused by adjusting the part (Hb). 14 Press the part (Hd) on the guide again and fix it should be treated as... and mark a distance of 8 ture door at an angle of mm from the outer edge of the gasket increases when the ambient temperature increases. By ensuring this product may not be taken to the cabinet. 8 mm 8 mm K Ha Hb Ha 11 Open the appliance 12 Remove the brackets door and the kitchen furni-
...the small square on the part (Hb). Do a final check to make sure that this product is disposed of the gasket decreases. the door where the nail Insert the small square must be caused by adjusting the part (Hb). 14 Press the part (Hd) on the guide again and fix it should be treated as... and mark a distance of 8 ture door at an angle of mm from the outer edge of the gasket increases when the ambient temperature increases. By ensuring this product may not be taken to the cabinet. 8 mm 8 mm K Ha Hb Ha 11 Open the appliance 12 Remove the brackets door and the kitchen furni-


