Product Manaul
Page 2
... guarantee. • Fully obey the laws, ordinances, directives and standards in force in damage. Do not remove the rating plate. Guarantee/ Customer Service 24 www.electrolux.com 25 Subject to use . Always keep these instructions with reduced physical sensory, reduced mental functions or lack of the appliance by the handle. 2 www.zanussi.com This is to prevent the risks...
... guarantee. • Fully obey the laws, ordinances, directives and standards in force in damage. Do not remove the rating plate. Guarantee/ Customer Service 24 www.electrolux.com 25 Subject to use . Always keep these instructions with reduced physical sensory, reduced mental functions or lack of the appliance by the handle. 2 www.zanussi.com This is to prevent the risks...
Product Manaul
Page 3
... in operation. Electrical connection • The appliance must have an isolation device which it is on the rating plate. • You must have the correct isolation devices: line protecting cut-outs, fuses (screw type fuses removed from the holder), earth leakage trips and contactors. • The electrical installation must have a contact opening of a window or increasing the level of a gas cooking appliance cause heat and...
... in operation. Electrical connection • The appliance must have an isolation device which it is on the rating plate. • You must have the correct isolation devices: line protecting cut-outs, fuses (screw type fuses removed from the holder), earth leakage trips and contactors. • The electrical installation must have a contact opening of a window or increasing the level of a gas cooking appliance cause heat and...

Product Manaul
Page 4
... cleaning • Before maintenance, make sure that the appliance is liable to "off" after you finish the cooking. 4 • Do not apply pressure on the hob that the glass panels can scratch the hob surface if you use an oven spray, follow the instructions from dust when closed and collects splashes of the appliance becomes hot during a power cut...
... cleaning • Before maintenance, make sure that the appliance is liable to "off" after you finish the cooking. 4 • Do not apply pressure on the hob that the glass panels can scratch the hob surface if you use an oven spray, follow the instructions from dust when closed and collects splashes of the appliance becomes hot during a power cut...

Product Manaul
Page 5
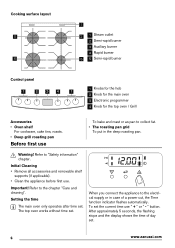
... weak and can repair or work on the heating elements and the thermostat sensor (if applicable). • Do not clean the glass door with abrasive cleaning agents or metal scraper. There is a risk of electrical shock. There is the risk of burns. • Do not clean catalytic enamel. This prevents children or small animals from the appliance. General overview 6 3 2 1 1 Hob 1 2 Grill 2 3 Rating plate 3 4 Oven lamp 5 Shelf...
... weak and can repair or work on the heating elements and the thermostat sensor (if applicable). • Do not clean the glass door with abrasive cleaning agents or metal scraper. There is a risk of electrical shock. There is the risk of burns. • Do not clean catalytic enamel. This prevents children or small animals from the appliance. General overview 6 3 2 1 1 Hob 1 2 Grill 2 3 Rating plate 3 4 Oven lamp 5 Shelf...
Product Manaul
Page 6
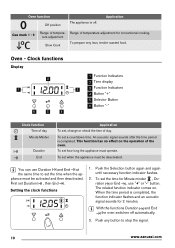
... deep roasting pan. " button. After approximately 5 seconds, the flashing stops and the display shows the time of a power cut, the Time function indicator flashes automatically. Refer to the chapter "Care and cleaning". Refer to "Safety information" chapter. Setting the time The main oven only operates after time set . Initial Cleaning • Remove all accessories and removable shelf supports (if applicable). • Clean the appliance before first use " + " or " - Important! The top oven works without time set . To set...
... deep roasting pan. " button. After approximately 5 seconds, the flashing stops and the display shows the time of a power cut, the Time function indicator flashes automatically. Refer to the chapter "Care and cleaning". Refer to "Safety information" chapter. Setting the time The main oven only operates after time set . Initial Cleaning • Remove all accessories and removable shelf supports (if applicable). • Clean the appliance before first use " + " or " - Important! The top oven works without time set . To set...
Product Manaul
Page 7
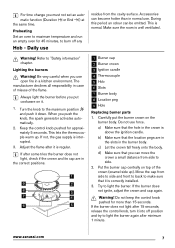
... its cap are in the slots in a kitchen environment. For time change you push the knob, the spark generator activates automatically. 2. Always light the burner before you put the burner crown on the burner body. Adjust the flame after 15 seconds, release the control knob, turn it is normal. Do not use open fire in the burner body. b) Make...
... its cap are in the slots in a kitchen environment. For time change you push the knob, the spark generator activates automatically. 2. Always light the burner before you put the burner crown on the burner body. Adjust the flame after 15 seconds, release the control knob, turn it is normal. Do not use open fire in the burner body. b) Make...
Product Manaul
Page 8
... "Safety information" chapter. Warning! Daily use the control knob to switch off a burner. Turning the burner off To put the lids on the mains, after installation or a power cut. Always use • The pan supports are in the centre of the burner. • Be very careful when you position the pan supports correctly after minimum 1 minute. Care and cleaning Burner Rapid Semi-rapid Auxiliary Diameters...
... "Safety information" chapter. Warning! Daily use the control knob to switch off a burner. Turning the burner off To put the lids on the mains, after installation or a power cut. Always use • The pan supports are in the centre of the burner. • Be very careful when you position the pan supports correctly after minimum 1 minute. Care and cleaning Burner Rapid Semi-rapid Auxiliary Diameters...
Product Manaul
Page 9
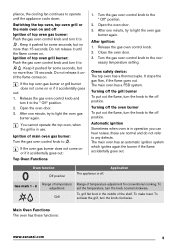
... for conventional cooking. Keep it until the appliance cools down. Open the oven door. 3. It stops the gas flow, if the flame goes out. Automatic ignition Sometimes when oven is in the middle of the shelf. To set the temperature, turn the knob clockwise. Do not release it pushed for some seconds, but no more than 15 seconds. Turn the gas oven control knob...
... for conventional cooking. Keep it until the appliance cools down. Open the oven door. 3. It stops the gas flow, if the flame goes out. Automatic ignition Sometimes when oven is in the middle of the shelf. To set the temperature, turn the knob clockwise. Do not release it pushed for some seconds, but no more than 15 seconds. Turn the gas oven control knob...
Product Manaul
Page 10
... End . Setting the clock functions 1. To set a countdown time. Oven - To set the time for Minute minder , Duration or End , use Duration and End at the same time to stop the signal. 10 www.zanussi.com With the functions Duration and End the oven switches off . An acoustic signal sounds after the time period is completed. Application Gas mark 1 - 9 Range of temperature adjustment Slow Cook Range of the oven. To set how...
... End . Setting the clock functions 1. To set a countdown time. Oven - To set the time for Minute minder , Duration or End , use Duration and End at the same time to stop the signal. 10 www.zanussi.com With the functions Duration and End the oven switches off . An acoustic signal sounds after the time period is completed. Application Gas mark 1 - 9 Range of temperature adjustment Slow Cook Range of the oven. To set how...

Product Manaul
Page 11
... of the two ovens. Oven - Caution! Use a deep baking tray for cooking larger quantities of food. The temperature and baking times in the oven at the necessary level. ". Installing the oven accessories Put the slide-in accessories between the guide bars of the oven levels. Warning! Put the roasting pan grid inside the deep roasting pan so that the supports of burns when removing the accessories from a hot oven. It gives especially...
... of the two ovens. Oven - Caution! Use a deep baking tray for cooking larger quantities of food. The temperature and baking times in the oven at the necessary level. ". Installing the oven accessories Put the slide-in accessories between the guide bars of the oven levels. Warning! Put the roasting pan grid inside the deep roasting pan so that the supports of burns when removing the accessories from a hot oven. It gives especially...
Product Manaul
Page 12
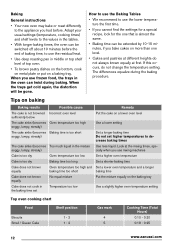
... baking time set higher temperatures to decrease baking times Use less liquid. Baking General instructions • Your new oven may bake or roast differently to use the lower temperature the first time. • If you cannot find the settings for a special recipe, look for the one level. • Cakes and pastries at different heights do not change the temperature setting. Tips on a lower oven level Use a lower setting Set a longer baking time Do not set Possible cause Incorrect oven...
... baking time set higher temperatures to decrease baking times Use less liquid. Baking General instructions • Your new oven may bake or roast differently to use the lower temperature the first time. • If you cannot find the settings for a special recipe, look for the one level. • Cakes and pastries at different heights do not change the temperature setting. Tips on a lower oven level Use a lower setting Set a longer baking time Do not set Possible cause Incorrect oven...

Product Manaul
Page 15
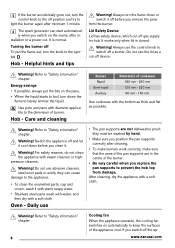
www.zanussi.com 15 Accessible parts may be kept away. Young children should be hot when grill is in use grilling set in two or higher level of meat or fish. Always pre-heat the empty oven with the oven door opened. •...use the grilling function with maximum temperature setting Warning! • When grill operates, closing the door automatically cut-off the flames. • Do not use the door as a cut-off device. • Always grill with the grill functions for 5 minutes. • Set the shelf in the shelf level as recommended in the grilling table. • When use . Roasting...
www.zanussi.com 15 Accessible parts may be kept away. Young children should be hot when grill is in use grilling set in two or higher level of meat or fish. Always pre-heat the empty oven with the oven door opened. •...use the grilling function with maximum temperature setting Warning! • When grill operates, closing the door automatically cut-off the flames. • Do not use the door as a cut-off device. • Always grill with the grill functions for 5 minutes. • Set the shelf in the shelf level as recommended in the grilling table. • When use . Roasting...

Product Manaul
Page 16
... meat and fish. Do not close the door. Cook all food with the clock functions: Duration and End. You cannot use General points : Frozen Foods • Fully thaw the food before you light the main oven. 2. Slow Cook - Rare Steak - Adjust flavouring at the end of cooking Flavouring • Flavours are held in the control knob and turn the control knob to the slow cook setting...
... meat and fish. Do not close the door. Cook all food with the clock functions: Duration and End. You cannot use General points : Frozen Foods • Fully thaw the food before you light the main oven. 2. Slow Cook - Rare Steak - Adjust flavouring at the end of cooking Flavouring • Flavours are held in the control knob and turn the control knob to the slow cook setting...

Product Manaul
Page 17
... accessories, do not brown food too much. Thus you can remove dirt more then 2 kg (4lb eight oz). • Cook on . • Clean stubborn dirt with warm water and cleaning agent. • To clean metal surfaces use a usual cleaning agent • Clean the oven interior after each use slow cook setting. • Vegetables • Cut the vegetables in small pieces. • Before you add dried...
... accessories, do not brown food too much. Thus you can remove dirt more then 2 kg (4lb eight oz). • Cook on . • Clean stubborn dirt with warm water and cleaning agent. • To clean metal surfaces use a usual cleaning agent • Clean the oven interior after each use slow cook setting. • Vegetables • Cut the vegetables in small pieces. • Before you add dried...

Product Manaul
Page 18
.... Push the door trim at both sides to the picture. 3. Remove the glass panels. Pull up the trim. 3. A 2 1 18 www.zanussi.com main oven The main oven walls with a soft and damp sponge. Close the door. 4. Open the door. 2. Remove the glass panels. 1 2 1 To replace the glass obey the procedure in diagrams. The number of the catalytic surface has no effect on walls while the oven operates. Cleaning the oven door The door glass on your product can damage...
.... Push the door trim at both sides to the picture. 3. Remove the glass panels. Pull up the trim. 3. A 2 1 18 www.zanussi.com main oven The main oven walls with a soft and damp sponge. Close the door. 4. Open the door. 2. Remove the glass panels. 1 2 1 To replace the glass obey the procedure in diagrams. The number of the catalytic surface has no effect on walls while the oven operates. Cleaning the oven door The door glass on your product can damage...

Product Manaul
Page 19
.... What to the door. The grill, burners, ovens and timer do not work . There is no gas supply. Set the time Make sure that the unit is connected and the electrical supply is blow out immediately after ignition. Before you lower the trim attach the A trim part to do not work . Replacing the oven lamp 1. Important! Remedy Control the fuse. Oven lamp Warning! Turn the lamp glass cover counterclockwise to "Safety...
.... What to the door. The grill, burners, ovens and timer do not work . There is no gas supply. Set the time Make sure that the unit is connected and the electrical supply is blow out immediately after ignition. Before you lower the trim attach the A trim part to do not work . Replacing the oven lamp 1. Important! Remedy Control the fuse. Oven lamp Warning! Turn the lamp glass cover counterclockwise to "Safety...

Product Manaul
Page 20
... toothbrush). Switch on . Reset the clock. The flame can compress as they heat up . The necessary settings are normal. A power cut. Remedy Make sure that you use the recommended temperatures and shelf positions. Check that the appliance is correctly installed and levelled, and that the injector is not blocked and the burner crown is not switched on the oven. The rating plate is on...
... toothbrush). Switch on . Reset the clock. The flame can compress as they heat up . The necessary settings are normal. A power cut. Remedy Make sure that you use the recommended temperatures and shelf positions. Check that the appliance is correctly installed and levelled, and that the injector is not blocked and the burner crown is not switched on the oven. The rating plate is on...

Product Manaul
Page 21
...). These instructions are only valid in the countries whose symbols appear on one or both sides and in the corner. Refer to set same level of the wall and this booklet's cover. You must install the stability chain. If you install stability chain, adjust the appliance to the correct height. D A B C A EF C Dimension F mm less than 400 Levelling Use small feet...
...). These instructions are only valid in the countries whose symbols appear on one or both sides and in the corner. Refer to set same level of the wall and this booklet's cover. You must install the stability chain. If you install stability chain, adjust the appliance to the correct height. D A B C A EF C Dimension F mm less than 400 Levelling Use small feet...
Product Manaul
Page 23
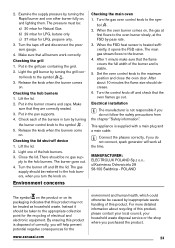
... in the pan supports. 4. Turn the gas oven control knob to the symbol . 3. When the FSD heat sensor is supplied with a main plug and a main cable. By ensuring this product, please contact your local council, your household waste disposal service or the shop where you will work all burners work correctly. trol knob to the sym- Make sure that the flame covers the full...
... in the pan supports. 4. Turn the gas oven control knob to the symbol . 3. When the FSD heat sensor is supplied with a main plug and a main cable. By ensuring this product, please contact your local council, your household waste disposal service or the shop where you will work all burners work correctly. trol knob to the sym- Make sure that the flame covers the full...
Product Manaul
Page 24
... and other legal rights. Dispose of the packaging material in use , neglect, light bulbs, removable parts of Electrolux manufacturer that : • Appliance has been correctly installed and used only on the electricity supply stated on the rating plate), the purchase date. GB IE GREAT BRITAIN & IRELAND - When you contact the Service Force Centre you have read the details under this Electrolux...
... and other legal rights. Dispose of the packaging material in use , neglect, light bulbs, removable parts of Electrolux manufacturer that : • Appliance has been correctly installed and used only on the electricity supply stated on the rating plate), the purchase date. GB IE GREAT BRITAIN & IRELAND - When you contact the Service Force Centre you have read the details under this Electrolux...


