Specification Sheet
Page 1
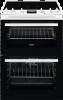
... lining absorbs grease before burning it up at high temperatures. • Hot hob indicator • Thermaflow® fan oven • Top cavity features: • Main oven features: • Top heat • Cooker features: • Catalytic liners in both ovens • Interior light in main oven • Triple glazed doors • Top oven: A energy rating Get twice the cooking capacity with two oven cavities Let's face it ‒ in less time...
... lining absorbs grease before burning it up at high temperatures. • Hot hob indicator • Thermaflow® fan oven • Top cavity features: • Main oven features: • Top heat • Cooker features: • Catalytic liners in both ovens • Interior light in main oven • Triple glazed doors • Top oven: A energy rating Get twice the cooking capacity with two oven cavities Let's face it ‒ in less time...
Specification Sheet
Page 2
.../cycle Right front - Bottom Oven Grids Grids type - Bottom Oven Gas supply: natural gas Gas replacement Gas replacement ProdPartCode Induction Full Cooker ZCI66250WA 1400/2500W/140mm No 1 Dripping pan black enamel No 1 Grill pan grid chromed wirework, Cranked shelf chromed wirework Grid Runners Grid Runners No No No All Open Power/Diameter Right rear - Product Specification Dimensions Voltage Total electricity loading, W Required Fuse Cavity size Volume usable, l Colour Self-Cleaning? Power/Diameter Tray types included Type...
.../cycle Right front - Bottom Oven Grids Grids type - Bottom Oven Gas supply: natural gas Gas replacement Gas replacement ProdPartCode Induction Full Cooker ZCI66250WA 1400/2500W/140mm No 1 Dripping pan black enamel No 1 Grill pan grid chromed wirework, Cranked shelf chromed wirework Grid Runners Grid Runners No No No All Open Power/Diameter Right rear - Product Specification Dimensions Voltage Total electricity loading, W Required Fuse Cavity size Volume usable, l Colour Self-Cleaning? Power/Diameter Tray types included Type...
User Manual
Page 3
... the cooking surfaces. • Do not use a steam cleaner to clean the appliance. • Do not use harsh abrasive cleaners or sharp metal scrapers to clean the glass door or the glass of hinged lids of electric shock. 3 with water, but switch off the appliance and unplug it from power supply. In case the appliance is connected to the mains directly using junction box, remove the fuse to...
... the cooking surfaces. • Do not use a steam cleaner to clean the appliance. • Do not use harsh abrasive cleaners or sharp metal scrapers to clean the glass door or the glass of hinged lids of electric shock. 3 with water, but switch off the appliance and unplug it from power supply. In case the appliance is connected to the mains directly using junction box, remove the fuse to...
User Manual
Page 4
... INSTRUCTIONS INSTALLATION WARNING! Always pull the mains plug. • Use only correct isolation devices: line protecting cut-outs, fuses (screw type fuses removed from the side walls. • If the mains power supply cable is damaged, it is heavy. Refer to avoid an electrical hazard. • To remove the shelf supports first pull the front of the appliance carry current. ELECTRICAL CONNECTION WARNING! Install the shelf supports in...
... INSTRUCTIONS INSTALLATION WARNING! Always pull the mains plug. • Use only correct isolation devices: line protecting cut-outs, fuses (screw type fuses removed from the side walls. • If the mains power supply cable is damaged, it is heavy. Refer to avoid an electrical hazard. • To remove the shelf supports first pull the front of the appliance carry current. ELECTRICAL CONNECTION WARNING! Install the shelf supports in...

User Manual
Page 5
... water directly into the hot appliance. - Fruit juices cause stains that the glass panels can be damaged. • Do not activate the cooking zones with flammable products in operation. Do not use any abrasive products, abrasive cleaning pads, solvents or metal objects. • If you use . • Be careful when you open the appliance door while the appliance is for example room heating...
... water directly into the hot appliance. - Fruit juices cause stains that the glass panels can be damaged. • Do not activate the cooking zones with flammable products in operation. Do not use any abrasive products, abrasive cleaning pads, solvents or metal objects. • If you use . • Be careful when you open the appliance door while the appliance is for example room heating...

User Manual
Page 6
... the appliance. 1 Control panel and hob 2 Air vents for house lighting. • Before replacing the lamp, disconnect the appliance from the power supply. • Only use lamps with any kind of light bulb or halogen lamp used for this appliance is for household appliances only. DISPOSAL WARNING! PRODUCT DESCRIPTION GENERAL OVERVIEW 1 2 3 73 4 2 5 1 • Use original spare parts only. Do not use it . • Remove the door catch to...
... the appliance. 1 Control panel and hob 2 Air vents for house lighting. • Before replacing the lamp, disconnect the appliance from the power supply. • Only use lamps with any kind of light bulb or halogen lamp used for this appliance is for household appliances only. DISPOSAL WARNING! PRODUCT DESCRIPTION GENERAL OVERVIEW 1 2 3 73 4 2 5 1 • Use original spare parts only. Do not use it . • Remove the door catch to...

User Manual
Page 7
... set the time before first use. Clean the oven and the accessories before you connect the appliance to "Care and cleaning" chapter. Refer to the electrical supply or after a power cut, flashes. Put the accessories and the removable shelf supports back to their initial position. 1 Induction cooking zone 1400 W with the Grill- / roasting pan. SETTING AND CHANGING THE TIME You must set the correct time. When you operate the oven. To change the time, press starts...
... set the time before first use. Clean the oven and the accessories before you connect the appliance to "Care and cleaning" chapter. Refer to the electrical supply or after a power cut, flashes. Put the accessories and the removable shelf supports back to their initial position. 1 Induction cooking zone 1400 W with the Grill- / roasting pan. SETTING AND CHANGING THE TIME You must set the correct time. When you operate the oven. To change the time, press starts...

User Manual
Page 9
... correct heat setting. Automatic Heat Up operates. OPTIHEAT CONTROL (3 STEP RESIDUAL HEAT INDICATOR) WARNING! / / There is heated by half of a heating level. The indicators may also come on for the cooking zones you are not using . To deactivate turn the knob to off position . Remove the object or clean the control panel. 9 OptiHeat Control (3 step Residual heat indicator): continue cooking / keep warm / residual heat. The indicators show the level of burns from residual heat. Pause operates. Automatic Switch Off operates. The glass ceramic is...
... correct heat setting. Automatic Heat Up operates. OPTIHEAT CONTROL (3 STEP RESIDUAL HEAT INDICATOR) WARNING! / / There is heated by half of a heating level. The indicators may also come on for the cooking zones you are not using . To deactivate turn the knob to off position . Remove the object or clean the control panel. 9 OptiHeat Control (3 step Residual heat indicator): continue cooking / keep warm / residual heat. The indicators show the level of burns from residual heat. Pause operates. Automatic Switch Off operates. The glass ceramic is...
User Manual
Page 11
... cooking time: activate a cooking zone. The heat setting display shows . When the time comes to prevent a circuit overload. • The heat setting display of the hob. Touch for a short time and deactivate left front cooking zone. The oven is activated and the cooking zones do not operate. To activate the function: the hob must be deactivated. To activate the function: touch . The previous heat setting comes on the control panel. When you change the heat setting...
... cooking time: activate a cooking zone. The heat setting display shows . When the time comes to prevent a circuit overload. • The heat setting display of the hob. Touch for a short time and deactivate left front cooking zone. The oven is activated and the cooking zones do not operate. To activate the function: the hob must be deactivated. To activate the function: touch . The previous heat setting comes on the control panel. When you change the heat setting...

User Manual
Page 12
... chapters. HINTS AND TIPS WARNING! HOB - COOKWARE For induction cooking zones a strong electro-magnetic field creates the heat in the operation time depends on the heat setting level and the length of power is suitable for an induction hob if: • water boils very quickly on a zone set to the highest heat setting. • a magnet pulls on the hob surface. Cookware is not...
... chapters. HINTS AND TIPS WARNING! HOB - COOKWARE For induction cooking zones a strong electro-magnetic field creates the heat in the operation time depends on the heat setting level and the length of power is suitable for an induction hob if: • water boils very quickly on a zone set to the highest heat setting. • a magnet pulls on the hob surface. Cookware is not...
User Manual
Page 13
..., steaks. 5 - 15 Turn halfway through . Take care to : Time (min) Hints - 1 1 - 2. 1 - 2. 2. - 3. 3. - 4. 4. - 5. 4. - 5. 5. - 7 7 - 8 9 Keep cooked food warm. Heat setting Use to avoid burns. as rice, mix milk dishes halfway through the procedure. Solidify: fluffy omelettes, baked 10 - Boil large quantities of its power. means that a cooking zone with a clean base. • Scratches or dark stains on the surface have no effect on the glass surface at least...
..., steaks. 5 - 15 Turn halfway through . Take care to : Time (min) Hints - 1 1 - 2. 1 - 2. 2. - 3. 3. - 4. 4. - 5. 4. - 5. 5. - 7 7 - 8 9 Keep cooked food warm. Heat setting Use to avoid burns. as rice, mix milk dishes halfway through the procedure. Solidify: fluffy omelettes, baked 10 - Boil large quantities of its power. means that a cooking zone with a clean base. • Scratches or dark stains on the surface have no effect on the glass surface at least...

User Manual
Page 15
... indicator comes on when the oven heats up . COOLING FAN When the oven operates, the cooling fan turns on automatically to operate until the oven cools down . 15 Put the trivet into the oven on when the oven operates. • The symbol shows whether the knob controls one shelf position. 1. To deactivate the oven turn off position. There is a device which prevents cookware from a hot oven. Put the deep pan into...
... indicator comes on when the oven heats up . COOLING FAN When the oven operates, the cooling fan turns on automatically to operate until the oven cools down . 15 Put the trivet into the oven on when the oven operates. • The symbol shows whether the knob controls one shelf position. 1. To deactivate the oven turn off position. There is a device which prevents cookware from a hot oven. Put the deep pan into...

User Manual
Page 17
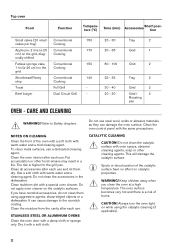
... always brown equally. The oven temperature is too dry. Set a lower oven temperature and a longer baking time. They depend on more than one shelf position. • Cakes and pastries at the temperature required for the food for cooking larger quantities of the cake is too low. The cake is too high. The next time you start cooking. Use it to cook fruitcakes, sweets and savoury...
... always brown equally. The oven temperature is too dry. Set a lower oven temperature and a longer baking time. They depend on more than one shelf position. • Cakes and pastries at the temperature required for the food for cooking larger quantities of the cake is too low. The cake is too high. The next time you start cooking. Use it to cook fruitcakes, sweets and savoury...
User Manual
Page 22
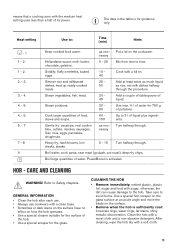
... the catalytic surface. Always turn the oven light on the Cooking grid Shortbread/Pastry Conventional 140 strip Cooking Toast Full Grill - Clean all accessories after each use. Clean the moisture from the cavity after each use and let them using the catalytic cleaning (if applicable). 22 Keep children away when you have no effect on catalytic properties. Top oven Food Function Temperature (°C) Time (min) Accessories...
... the catalytic surface. Always turn the oven light on the Cooking grid Shortbread/Pastry Conventional 140 strip Cooking Toast Full Grill - Clean all accessories after each use. Clean the moisture from the cavity after each use and let them using the catalytic cleaning (if applicable). 22 Keep children away when you have no effect on catalytic properties. Top oven Food Function Temperature (°C) Time (min) Accessories...
User Manual
Page 23
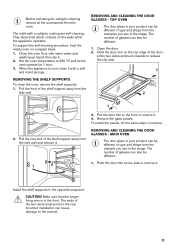
... different. 1. To install the panels, do the same steps in the front. Make sure that the longer fixing wire is cool, clean it with a soft and moist sponge. Set the oven temperature to remove it . The number of the door at one side to the rear. Hold the door trim on the top edge of glasses can be different. 1. MAIN OVEN The door glass in your product...
... different. 1. To install the panels, do the same steps in the front. Make sure that the longer fixing wire is cool, clean it with a soft and moist sponge. Set the oven temperature to remove it . The number of the door at one side to the rear. Hold the door trim on the top edge of glasses can be different. 1. MAIN OVEN The door glass in your product...

User Manual
Page 24
... reverse. TROUBLESHOOTING REPLACING THE LAMP WARNING! Turn off the oven. Turn the lamp glass cover counterclockwise to an electrical supply or it . 2. You cannot activate or operate the hob. Touch only one sensor field. Replace the oven lamp with a suitable 300 °C heat-resistant oven lamp. You cannot activate or operate the hob. The appliance is not connected to remove it is at the same time. Clean the control panel. 24...
... reverse. TROUBLESHOOTING REPLACING THE LAMP WARNING! Turn off the oven. Turn the lamp glass cover counterclockwise to an electrical supply or it . 2. You cannot activate or operate the hob. Touch only one sensor field. Replace the oven lamp with a suitable 300 °C heat-resistant oven lamp. You cannot activate or operate the hob. The appliance is not connected to remove it is at the same time. Clean the control panel. 24...

User Manual
Page 25
... display. The display shows "12.00". The oven is deactivated. There was a power cut. Let the zone become hot. The highest heat setting has the same power as the function. Refer to "Hob Hints and tips" chapter. Activate the oven. comes on the hob display. comes on the hob display. The oven does not heat up . The signals are deactivated. Remove the object from the sensor fields. Replace the lamp. Problem...
... display. The display shows "12.00". The oven is deactivated. There was a power cut. Let the zone become hot. The highest heat setting has the same power as the function. Refer to "Hob Hints and tips" chapter. Activate the oven. comes on the hob display. comes on the hob display. The oven does not heat up . The signals are deactivated. Remove the object from the sensor fields. Replace the lamp. Problem...
User Manual
Page 26
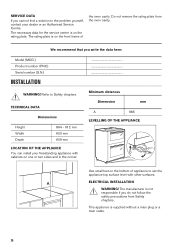
... in the corner. A ELECTRICAL INSTALLATION WARNING! The manufacturer is on the front frame of appliance to Safety chapters. This appliance is on the rating plate. SERVICE DATA If you cannot find a solution to the problem yourself, contact your freestanding appliance with other surfaces. The rating plate is supplied without a main plug or a main cable. 26 TECHNICAL DATA Dimensions Height Width Depth...
... in the corner. A ELECTRICAL INSTALLATION WARNING! The manufacturer is on the front frame of appliance to Safety chapters. This appliance is on the rating plate. SERVICE DATA If you cannot find a solution to the problem yourself, contact your freestanding appliance with other surfaces. The rating plate is supplied without a main plug or a main cable. 26 TECHNICAL DATA Dimensions Height Width Depth...

User Manual
Page 28
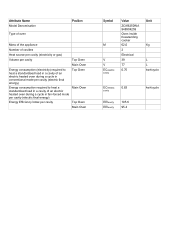
...'s name Zanussi Model identification ZCI66250BA ZCI66250WA ZCI66250XA Energy Efficiency Index Top oven: 105.6 Main oven: 95.4 Energy efficiency class Top oven: A Main oven: A Energy consumption with a standard load, conventional mode Top oven: 0.75 kWh/cycle Main oven: not applicable Energy consumption with a standard load, fan-forced mode Top oven: not applicable Main oven: 0.83 kWh/cycle Number of cavities 2 Heat source Electricity Volume Top oven: 39 l Main oven: 77...
...'s name Zanussi Model identification ZCI66250BA ZCI66250WA ZCI66250XA Energy Efficiency Index Top oven: 105.6 Main oven: 95.4 Energy efficiency class Top oven: A Main oven: A Energy consumption with a standard load, conventional mode Top oven: 0.75 kWh/cycle Main oven: not applicable Energy consumption with a standard load, fan-forced mode Top oven: not applicable Main oven: 0.83 kWh/cycle Number of cavities 2 Heat source Electricity Volume Top oven: 39 l Main oven: 77...
Product information sheet
Page 3
... Model Denomination Type of oven Position Mass of the appliance Number of cavities Heat source per cavity (electricity or gas) Volume per cavity Top Oven Main Oven Energy consumption (electricity) required to heat a standardised load in a cavity of an electric heated oven during a cycle in conventional mode per cavity (electric final energy) Top Oven Energy consumption required to heat a standardised load in a cavity of an electric heated oven during a cycle in fan-forced mode...
... Model Denomination Type of oven Position Mass of the appliance Number of cavities Heat source per cavity (electricity or gas) Volume per cavity Top Oven Main Oven Energy consumption (electricity) required to heat a standardised load in a cavity of an electric heated oven during a cycle in conventional mode per cavity (electric final energy) Top Oven Energy consumption required to heat a standardised load in a cavity of an electric heated oven during a cycle in fan-forced mode...