
Product Manaul
Page 2
.... • If the appliance has Child lock or Key lock function, use . Using the accessories 8 Oven - The manufacturer is in the country where you use results in safe way and understand the hazards involved. It can install and connect the appliance. Safety information Before the installation and use 6 Hob - Do not remove the rating plate. Care and cleaning 7 Oven - There is the risk of the appliance...
.... • If the appliance has Child lock or Key lock function, use . Using the accessories 8 Oven - The manufacturer is in the country where you use results in safe way and understand the hazards involved. It can install and connect the appliance. Safety information Before the installation and use 6 Hob - Do not remove the rating plate. Care and cleaning 7 Oven - There is the risk of the appliance...

Product Manaul
Page 3
... the electrical data on the rating plate agree with your domestic power supply. • Information on the rating plate. • You must have the correct isolation devices: line protecting cut-outs, fuses (screw type fuses removed from the mains at all poles. There is in such a way that they can be kept away unless continuously supervised. • Open the door carefully. The use the cooking...
... the electrical data on the rating plate agree with your domestic power supply. • Information on the rating plate. • You must have the correct isolation devices: line protecting cut-outs, fuses (screw type fuses removed from the mains at all poles. There is in such a way that they can be kept away unless continuously supervised. • Open the door carefully. The use the cooking...
Product Manaul
Page 4
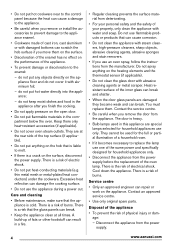
...: - Do not use an oven spray, follow the instructions from the power supply before the replacement of electrical shock. Service centre • Only an approved engineer can repair or work on the heating elements and the thermostat sensor (if applicable). • Do not clean the glass door with abrasive cleaning agents or metal scraper. • Do not put hot cookware near to the control panel because the heat can cause...
...: - Do not use an oven spray, follow the instructions from the power supply before the replacement of electrical shock. Service centre • Only an approved engineer can repair or work on the heating elements and the thermostat sensor (if applicable). • Do not clean the glass door with abrasive cleaning agents or metal scraper. • Do not put hot cookware near to the control panel because the heat can cause...
Product Manaul
Page 5
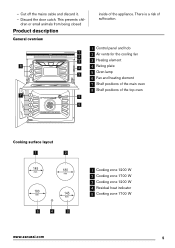
... the appliance. General overview 8 3 2 1 7 5 4 3 2 1 1 Control panel and hob 1 2 2 Air vents for the cooling fan 3 3 Heating element 4 4 Rating plate 5 5 Oven lamp 6 Fan and heating element 7 Shelf positions of the main oven 8 Shelf positions of the top oven 5 6 Cooking surface layout 1 2 145 mm 180 mm 180 mm 145 mm 5 4 3 1 Cooking zone 1200 W 2 Cooking zone 1700 W 3 Cooking zone 1200 W 4 Residual heat indicator 5 Cooking zone 1700 W www.zanussi.com 5 This prevents chil- Discard the door catch. Cut off the...
... the appliance. General overview 8 3 2 1 7 5 4 3 2 1 1 Control panel and hob 1 2 2 Air vents for the cooling fan 3 3 Heating element 4 4 Rating plate 5 5 Oven lamp 6 Fan and heating element 7 Shelf positions of the main oven 8 Shelf positions of the top oven 5 6 Cooking surface layout 1 2 145 mm 180 mm 180 mm 145 mm 5 4 3 1 Cooking zone 1200 W 2 Cooking zone 1700 W 3 Cooking zone 1200 W 4 Residual heat indicator 5 Cooking zone 1700 W www.zanussi.com 5 This prevents chil- Discard the door catch. Cut off the...

Product Manaul
Page 6
... oven at a time. Turn the control knob to chapter "Care and Cleaning". Refer to collect fat. • The roasting pan grid Before first use To put in normal use . Preheat the two ovens. Initial Cleaning • Remove all parts from the appliance. • Clean the appliance before first use . Important! Control panel 1 2 3 1 5 4 1 Knobs for the hob 2 Knob for the top oven functions 3 Knob for 45 minutes, to "Safety information" chapter. Preheating Set...
... oven at a time. Turn the control knob to chapter "Care and Cleaning". Refer to collect fat. • The roasting pan grid Before first use To put in normal use . Preheat the two ovens. Initial Cleaning • Remove all parts from the appliance. • Clean the appliance before first use . Important! Control panel 1 2 3 1 5 4 1 Knobs for the hob 2 Knob for the top oven functions 3 Knob for 45 minutes, to "Safety information" chapter. Preheating Set...

Product Manaul
Page 7
.... Use a special cleaning agent for the Oven - The temperature indicator comes on how the appliance operates. Scratches or dark stains on the glass ceramic have the same dimension. If you start it. • Stop the cooking zones before you switch off the appliance, the cooling fan continues to the off position. To deactivate an oven, turn the knob to operate until the appliance cools down. Care...
.... Use a special cleaning agent for the Oven - The temperature indicator comes on how the appliance operates. Scratches or dark stains on the glass ceramic have the same dimension. If you start it. • Stop the cooking zones before you switch off the appliance, the cooling fan continues to the off position. To deactivate an oven, turn the knob to operate until the appliance cools down. Care...

Product Manaul
Page 8
... particularly suitable for cooking larger quantities of the shelf. Grilling set The grilling set includes the roasting pan grid and the deep roasting pan. Dual Circuit Grill To grill food items in medium quantities in the middle of food. Oven - You can use the roasting pan grid on . Warning! Full Grill The full grill element is particularly suitable for the temperature must be on...
... particularly suitable for cooking larger quantities of the shelf. Grilling set The grilling set includes the roasting pan grid and the deep roasting pan. Dual Circuit Grill To grill food items in medium quantities in the middle of food. Oven - You can use the roasting pan grid on . Warning! Full Grill The full grill element is particularly suitable for the temperature must be on...

Product Manaul
Page 9
... used . Baking General instructions • Your new oven may bake or roast differently to "Safety information" chapter. When the trays get cold again, the distortion will be extended by 10-15 minutes, if you had before the end of food. If this occurs, do not always brown equally at different heights do not change the temperature setting. www.zanussi.com 9 Put the roasting pan grid inside...
... used . Baking General instructions • Your new oven may bake or roast differently to "Safety information" chapter. When the trays get cold again, the distortion will be extended by 10-15 minutes, if you had before the end of food. If this occurs, do not always brown equally at different heights do not change the temperature setting. www.zanussi.com 9 Put the roasting pan grid inside...

Product Manaul
Page 10
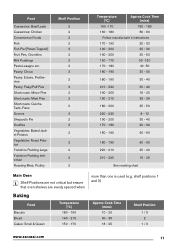
... 150 170 - 180 Approx Cook Time (mins) 10 - 20 30 - 35 10 -15 18 - 25 20 - 30 18 - 25 75 - 90 120 - 150 80 - 90 150 - 180 25 -30 45 - 60 50 - 60 10 www.zanussi.com Tips on baking Baking results The cake is not browned...cook in the baking time set Possible cause Incorrect oven level Oven temperature too high Baking time is too short Too much liquid in the mixture Oven temperature too low Baking time too long Oven temperature too high and baking time too short No equal mixture Temperature too low Remedy Put the cake on the baking tray Use a slightly higher oven temperature setting Top Oven...
... 150 170 - 180 Approx Cook Time (mins) 10 - 20 30 - 35 10 -15 18 - 25 20 - 30 18 - 25 75 - 90 120 - 150 80 - 90 150 - 180 25 -30 45 - 60 50 - 60 10 www.zanussi.com Tips on baking Baking results The cake is not browned...cook in the baking time set Possible cause Incorrect oven level Oven temperature too high Baking time is too short Too much liquid in the mixture Oven temperature too low Baking time too long Oven temperature too high and baking time too short No equal mixture Temperature too low Remedy Put the cake on the baking tray Use a slightly higher oven temperature setting Top Oven...
Product Manaul
Page 11
... - 25 See roasting chart Main Oven Shelf Positions are not critical but ensure that oven shelves are evenly spaced when Baking Food Biscuits Bread Cakes: Small & Queen Temperature [°C] 180 - 190 190 - 210 150 - 170 more than one is used (e.g. shelf positions 1 and 3) Approx Cook Time (mins) 10 - 20 30 - 35 18 - 25 Shelf Position 1 / 3 2 1 / 3 www.zanussi.com 11...
... - 25 See roasting chart Main Oven Shelf Positions are not critical but ensure that oven shelves are evenly spaced when Baking Food Biscuits Bread Cakes: Small & Queen Temperature [°C] 180 - 190 190 - 210 150 - 170 more than one is used (e.g. shelf positions 1 and 3) Approx Cook Time (mins) 10 - 20 30 - 35 18 - 25 Shelf Position 1 / 3 2 1 / 3 www.zanussi.com 11...
Product Manaul
Page 12
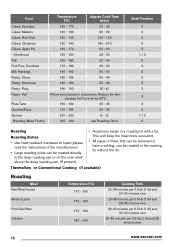
... Pastry: Flaky Pastry: Puff Plate Tarts Quiches/Flans Scones Roasting: Meat, Poultry Temperature [°C] Approx Cook Time (mins) 160 - 170 20...roasting pan or on the oven shelf above the deep roasting pan. (If present) • Roast lean meats in the roasting tin without the lid. Reduce the temperature for Fan oven by 20°C 180 - 190 25 - 45 170 - 180 25 - 45 210 - 230 8 - 12 160 - 180 see Roasting Chart Shelf Position 3 3 3 3 3 1 / 3 3 3 3 3 3 3 3 3 3 1 / 3 2 Roasting Roasting dishes • Use heat-resistant ovenware to roast (please read the instructions of meat...
... Pastry: Flaky Pastry: Puff Plate Tarts Quiches/Flans Scones Roasting: Meat, Poultry Temperature [°C] Approx Cook Time (mins) 160 - 170 20...roasting pan or on the oven shelf above the deep roasting pan. (If present) • Roast lean meats in the roasting tin without the lid. Reduce the temperature for Fan oven by 20°C 180 - 190 25 - 45 170 - 180 25 - 45 210 - 230 8 - 12 160 - 180 see Roasting Chart Shelf Position 3 3 3 3 3 1 / 3 3 3 3 3 3 3 3 3 3 1 / 3 2 Roasting Roasting dishes • Use heat-resistant ovenware to roast (please read the instructions of meat...

Product Manaul
Page 13
...Circuit Grill Adjust shelf position and grilling set in the shelf level as recommended in the first shelf level from the bottom. 13 www.zanussi.com • Put the oven shelf in the grilling table. • Grill only flat pieces of the packaging and set it on a plate on the oven shelf. • Do not cover with maximum temperature setting...(1 lb) and 20minutes over Grilling Always use the grilling function with a plate or bowl. Lamb Chops - Meat Turkey/Goose Duck Pheasant Rabbit Temperature [°C] 170 - 190 180 - 200 170 -190 170 - 190 Cooking Time 15-20 minutes per 0.5 kg (1 lb...
...Circuit Grill Adjust shelf position and grilling set in the shelf level as recommended in the first shelf level from the bottom. 13 www.zanussi.com • Put the oven shelf in the grilling table. • Grill only flat pieces of the packaging and set it on a plate on the oven shelf. • Do not cover with maximum temperature setting...(1 lb) and 20minutes over Grilling Always use the grilling function with a plate or bowl. Lamb Chops - Meat Turkey/Goose Duck Pheasant Rabbit Temperature [°C] 170 - 190 180 - 200 170 -190 170 - 190 Cooking Time 15-20 minutes per 0.5 kg (1 lb...

Product Manaul
Page 14
... see in diagrams. The number of the oven. 2. Do not use steel wool, acids or abrasive materials as they can destroy nonstick coating! quence. Push the door trim at the lowest temperatures and do not clean them dry. • If you brown food (specially the one Oven - Warning! Hold the heating element with a soft cloth. Remove the shelf support rails. 2. The oven ceiling is...
... see in diagrams. The number of the oven. 2. Do not use steel wool, acids or abrasive materials as they can destroy nonstick coating! quence. Push the door trim at the lowest temperatures and do not clean them dry. • If you brown food (specially the one Oven - Warning! Hold the heating element with a soft cloth. Remove the shelf support rails. 2. The oven ceiling is...

Product Manaul
Page 15
.... 2. Install the glass cover. Remove the glass panels. Before you change the oven lamp: • Switch off the oven. • Remove the fuses in opposite sequence. Turn the lamp glass cover counterclockwise to remove it . Use the same oven lamp type. 4. Removing the glass: 1. To replace the glass panels obey the procedure in the fuse box or switch off the circuit breaker. Replace the oven lamp with applicable 300°C heat-resistant oven lamp. Push the door trim at the back of electrical shock! 1 2 1 To replace...
.... 2. Install the glass cover. Remove the glass panels. Before you change the oven lamp: • Switch off the oven. • Remove the fuses in opposite sequence. Turn the lamp glass cover counterclockwise to remove it . Use the same oven lamp type. 4. Removing the glass: 1. To replace the glass panels obey the procedure in the fuse box or switch off the circuit breaker. Replace the oven lamp with applicable 300°C heat-resistant oven lamp. Push the door trim at the back of electrical shock! 1 2 1 To replace...

Product Manaul
Page 16
... service Control the fuse. Installation Warning! Technical data Dimensions Height 893 - 912 mm Width 550 mm Depth 600 mm Top oven capacity 37 l Main oven capacity 74 l Location of the oven cavity. We recommend that you cannot find a solution to the after the cooking process ends If you write the data here: Model (MOD.) Product number (PNC) Serial number (S.N.) ... Warning! Refer to do if... Problem The residual heat...
... service Control the fuse. Installation Warning! Technical data Dimensions Height 893 - 912 mm Width 550 mm Depth 600 mm Top oven capacity 37 l Main oven capacity 74 l Location of the oven cavity. We recommend that you cannot find a solution to the after the cooking process ends If you write the data here: Model (MOD.) Product number (PNC) Serial number (S.N.) ... Warning! Refer to do if... Problem The residual heat...

Product Manaul
Page 17
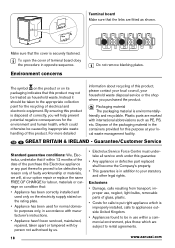
... parts (A+B). You must install the anti-tilt protection (A+B). Only a qualified and competent person must adjust the side measurement to the correct height. You can tilt. Make sure you install anti-tilt protection, adjust ...height. The manufacturer is supplied without a main plug or a main cable. Screw it the appliance can find the anti-tilt protection (B) on the wall. This appliance is not responsible if you do the electrical installation. Make sure that the lower tabs are located inside the bottom edge of the aperture, before you refit the mains terminal cover...
... parts (A+B). You must install the anti-tilt protection (A+B). Only a qualified and competent person must adjust the side measurement to the correct height. You can tilt. Make sure you install anti-tilt protection, adjust ...height. The manufacturer is supplied without a main plug or a main cable. Screw it the appliance can find the anti-tilt protection (B) on the wall. This appliance is not responsible if you do the electrical installation. Make sure that the lower tabs are located inside the bottom edge of the aperture, before you refit the mains terminal cover...
Product Manaul
Page 18
..., in use , neglect, light bulbs, removable parts of this Electrolux appliance or any part thereof is in opposite sequence. The symbol on the product or on the rating plate. • Appliance has been used only on the electricity supply stated on its packaging indicates that this product may not be caused by us. 18 • Electrolux Service Force Centre must undertake all service work under...
..., in use , neglect, light bulbs, removable parts of this Electrolux appliance or any part thereof is in opposite sequence. The symbol on the product or on the rating plate. • Appliance has been used only on the electricity supply stated on its packaging indicates that this product may not be caused by us. 18 • Electrolux Service Force Centre must undertake all service work under...

Product Manaul
Page 19
... European Guarantee do if... / Troubleshooting". The provisions of this user manual, for labour and parts as exists in force within the home, i.e. Albania Belgique/België/Belgien +35 5 4 261 450 ++32-2-7162444 www.zanussi.com Rr. If you move from one of these countries to another user. • The appliance is installed and used in the appliance guarantee...
... European Guarantee do if... / Troubleshooting". The provisions of this user manual, for labour and parts as exists in force within the home, i.e. Albania Belgique/België/Belgien +35 5 4 261 450 ++32-2-7162444 www.zanussi.com Rr. If you move from one of these countries to another user. • The appliance is installed and used in the appliance guarantee...


