Product Manaul
Page 2
... incorrect installation or use it . Do not remove the rating plate. Care and cleaning 7 Oven - Using the accessories 9 Oven - This is not damaged because of injury or other permanent disability. • If the appliance has Child lock or Key lock function, use results in the country where you use of the appliance. www.zanussi.com Installation • Only an approved technician can be used by the handle. •...
... incorrect installation or use it . Do not remove the rating plate. Care and cleaning 7 Oven - Using the accessories 9 Oven - This is not damaged because of injury or other permanent disability. • If the appliance has Child lock or Key lock function, use results in the country where you use of the appliance. www.zanussi.com Installation • Only an approved technician can be used by the handle. •...
Product Manaul
Page 3
... opening width of alcohol and air. Use • Only use . Hot steam can become hot during use . There is a risk of explosion or fire. • Set the cooking zones to avoid touching the heating elements. www.zanussi.com 3 This is a risk of burns. Do not operate the appliance with your domestic power supply. • Information on the voltage is on the surface, as a work...
... opening width of alcohol and air. Use • Only use . Hot steam can become hot during use . There is a risk of explosion or fire. • Set the cooking zones to avoid touching the heating elements. www.zanussi.com 3 This is a risk of burns. Do not operate the appliance with your domestic power supply. • Information on the voltage is on the surface, as a work...
Product Manaul
Page 4
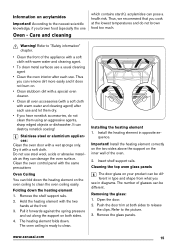
... enamel: - Service centre • Only an approved engineer can repair or work on the heating elements and the thermostat sensor (if applicable). • Do not clean the glass door with abrasive cleaning agents or metal scraper. Cut off the mains...oven. The door is heavy. • Bulb lamps used for the full or partial illumination of a household room. • If it becomes necessary to replace the lamp use one of the same power and specifically designed for household appliances use an oven spray, follow the instructions from the appliance. • Be careful when you remove or install...
... enamel: - Service centre • Only an approved engineer can repair or work on the heating elements and the thermostat sensor (if applicable). • Do not clean the glass door with abrasive cleaning agents or metal scraper. Cut off the mains...oven. The door is heavy. • Bulb lamps used for the full or partial illumination of a household room. • If it becomes necessary to replace the lamp use one of the same power and specifically designed for household appliances use an oven spray, follow the instructions from the appliance. • Be careful when you remove or install...

Product Manaul
Page 5
Product description General overview 1 2 3 8 3 4 2 1 5 7 5 5 4 3 6 2 1 1 Control panel and hob 2 Air vents for the cooling fan 3 Heating element 4 Rating plate 5 Oven lamp 6 Fan and heating element 7 Shelf positions of the main oven 8 Shelf positions of the appliance. inside of the top oven Cooking surface layout 1 2 145 mm 180 mm 180 mm 145 mm 5 4 3 1 Cooking zone 1200 W 2 Cooking zone 1700 W 3 Cooking zone 1200 W 4 Residual heat indicator 5 Cooking zone 1700 W www.zanussi.com 5 There is a risk of suffocation.
Product description General overview 1 2 3 8 3 4 2 1 5 7 5 5 4 3 6 2 1 1 Control panel and hob 2 Air vents for the cooling fan 3 Heating element 4 Rating plate 5 Oven lamp 6 Fan and heating element 7 Shelf positions of the main oven 8 Shelf positions of the appliance. inside of the top oven Cooking surface layout 1 2 145 mm 180 mm 180 mm 145 mm 5 4 3 1 Cooking zone 1200 W 2 Cooking zone 1700 W 3 Cooking zone 1200 W 4 Residual heat indicator 5 Cooking zone 1700 W www.zanussi.com 5 There is a risk of suffocation.
Product Manaul
Page 6
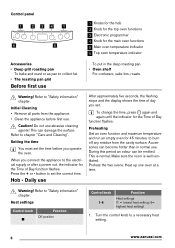
... heat setting) 1. Turn the control knob to set the time before first use . Caution! button to a necessary heat setting. 6 www.zanussi.com Heat up one oven at a time. Control panel 1 234 1 6 5 1 Knobs for the hob 2 Knob for the top oven functions 3 Electronic programmer 4 Knob for 45 minutes, to burn off any residue from the appliance. • Clean the appliance before you connect the appliance to the electrical supply or after a power cut...
... heat setting) 1. Turn the control knob to set the time before first use . Caution! button to a necessary heat setting. 6 www.zanussi.com Heat up one oven at a time. Control panel 1 234 1 6 5 1 Knobs for the hob 2 Knob for the top oven functions 3 Electronic programmer 4 Knob for 45 minutes, to burn off any residue from the appliance. • Clean the appliance before you connect the appliance to the electrical supply or after a power cut...
Product Manaul
Page 7
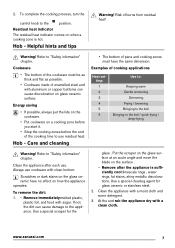
.... • Put cookware on the surface . - Remove immediately:melted plastic, plastic foil, and food with a clean cloth. To complete the cooking process, turn the control knob to "Safety information" chapter. Scratches or dark stains on the glass ceramic have the same dimension. Refer to use . Care and cleaning • The bottom of pans and cooking zones must be as thick and flat...
.... • Put cookware on the surface . - Remove immediately:melted plastic, plastic foil, and food with a clean cloth. To complete the cooking process, turn the control knob to "Safety information" chapter. Scratches or dark stains on the glass ceramic have the same dimension. Refer to use . Care and cleaning • The bottom of pans and cooking zones must be as thick and flat...
Product Manaul
Page 8
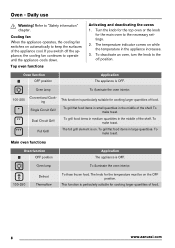
... cooling fan continues to the necessary settings. 2. The temperature indicator comes on automatically to keep the surfaces of the shelf. Oven function OFF position Application The appliance is OFF. Oven lamp To illuminate the oven interior. 100-250 Conventional Cooking This function is particularly suitable for cooking larger quantities of food. 8 www.zanussi.com To illuminate the oven interior. To deactivate an oven, turn...
... cooling fan continues to the necessary settings. 2. The temperature indicator comes on automatically to keep the surfaces of the shelf. Oven function OFF position Application The appliance is OFF. Oven lamp To illuminate the oven interior. 100-250 Conventional Cooking This function is particularly suitable for cooking larger quantities of food. 8 www.zanussi.com To illuminate the oven interior. To deactivate an oven, turn...

Product Manaul
Page 9
Set the time with + or - Oven - When the set , change or check the time of the oven. You can use the roasting pan grid on the operation of day. Risk of day Minute Minder Application To set time ends, press a button to stop the signal. Oven - Clock functions Electronic programmer 1 2 3 1 Minute minder indicator 2 Time display 3 Time of day indicator 4 Button + 5 Selection button 6 Button - 6 5 4 Clock function Time of burns when removing the accessories from a hot oven. This function has...
Set the time with + or - Oven - When the set , change or check the time of the oven. You can use the roasting pan grid on the operation of day. Risk of day Minute Minder Application To set time ends, press a button to stop the signal. Oven - Clock functions Electronic programmer 1 2 3 1 Minute minder indicator 2 Time display 3 Time of day indicator 4 Button + 5 Selection button 6 Button - 6 5 4 Clock function Time of burns when removing the accessories from a hot oven. This function has...
Product Manaul
Page 10
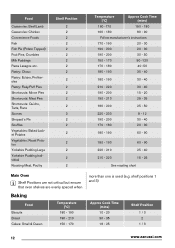
... set to roast larger pieces of baking time, to use the residual heat. If this occurs, do not always brown equally at first. Helpful hints and tips Warning! Main oven The main oven is to cook smaller quantities of the two ovens. Put the roasting pan grid inside the deep roasting pan so that the supports of the oven shelf point downwards. Baking General instructions • Your new oven may bake or roast...
... set to roast larger pieces of baking time, to use the residual heat. If this occurs, do not always brown equally at first. Helpful hints and tips Warning! Main oven The main oven is to cook smaller quantities of the two ovens. Put the roasting pan grid inside the deep roasting pan so that the supports of the oven shelf point downwards. Baking General instructions • Your new oven may bake or roast...
Product Manaul
Page 11
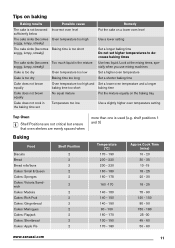
... oven temperature Set a shorter baking time Set a lower oven temperature and a longer baking time Put the mixture equally on a lower oven level Use a lower setting Set a longer baking time Do not set Possible cause Incorrect oven level Oven temperature too high Baking time is too short Too much liquid in the mixture Oven temperature too low Baking time too long Oven temperature too high and baking time too short No equal mixture Temperature too low Remedy Put the cake on the baking tray Use...
... oven temperature Set a shorter baking time Set a lower oven temperature and a longer baking time Put the mixture equally on a lower oven level Use a lower setting Set a longer baking time Do not set Possible cause Incorrect oven level Oven temperature too high Baking time is too short Too much liquid in the mixture Oven temperature too low Baking time too long Oven temperature too high and baking time too short No equal mixture Temperature too low Remedy Put the cake on the baking tray Use...
Product Manaul
Page 12
...: Flaky/Puff Pies Shortcrusts: Mince Pies Shortcrusts: Meat Pies Shortcrusts: Quiche, Tarts, Flans Scones Shepard`s Pie Souffles Vegetables: Baked Jacket Potatos Vegetables: Roast Potatos Yorkshire Pudding Large Yorkshire Pudding Individual Roasting Meat, Poultry Shelf Position 2 2 2 2 2 2 2 2 2 2 2 2 2 2 3 2 2 2 2 2 2 2 Temperature [°C] Approx Cook Time (mins) 160 -170 150 - 180 160 - 180 80 - 90 Follow manufacturer`s instructions 170 - 190 20 - 30 190 - 200 20...
...: Flaky/Puff Pies Shortcrusts: Mince Pies Shortcrusts: Meat Pies Shortcrusts: Quiche, Tarts, Flans Scones Shepard`s Pie Souffles Vegetables: Baked Jacket Potatos Vegetables: Roast Potatos Yorkshire Pudding Large Yorkshire Pudding Individual Roasting Meat, Poultry Shelf Position 2 2 2 2 2 2 2 2 2 2 2 2 2 2 3 2 2 2 2 2 2 2 Temperature [°C] Approx Cook Time (mins) 160 -170 150 - 180 160 - 180 80 - 90 Follow manufacturer`s instructions 170 - 190 20 - 30 190 - 200 20...
Product Manaul
Page 13
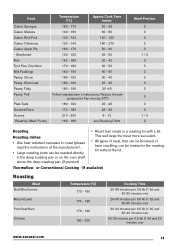
... the temperature for Fan oven by 20°C 180 - 190 25 - 45 170 - 180 25 - 45 210 - 230 8 - 12 160 - 180 see Roasting Chart Shelf Position 3 3 3 3 3 1 / 3 3 3 3 3 3 3 3 3 3 1 / 3 2 Roasting Roasting dishes • Use heat-resistant ovenware to roast (please read the instructions of meat, that can be browned or have crackling, can be roasted in a roasting tin with a lid. Thermaflow or Conventional Cooking (if available) Roasting Meat Beef...
... the temperature for Fan oven by 20°C 180 - 190 25 - 45 170 - 180 25 - 45 210 - 230 8 - 12 160 - 180 see Roasting Chart Shelf Position 3 3 3 3 3 1 / 3 3 3 3 3 3 3 3 3 3 1 / 3 2 Roasting Roasting dishes • Use heat-resistant ovenware to roast (please read the instructions of meat, that can be browned or have crackling, can be roasted in a roasting tin with a lid. Thermaflow or Conventional Cooking (if available) Roasting Meat Beef...
Product Manaul
Page 14
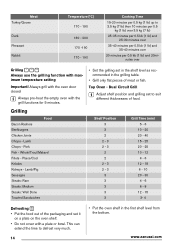
Always grill with the oven door closed Always pre-heat the empty oven with the grill functions for 5 minutes. • Set the grilling set it on a plate on the oven shelf. • Do not cover with maximum temperature setting Important! Plaice/Cod Kebabs Kidneys - Lamb/Pig Sausages Steaks: Rare Steaks: Medium Steaks: Well Done Toasted Sandwiches Shelf Position 3 3 2 2 - 3 2 - 3 2 2 2 - 3 2 - 3 3 3 3 3 3 Grill Time (min) 5 - 6 10 - 20...
Always grill with the oven door closed Always pre-heat the empty oven with the grill functions for 5 minutes. • Set the grilling set it on a plate on the oven shelf. • Do not cover with maximum temperature setting Important! Plaice/Cod Kebabs Kidneys - Lamb/Pig Sausages Steaks: Rare Steaks: Medium Steaks: Well Done Toasted Sandwiches Shelf Position 3 3 2 2 - 3 2 - 3 2 2 2 - 3 2 - 3 3 3 3 3 3 Grill Time (min) 5 - 6 10 - 20...
Product Manaul
Page 15
...: Clean the oven door with a soft cloth. Clean the oven control panel with warm water and cleaning agent. • To clean metal surfaces use a usual cleaning agent • Clean the oven interior after each use. Install the heating element in diagrams. The number of the appliance with a soft cloth with the same precautions Oven Ceiling You can fold down . Cleaning the top oven glass panels The door glass on . • Clean stubborn dirt with a special oven cleaner. • Clean all oven accessories...
...: Clean the oven door with a soft cloth. Clean the oven control panel with warm water and cleaning agent. • To clean metal surfaces use a usual cleaning agent • Clean the oven interior after each use. Install the heating element in diagrams. The number of the appliance with a soft cloth with the same precautions Oven Ceiling You can fold down . Cleaning the top oven glass panels The door glass on . • Clean stubborn dirt with a special oven cleaner. • Clean all oven accessories...
Product Manaul
Page 16
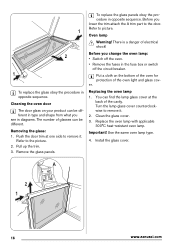
... you change the oven lamp: • Switch off the oven. • Remove the fuses in diagrams. The number of the cavity. Oven lamp Warning! Turn the lamp glass cover counterclockwise to remove it . Clean the glass cover. 3. Use the same oven lamp type. 4. Install the glass cover. Remove the glass panels. Before you lower the trim attach the A trim part to remove it . 2. Pull up the trim. 3. Refer to the picture. 2. Replacing the oven lamp 1. Removing the glass: 1. Important! Push the door trim at the...
... you change the oven lamp: • Switch off the oven. • Remove the fuses in diagrams. The number of the cavity. Oven lamp Warning! Turn the lamp glass cover counterclockwise to remove it . Clean the glass cover. 3. Use the same oven lamp type. 4. Install the glass cover. Remove the glass panels. Before you lower the trim attach the A trim part to remove it . 2. Pull up the trim. 3. Refer to the picture. 2. Replacing the oven lamp 1. Removing the glass: 1. Important! Push the door trim at the...
Product Manaul
Page 17
... heat setting is not set The oven is not switched on The clock is not set The necessary settings are not set The fuse in the fuse box is released The oven lamp is on one time, refer to the problem yourself, contact your freestanding appliance with cabinets on the rating plate. Technical Data Height Width Depth Dimensions 900 mm 596 mm 600 mm Dimensions Top oven capacity 37 l Main oven capacity 74 l Location...
... heat setting is not set The oven is not switched on The clock is not set The necessary settings are not set The fuse in the fuse box is released The oven lamp is on one time, refer to the problem yourself, contact your freestanding appliance with cabinets on the rating plate. Technical Data Height Width Depth Dimensions 900 mm 596 mm 600 mm Dimensions Top oven capacity 37 l Main oven capacity 74 l Location...
Product Manaul
Page 18
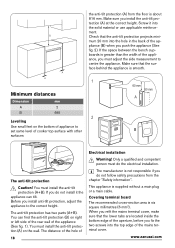
...tilt protection (A) from the chapter "Safety information". Screw it the appliance can find the anti-tilt protection (B) on the wall. You must do the electrical installation. If you do not follow safety precautions from the floor is not responsible if you must... (6 mm²). www.zanussi.com Make sure you fix the two screws into the solid material or use applicable reinforcement. Covering terminal board The recommended cross-section area is supplied without a main plug or a main cable. You must adjust the side measurement to the correct height. If the space between ...
...tilt protection (A) from the chapter "Safety information". Screw it the appliance can find the anti-tilt protection (B) on the wall. You must do the electrical installation. If you do not follow safety precautions from the floor is not responsible if you must... (6 mm²). www.zanussi.com Make sure you fix the two screws into the solid material or use applicable reinforcement. Covering terminal board The recommended cross-section area is supplied without a main plug or a main cable. You must adjust the side measurement to the correct height. If the space between ...
Product Manaul
Page 19
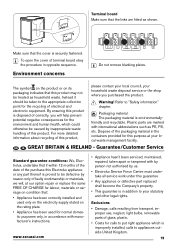
... of electrical and electronic equipment. Exclusions • Damage, calls resulting from transport, improper use, neglect, light bulbs, removable parts of this product. www.zanussi.com • Appliance hasn't been serviced, maintained, repaired, taken apart or tampered with international abbreviations such as shown. Make sure that the cover is environmentallyfriendly and recyclable. Refer to "Safety information" chapter. Environment concerns L L N N N Do not remove blanking plates...
... of electrical and electronic equipment. Exclusions • Damage, calls resulting from transport, improper use, neglect, light bulbs, removable parts of this product. www.zanussi.com • Appliance hasn't been serviced, maintained, repaired, taken apart or tampered with international abbreviations such as shown. Make sure that the cover is environmentallyfriendly and recyclable. Refer to "Safety information" chapter. Environment concerns L L N N N Do not remove blanking plates...
Product Manaul
Page 20
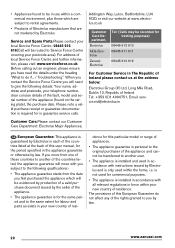
... on the rating plate), the purchase date. When you contact the Service Force Centre you will need to give the following qualifications:- • The appliance guarantee starts from one of these countries to another user. • The appliance is installed and used within your new country of the rights granted to the same extent for labour and parts as...
... on the rating plate), the purchase date. When you contact the Service Force Centre you will need to give the following qualifications:- • The appliance guarantee starts from one of these countries to another user. • The appliance is installed and used within your new country of the rights granted to the same extent for labour and parts as...


