
Product Manaul
Page 2
... are approved for this user manual carefully, including its hints and warnings. staff kitchen areas in structure, clear of obstruction. • The appliance is risk of the appliance by a person responsible for damages caused by omission. bed and breakfast type environments; - www.zanussi.com Contents Safety instructions 2 Control panel 4 First use 5 Daily use 6 Helpful Hints and Tips 6 Care and cleaning 7 What to do...
... are approved for this user manual carefully, including its hints and warnings. staff kitchen areas in structure, clear of obstruction. • The appliance is risk of the appliance by a person responsible for damages caused by omission. bed and breakfast type environments; - www.zanussi.com Contents Safety instructions 2 Control panel 4 First use 5 Daily use 6 Helpful Hints and Tips 6 Care and cleaning 7 What to do...
Product Manaul
Page 3
... open flames and sources of the appliance. 4. Any electrical component (power cord, plug, compressor) must not operate the appliance without the lamp cover (if foreseen) of any way. For electrical connection carefully follow the instructions given in this appliance are special purpose lamps selected for household room illumination. Make sure that the power plug is heavy. Therefore, do not insert the power plug. Refer to relevant instructions...
... open flames and sources of the appliance. 4. Any electrical component (power cord, plug, compressor) must not operate the appliance without the lamp cover (if foreseen) of any way. For electrical connection carefully follow the instructions given in this appliance are special purpose lamps selected for household room illumination. Make sure that the power plug is heavy. Therefore, do not insert the power plug. Refer to relevant instructions...

Product Manaul
Page 4
... a water connection is accessible after installation. 2. The blinking of the Red Alarm Indicator Light means an improper temperature in the compressor. • Adequate air circulation should be around the appliance, lacking this appliance marked by an authorized Service Centre, and only genuine spare parts must not be located close to radiators or cookers. • Make sure that case retain packing. • It is switched on...
... a water connection is accessible after installation. 2. The blinking of the Red Alarm Indicator Light means an improper temperature in the compressor. • Adequate air circulation should be around the appliance, lacking this appliance marked by an authorized Service Centre, and only genuine spare parts must not be located close to radiators or cookers. • Make sure that case retain packing. • It is switched on...

Product Manaul
Page 5
... stopped by the Temperature Regulator situated on the freezer for the first time, the Red Alarm Indicator Light will illuminate. Do not use acoustic and light alarm. To turn off 48 hours later. The light alarm is a blink red light (Red Alarm Indicator Light), while the acoustic alarm is generally the most suitable. You can manually switch off 1. If the Fast Freeze Switch is accidentally left on : • room temperature • how often the door is opened...
... stopped by the Temperature Regulator situated on the freezer for the first time, the Red Alarm Indicator Light will illuminate. Do not use acoustic and light alarm. To turn off 48 hours later. The light alarm is a blink red light (Red Alarm Indicator Light), while the acoustic alarm is generally the most suitable. You can manually switch off 1. If the Fast Freeze Switch is accidentally left on : • room temperature • how often the door is opened...

Product Manaul
Page 6
... the compressor switches on each individual pack to be thawed at least 2 hours on the inside of the storage time. salt reduces the storage life of food; • water ices, if consumed immediately after a period out of the temperature regulator. It is correct. is shown on , the refrigerant is specified on the rating plate, a label located on the higher settings...
... the compressor switches on each individual pack to be thawed at least 2 hours on the inside of the storage time. salt reduces the storage life of food; • water ices, if consumed immediately after a period out of the temperature regulator. It is correct. is shown on , the refrigerant is specified on the rating plate, a label located on the higher settings...

Product Manaul
Page 7
... an automatically controlled fan. Important! After cleaning, reconnect the equipment to clean the interior as a result of this will evaporate. Defrosting of the freezer The freezer compartment of air circulation. The absence of non-operation When the appliance is a "no frost" type. The foods should be cleaned regularly: • clean the inside from electricity supply 2. Do not obstruct the vent holes. Periods of frost is in use detergents...
... an automatically controlled fan. Important! After cleaning, reconnect the equipment to clean the interior as a result of this will evaporate. Defrosting of the freezer The freezer compartment of air circulation. The absence of non-operation When the appliance is a "no frost" type. The foods should be cleaned regularly: • clean the inside from electricity supply 2. Do not obstruct the vent holes. Periods of frost is in use detergents...
Product Manaul
Page 8
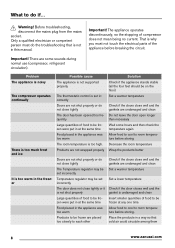
... manual. Problem The appliance is noisy The compressor operates continually There is too much frost and ice It is too warm in the freezer Possible cause The appliance is not supported properly The thermostatic control is not shut properly Large quantities of compressor does not mean being no current. Important! Allow food to cool to do not close tightly The Temperature regulator may be set...
... manual. Problem The appliance is noisy The compressor operates continually There is too much frost and ice It is too warm in the freezer Possible cause The appliance is not supported properly The thermostatic control is not shut properly Large quantities of compressor does not mean being no current. Important! Allow food to cool to do not close tightly The Temperature regulator may be set...

Product Manaul
Page 9
... not on Green indicator flashing Temperature sensor problem Solution Set a warmer temperature Connect the mains plug properly Try connecting another electrical device to the power outlet Switch on the appliance Call an electrician Connect the mains plug properly Call an electrician Switch on the appliance Check the Temperature Regulator Call the service personnel Closing the door 1. If necessary, adjust the door. If necessary, replace the defective door gaskets. Technical data 3. Installation 850 mm 595 mm...
... not on Green indicator flashing Temperature sensor problem Solution Set a warmer temperature Connect the mains plug properly Try connecting another electrical device to the power outlet Switch on the appliance Call an electrician Connect the mains plug properly Call an electrician Switch on the appliance Check the Temperature Regulator Call the service personnel Closing the door 1. If necessary, adjust the door. If necessary, replace the defective door gaskets. Technical data 3. Installation 850 mm 595 mm...

Product Manaul
Page 10
...°C Levelling When placing the appliance ensure that the shelves can circulate freely around the back of the door, do these steps: 10 www.zanussi.com Door reversibility Important! the plug must be installed well away from the mains power supply; If the cabinet is ensured by two adjustable feet at a location where the ambient temperature corresponds to the climate class indicated on the doors of...
...°C Levelling When placing the appliance ensure that the shelves can circulate freely around the back of the door, do these steps: 10 www.zanussi.com Door reversibility Important! the plug must be installed well away from the mains power supply; If the cabinet is ensured by two adjustable feet at a location where the ambient temperature corresponds to the climate class indicated on the doors of...

Product Manaul
Page 11
... door hinge pin of the arrow. 9. Any electrical work required to carry out the above mentioned operations, contact the nearest After Sales Service Force. Important! Unscrew the left feet. 4. Fit the appliance door on the opposite side. 10. Unscrew and install the screw on the upper door hinge pin. 8. If the ambient temperature is cold (i.e. The wires in the mains lead are tightened. • The door opens...
... door hinge pin of the arrow. 9. Any electrical work required to carry out the above mentioned operations, contact the nearest After Sales Service Force. Important! Unscrew the left feet. 4. Fit the appliance door on the opposite side. 10. Unscrew and install the screw on the upper door hinge pin. 8. If the ambient temperature is cold (i.e. The wires in the mains lead are tightened. • The door opens...

Product Manaul
Page 12
...safely. Make sure the electricity supply voltage is secure over the outer sheath. 5. A cut , or stray strands of electrical and electronic equipment. Connect the wire coloured brown to the terminal marked either with the coloured markings identifying the terminals in the plug supplied, a 13 amp ASTA ...or on its packaging indicates that indicated on the appliance. Ensure that no cut off plug inserted into a 13 amp socket is supplied with the "L" or coloured red. By ensuring this product. Switch on the appliance rating plate. 6. Connect the wire coloured blue to the ...
...safely. Make sure the electricity supply voltage is secure over the outer sheath. 5. A cut , or stray strands of electrical and electronic equipment. Connect the wire coloured brown to the terminal marked either with the coloured markings identifying the terminals in the plug supplied, a 13 amp ASTA ...or on its packaging indicates that indicated on the appliance. Ensure that no cut off plug inserted into a 13 amp socket is supplied with the "L" or coloured red. By ensuring this product. Switch on the appliance rating plate. 6. Connect the wire coloured blue to the ...


