
Specification Sheet
Page 1
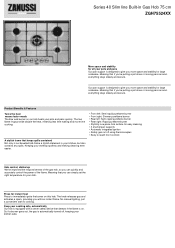
... meals The 4kw wok burner on . Hob control, dialled up We've improved the responsiveness of the flame. Series 40 Slim line Built-in your kitchen, but also contains any spills. No manual lighting, just a convenient start to immediately ignite the burner on this hob. Meaning that you can quickly and accurately control the power of the gas hob, so you can simply set the right temperature...
... meals The 4kw wok burner on . Hob control, dialled up We've improved the responsiveness of the flame. Series 40 Slim line Built-in your kitchen, but also contains any spills. No manual lighting, just a convenient start to immediately ignite the burner on this hob. Meaning that you can quickly and accurately control the power of the gas hob, so you can simply set the right temperature...
Specification Sheet
Page 2
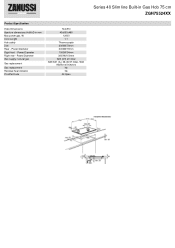
Power/Diameter Gas supply: natural gas Gas replacement Gas replacement Residual heat indicator ProdPartCode 744x510 40x560x480 12000 1.1 Thermocouple 2000W/70mm 2000W/70mm 1000W/54mm 3000W/100mm G20 (2H) 20 mbar G30/G31 (3+) 28-30/37 mbar, With Additional Injectors No No All Open Series 40 Slim line Built-in mm Max power gas, W Cord Length Hob safety Dial Rear - Power/Diameter Right rear - Power/Diameter Right front - Product Specification Hobs Dimensions Aperture dimensions HxWxD in Gas Hob 75 cm ZGH75524XX
Power/Diameter Gas supply: natural gas Gas replacement Gas replacement Residual heat indicator ProdPartCode 744x510 40x560x480 12000 1.1 Thermocouple 2000W/70mm 2000W/70mm 1000W/54mm 3000W/100mm G20 (2H) 20 mbar G30/G31 (3+) 28-30/37 mbar, With Additional Injectors No No All Open Series 40 Slim line Built-in mm Max power gas, W Cord Length Hob safety Dial Rear - Power/Diameter Right rear - Power/Diameter Right front - Product Specification Hobs Dimensions Aperture dimensions HxWxD in Gas Hob 75 cm ZGH75524XX
User Manual
Page 1
EASY. User Manual GETTING STARTED? ZGH75524XB ZGH75524XX ZGH76524XX EN User Manual Hob GB IE MT NG
EASY. User Manual GETTING STARTED? ZGH75524XB ZGH75524XX ZGH76524XX EN User Manual Hob GB IE MT NG
User Manual
Page 2
... the installation and use . GENERAL SAFETY • WARNING: The appliance and its accessible parts become hot during use of incorrect installation or usage. The manufacturer is not responsible for future reference. Accessible parts are the result of the appliance, carefully read the supplied instructions. Care should be used by means of an external timer or separate remote-control system. • WARNING: Unattended cooking on...
... the installation and use . GENERAL SAFETY • WARNING: The appliance and its accessible parts become hot during use of incorrect installation or usage. The manufacturer is not responsible for future reference. Accessible parts are the result of the appliance, carefully read the supplied instructions. Care should be used by means of an external timer or separate remote-control system. • WARNING: Unattended cooking on...
User Manual
Page 3
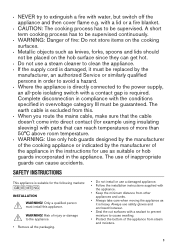
... the appliance. • Remove all -pole isolating switch with water, but switch off the appliance and then cover flame e.g. Only a qualified person must be replaced by the manufacturer of the appliance in the instructions for use a damaged appliance. • Follow the installation instructions supplied with the conditions specified in compliance with the appliance. • Keep the minimum distance from other appliances...
... the appliance. • Remove all -pole isolating switch with water, but switch off the appliance and then cover flame e.g. Only a qualified person must be replaced by the manufacturer of the appliance in the instructions for use a damaged appliance. • Follow the installation instructions supplied with the conditions specified in compliance with the appliance. • Keep the minimum distance from other appliances...
User Manual
Page 4
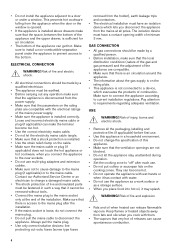
... on the cooking zones. Loose and incorrect electricity mains cable or plug (if applicable) can cause spontaneous combustion. 4 Always pull the mains plug. • Use only correct isolation devices: line protecting cut-outs, fuses (screw type fuses removed from the holder), earth leakage trips and contactors. • The electrical installation must be made by a qualified person. • Before installation, make sure that very hot oil...
... on the cooking zones. Loose and incorrect electricity mains cable or plug (if applicable) can cause spontaneous combustion. 4 Always pull the mains plug. • Use only correct isolation devices: line protecting cut-outs, fuses (screw type fuses removed from the holder), earth leakage trips and contactors. • The electrical installation must be made by a qualified person. • Before installation, make sure that very hot oil...
User Manual
Page 5
... the dimensions of the burners. • Make sure cookware is centrally positioned on the burners. • Make sure the flame does not go out when you quickly turn the knob from the electrical supply before you install the hob, write down before maintenance. • Do not use of the appliance may get inside the appliance and cause damage. • Clean the...
... the dimensions of the burners. • Make sure cookware is centrally positioned on the burners. • Make sure the flame does not go out when you quickly turn the knob from the electrical supply before you install the hob, write down before maintenance. • Do not use of the appliance may get inside the appliance and cause damage. • Clean the...
User Manual
Page 6
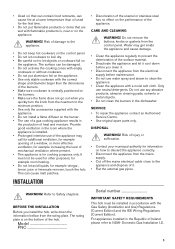
... be allowed from the edges of Ireland please refer to determine the requisite air vent requirements. Rigid connection: Carry out connection by a GAS SAFE REGISTER installer. Any gas installation must be installed in a bathroom or shower room. Be careful they are other safety instructions incorporated in the diagram. For appliances installed in touch with the edges of Appliance. 813 Current Editions and the ETCI...
... be allowed from the edges of Ireland please refer to determine the requisite air vent requirements. Rigid connection: Carry out connection by a GAS SAFE REGISTER installer. Any gas installation must be installed in a bathroom or shower room. Be careful they are other safety instructions incorporated in the diagram. For appliances installed in touch with the edges of Appliance. 813 Current Editions and the ETCI...
User Manual
Page 7
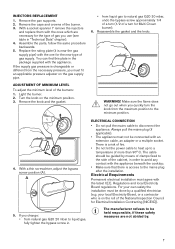
... different from natural gas G20 20 mbar to the minimum position. 4. Assemble the parts, follow the same procedure backwards. 5. Turn the knob on the gas supply pipe. your own safety the installation must fit an applicable pressure adjuster on the minimum position. 3. Remove the pan supports. 2. If the supply gas pressure is access to avoid any contact with the ones which are not abided by. 7 ELECTRICAL CONNECTION •...
... different from natural gas G20 20 mbar to the minimum position. 4. Assemble the parts, follow the same procedure backwards. 5. Turn the knob on the gas supply pipe. your own safety the installation must fit an applicable pressure adjuster on the minimum position. 3. Remove the pan supports. 2. If the supply gas pressure is access to avoid any contact with the ones which are not abided by. 7 ELECTRICAL CONNECTION •...
User Manual
Page 8
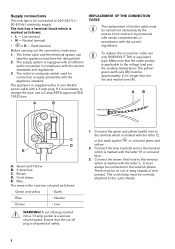
... outlet or omnipolar switch used for connection is easily accessible with the current standards and regulations 3. If it is necessary to the terminal which is marked with the letter 'N' or coloured blue. 3. To replace the connection cable use a 3 amp ASTA-approved (BS 1362) fuse. Brown D. Connect the blue (neutral) wire to change the fuse, use only H03V2V2-F T90 or equivalent type. The supply system is...
... outlet or omnipolar switch used for connection is easily accessible with the current standards and regulations 3. If it is necessary to the terminal which is marked with the letter 'N' or coloured blue. 3. To replace the connection cable use a 3 amp ASTA-approved (BS 1362) fuse. Brown D. Connect the blue (neutral) wire to change the fuse, use only H03V2V2-F T90 or equivalent type. The supply system is...
User Manual
Page 9
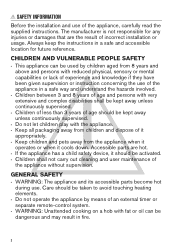
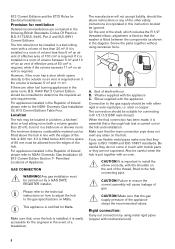
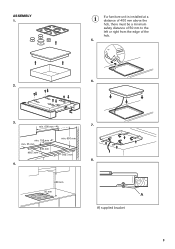
min. 600 mm min. 150 mm min. 55 mm min. 650 mm 30 mm 480+02 mm 560+02 mm 8. 4. 400 mm 50 mm A A) supplied bracket 9 If a furniture unit is installed at a distance of 400 mm above the hob, there must be a minimum safety distance of 50 mm to the left or right from the edge of the hob. 5. 6. 2. 3. 7. ASSEMBLY 1.
min. 600 mm min. 150 mm min. 55 mm min. 650 mm 30 mm 480+02 mm 560+02 mm 8. 4. 400 mm 50 mm A A) supplied bracket 9 If a furniture unit is installed at a distance of 400 mm above the hob, there must be a minimum safety distance of 50 mm to the left or right from the edge of the hob. 5. 6. 2. 3. 7. ASSEMBLY 1.
User Manual
Page 10
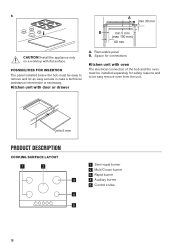
... (max 150 mm) 60 mm CAUTION! Removable panel B. min 6 mm PRODUCT DESCRIPTION COOKING SURFACE LAYOUT 1 2 3 4 5 1 Semi-rapid burner 2 Multi Crown burner 3 Rapid burner 4 Auxiliary burner 5 Control knobs 10 9. POSSIBILITIES FOR INSERTION The panel installed below the hob must be installed separately for connections Kitchen unit with oven The electrical connection of the hob and the oven must be easy to let easy remove oven from the unit. Space for safety reasons...
... (max 150 mm) 60 mm CAUTION! Removable panel B. min 6 mm PRODUCT DESCRIPTION COOKING SURFACE LAYOUT 1 2 3 4 5 1 Semi-rapid burner 2 Multi Crown burner 3 Rapid burner 4 Auxiliary burner 5 Control knobs 10 9. POSSIBILITIES FOR INSERTION The panel installed below the hob must be installed separately for connections Kitchen unit with oven The electrical connection of the hob and the oven must be easy to let easy remove oven from the unit. Space for safety reasons...
User Manual
Page 11
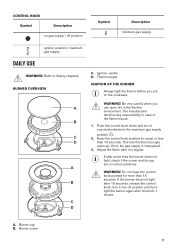
... the burner does not light, check if the crown and its cap are in the kitchen environment. WARNING! A. The manufacturer declines any responsibility in case of the flame misuse. 1. Keep the control knob pushed for more than 10 seconds. Refer to Safety chapters. Push the control knob down and turn it into off position Symbol Description minimum gas supply DAILY USE ignition position / maximum gas...
... the burner does not light, check if the crown and its cap are in the kitchen environment. WARNING! A. The manufacturer declines any responsibility in case of the flame misuse. 1. Keep the control knob pushed for more than 10 seconds. Refer to Safety chapters. Push the control knob down and turn it into off position Symbol Description minimum gas supply DAILY USE ignition position / maximum gas...
User Manual
Page 12
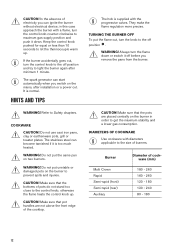
... make the flame regulation more precise. HINTS AND TIPS WARNING! The stainless steel can ignite the burner without electrical device; CAUTION! WARNING! If the burner accidentally goes out, turn the control knob counter-clockwise to get the maximum stability and a lower gas consumption. WARNING! Make sure that the bottoms of burners. DIAMETERS OF COOKWARE Use cookware with the progressive valves. in order to maximum gas supply position...
... make the flame regulation more precise. HINTS AND TIPS WARNING! The stainless steel can ignite the burner without electrical device; CAUTION! WARNING! If the burner accidentally goes out, turn the control knob counter-clockwise to get the maximum stability and a lower gas consumption. WARNING! Make sure that the bottoms of burners. DIAMETERS OF COOKWARE Use cookware with the progressive valves. in order to maximum gas supply position...
User Manual
Page 13
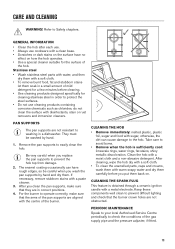
..., remove stubborn stains with a moist cloth and a non-abrasive detergent. Take care to prevent difficult lighting and check that the arms of the gas supply pipe and the pressure adjuster, if fitted. 13 Clean the hob with a paste cleaner. 3. PERIODIC MAINTENANCE Speak to your local Authorised Service Centre periodically to prevent the hob top from damage. 2. Stainless steel • Wash stainless steel parts...
..., remove stubborn stains with a moist cloth and a non-abrasive detergent. Take care to prevent difficult lighting and check that the arms of the gas supply pipe and the pressure adjuster, if fitted. 13 Clean the hob with a paste cleaner. 3. PERIODIC MAINTENANCE Speak to your local Authorised Service Centre periodically to prevent the hob top from damage. 2. Stainless steel • Wash stainless steel parts...
User Manual
Page 14
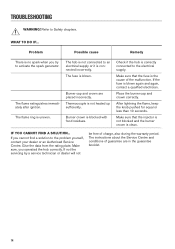
... spark generator. The hob is connected incorrectly. If the fuse is uneven. The instructions about the Service Centre and conditions of charge, also during the warranty period. Refer to the electrical supply. The flame ring is blown again and again, contact a qualified electrician. Check if the hob is clean. Make sure that the injector is not blocked and the burner...
... spark generator. The hob is connected incorrectly. If the fuse is uneven. The instructions about the Service Centre and conditions of charge, also during the warranty period. Refer to the electrical supply. The flame ring is blown again and again, contact a qualified electrician. Check if the hob is clean. Make sure that the injector is not blocked and the burner...
User Manual
Page 15
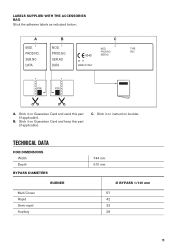
LABELS SUPPLIED WITH THE ACCESSORIES BAG Stick the adhesive labels as indicated below: A B C MOD. MOD. C. Stick it on Guarantee Card and send this part (if applicable). PROD.NO. 0049 PROD.NO. TECHNICAL DATA HOB DIMENSIONS Width Depth BYPASS DIAMETERS BURNER Multi Crown Rapid Semi-rapid Auxiliary 744 mm 510 mm Ø BYPASS 1/100 mm 57 42 32 28 15 TYPE PROD.NO. SER.NO. MOD. B. Stick it on Guarantee Card and keep this part (if applicable). IP20 SER.NO SER.NO 03 IT DATA DATA MADE IN ITALY A. Stick it on instruction booklet.
LABELS SUPPLIED WITH THE ACCESSORIES BAG Stick the adhesive labels as indicated below: A B C MOD. MOD. C. Stick it on Guarantee Card and send this part (if applicable). PROD.NO. 0049 PROD.NO. TECHNICAL DATA HOB DIMENSIONS Width Depth BYPASS DIAMETERS BURNER Multi Crown Rapid Semi-rapid Auxiliary 744 mm 510 mm Ø BYPASS 1/100 mm 57 42 32 28 15 TYPE PROD.NO. SER.NO. MOD. B. Stick it on Guarantee Card and keep this part (if applicable). IP20 SER.NO SER.NO 03 IT DATA DATA MADE IN ITALY A. Stick it on instruction booklet.
User Manual
Page 16
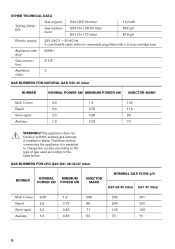
... with non rewireable plug fitted with the existing gas settings if installed in Malta. Therefore, before connecting the appliance it is essential to change the nozzles according to the type of gas used according to the table below. This appliance does not function with a 3 amp cartridge fuse Appliance category: II2H3+ Gas connection: R 1/2" Appliance 3 class: GAS BURNERS FOR NATURAL GAS G20 20 mbar BURNER NORMAL POWER kW MINIMUM POWER kW INJECTOR MARK...
... with non rewireable plug fitted with the existing gas settings if installed in Malta. Therefore, before connecting the appliance it is essential to change the nozzles according to the type of gas used according to the table below. This appliance does not function with a 3 amp cartridge fuse Appliance category: II2H3+ Gas connection: R 1/2" Appliance 3 class: GAS BURNERS FOR NATURAL GAS G20 20 mbar BURNER NORMAL POWER kW MINIMUM POWER kW INJECTOR MARK...
User Manual
Page 17
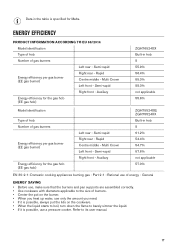
... on the burner. • When you heat up water, use only the amount you need. • If it is possible, always put the lids on the cookware. • When the liquid starts to boil, turn down the flame to its user manual. 17 ENERGY EFFICIENCY PRODUCT INFORMATION ACCORDING TO EU 66/2014 Model identification Type of hob Number of gas burners Left rear...
... on the burner. • When you heat up water, use only the amount you need. • If it is possible, always put the lids on the cookware. • When the liquid starts to boil, turn down the flame to its user manual. 17 ENERGY EFFICIENCY PRODUCT INFORMATION ACCORDING TO EU 66/2014 Model identification Type of hob Number of gas burners Left rear...

Product information sheet
Page 1
Attribute Name Model Denomination Type of hob Number of gas burners Energy efficiency per gas burner Energy efficiency for the gas hob Position Symbol Value Unit ZGH75524XX 949630819 Built-In Hob Right Front - Auxiliary EEgas burner N/A % Burner EEgas hob ,0 %
Attribute Name Model Denomination Type of hob Number of gas burners Energy efficiency per gas burner Energy efficiency for the gas hob Position Symbol Value Unit ZGH75524XX 949630819 Built-In Hob Right Front - Auxiliary EEgas burner N/A % Burner EEgas hob ,0 %


