User Manual
Page 1
ZGH75524XB ZGH75524XX ZGH76524XX EN User Manual Hob GB IE MT NG User Manual GETTING STARTED? EASY.
ZGH75524XB ZGH75524XX ZGH76524XX EN User Manual Hob GB IE MT NG User Manual GETTING STARTED? EASY.

User Manual
Page 2
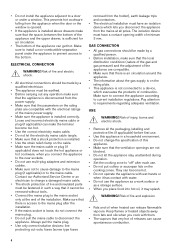
... parts become hot during use. Accessible parts are the result of the appliance, carefully read the supplied instructions. Care should be kept away unless continuously supervised. • Do not let children play with fat or oil can be activated. • Children shall not carry out cleaning and user maintenance of the appliance without supervision. SAFETY INFORMATION Before the installation and use...
... parts become hot during use. Accessible parts are the result of the appliance, carefully read the supplied instructions. Care should be kept away unless continuously supervised. • Do not let children play with fat or oil can be activated. • Children shall not carry out cleaning and user maintenance of the appliance without supervision. SAFETY INFORMATION Before the installation and use...
User Manual
Page 3
...; Where the appliance is directly connected to the power supply, an all the packaging. • Do not install or use a steam cleaner to clean the appliance. • If the supply cord is damaged, it is required. Always use as it must be replaced by the manufacturer of the cooking appliance or indicated by the manufacturer, an authorized Service or similarly qualified persons...
...; Where the appliance is directly connected to the power supply, an all the packaging. • Do not install or use a steam cleaner to clean the appliance. • If the supply cord is damaged, it is required. Always use as it must be replaced by the manufacturer of the cooking appliance or indicated by the manufacturer, an authorized Service or similarly qualified persons...
User Manual
Page 4
... plug (if applicable) or to current installation regulations. Make sure to connect the appliance according to the mains cable. Keep flames or heated objects away from the power supply. • Make sure that the parameters on the rating plate are compatible. • Make sure that the appliance is installed. • Use the strain relief clamp on the cooking zones. GAS CONNECTION • All gas connections...
... plug (if applicable) or to current installation regulations. Make sure to connect the appliance according to the mains cable. Keep flames or heated objects away from the power supply. • Make sure that the parameters on the rating plate are compatible. • Make sure that the appliance is installed. • Use the strain relief clamp on the cooking zones. GAS CONNECTION • All gas connections...
User Manual
Page 5
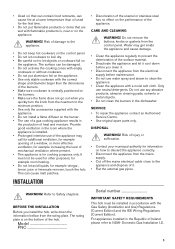
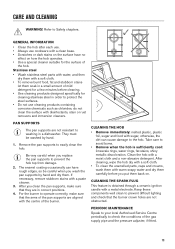
... Authorised Service Centre. • Use original spare parts only. Do not use any abrasive products, abrasive cleaning pads, solvents or metal objects. • Do not clean the burners in the room where the appliance is installed. • Prolonged intensive use neutral detergents. WARNING! The surface can be used for example vinegar, lemon juice or limescale remover, touch the hob. MPNoCde.l Serial number IMPORTANT SAFETY REQUIREMENTS...
... Authorised Service Centre. • Use original spare parts only. Do not use any abrasive products, abrasive cleaning pads, solvents or metal objects. • Do not clean the burners in the room where the appliance is installed. • Prolonged intensive use neutral detergents. WARNING! The surface can be used for example vinegar, lemon juice or limescale remover, touch the hob. MPNoCde.l Serial number IMPORTANT SAFETY REQUIREMENTS...
User Manual
Page 6
... to the outside no air vent is fitted between the components as shown in this instruction booklet be suitable for connecting to the gas specifications on the hob and installation. The minimum distance combustible material can be located in the same room, B.S. 5440 Part 2 Current Edition, should not be consulted to install the elbow correctly, with nut B. Any gas installation must be allowed...
... to the outside no air vent is fitted between the components as shown in this instruction booklet be suitable for connecting to the gas specifications on the hob and installation. The minimum distance combustible material can be located in the same room, B.S. 5440 Part 2 Current Edition, should not be consulted to install the elbow correctly, with nut B. Any gas installation must be allowed...
User Manual
Page 7
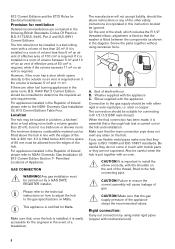
... the power cable to heat up to disconnect the appliance. ELECTRICAL CONNECTION • Do not pull the mains cable to a temperature of gas you change: • from the maximum position to natural gas G20 20 mbar, undo the bypass screw approximately 1/4 of a turn (1/2 of gas supply. Electrical Requirements Permanent electrical installation must fit an applicable pressure adjuster on the minimum position. 3. Remove the pan supports. 2. Reassemble the gasket and the knob...
... the power cable to heat up to disconnect the appliance. ELECTRICAL CONNECTION • Do not pull the mains cable to a temperature of gas you change: • from the maximum position to natural gas G20 20 mbar, undo the bypass screw approximately 1/4 of a turn (1/2 of gas supply. Electrical Requirements Permanent electrical installation must fit an applicable pressure adjuster on the minimum position. 3. Remove the pan supports. 2. Reassemble the gasket and the knob...
User Manual
Page 8
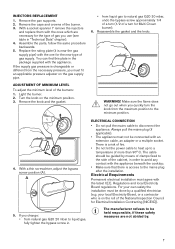
The limiter valve and the electrical system can take the appliance load (see the rating plate) 2. To replace the connection cable use a 3 amp ASTA-approved (BS 1362) fuse. The yellow/ green earth wire (B) must be correctly attached to the outer sheath. 8 Neutral Brown - Ensure that the cable section is applicable to the voltage load and the working temperature. Earth terminal Before...
The limiter valve and the electrical system can take the appliance load (see the rating plate) 2. To replace the connection cable use a 3 amp ASTA-approved (BS 1362) fuse. The yellow/ green earth wire (B) must be correctly attached to the outer sheath. 8 Neutral Brown - Ensure that the cable section is applicable to the voltage load and the working temperature. Earth terminal Before...
User Manual
Page 9
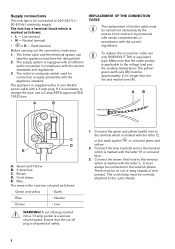
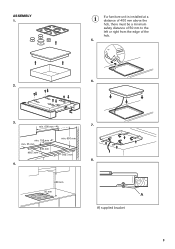
ASSEMBLY 1. If a furniture unit is installed at a distance of 400 mm above the hob, there must be a minimum safety distance of 50 mm to the left or right from the edge of the hob. 5. 6. 2. 3. 7. min. 600 mm min. 150 mm min. 55 mm min. 650 mm 30 mm 480+02 mm 560+02 mm 8. 4. 400 mm 50 mm A A) supplied bracket 9
ASSEMBLY 1. If a furniture unit is installed at a distance of 400 mm above the hob, there must be a minimum safety distance of 50 mm to the left or right from the edge of the hob. 5. 6. 2. 3. 7. min. 600 mm min. 150 mm min. 55 mm min. 650 mm 30 mm 480+02 mm 560+02 mm 8. 4. 400 mm 50 mm A A) supplied bracket 9
User Manual
Page 10
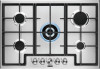
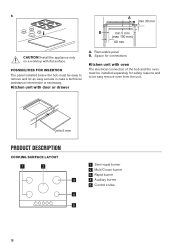
... only on a worktop with door or drawer A. min 6 mm PRODUCT DESCRIPTION COOKING SURFACE LAYOUT 1 2 3 4 5 1 Semi-rapid burner 2 Multi Crown burner 3 Rapid burner 4 Auxiliary burner 5 Control knobs 10 Removable panel B. Space for connections Kitchen unit with oven The electrical connection of the hob and the oven must be installed separately for safety reasons and to remove and let an easy access in case a technical assistance intervention is necessary. POSSIBILITIES...
... only on a worktop with door or drawer A. min 6 mm PRODUCT DESCRIPTION COOKING SURFACE LAYOUT 1 2 3 4 5 1 Semi-rapid burner 2 Multi Crown burner 3 Rapid burner 4 Auxiliary burner 5 Control knobs 10 Removable panel B. Space for connections Kitchen unit with oven The electrical connection of the hob and the oven must be installed separately for safety reasons and to remove and let an easy access in case a technical assistance intervention is necessary. POSSIBILITIES...
User Manual
Page 11
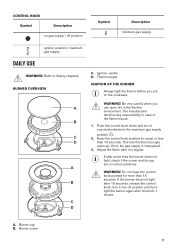
... seconds. A. Burner crown 11 Thermocouple IGNITION OF THE BURNER Always light the burner before you use open fire in case of the flame misuse. 1. Adjust the flame after minimum 1 minute. WARNING! Burner cap B. CONTROL KNOB Symbol Description no gas supply / off position and try to light the burner again after it is interrupted. 3. Be very careful when you put on the cookware. Push the control knob down and turn it counterclockwise...
... seconds. A. Burner crown 11 Thermocouple IGNITION OF THE BURNER Always light the burner before you use open fire in case of the flame misuse. 1. Adjust the flame after minimum 1 minute. WARNING! Burner cap B. CONTROL KNOB Symbol Description no gas supply / off position and try to light the burner again after it is interrupted. 3. Be very careful when you put on the cookware. Push the control knob down and turn it counterclockwise...
User Manual
Page 12
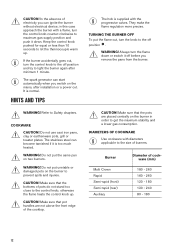
... burner in this case approach the burner with the progressive valves. Do not put the flame out, turn the flame down . CAUTION! DIAMETERS OF COOKWARE Use cookware with diameters applicable to light the burner again after installation or a power cut. HINTS AND TIPS WARNING! CAUTION! The hob is normal. It is supplied with a flame, turn the control knob to the off before you can ignite the burner without electrical...
... burner in this case approach the burner with the progressive valves. Do not put the flame out, turn the flame down . CAUTION! DIAMETERS OF COOKWARE Use cookware with diameters applicable to light the burner again after installation or a power cut. HINTS AND TIPS WARNING! CAUTION! The hob is normal. It is supplied with a flame, turn the control knob to the off before you can ignite the burner without electrical...
User Manual
Page 13
... you clean the pan supports, make sure that the arms of the pan supports are not resistant to prevent the hob top from damage. 2. Remove the pan supports to prevent difficult lighting and check that they are not obstructed. For the burner to protect the steel surfaces. • Do not use cookware with disinfectants, stain or rust removers and immersion cleaners. Stainless steel • Wash stainless steel parts with...
... you clean the pan supports, make sure that the arms of the pan supports are not resistant to prevent the hob top from damage. 2. Remove the pan supports to prevent difficult lighting and check that they are not obstructed. For the burner to protect the steel surfaces. • Do not use cookware with disinfectants, stain or rust removers and immersion cleaners. Stainless steel • Wash stainless steel parts with...
User Manual
Page 14
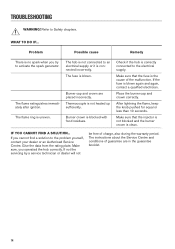
... the servicing by a service technician or dealer will not be free of guarantee are placed incorrectly. If you operated the hob correctly. The fuse is not heated up sufficiently. The flame extinguishes immediately after ignition. If the fuse is correctly connected to activate the spark generator. Make sure that the fuse is no spark when you try to the electrical supply. TROUBLESHOOTING WARNING! Problem Possible...
... the servicing by a service technician or dealer will not be free of guarantee are placed incorrectly. If you operated the hob correctly. The fuse is not heated up sufficiently. The flame extinguishes immediately after ignition. If the fuse is correctly connected to activate the spark generator. Make sure that the fuse is no spark when you try to the electrical supply. TROUBLESHOOTING WARNING! Problem Possible...
User Manual
Page 15
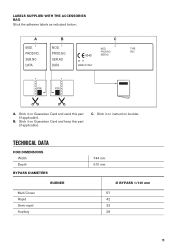
MOD. TYPE PROD.NO. PROD.NO. 0049 PROD.NO. SER.NO. B. TECHNICAL DATA HOB DIMENSIONS Width Depth BYPASS DIAMETERS BURNER Multi Crown Rapid Semi-rapid Auxiliary 744 mm 510 mm Ø BYPASS 1/100 mm 57 42 32 28 15 MOD. IP20 SER.NO SER.NO 03 IT DATA DATA MADE IN ITALY A. Stick it on instruction booklet. Stick it on Guarantee Card and keep this part (if applicable). C. Stick it on Guarantee Card and send this part (if applicable). LABELS SUPPLIED WITH THE ACCESSORIES BAG Stick the adhesive labels as indicated below: A B C MOD.
MOD. TYPE PROD.NO. PROD.NO. 0049 PROD.NO. SER.NO. B. TECHNICAL DATA HOB DIMENSIONS Width Depth BYPASS DIAMETERS BURNER Multi Crown Rapid Semi-rapid Auxiliary 744 mm 510 mm Ø BYPASS 1/100 mm 57 42 32 28 15 MOD. IP20 SER.NO SER.NO 03 IT DATA DATA MADE IN ITALY A. Stick it on instruction booklet. Stick it on Guarantee Card and keep this part (if applicable). C. Stick it on Guarantee Card and send this part (if applicable). LABELS SUPPLIED WITH THE ACCESSORIES BAG Stick the adhesive labels as indicated below: A B C MOD.
User Manual
Page 16
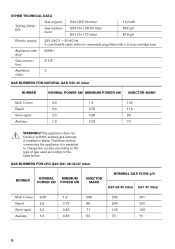
... DATA TOTAL POWER: Gas original: Gas replacement: G20 (2H) 20 mbar G30 (3+) 28-30 mbar G31 (3+) 37 mbar 12,0 kW 832 g/h 818 g/h Electric supply: 220-240 V ~ 50-60 Hz 3 core flexible cable with non rewireable plug fitted with the existing gas settings if installed in Malta. GAS BURNERS FOR LPG G30/G31 28-30/37 mbar BURNER NORMAL MINIMUM POWER kW POWER kW INJECTOR MARK...
... DATA TOTAL POWER: Gas original: Gas replacement: G20 (2H) 20 mbar G30 (3+) 28-30 mbar G31 (3+) 37 mbar 12,0 kW 832 g/h 818 g/h Electric supply: 220-240 V ~ 50-60 Hz 3 core flexible cable with non rewireable plug fitted with the existing gas settings if installed in Malta. GAS BURNERS FOR LPG G30/G31 28-30/37 mbar BURNER NORMAL MINIMUM POWER kW POWER kW INJECTOR MARK...
User Manual
Page 17
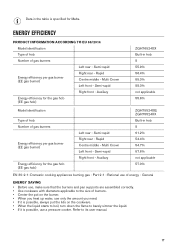
... burners and pan supports are assembled correctly. • Use cookware with diameters applicable to the size of gas burners Energy efficiency per gas burner (EE gas burner) Right rear - Rapid Centre middle - Auxiliary ZGH75524XB, ZGH75524XX Built-in hob 5 61.2% 54.4% 54.7% 57.6% not applicable 57.0% EN 30-2-1: Domestic cooking appliances burning gas - ENERGY EFFICIENCY PRODUCT INFORMATION ACCORDING TO EU 66/2014 Model identification Type of hob Number...
... burners and pan supports are assembled correctly. • Use cookware with diameters applicable to the size of gas burners Energy efficiency per gas burner (EE gas burner) Right rear - Rapid Centre middle - Auxiliary ZGH75524XB, ZGH75524XX Built-in hob 5 61.2% 54.4% 54.7% 57.6% not applicable 57.0% EN 30-2-1: Domestic cooking appliances burning gas - ENERGY EFFICIENCY PRODUCT INFORMATION ACCORDING TO EU 66/2014 Model identification Type of hob Number...
Specification Sheet
Page 1
... burner on our hob increase the stability of the flame. So no matter what meal you're making cleaning even easier. even the large ones. Press for instant heat Press to give you can simply set the right temperature for easy cleaning • 3 stylish cast iron pan supports • Automatic integrated ignition • Safety gas cut off using thermocouples • Easy to cooking...
... burner on our hob increase the stability of the flame. So no matter what meal you're making cleaning even easier. even the large ones. Press for instant heat Press to give you can simply set the right temperature for easy cleaning • 3 stylish cast iron pan supports • Automatic integrated ignition • Safety gas cut off using thermocouples • Easy to cooking...

Specification Sheet
Page 2
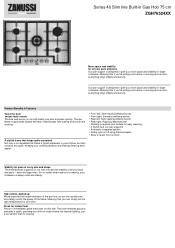
Power/Diameter Right rear - Power/Diameter Rear - Power/Diameter Gas supply: natural gas Gas replacement Gas replacement Residual heat indicator ProdPartCode 744x510 40x560x480 12000 1.1 Thermocouple 2000W/70mm 4000W/128mm 2000W/70mm 1000W/54mm 3000W/100mm G20 (2H) 20 mbar G30/G31 (3+) 28-30/37 mbar, With Additional Injectors No No All Open Series 40 Slim line Built-in mm Max power gas, W Cord Length Hob safety Dial Middle rear - Product Specification Hobs Dimensions Aperture dimensions HxWxD in Gas Hob 75 cm ZGH76524XX Power/Diameter Right front -
Power/Diameter Right rear - Power/Diameter Rear - Power/Diameter Gas supply: natural gas Gas replacement Gas replacement Residual heat indicator ProdPartCode 744x510 40x560x480 12000 1.1 Thermocouple 2000W/70mm 4000W/128mm 2000W/70mm 1000W/54mm 3000W/100mm G20 (2H) 20 mbar G30/G31 (3+) 28-30/37 mbar, With Additional Injectors No No All Open Series 40 Slim line Built-in mm Max power gas, W Cord Length Hob safety Dial Middle rear - Product Specification Hobs Dimensions Aperture dimensions HxWxD in Gas Hob 75 cm ZGH76524XX Power/Diameter Right front -

Product information sheet
Page 1
Auxiliary EEgas burner N/A % Burner EEgas hob ,0 % Attribute Name Model Denomination Type of hob Number of gas burners Energy efficiency per gas burner Energy efficiency for the gas hob Position Symbol Value Unit ZGH76524XX 949630812 Built-In Hob Right Front -
Auxiliary EEgas burner N/A % Burner EEgas hob ,0 % Attribute Name Model Denomination Type of hob Number of gas burners Energy efficiency per gas burner Energy efficiency for the gas hob Position Symbol Value Unit ZGH76524XX 949630812 Built-In Hob Right Front -


