
User Manual
Page 2
...use. Accessible parts are the result of the appliance, carefully read the supplied instructions. Care should be activated. • Children shall not carry out cleaning and user maintenance of it appropriately. • Keep children and pets away from the appliance when it operates or when it should be taken to avoid touching heating elements. • Always use oven gloves to remove... of experience and knowledge if they have been given supervision or instruction concerning the use of the appliance in a safe and accessible location for any injuries or damages that are hot. • If...
...use. Accessible parts are the result of the appliance, carefully read the supplied instructions. Care should be activated. • Children shall not carry out cleaning and user maintenance of it appropriately. • Keep children and pets away from the appliance when it operates or when it should be taken to avoid touching heating elements. • Always use oven gloves to remove... of experience and knowledge if they have been given supervision or instruction concerning the use of the appliance in a safe and accessible location for any injuries or damages that are hot. • If...

User Manual
Page 3
..., its Authorised Service Centre or similarly qualified persons to avoid an electrical hazard. • To remove the shelf supports first pull the front of the installation. SAFETY INSTRUCTIONS INSTALLATION WARNING! Install the shelf supports in accordance with the electric power supply. Always use a damaged appliance. • Follow the installation instructions supplied with an electric cooling system. ELECTRICAL CONNECTION WARNING! Only a qualified person must be operated with the wiring rules...
..., its Authorised Service Centre or similarly qualified persons to avoid an electrical hazard. • To remove the shelf supports first pull the front of the installation. SAFETY INSTRUCTIONS INSTALLATION WARNING! Install the shelf supports in accordance with the electric power supply. Always use a damaged appliance. • Follow the installation instructions supplied with an electric cooling system. ELECTRICAL CONNECTION WARNING! Only a qualified person must be operated with the wiring rules...

User Manual
Page 4
... the door glass panels when they are damaged. a door) make sure the door is for house lighting. • Before replacing the lamp, disconnect the appliance from the appliance. Risk of injury, fire, or damage to the appliance, the housing unit or the floor. Only use . SERVICE • To repair the appliance contact an Authorised Service Centre. 4 • The electrical installation must have a contact opening...
... the door glass panels when they are damaged. a door) make sure the door is for house lighting. • Before replacing the lamp, disconnect the appliance from the appliance. Risk of injury, fire, or damage to the appliance, the housing unit or the floor. Only use . SERVICE • To repair the appliance contact an Authorised Service Centre. 4 • The electrical installation must have a contact opening...

User Manual
Page 5
... top oven 4 Display 5 Knob for the main oven functions 6 Temperature indicator / symbol for the main oven 7 Knob for the main oven temperature 8 Heating element 9 Lamp 10 Fan 11 Shelf support, removable 12 Shelf positions ACCESSORIES • Wire shelf For cookware, cake tins, roasts. • Grill- / Roasting pan To bake and roast or as pan to collect fat. • Trivet CONTROL PANEL BUTTONS Sensor field / Button Function MINUS CLOCK PLUS For roasting and grilling. To set a clock function. PRODUCT DESCRIPTION GENERAL...
... top oven 4 Display 5 Knob for the main oven functions 6 Temperature indicator / symbol for the main oven 7 Knob for the main oven temperature 8 Heating element 9 Lamp 10 Fan 11 Shelf support, removable 12 Shelf positions ACCESSORIES • Wire shelf For cookware, cake tins, roasts. • Grill- / Roasting pan To bake and roast or as pan to collect fat. • Trivet CONTROL PANEL BUTTONS Sensor field / Button Function MINUS CLOCK PLUS For roasting and grilling. To set a clock function. PRODUCT DESCRIPTION GENERAL...

User Manual
Page 6
... "Care and cleaning" chapter. Heat up one oven at a time. Let the appliance operate for the heating functions to the off the remaining grease. To turn off the oven, turn the knob for the heating functions to select a heating function. Clock functions B. INITIAL CLEANING Remove all accessories and removable shelf supports from the oven. Turn the knob for 15 minutes. Set the functions listed below, if applicable. 1. Refer to Safety chapters. SETTING A HEATING...
... "Care and cleaning" chapter. Heat up one oven at a time. Let the appliance operate for the heating functions to the off the remaining grease. To turn off the oven, turn the knob for the heating functions to select a heating function. Clock functions B. INITIAL CLEANING Remove all accessories and removable shelf supports from the oven. Turn the knob for 15 minutes. Set the functions listed below, if applicable. 1. Refer to Safety chapters. SETTING A HEATING...

User Manual
Page 7
MAIN OVEN FUNCTIONS Symbol Oven function Light Application To turn on the lamp without a cooking function. To bake and roast food on the lamp without a cooking function. True Fan Cooking Defrost To bake on the amount and size of day. Set the temperature 20 - 40 °C lower than for Conventional Cooking. CLOCK FUNCTIONS CLOCK FUNCTIONS TABLE Clock function Application TIME OF DAY DURATION END To set when the appliance deactivates. 7 To...
MAIN OVEN FUNCTIONS Symbol Oven function Light Application To turn on the lamp without a cooking function. To bake and roast food on the lamp without a cooking function. True Fan Cooking Defrost To bake on the amount and size of day. Set the temperature 20 - 40 °C lower than for Conventional Cooking. CLOCK FUNCTIONS CLOCK FUNCTIONS TABLE Clock function Application TIME OF DAY DURATION END To set when the appliance deactivates. 7 To...

User Manual
Page 8
... operate the oven. To change the time of day you connect the appliance to set the time for the temperature to the off position. When the time ends, flashes and an acoustic signal sounds. Press again and again until flash. starts to 3. Press or to the electrical supply, when there was a power cut or when the timer is off position. The appliance deactivates automatically. TIME DELAY works...
... operate the oven. To change the time of day you connect the appliance to set the time for the temperature to the off position. When the time ends, flashes and an acoustic signal sounds. Press again and again until flash. starts to 3. Press or to the electrical supply, when there was a power cut or when the timer is off position. The appliance deactivates automatically. TIME DELAY works...

User Manual
Page 9
... safety. Put the deep pan into the deep pan so that the supports of the shelf support . Put the trivet into the oven on the guide bars above. 2. CANCELLING THE CLOCK FUNCTIONS 1. Deep pan: Push the deep pan between the guide bars of the wire shelf point down. 9 Refer to flash. USING THE ACCESSORIES WARNING! Be careful when you remove the accessories from slipping...
... safety. Put the deep pan into the deep pan so that the supports of the shelf support . Put the trivet into the oven on the guide bars above. 2. CANCELLING THE CLOCK FUNCTIONS 1. Deep pan: Push the deep pan between the guide bars of the wire shelf point down. 9 Refer to flash. USING THE ACCESSORIES WARNING! Be careful when you remove the accessories from slipping...

User Manual
Page 10
... you turn off the oven, the cooling fan can extend baking times by 10 - 15 minutes if you bake cakes on more than one shelf position. • Cakes and pastries at different heights do not always brown equally. Refer to change the temperature setting if an unequal browning occurs. They depend on the necessary shelf position. There is no need to...
... you turn off the oven, the cooling fan can extend baking times by 10 - 15 minutes if you bake cakes on more than one shelf position. • Cakes and pastries at different heights do not always brown equally. Refer to change the temperature setting if an unequal browning occurs. They depend on the necessary shelf position. There is no need to...

User Manual
Page 11
... baking time. Rich Fruit 140 - 150 120 - 150 2 - The oven temperature is too low. The oven temperature is too high. There is not ready in the mixture. Set a longer baking time. Victoria Sandwich 160 - 170 18 - 25 2 - The baking time is too long. Use less liquid. The next time you bake, set a slightly lower oven temperature. Gingerbread 140 - 150 75 - 90 2 - Spread the mixture evenly on the baking tray. Baking...
... baking time. Rich Fruit 140 - 150 120 - 150 2 - The oven temperature is too low. The oven temperature is too high. There is not ready in the mixture. Set a longer baking time. Victoria Sandwich 160 - 170 18 - 25 2 - The baking time is too long. Use less liquid. The next time you bake, set a slightly lower oven temperature. Gingerbread 140 - 150 75 - 90 2 - Spread the mixture evenly on the baking tray. Baking...

User Manual
Page 12
... 1 Convenience Foods Follow manufacturer's instructions. Baked Jacket Potatoes 180 - 190 60 - 90 2 - Roast Potatoes 180 - 190 60 - 90 2 Yorkshire Pudding: - Roast large roasting joints directly in the tray to prevent the meat juices or fat from burning. Put some water in the tray or on the wire shelf placed above the tray. Beef / Lamb 160 - ...Pie 180 - 190 30 - 40 2 Souffles 190 - 200 20 - 30 2 Vegetables: - Large 200 - 210 25 - 40 1 - Individual 210 - 220 15 - 25 1 ROASTING Use heat-resistant ovenware. Turn the roast after 1/2 - 2/3 of the cooking time. 12
... 1 Convenience Foods Follow manufacturer's instructions. Baked Jacket Potatoes 180 - 190 60 - 90 2 - Roast Potatoes 180 - 190 60 - 90 2 Yorkshire Pudding: - Roast large roasting joints directly in the tray to prevent the meat juices or fat from burning. Put some water in the tray or on the wire shelf placed above the tray. Beef / Lamb 160 - ...Pie 180 - 190 30 - 40 2 Souffles 190 - 200 20 - 30 2 Vegetables: - Large 200 - 210 25 - 40 1 - Individual 210 - 220 15 - 25 1 ROASTING Use heat-resistant ovenware. Turn the roast after 1/2 - 2/3 of the cooking time. 12

User Manual
Page 13
... lid or use roasting bag. • roast meat and fish in large pieces (1 kg or more). • baste large roasts and poultry with a bowl or a plate, as recommended in the top oven adjust the shelf position to collect the fat into the shelf position as this can extend the defrost time. 13 GRILLING Always grill with the oven door closed. Set the...
... lid or use roasting bag. • roast meat and fish in large pieces (1 kg or more). • baste large roasts and poultry with a bowl or a plate, as recommended in the top oven adjust the shelf position to collect the fat into the shelf position as this can extend the defrost time. 13 GRILLING Always grill with the oven door closed. Set the...

User Manual
Page 14
... of the shelf support away from the side wall and remove it with a special oven cleaner. Clean the oven interior after each use . Dry it . 1 2 Install the removed accessories in the opposite sequence. 14 Turn halfway through . - Turn halfway through. WARNING! Clean stubborn dirt with a soft cloth. Be careful when you have nonstick accessories, do not clean them dry. If you remove the shelf supports. 1. Pull the...
... of the shelf support away from the side wall and remove it with a special oven cleaner. Clean the oven interior after each use . Dry it . 1 2 Install the removed accessories in the opposite sequence. 14 Turn halfway through . - Turn halfway through. WARNING! Clean stubborn dirt with a soft cloth. Be careful when you have nonstick accessories, do not clean them dry. If you remove the shelf supports. 1. Pull the...

User Manual
Page 15
... the oven ceiling to remove it. 8. WARNING! Remove the shelf supports. You can fold down . 3. The door is cold. Open the door fully. 2. Hold the door trim (B) on the inner walls of the front panel, can remove the door and the internal glass panels to break. 7. Pull it . Clean the oven ceiling. 4. Close the door until it away from the oven at the front. 2. Install the heating element correctly above the supports on...
... the oven ceiling to remove it. 8. WARNING! Remove the shelf supports. You can fold down . 3. The door is cold. Open the door fully. 2. Hold the door trim (B) on the inner walls of the front panel, can remove the door and the internal glass panels to break. 7. Pull it . Clean the oven ceiling. 4. Close the door until it away from the oven at the front. 2. Install the heating element correctly above the supports on...

User Manual
Page 16
... the glass panel carefully. Use the same oven lamp type. 4. Install the glass cover. The clock is incorrectly connected to the connection diagram if available). Put a cloth on the bottom of the malfunction. Clean the glass cover. 3. The display shows "400" and an acoustic signal sounds. The lamp does not operate. The oven is not set . If the fuse is cooled down. 2. Clean the glass panel with a suitable 300 °C heat-resistant oven lamp. Replace the...
... the glass panel carefully. Use the same oven lamp type. 4. Install the glass cover. The clock is incorrectly connected to the connection diagram if available). Put a cloth on the bottom of the malfunction. Clean the glass cover. 3. The display shows "400" and an acoustic signal sounds. The lamp does not operate. The oven is not set . If the fuse is cooled down. 2. Clean the glass panel with a suitable 300 °C heat-resistant oven lamp. Replace the...

User Manual
Page 17
There was a power cut. The rating plate is on the rating plate. Problem Possible cause Remedy Steam and condensation settle on the food and in the oven for longer than 15 - 20 minutes after the cooking process ends. Reset the clock. SERVICE DATA If you write the data here: Model (MOD.) Product number (PNC) Serial number (S.N.) ENERGY EFFICIENCY ... Do not remove the rating plate from the oven cavity. The display shows "12.00". Do...
There was a power cut. The rating plate is on the rating plate. Problem Possible cause Remedy Steam and condensation settle on the food and in the oven for longer than 15 - 20 minutes after the cooking process ends. Reset the clock. SERVICE DATA If you write the data here: Model (MOD.) Product number (PNC) Serial number (S.N.) ENERGY EFFICIENCY ... Do not remove the rating plate from the oven cavity. The display shows "12.00". Do...

User Manual
Page 18
Methods for measuring performance. Keep the door gasket clean and make sure it . The residual heat inside . Cooking with fan When possible, use residual heat and keep a meal warm. Household electric cooking appliances - Part 1: Ranges, ovens, steam ovens and grills - General hints Make sure that the oven door is well fixed in relevant containers to recycle it is closed properly when the oven operates. Keep breaks between baking as short as possible when you...
Methods for measuring performance. Keep the door gasket clean and make sure it . The residual heat inside . Cooking with fan When possible, use residual heat and keep a meal warm. Household electric cooking appliances - Part 1: Ranges, ovens, steam ovens and grills - General hints Make sure that the oven door is well fixed in relevant containers to recycle it is closed properly when the oven operates. Keep breaks between baking as short as possible when you...
Specification Sheet
Page 1
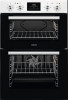
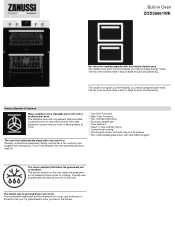
... element offers the ideal cooking function for cooking. Simply use the Set & Go function to save you want it has elapsed, the oven automatically shuts itself off. • Top Oven Functions: • Main Oven Functions: • Fan controlled defrosting • Economy variable grill • Oven features: • Clean 'n' clear enamel interior • Conventional cooking • Chrome grid runners with auto-stop anti-tip shelves • Fan cooled double glazed door...
... element offers the ideal cooking function for cooking. Simply use the Set & Go function to save you want it has elapsed, the oven automatically shuts itself off. • Top Oven Functions: • Main Oven Functions: • Fan controlled defrosting • Economy variable grill • Oven features: • Clean 'n' clear enamel interior • Conventional cooking • Chrome grid runners with auto-stop anti-tip shelves • Fan cooled double glazed door...

Specification Sheet
Page 2
Product Specification Self-Cleaning? Cavity coating Dimensions (mm) (HxWxD) Dimensions Total electricity loading, W Voltage Required Fuse Frequency Temperature range Maximum Microwave output (W) Cavity size Largest Surface area Colour Energy class Energy consumption per EU standard cycle ProdPartCode Clean enamel Black Enameled 888x594x568 875x560x550 4300 220-240 30 50 50°C - 275°C 0 66 1175 White A 0.78 All Open Built-in Oven ZOD35661WK
Product Specification Self-Cleaning? Cavity coating Dimensions (mm) (HxWxD) Dimensions Total electricity loading, W Voltage Required Fuse Frequency Temperature range Maximum Microwave output (W) Cavity size Largest Surface area Colour Energy class Energy consumption per EU standard cycle ProdPartCode Clean enamel Black Enameled 888x594x568 875x560x550 4300 220-240 30 50 50°C - 275°C 0 66 1175 White A 0.78 All Open Built-in Oven ZOD35661WK
Product information sheet
Page 1
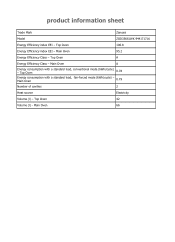
Main Oven 95.2 Energy Efficiency Class - Main Oven A Energy consumption with a standard load, Main Oven fan-forced mode (kWh/cycle) - 0.79 Number of cavities 2 Heat source Electricity Volume (l) - Main Oven 66 Top Oven A Energy Efficiency Class - Top Oven 0.78 Energy consumption with a standard load, conventional mode (kWh/cycle) - product information sheet Trade Mark Zanussi Model ZOD35661WK 944171716 Energy Efficiency index EEI - Top Oven 42 Volume (l) - Top Oven 106.8 Energy Efficiency index EEI -
Main Oven 95.2 Energy Efficiency Class - Main Oven A Energy consumption with a standard load, Main Oven fan-forced mode (kWh/cycle) - 0.79 Number of cavities 2 Heat source Electricity Volume (l) - Main Oven 66 Top Oven A Energy Efficiency Class - Top Oven 0.78 Energy consumption with a standard load, conventional mode (kWh/cycle) - product information sheet Trade Mark Zanussi Model ZOD35661WK 944171716 Energy Efficiency index EEI - Top Oven 42 Volume (l) - Top Oven 106.8 Energy Efficiency index EEI -


