
Specification Sheet
Page 1
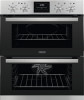
... shuts itself off. • Top Oven Functions: • Economy variable grill • Top heat • Main Oven Functions: • Fan controlled defrosting • Economy variable grill • Oven features: • Clean 'n' clear enamel interior • Conventional cooking • Chrome grid runners with a multifunction oven. Built-in Oven ZOF35661XK Get twice the cooking capacity with ring element offers the ideal cooking function for cooking. Product Benefits & Features Make cooking a more enjoyable part...
... shuts itself off. • Top Oven Functions: • Economy variable grill • Top heat • Main Oven Functions: • Fan controlled defrosting • Economy variable grill • Oven features: • Clean 'n' clear enamel interior • Conventional cooking • Chrome grid runners with a multifunction oven. Built-in Oven ZOF35661XK Get twice the cooking capacity with ring element offers the ideal cooking function for cooking. Product Benefits & Features Make cooking a more enjoyable part...
Specification Sheet
Page 2
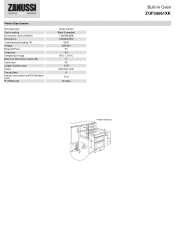
Cavity coating Dimensions (mm) (HxWxD) Dimensions Total electricity loading, W Voltage Required Fuse Frequency Temperature range Maximum Microwave output (W) Cavity size Largest Surface area Colour Energy class Energy consumption per EU standard cycle ProdPartCode Clean enamel Black Enameled 715x594x568 720x600x550 5300 220-240 30 50 50°C - 275°C 0 45 1175 Stainless steel A 0.78 All Open Built-in Oven ZOF35661XK Product Specification Self-Cleaning?
Cavity coating Dimensions (mm) (HxWxD) Dimensions Total electricity loading, W Voltage Required Fuse Frequency Temperature range Maximum Microwave output (W) Cavity size Largest Surface area Colour Energy class Energy consumption per EU standard cycle ProdPartCode Clean enamel Black Enameled 715x594x568 720x600x550 5300 220-240 30 50 50°C - 275°C 0 45 1175 Stainless steel A 0.78 All Open Built-in Oven ZOF35661XK Product Specification Self-Cleaning?
User Manual
Page 2
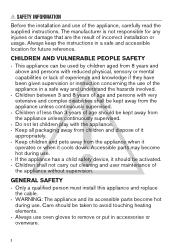
... Before the installation and use of the appliance without supervision. Accessible parts may become hot during use. • If the appliance has a child safety device, it should be activated. • Children shall not carry out cleaning and user maintenance of the appliance, carefully read the supplied instructions. Care should be taken to remove or put in a safe and accessible location for...
... Before the installation and use of the appliance without supervision. Accessible parts may become hot during use. • If the appliance has a child safety device, it should be activated. • Children shall not carry out cleaning and user maintenance of the appliance, carefully read the supplied instructions. Care should be taken to remove or put in a safe and accessible location for...

User Manual
Page 3
... Authorised Service Centre or similarly qualified persons to clean the appliance. • Do not use a damaged appliance. • Follow the installation instructions supplied with the appliance. • Always take care when moving the appliance as it in the built-in unit must be incorporated in the fixed wiring in depth of DIN 68930. It must meet the stability requirements...
... Authorised Service Centre or similarly qualified persons to clean the appliance. • Do not use a damaged appliance. • Follow the installation instructions supplied with the appliance. • Always take care when moving the appliance as it in the built-in unit must be incorporated in the fixed wiring in depth of DIN 68930. It must meet the stability requirements...

User Manual
Page 4
... bottom rear side Mounting screws 560x20 mm 3.5x25 mm ELECTRICAL CONNECTION WARNING! do not put ovenware or other purposes, for moist cakes. Always pull the mains plug. • Use only correct isolation devices: line protecting cut-outs, fuses (screw type fuses removed from the mains at the end of live and insulated parts must have a contact opening minimum size. Hot air can cause...
... bottom rear side Mounting screws 560x20 mm 3.5x25 mm ELECTRICAL CONNECTION WARNING! do not put ovenware or other purposes, for moist cakes. Always pull the mains plug. • Use only correct isolation devices: line protecting cut-outs, fuses (screw type fuses removed from the mains at the end of live and insulated parts must have a contact opening minimum size. Hot air can cause...
User Manual
Page 5
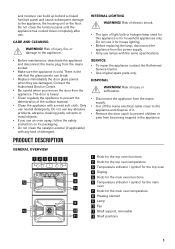
.... • Replace immediately the door glass panels when they are damaged. Only use any kind of light bulb or halogen lamp used for household appliances only. SERVICE • To repair the appliance contact the Authorised Service Centre. • Use original spare parts only. CARE AND CLEANING WARNING! GENERAL OVERVIEW 1234567 8 4 3 12 2 9 1 11 9 4 3 12 2 10 1 11 1 Knob for the top oven functions 2 Knob for the top oven temperature 3 Temperature indicator / symbol...
.... • Replace immediately the door glass panels when they are damaged. Only use any kind of light bulb or halogen lamp used for household appliances only. SERVICE • To repair the appliance contact the Authorised Service Centre. • Use original spare parts only. CARE AND CLEANING WARNING! GENERAL OVERVIEW 1234567 8 4 3 12 2 9 1 11 9 4 3 12 2 10 1 11 1 Knob for the top oven functions 2 Knob for the top oven temperature 3 Temperature indicator / symbol...

User Manual
Page 6
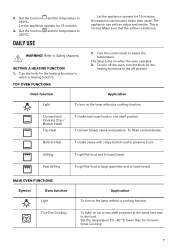
... chapters. Heat up one oven at a time. Set the function and the temperature to "Care and cleaning" chapter. Use the trivet only with the main oven. To set the time. DISPLAY The display works only with the Grill- / roasting pan. Clock function A B C BEFORE FIRST USE WARNING! Refer to 250ºC. INITIAL CLEANING Remove all accessories and removable shelf supports from the oven. PREHEATING Preheat the empty appliance to collect fat. • Trivet CONTROL PANEL BUTTONS For roasting and grilling...
... chapters. Heat up one oven at a time. Set the function and the temperature to "Care and cleaning" chapter. Use the trivet only with the main oven. To set the time. DISPLAY The display works only with the Grill- / roasting pan. Clock function A B C BEFORE FIRST USE WARNING! Refer to 250ºC. INITIAL CLEANING Remove all accessories and removable shelf supports from the oven. PREHEATING Preheat the empty appliance to collect fat. • Trivet CONTROL PANEL BUTTONS For roasting and grilling...
User Manual
Page 7
... OVEN FUNCTIONS Symbol Oven function Light True Fan Cooking Application To turn on the lamp without a cooking function. This is sufficient. Conventional Cooking (Top / Bottom Heat) Top Heat To bake and roast food on when the oven operates. 3. Grilling To grill flat food and to select the temperature. Refer to the off the oven, turn off position. To turn the knob for the heating functions to dry food. Set the...
... OVEN FUNCTIONS Symbol Oven function Light True Fan Cooking Application To turn on the lamp without a cooking function. This is sufficient. Conventional Cooking (Top / Bottom Heat) Top Heat To bake and roast food on when the oven operates. 3. Grilling To grill flat food and to select the temperature. Refer to the off the oven, turn off position. To turn the knob for the heating functions to dry food. Set the...

User Manual
Page 8
... that the oven operates with the energy efficiency class according to brown. Moist Baking CLOCK FUNCTIONS CLOCK FUNCTIONS TABLE Clock function TIME OF DAY DURATION END TIME DELAY This function is not set. This function was a power cut or when the timer is designed to toast bread. CHANGING THE TIME You must set the time before you connect the appliance to the electrical supply, when there was used to comply...
... that the oven operates with the energy efficiency class according to brown. Moist Baking CLOCK FUNCTIONS CLOCK FUNCTIONS TABLE Clock function TIME OF DAY DURATION END TIME DELAY This function is not set. This function was a power cut or when the timer is designed to toast bread. CHANGING THE TIME You must set the time before you connect the appliance to the electrical supply, when there was used to comply...

User Manual
Page 9
... ACCESSORIES Wire shelf: Push the shelf between the guide bars of the shelf support . 9 Press any button to stop the acoustic signal. 4. SETTING THE END 1. again and again until starts to set the time for END. 6. Press or to flash. 2. The display shows . 4. starts to confirm. Press to 3. When the set END time. CANCELLING THE CLOCK FUNCTIONS 1. Refer to 3. Turn the knob for the oven functions...
... ACCESSORIES Wire shelf: Push the shelf between the guide bars of the shelf support . 9 Press any button to stop the acoustic signal. 4. SETTING THE END 1. again and again until starts to set the time for END. 6. Press or to flash. 2. The display shows . 4. starts to confirm. Press to 3. When the set END time. CANCELLING THE CLOCK FUNCTIONS 1. Refer to 3. Turn the knob for the oven functions...
User Manual
Page 10
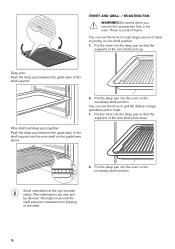
.... Wire shelf and deep pan together: Push the deep pan between the guide bars of the shelf support and the wire shelf on one shelf position. 1. Deep pan: Push the deep pan between the guide bars of the shelf support. Small indentation at the top increase safety. You can use the trivet to toast. 1. TRIVET AND GRILL- / ROASTING PAN WARNING! Be careful when you remove...
.... Wire shelf and deep pan together: Push the deep pan between the guide bars of the shelf support and the wire shelf on one shelf position. 1. Deep pan: Push the deep pan between the guide bars of the shelf support. Small indentation at the top increase safety. You can use the trivet to toast. 1. TRIVET AND GRILL- / ROASTING PAN WARNING! Be careful when you remove...
User Manual
Page 11
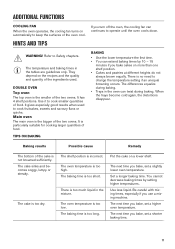
.... • Cakes and pastries at different heights do not always brown equally. DOUBLE OVEN Top oven The top oven is the smaller of the two ovens. Main oven The main oven is no need to operate until the oven cools down. TIPS ON BAKING BAKING • Use the lower temperature the first time. • You can continues to change the temperature setting if an unequal browning occurs. The shelf...
.... • Cakes and pastries at different heights do not always brown equally. DOUBLE OVEN Top oven The top oven is the smaller of the two ovens. Main oven The main oven is no need to operate until the oven cools down. TIPS ON BAKING BAKING • Use the lower temperature the first time. • You can continues to change the temperature setting if an unequal browning occurs. The shelf...

User Manual
Page 12
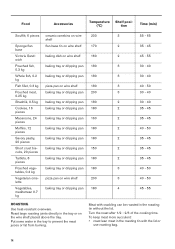
...oven temperature is too high and the baking time is unevenly distributed. Spread the mixture evenly on the baking tray. Small & Queen 160 - 170 18 - 25 2 - Victoria Sandwich 160 - 170 18 - 25 2 - The mixture is too short. BAKING To bake in the baking time given. Food Temperature (°C) Time...180 75 - 90 1 Convenience Foods Follow manufacturer's instructions. Top oven Set a lower oven temperature and a longer baking time. The oven temperature is not ready in the top oven use the function Conventional Cooking. Gingerbread 140 - 150 75 - 90 2 -...
...oven temperature is too high and the baking time is unevenly distributed. Spread the mixture evenly on the baking tray. Small & Queen 160 - 170 18 - 25 2 - Victoria Sandwich 160 - 170 18 - 25 2 - The mixture is too short. BAKING To bake in the baking time given. Food Temperature (°C) Time...180 75 - 90 1 Convenience Foods Follow manufacturer's instructions. Top oven Set a lower oven temperature and a longer baking time. The oven temperature is not ready in the top oven use the function Conventional Cooking. Gingerbread 140 - 150 75 - 90 2 -...
User Manual
Page 14
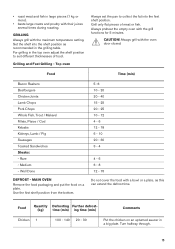
... tray. Meat with the lid or use roasting bag. 14 Roast large roasting joints directly in the roasting tin with crackling can be roasted in the tray to prevent the meat juices or fat from burning. To keep meat more succulent: • roast lean meat in the tray or on wire shelf 200 3 40 - 50 lette Vegetables, baking tray or dripping pan 180 4 45 - 55 mediterrean 0.7 kg ROASTING Use heat-resistant ovenware. baking tray...
... tray. Meat with the lid or use roasting bag. 14 Roast large roasting joints directly in the roasting tin with crackling can be roasted in the tray to prevent the meat juices or fat from burning. To keep meat more succulent: • roast lean meat in the tray or on wire shelf 200 3 40 - 50 lette Vegetables, baking tray or dripping pan 180 4 45 - 55 mediterrean 0.7 kg ROASTING Use heat-resistant ovenware. baking tray...
User Manual
Page 15
... defrost time. Top oven Always set the pan to suit different thicknesses of meat or fish. Turn halfway through. 15 Use the first shelf position from the bottom. 5 -6 10 - 20 20 - 40 15 - 25 20 - 25 10 - 12 4 - 6 12 - 18 6 - 10 20 - 30 3 - 4 4 - 6 6 - 8 12 - 15 Do not cover the food with the oven door closed. Always grill with a bowl or a plate...
... defrost time. Top oven Always set the pan to suit different thicknesses of meat or fish. Turn halfway through. 15 Use the first shelf position from the bottom. 5 -6 10 - 20 20 - 40 15 - 25 20 - 25 10 - 12 4 - 6 12 - 18 6 - 10 20 - 30 3 - 4 4 - 6 6 - 8 12 - 15 Do not cover the food with the oven door closed. Always grill with a bowl or a plate...
User Manual
Page 16
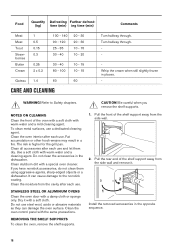
... OR ALUMINIUM OVENS Clean the oven door with the same precautions. CAUTION! Refer to the nonstick coating. Clean the oven interior after each use . Fat accumulation or other food remains may result in places. - It can damage the oven surface. REMOVING THE SHELF SUPPORTS To clean the oven, remove the shelf supports. Turn halfway through . Do not clean the accessories in the opposite sequence. 16 Clean the oven control panel with...
... OR ALUMINIUM OVENS Clean the oven door with the same precautions. CAUTION! Refer to the nonstick coating. Clean the oven interior after each use . Fat accumulation or other food remains may result in places. - It can damage the oven surface. REMOVING THE SHELF SUPPORTS To clean the oven, remove the shelf supports. Turn halfway through . Do not clean the accessories in the opposite sequence. 16 Clean the oven control panel with...
User Manual
Page 17
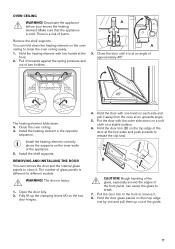
.... 5. Clean the oven ceiling. 4. REMOVING AND INSTALLING THE DOOR You can remove the door and the internal glass panels to clean it . 8. The number of burns. Rough handling of the glass, especially around the edges of the appliance. 5. OVEN CEILING WARNING! Close the door until it is different for different models. Install the heating element in the opposite sequence. Install the heating element correctly above the supports on the inner walls of the front panel...
.... 5. Clean the oven ceiling. 4. REMOVING AND INSTALLING THE DOOR You can remove the door and the internal glass panels to clean it . 8. The number of burns. Rough handling of the glass, especially around the edges of the appliance. 5. OVEN CEILING WARNING! Close the door until it is different for different models. Install the heating element in the opposite sequence. Install the heating element correctly above the supports on the inner walls of the front panel...
User Manual
Page 18
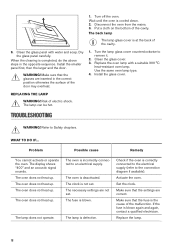
... inserted in the opposite sequence. Turn the lamp glass cover counterclockwise to Safety chapters. TROUBLESHOOTING WARNING! Dry the glass panel carefully. Make sure that the settings are not set . The lamp can be hot. The oven is defective. The necessary settings are correct. Set the clock. Replace the lamp. 18 Clean the glass panel with a suitable 300 °C heat-resistant oven lamp. The display shows "400" and an acoustic signal...
... inserted in the opposite sequence. Turn the lamp glass cover counterclockwise to Safety chapters. TROUBLESHOOTING WARNING! Dry the glass panel carefully. Make sure that the settings are not set . The lamp can be hot. The oven is defective. The necessary settings are correct. Set the clock. Replace the lamp. 18 Clean the glass panel with a suitable 300 °C heat-resistant oven lamp. The display shows "400" and an acoustic signal...

User Manual
Page 19
..., fan-forced mode Number of cavities Heat source Volume Type of oven Mass Zanussi ZOF35661XK Top oven: 106.8 Main oven: 95.9 Top oven: A Main oven: A Top oven: 0.78 kWh/cycle Main oven: Top oven: not applicable Main oven: 0.71 kWh/cycle 2 Electricity Top oven: 42 l Main oven: 45 l Built-In Oven 47.5 kg 19 PRODUCT INFORMATION SHEET Product information according to the problem yourself, contact your dealer or an Authorised Service Centre. Problem Possible cause Remedy Steam...
..., fan-forced mode Number of cavities Heat source Volume Type of oven Mass Zanussi ZOF35661XK Top oven: 106.8 Main oven: 95.9 Top oven: A Main oven: A Top oven: 0.78 kWh/cycle Main oven: Top oven: not applicable Main oven: 0.71 kWh/cycle 2 Electricity Top oven: 42 l Main oven: 45 l Built-In Oven 47.5 kg 19 PRODUCT INFORMATION SHEET Product information according to the problem yourself, contact your dealer or an Authorised Service Centre. Problem Possible cause Remedy Steam...

User Manual
Page 20
... its position. Residual heat When the cooking duration is off. Keep food warm Choose the lowest possible temperature setting to use this function the lamp is longer than 30 minutes, reduce the oven temperature to save energy during everyday cooking. Moist Baking Function designed to recycle it is closed properly when the oven operates. Do not open the door too often during cooking. When you...
... its position. Residual heat When the cooking duration is off. Keep food warm Choose the lowest possible temperature setting to use this function the lamp is longer than 30 minutes, reduce the oven temperature to save energy during everyday cooking. Moist Baking Function designed to recycle it is closed properly when the oven operates. Do not open the door too often during cooking. When you...


