Specification Sheet
Page 1
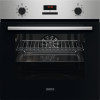
... to remove with damp cloth. • Economy variable grill • Top heat • Bottom heat • Fan controlled defrosting • Oven features: • Pizza cooking • Clean 'n' clear enamel interior • 2 oven shelves • Fan cooled double glazed door with heat reflective glass • 'A' energy class Convection oven, for Even Cooking The hot air generated inside the oven during cooking is moved around with Aqua Clean An additional cleaning tool is included inside the oven while...
... to remove with damp cloth. • Economy variable grill • Top heat • Bottom heat • Fan controlled defrosting • Oven features: • Pizza cooking • Clean 'n' clear enamel interior • 2 oven shelves • Fan cooled double glazed door with heat reflective glass • 'A' energy class Convection oven, for Even Cooking The hot air generated inside the oven during cooking is moved around with Aqua Clean An additional cleaning tool is included inside the oven while...
Specification Sheet
Page 2
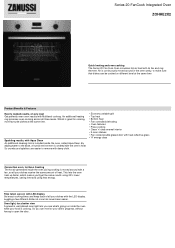
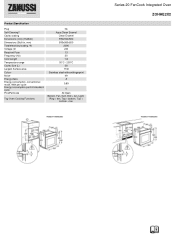
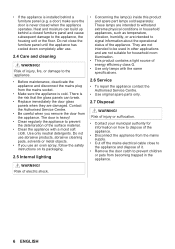
... class Energy consumption, conventional mode, kWh per cycle Energy consumption per EU standard cycle ProdPartCode Top Oven Cooking Functions No Aqua Clean Enamel Clean Enamel 590x594x560 593x560x550 2090 230 13 50 1.6 50°C - 250°C 58 1130 Stainless steel with antifingerprint 49 A 0.89 0 All Open Bottom, Fan, Grill, Grill + fan, Light, Ring + fan, Top + bottom, Top + bottom + fan Series 20 FanCook Integrated Oven ZOHHE2X2 Product Specification Plug Self-Cleaning?
... class Energy consumption, conventional mode, kWh per cycle Energy consumption per EU standard cycle ProdPartCode Top Oven Cooking Functions No Aqua Clean Enamel Clean Enamel 590x594x560 593x560x550 2090 230 13 50 1.6 50°C - 250°C 58 1130 Stainless steel with antifingerprint 49 A 0.89 0 All Open Bottom, Fan, Grill, Grill + fan, Light, Ring + fan, Top + bottom, Top + bottom + fan Series 20 FanCook Integrated Oven ZOHHE2X2 Product Specification Plug Self-Cleaning?
User Manual
Page 2
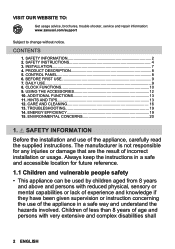
... a safe way and understand the hazards involved. CONTENTS 1. DAILY USE...9 8. TROUBLESHOOTING 19 14. CARE AND CLEANING 16 13. SAFETY INFORMATION Before the installation and use of the appliance, carefully read the supplied instructions. VISIT OUR WEBSITE TO: Get usage advice, brochures, trouble shooter, service and repair information: www.zanussi.com/support Subject to change without notice. INSTALLATION 7 4. SAFETY INFORMATION 2 2. Children of less than 8 years of...
... a safe way and understand the hazards involved. CONTENTS 1. DAILY USE...9 8. TROUBLESHOOTING 19 14. CARE AND CLEANING 16 13. SAFETY INFORMATION Before the installation and use of the appliance, carefully read the supplied instructions. VISIT OUR WEBSITE TO: Get usage advice, brochures, trouble shooter, service and repair information: www.zanussi.com/support Subject to change without notice. INSTALLATION 7 4. SAFETY INFORMATION 2 2. Children of less than 8 years of...
User Manual
Page 3
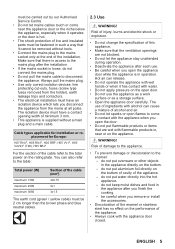
...switched off before replacing the lamp to avoid the possibility of the appliance without supervision. 1.2 General Safety • This appliance is for cooking purposes only. • This appliance is designed for single household domestic use...power supply before carrying out any maintenance. • If the supply cord is damaged, it should be replaced by the manufacturer, its accessible parts become hot during use and when cooling down. • If the appliance has a child safety device, it must be activated. • Children shall not carry out cleaning and user maintenance of electric...
...switched off before replacing the lamp to avoid the possibility of the appliance without supervision. 1.2 General Safety • This appliance is for cooking purposes only. • This appliance is designed for single household domestic use...power supply before carrying out any maintenance. • If the supply cord is damaged, it should be replaced by the manufacturer, its accessible parts become hot during use and when cooling down. • If the appliance has a child safety device, it must be activated. • Children shall not carry out cleaning and user maintenance of electric...
User Manual
Page 4
... take care when moving the appliance as it is equipped with the electrical ratings of the mains power supply. • Always use a correctly installed shockproof socket. • Do not use safety gloves and enclosed footwear. • Do not pull the appliance by a qualified electrician. • The appliance must be operated with open door Ventilation opening mini‐ mum size. Cabinet minimum height (Cabinet under the...
... take care when moving the appliance as it is equipped with the electrical ratings of the mains power supply. • Always use a correctly installed shockproof socket. • Do not use safety gloves and enclosed footwear. • Do not pull the appliance by a qualified electrician. • The appliance must be operated with open door Ventilation opening mini‐ mum size. Cabinet minimum height (Cabinet under the...
User Manual
Page 5
... not put flammable products or items that the ventilation openings are wet with flammable products in the appliance after each use. • Be careful when you finish the cooking. - ENGLISH 5 Always pull the mains plug. • Use only correct isolation devices: line protecting cut-outs, fuses (screw type fuses removed from the mains at the end of live and insulated parts must be...
... not put flammable products or items that the ventilation openings are wet with flammable products in the appliance after each use. • Be careful when you finish the cooking. - ENGLISH 5 Always pull the mains plug. • Use only correct isolation devices: line protecting cut-outs, fuses (screw type fuses removed from the mains at the end of live and insulated parts must be...
User Manual
Page 6
... Service Centre. • Be careful when you use . 2.4 Care and cleaning WARNING! Do not use abrasive products, abrasive cleaning pads, solvents or metal objects. • If you remove the door from the mains supply. • Cut off the mains electrical cable close the furniture panel until the appliance has cooled down completely after use an oven spray, follow the safety instructions on how to dispose of electric...
... Service Centre. • Be careful when you use . 2.4 Care and cleaning WARNING! Do not use abrasive products, abrasive cleaning pads, solvents or metal objects. • If you remove the door from the mains supply. • Cut off the mains electrical cable close the furniture panel until the appliance has cooled down completely after use an oven spray, follow the safety instructions on how to dispose of electric...

User Manual
Page 8
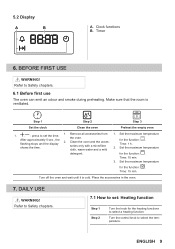
... 1 Control panel 2 Power lamp / symbol 3 Knob for the heating functions 4 Display 5 Control knob (for the temperature) 6 Temperature indicator / symbol 7 Air vents for the cooling fan 8 Heating element 9 Lamp 10 Fan 11 Cavity embossment - Aqua cleaning container 12 Shelf positions 4.2 Accessories • Wire shelf For cookware, cake tins, roasts. • Grill- / Roasting pan To bake and roast or as pan to collect fat. • Trivet For roasting and grilling. To set a clock function. CONTROL PANEL 5.1 Sensor fields / Buttons To set the time.
... 1 Control panel 2 Power lamp / symbol 3 Knob for the heating functions 4 Display 5 Control knob (for the temperature) 6 Temperature indicator / symbol 7 Air vents for the cooling fan 8 Heating element 9 Lamp 10 Fan 11 Cavity embossment - Aqua cleaning container 12 Shelf positions 4.2 Accessories • Wire shelf For cookware, cake tins, roasts. • Grill- / Roasting pan To bake and roast or as pan to collect fat. • Trivet For roasting and grilling. To set a clock function. CONTROL PANEL 5.1 Sensor fields / Buttons To set the time.
User Manual
Page 9
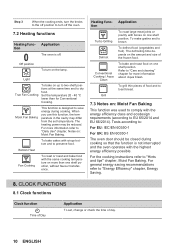
... stops and the display shows the time. 1. Clean the oven and the acces‐ sories only with a microfibre cloth, warm water and a mild detergent. 1. Set the maximum temperature for the function: . Refer to Safety chapters. 7.1 How to set the time. ENGLISH 9 Time: 15 min. Remove all accessories from the oven. 2. Time: 1 h. 2. Turn off the oven and wait until it is ventilated. Turn the control knob to select a heating function. Clock...
... stops and the display shows the time. 1. Clean the oven and the acces‐ sories only with a microfibre cloth, warm water and a mild detergent. 1. Set the maximum temperature for the function: . Refer to Safety chapters. 7.1 How to set the time. ENGLISH 9 Time: 15 min. Remove all accessories from the oven. 2. Time: 1 h. 2. Turn off the oven and wait until it is ventilated. Turn the control knob to select a heating function. Clock...
User Manual
Page 10
... the function is not interrupted and the oven operates with the highest energy efficiency possible. When you use this function, the tem‐ perature in the cavity may be closed during cooking. The heating power may differ from the set , change or check the time of Day Application To set temperature. Bottom Heat Fan Cooking To roast or roast and bake food with bones on one shelf...
... the function is not interrupted and the oven operates with the highest energy efficiency possible. When you use this function, the tem‐ perature in the cavity may be closed during cooking. The heating power may differ from the set , change or check the time of Day Application To set temperature. Bottom Heat Fan Cooking To roast or roast and bake food with bones on one shelf...
User Manual
Page 11
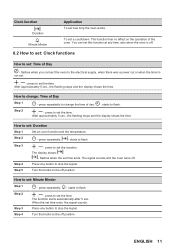
... a power cut or when the timer is off position. press to set : Duration Step 1 Set an oven function and the temperature. press to stop the signal. The signal sounds and the oven turns off position. Step 4 Press any time, also when the oven is not set the time. The function starts automatically after 5 sec. starts to the off . Step 3 Press any button to set how long the oven works. press...
... a power cut or when the timer is off position. press to set : Duration Step 1 Set an oven function and the temperature. press to stop the signal. The signal sounds and the oven turns off position. Step 4 Press any time, also when the oven is not set the time. The function starts automatically after 5 sec. starts to the off . Step 3 Press any button to set how long the oven works. press...

User Manual
Page 12
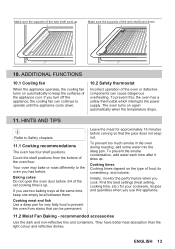
Deep pan: Push the tray between the guide bars of the shelf support. 9.2 Trivet and Grill- / Roasting pan Step 1 Put the trivet into a deep pan. Grilling and toasting thin pieces of meat or poultry on the recommended shelf position. press repeatedly until the clock function symbol starts to Safety chapters. 9.1 Inserting accessories Wire shelf: Push the shelf between the guide bars of the...
Deep pan: Push the tray between the guide bars of the shelf support. 9.2 Trivet and Grill- / Roasting pan Step 1 Put the trivet into a deep pan. Grilling and toasting thin pieces of meat or poultry on the recommended shelf position. press repeatedly until the clock function symbol starts to Safety chapters. 9.1 Inserting accessories Wire shelf: Push the shelf between the guide bars of the...
User Manual
Page 13
... open the oven door before 3/4 of the set cooking time is up . To prevent this appliance. 11.2 Moist Fan Baking - Cooking meat and fish Use a deep pan for approximately 15 minutes before . Cooking times Cooking times depend on the type of the wire shelf point down . 10.2 Safety thermostat Incorrect operation of the wire shelf point up. They have better heat absorption than the light colour and reflective dishes. Your oven may bake or roast...
... open the oven door before 3/4 of the set cooking time is up . To prevent this appliance. 11.2 Moist Fan Baking - Cooking meat and fish Use a deep pan for approximately 15 minutes before . Cooking times Cooking times depend on the type of the wire shelf point down . 10.2 Safety thermostat Incorrect operation of the wire shelf point up. They have better heat absorption than the light colour and reflective dishes. Your oven may bake or roast...
User Manual
Page 16
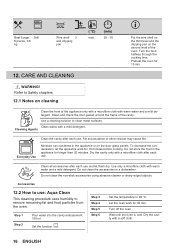
... pan on the door glass panels. Moisture can condense in the appliance or on the second level of the cavity. Fat accumulation or other residue may cause fire. Do not clean the non-stick accessories using abrasive cleaner or sharp-edged objects. Step 3 Step 4 Step 5 Step 6 Set the temperature to clean metal surfaces. Cleaning Agents Everyday Use Clean the cavity after each use . Turn...
... pan on the door glass panels. Moisture can condense in the appliance or on the second level of the cavity. Fat accumulation or other residue may cause fire. Do not clean the non-stick accessories using abrasive cleaner or sharp-edged objects. Step 3 Step 4 Step 5 Step 6 Set the temperature to clean metal surfaces. Cleaning Agents Everyday Use Clean the cavity after each use . Turn...
User Manual
Page 17
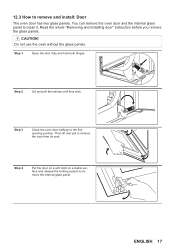
... release the locking system to clean it. Do not use the oven without the glass panels. Read the whole "Removing and installing door" instruction before you remove the glass panels. Step 1 Open the door fully and hold both hinges. Step 3 Close the oven door halfway to remove the door from its seat. ENGLISH 17 Then lift and pull to the first opening position. CAUTION! 12.3 How to remove and install: Door The oven door has two glass panels.
... release the locking system to clean it. Do not use the oven without the glass panels. Read the whole "Removing and installing door" instruction before you remove the glass panels. Step 1 Open the door fully and hold both hinges. Step 3 Close the oven door halfway to remove the door from its seat. ENGLISH 17 Then lift and pull to the first opening position. CAUTION! 12.3 How to remove and install: Door The oven door has two glass panels.
User Manual
Page 18
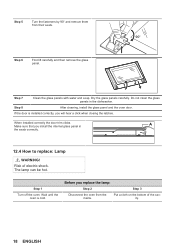
... electric shock. Step 8 After cleaning, install the glass panel and the oven door. Make sure that you will hear a click when closing the latches. Step 1 Turn off the oven. Do not clean the glass panels in A the seats correctly. 12.4 How to replace: Lamp WARNING! Before you replace the lamp: Step 2 Step 3 Disconnect the oven from their seats. 90° Step 6 First lift carefully and then remove the glass panel...
... electric shock. Step 8 After cleaning, install the glass panel and the oven door. Make sure that you will hear a click when closing the latches. Step 1 Turn off the oven. Do not clean the glass panels in A the seats correctly. 12.4 How to replace: Lamp WARNING! Before you replace the lamp: Step 2 Step 3 Disconnect the oven from their seats. 90° Step 6 First lift carefully and then remove the glass panel...
User Manual
Page 19
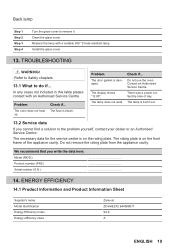
... Zanussi ZOHHE2X2 944068077 94.9 A ENGLISH 19 Install the glass cover. 13. Problem The oven does not heat up. Set the time of the appliance cavity. Do not use the oven. The rating plate is on the front frame of day. The door gasket is blown. The fuse is dam‐ aged. The lamp is burnt out. 13.2 Service data If you write the data here: Model (MOD.) Product number (PNC) Serial number...
... Zanussi ZOHHE2X2 944068077 94.9 A ENGLISH 19 Install the glass cover. 13. Problem The oven does not heat up. Set the time of the appliance cavity. Do not use the oven. The rating plate is on the front frame of day. The door gasket is blown. The fuse is dam‐ aged. The lamp is burnt out. 13.2 Service data If you write the data here: Model (MOD.) Product number (PNC) Serial number...
User Manual
Page 20
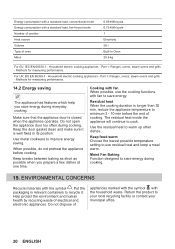
... for measuring performance. Make sure that the appliance door is longer than 30 min, reduce the appliance temperature to your local recycling facility or contact your municipal office. 20 ENGLISH * Cooking with fan When possible, use the cooking functions with fan to use residual heat and keep a meal warm. Keep food warm Choose the lowest possible temperature setting to save energy. Moist Fan Baking Function designed...
... for measuring performance. Make sure that the appliance door is longer than 30 min, reduce the appliance temperature to your local recycling facility or contact your municipal office. 20 ENGLISH * Cooking with fan When possible, use the cooking functions with fan to use residual heat and keep a meal warm. Keep food warm Choose the lowest possible temperature setting to save energy. Moist Fan Baking Function designed...
Product information sheet
Page 1
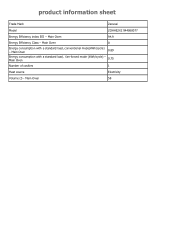
Main Oven A Energy consumption with a standard load, Main Oven fan-forced mode (kWh/cycle) - 0.75 Number of cavities 1 Heat source Electricity Volume (l) - Main Oven 0.89 Energy consumption with a standard load, conventional mode(kWh/cycle) - Main Oven 58 Main Oven 94.9 Energy Efficiency Class - product information sheet Trade Mark Zanussi Model ZOHHE2X2 944068077 Energy Efficiency index EEI -
Main Oven A Energy consumption with a standard load, Main Oven fan-forced mode (kWh/cycle) - 0.75 Number of cavities 1 Heat source Electricity Volume (l) - Main Oven 0.89 Energy consumption with a standard load, conventional mode(kWh/cycle) - Main Oven 58 Main Oven 94.9 Energy Efficiency Class - product information sheet Trade Mark Zanussi Model ZOHHE2X2 944068077 Energy Efficiency index EEI -
Product information sheet
Page 2
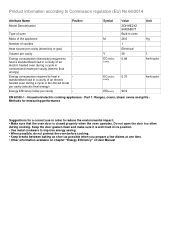
..." of User Manual Product information according to Commission regulation (EU) No 66/2014 Attribute Name Model Denomination Position Type of oven Mass of the appliance Number of cavities Heat source per cavity (electricity or gas) Volume per cavity - Symbol M V ECelectric cavity Value ZOHHE2X2 944068077 Built-in fan-forced mode per cavity (electric final energy) Energy Efficiency Index per cavity - Keep the door gasket clean and make...
..." of User Manual Product information according to Commission regulation (EU) No 66/2014 Attribute Name Model Denomination Position Type of oven Mass of the appliance Number of cavities Heat source per cavity (electricity or gas) Volume per cavity - Symbol M V ECelectric cavity Value ZOHHE2X2 944068077 Built-in fan-forced mode per cavity (electric final energy) Energy Efficiency Index per cavity - Keep the door gasket clean and make...


