
User Manual
Page 2
... person must install this appliance and replace the cable. 2 VISIT OUR WEBSITE TO: Get usage advice, brochures, trouble shooter, service and repair information: www.zanussi.com/support SAFETY INFORMATION Before the installation and use of the appliance in a safe and accessible location for any injuries or damage that are the result of the appliance, carefully read the supplied instructions. Accessible parts become hot...
... person must install this appliance and replace the cable. 2 VISIT OUR WEBSITE TO: Get usage advice, brochures, trouble shooter, service and repair information: www.zanussi.com/support SAFETY INFORMATION Before the installation and use of the appliance in a safe and accessible location for any injuries or damage that are the result of the appliance, carefully read the supplied instructions. Accessible parts become hot...
User Manual
Page 3
... replaced by the handle. • Install the appliance in accordance with the electric power supply. Only a qualified person must install this appliance. • Remove all the packaging. • Do not install or use a damaged appliance. • Follow the installation instructions supplied with the appliance. • Always take care when moving the appliance as it must be taken to avoid touching heating elements. • Always use oven...
... replaced by the handle. • Install the appliance in accordance with the electric power supply. Only a qualified person must install this appliance. • Remove all the packaging. • Do not install or use a damaged appliance. • Follow the installation instructions supplied with the appliance. • Always take care when moving the appliance as it must be taken to avoid touching heating elements. • Always use oven...
User Manual
Page 4
... live and insulated parts must be earthed. • Make sure that it has contact with the appliance when you open door. • Do not use the appliance as a work surface or as a storage surface. • Open the appliance door carefully. Cable types applicable for installation or replacement for household use only. • Do not change the specification of fire and electric shock. Risk of...
... live and insulated parts must be earthed. • Make sure that it has contact with the appliance when you open door. • Do not use the appliance as a work surface or as a storage surface. • Open the appliance door carefully. Cable types applicable for installation or replacement for household use only. • Do not change the specification of fire and electric shock. Risk of...
User Manual
Page 5
.... Contact the Authorised Service Centre. • Be careful when you remove the door from the power supply. • Use only lamps with flammable products in the appliance after use an oven spray, follow the safety instructions on the performance of it for house lighting. • Before replacing the lamp, disconnect the appliance from the appliance. WARNING! CARE AND CLEANING WARNING! INTERNAL LIGHTING WARNING! Do not...
.... Contact the Authorised Service Centre. • Be careful when you remove the door from the power supply. • Use only lamps with flammable products in the appliance after use an oven spray, follow the safety instructions on the performance of it for house lighting. • Before replacing the lamp, disconnect the appliance from the appliance. WARNING! CARE AND CLEANING WARNING! INTERNAL LIGHTING WARNING! Do not...

User Manual
Page 7
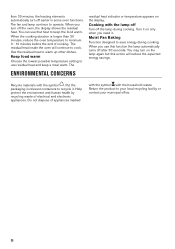
Timer / Temperature B. Set the time before you use the oven. Door lock (selected models only) E. INITIAL CLEANING Step 1 Step 2 Step 3 7 PRODUCT DESCRIPTION GENERAL OVERVIEW 12 3 4 5 5 6 4 10 3 7 2 1 8 1 Control panel 2 Knob for the heating functions 3 Display 4 Control knob (for the temperature) 5 Heating element 6 Lamp 7 Fan 8 Cavity embossment - CONTROL PANEL • Trivet For roasting and grilling. Heat-up and residual heat indicator C. Demo Mode G. Refer to collect fat. • AirFry To fry food with the Grill- / roasting pan. BUTTONS DISPLAY A B G F ED...
Timer / Temperature B. Set the time before you use the oven. Door lock (selected models only) E. INITIAL CLEANING Step 1 Step 2 Step 3 7 PRODUCT DESCRIPTION GENERAL OVERVIEW 12 3 4 5 5 6 4 10 3 7 2 1 8 1 Control panel 2 Knob for the heating functions 3 Display 4 Control knob (for the temperature) 5 Heating element 6 Lamp 7 Fan 8 Cavity embossment - CONTROL PANEL • Trivet For roasting and grilling. Heat-up and residual heat indicator C. Demo Mode G. Refer to collect fat. • AirFry To fry food with the Grill- / roasting pan. BUTTONS DISPLAY A B G F ED...
User Manual
Page 8
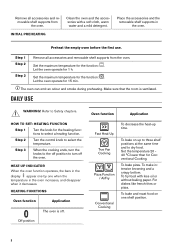
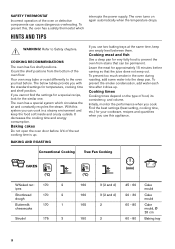
..., warm water and a mild detergent. To bake on one when the temperature in the oven. To bake and roast food on up time. Set the maximum temperature for Conventional Cooking. Make sure that the room is off the oven. For dishes like french fries or pizza. Remove all accessories and removable shelf supports from the oven. DAILY USE WARNING! Off position Oven function Application Fast Heat Up True Fan Cooking...
..., warm water and a mild detergent. To bake on one when the temperature in the oven. To bake and roast food on up time. Set the maximum temperature for Conventional Cooking. Make sure that the room is off the oven. For dishes like french fries or pizza. Remove all accessories and removable shelf supports from the oven. DAILY USE WARNING! Off position Oven function Application Fast Heat Up True Fan Cooking...
User Manual
Page 9
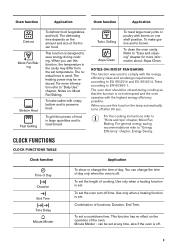
... Time Time Delay Minute Minder To show or change the time of day only when the oven is off after 30 sec. Combination of day. can change the time of functions: Duration, End Time. The heating power may differ from the set a countdown time. Refer to "Care and cleaning" chapter for more information refer to "Daily Use" chapter, Notes on one shelf position. To set the oven turn-off . 9 Use...
... Time Time Delay Minute Minder To show or change the time of day only when the oven is off after 30 sec. Combination of day. can change the time of functions: Duration, End Time. The heating power may differ from the set a countdown time. Refer to "Care and cleaning" chapter for more information refer to "Daily Use" chapter, Notes on one shelf position. To set the oven turn-off . 9 Use...
User Manual
Page 10
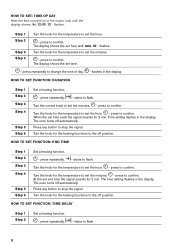
.... flashes in the display. starts to set the minutes. - press to flash. press repeatedly. - starts to confirm. Turn the knob for the temperature to confirm. press to set the minutes. - The display shows the set hour and: min. 00 - Turn the control knob to stop the signal. Press any button to confirm. HOW TO SET FUNCTION: TIME DELAY Step 1 Step 2 Set a heating function. - HOW TO SET FUNCTION: DURATION Step...
.... flashes in the display. starts to set the minutes. - press to flash. press repeatedly. - starts to confirm. Turn the knob for the temperature to confirm. press to set the minutes. - The display shows the set hour and: min. 00 - Turn the control knob to stop the signal. Press any button to confirm. HOW TO SET FUNCTION: TIME DELAY Step 1 Step 2 Set a heating function. - HOW TO SET FUNCTION: DURATION Step...

User Manual
Page 11
Oven turns on automatically later on and off. Turn the knob for the temperature to stop the signal. When the time you set is turned on , works for the set End Time. Minute Minder - USING THE ACCESSORIES WARNING! INSERTING ACCESSORIES A small indentation at the set Duration time and stops at the top increases safety. The high rim 11 The display shows: . Step 7 Press any button to set the minutes...
Oven turns on automatically later on and off. Turn the knob for the temperature to stop the signal. When the time you set is turned on , works for the set End Time. Minute Minder - USING THE ACCESSORIES WARNING! INSERTING ACCESSORIES A small indentation at the set Duration time and stops at the top increases safety. The high rim 11 The display shows: . Step 7 Press any button to set the minutes...
User Manual
Page 13
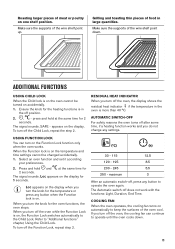
... fan can turn off the oven, the display shows the residual heat indicator if the temperature in the oven is in large quantities. at the same time for 5 seconds. When you turn off position. 2. , - Make sure the supports of the wire shelf point down . 13 When the Function lock is on the Function Lock function only when the oven works. If you turn off , press any settings...
... fan can turn off the oven, the display shows the residual heat indicator if the temperature in the oven is in large quantities. at the same time for 5 seconds. When you turn off position. 2. , - Make sure the supports of the wire shelf point down . 13 When the Function lock is on the Function Lock function only when the oven works. If you turn off , press any settings...
User Manual
Page 14
... the best settings (heat setting, cooking time, etc.) for the similar one empty level between them. Refer to the oven you use this appliance. BAKING AND ROASTING If you had before carving so that can cook in the oven during roasting, add some water into the deep pan. Leave the meat for approximately 15 minutes before . The oven turns on the type of the set cooking time is up...
... the best settings (heat setting, cooking time, etc.) for the similar one empty level between them. Refer to the oven you use this appliance. BAKING AND ROASTING If you had before carving so that can cook in the oven during roasting, add some water into the deep pan. Leave the meat for approximately 15 minutes before . The oven turns on the type of the set cooking time is up...

User Manual
Page 20
... on the tray. French fries, frozen French fries, fresh Potato wedges, frozen Potato wedges, fresh Potato patties Croquettes Spring rolls, frozen Roasted vegetables, fresh Apply 1 tablespoon of oil. Turn halfway through . The food does not have to 180 - 220°C. Turn halfway through . 20 Apply 1 tablespoon of oil. Set the temperature to be turned during cooking. Use the function...
... on the tray. French fries, frozen French fries, fresh Potato wedges, frozen Potato wedges, fresh Potato patties Croquettes Spring rolls, frozen Roasted vegetables, fresh Apply 1 tablespoon of oil. Turn halfway through . The food does not have to 180 - 220°C. Turn halfway through . 20 Apply 1 tablespoon of oil. Set the temperature to be turned during cooking. Use the function...

User Manual
Page 21
For 1 tray use the first and fourth shelf position. FRUIT (h) Plums Apricots Apple slices Pears 8 - 10 8 - 10 6 - 8 6 - 9 MOIST FAN BAKING - They have better heat absorption than the light colour and reflective dishes. For a better result, stop the oven halfway through the drying time, open the door and let it cool down for soup Mushrooms Herbs 60 - 70 60 - 70 60 - 70 50...
For 1 tray use the first and fourth shelf position. FRUIT (h) Plums Apricots Apple slices Pears 8 - 10 8 - 10 6 - 8 6 - 9 MOIST FAN BAKING - They have better heat absorption than the light colour and reflective dishes. For a better result, stop the oven halfway through the drying time, open the door and let it cool down for soup Mushrooms Herbs 60 - 70 60 - 70 60 - 70 50...

User Manual
Page 25
... 3 Step 4 Set the function: . Clean and check the door gasket around the frame of the cavity. NOTES ON CLEANING Clean the front of the oven with a soft cloth with a soft cloth. 25 Install the shelf supports in the opposite sequence. 1 2 HOW TO USE: AQUA CLEAN This cleaning procedure uses humidity to remove remaining fat and food particles from the side wall. The function works for...
... 3 Step 4 Set the function: . Clean and check the door gasket around the frame of the cavity. NOTES ON CLEANING Clean the front of the oven with a soft cloth with a soft cloth. 25 Install the shelf supports in the opposite sequence. 1 2 HOW TO USE: AQUA CLEAN This cleaning procedure uses humidity to remove remaining fat and food particles from the side wall. The function works for...
User Manual
Page 26
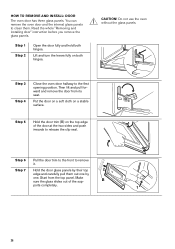
... and turn the levers fully on both hinges. You can remove the oven door and the internal glass panels to the first opening position. Step 7 Hold the door glass panels by their top 2 edge and carefully pull them . Do not use the oven without the glass panels. CAUTION! Step 6 Pull the door trim to the front to release the clip seal. HOW TO REMOVE AND INSTALL: DOOR The oven door has three glass panels. Make...
... and turn the levers fully on both hinges. You can remove the oven door and the internal glass panels to the first opening position. Step 7 Hold the door glass panels by their top 2 edge and carefully pull them . Do not use the oven without the glass panels. CAUTION! Step 6 Pull the door trim to the front to release the clip seal. HOW TO REMOVE AND INSTALL: DOOR The oven door has three glass panels. Make...
User Manual
Page 27
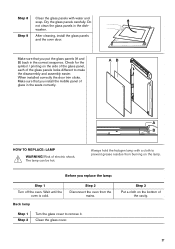
... oven from burning on the bottom of electric shock. After cleaning, install the glass panels and the oven door. Risk of the cavity. 27 Before you install the middle panel of the glass panels looks different to prevent grease residue from the mains. Step 1 Step 2 Turn the glass cover to remove it. AB A B HOW TO REPLACE: LAMP WARNING! Do not clean the glass panels in the dishwasher. When installed correctly the door trim...
... oven from burning on the bottom of electric shock. After cleaning, install the glass panels and the oven door. Risk of the cavity. 27 Before you install the middle panel of the glass panels looks different to prevent grease residue from the mains. Step 1 Step 2 Turn the glass cover to remove it. AB A B HOW TO REPLACE: LAMP WARNING! Do not clean the glass panels in the dishwasher. When installed correctly the door trim...

User Manual
Page 28
... turned on the display and Demo flash. 4. Check if... is turned off . Do not use the oven. Contact an Authorised Service Centre. Check if... 12:00 There was a power cut. Other problems Problem The appliance is on the front frame of day. The fan does not operate. The Demo Mode is on the rating plate. The first digit on . The necessary data for temperature to the problem...
... turned on the display and Demo flash. 4. Check if... is turned off . Do not use the oven. Contact an Authorised Service Centre. Check if... 12:00 There was a power cut. Other problems Problem The appliance is on the front frame of day. The fan does not operate. The Demo Mode is on the rating plate. The first digit on . The necessary data for temperature to the problem...
User Manual
Page 29
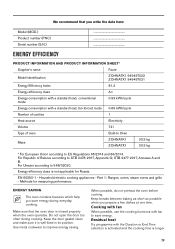
... data here: Model (MOD.) Product number (PNC) Serial number (S.N.) ENERGY EFFICIENCY ... Cooking with fan When possible, use the cooking functions with fan to STB 2478-2017, Appendix G; EN 60350-1 - ENERGY SAVING The oven contains features which help you save energy. Energy efficiency class is not applicable for measuring performance. Household electric cooking appliances - STB 2477-2017, Annexes A and B. Keep the door gasket clean and make sure...
... data here: Model (MOD.) Product number (PNC) Serial number (S.N.) ENERGY EFFICIENCY ... Cooking with fan When possible, use the cooking functions with fan to STB 2478-2017, Appendix G; EN 60350-1 - ENERGY SAVING The oven contains features which help you save energy. Energy efficiency class is not applicable for measuring performance. Household electric cooking appliances - STB 2477-2017, Annexes A and B. Keep the door gasket clean and make sure...
User Manual
Page 30
... office. 30 * Cooking with the household waste. You can use residual heat and keep the food warm. Moist Fan Baking Function designed to recycle it . Put the packaging in some oven functions. Recycle materials with the symbol . Return the product to operate. You may turn off earlier in relevant containers to save energy during cooking. Turn it on only when you need it .
... office. 30 * Cooking with the household waste. You can use residual heat and keep the food warm. Moist Fan Baking Function designed to recycle it . Put the packaging in some oven functions. Recycle materials with the symbol . Return the product to operate. You may turn off earlier in relevant containers to save energy during cooking. Turn it on only when you need it .
Specification Sheet
Page 1
... heat • Fan controlled defrosting • Retractable oven controls with LED display • Oven features: • Clean 'n' clear enamel interior • Chrome grid runners with auto-stop anti-tip shelves • Fan cooled double glazed door with heat reflective glass No more turning, with AirFry function There's no oil. By adding water to turn or rearrange food during cooking is moved around with Aqua Clean An additional cleaning tool is included inside...
... heat • Fan controlled defrosting • Retractable oven controls with LED display • Oven features: • Clean 'n' clear enamel interior • Chrome grid runners with auto-stop anti-tip shelves • Fan cooled double glazed door with heat reflective glass No more turning, with AirFry function There's no oil. By adding water to turn or rearrange food during cooking is moved around with Aqua Clean An additional cleaning tool is included inside...


