
Specification Sheet
Page 1
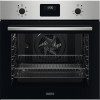
... LED display / Time taken care of Keep track of the past with anti-fingerprint coating. Convection oven, for cooking more favourite dishes at the same time. • Economy variable grill • Top heat • Fan controlled defrosting • Retractable oven controls with LED display • Oven features: • Clean 'n' clear enamel interior • Chrome grid runners with auto-stop anti-tip shelves • Fan cooled double glazed door with heat reflective glass •...
... LED display / Time taken care of Keep track of the past with anti-fingerprint coating. Convection oven, for cooking more favourite dishes at the same time. • Economy variable grill • Top heat • Fan controlled defrosting • Retractable oven controls with LED display • Oven features: • Clean 'n' clear enamel interior • Chrome grid runners with auto-stop anti-tip shelves • Fan cooled double glazed door with heat reflective glass •...
Specification Sheet
Page 2
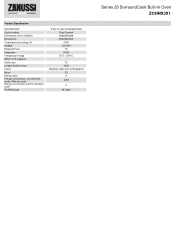
Cavity coating Dimensions (mm) (HxWxD) Dimensions Total electricity loading, W Voltage Required Fuse Frequency Temperature range Water Tank Capacity Cavity size Largest Surface area Colour Noise Energy class Energy consumption, conventional mode, kWh per cycle Energy consumption per EU standard cycle ProdPartCode Easy to clean enamel/pinned Grey Enamel 589x594x568 600x560x550 2790 220-240 15 50/60 50°C - 275°C 72 1424 Stainless steel with antifingerprint 53 A 0.93 0 All Open Series 20 SurroundCook Built-in Oven ZOHNX3X1 Product Specification Self-Cleaning?
Cavity coating Dimensions (mm) (HxWxD) Dimensions Total electricity loading, W Voltage Required Fuse Frequency Temperature range Water Tank Capacity Cavity size Largest Surface area Colour Noise Energy class Energy consumption, conventional mode, kWh per cycle Energy consumption per EU standard cycle ProdPartCode Easy to clean enamel/pinned Grey Enamel 589x594x568 600x560x550 2790 220-240 15 50/60 50°C - 275°C 72 1424 Stainless steel with antifingerprint 53 A 0.93 0 All Open Series 20 SurroundCook Built-in Oven ZOHNX3X1 Product Specification Self-Cleaning?
User Manual
Page 2
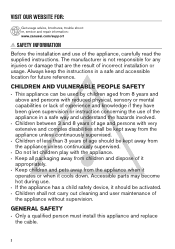
GENERAL SAFETY • Only a qualified person must install this appliance and replace the cable. 2 Accessible parts may become hot during use. • If the appliance has a child safety device, it cools down. Always keep the instructions in a safe way and understand the hazards ..., brochures, trouble shooter, service and repair information: www.zanussi.com/support SAFETY INFORMATION Before the installation and use of the appliance in a safe and accessible location for any injuries or damage that are the result of the appliance, carefully read the supplied instructions. CHILDREN AND...
GENERAL SAFETY • Only a qualified person must install this appliance and replace the cable. 2 Accessible parts may become hot during use. • If the appliance has a child safety device, it cools down. Always keep the instructions in a safe way and understand the hazards ..., brochures, trouble shooter, service and repair information: www.zanussi.com/support SAFETY INFORMATION Before the installation and use of the appliance in a safe and accessible location for any injuries or damage that are the result of the appliance, carefully read the supplied instructions. CHILDREN AND...
User Manual
Page 3
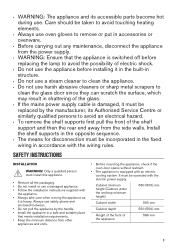
... electric cooling system. It must be operated with the electric power supply. Always use oven gloves to remove or put in shattering of the glass. • If the mains power supply cable is damaged, it must install this appliance. • Remove all the packaging. • Do not install or use . SAFETY INSTRUCTIONS INSTALLATION WARNING! Cabinet minimum height (Cabinet under the worktop minimum height) 580 (600) mm Cabinet width 560 mm Cabinet...
... electric cooling system. It must be operated with the electric power supply. Always use oven gloves to remove or put in shattering of the glass. • If the mains power supply cable is damaged, it must install this appliance. • Remove all the packaging. • Do not install or use . SAFETY INSTRUCTIONS INSTALLATION WARNING! Cabinet minimum height (Cabinet under the worktop minimum height) 580 (600) mm Cabinet width 560 mm Cabinet...

User Manual
Page 4
... the electrical ratings of the mains power supply. • Always use a correctly installed shockproof socket. • Do not use . • Be careful when you disconnect the appliance from the mains at the end of fire and electric shock. size ca- Cable types applicable for installation or replacement for household use only. • Do not change the specification of this must have a contact opening minimum size. PVC...
... the electrical ratings of the mains power supply. • Always use a correctly installed shockproof socket. • Do not use . • Be careful when you disconnect the appliance from the mains at the end of fire and electric shock. size ca- Cable types applicable for installation or replacement for household use only. • Do not change the specification of this must have a contact opening minimum size. PVC...

User Manual
Page 5
... finish the cooking. - do not put water directly into the hot appliance. - be used for this appliance is cold. DISPOSAL WARNING! Heat and moisture can break. • Replace immediately the door glass panels when they are wet with flammable products in the appliance directly on the bottom. - CARE AND CLEANING WARNING! Contact the Authorised Service Centre. • Be careful when you remove or install the accessories...
... finish the cooking. - do not put water directly into the hot appliance. - be used for this appliance is cold. DISPOSAL WARNING! Heat and moisture can break. • Replace immediately the door glass panels when they are wet with flammable products in the appliance directly on the bottom. - CARE AND CLEANING WARNING! Contact the Authorised Service Centre. • Be careful when you remove or install the accessories...
User Manual
Page 7
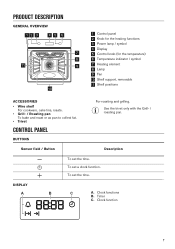
... roasting pan. To set the time. Sensor field / Button Description To set the time. Clock function 7 PRODUCT DESCRIPTION GENERAL OVERVIEW 12 3 45 6 1 Control panel 2 Knob for the heating functions 3 Power lamp / symbol 4 Display 7 5 Control knob (for the temperature) 5 4 11 3 2 8 6 Temperature indicator / symbol 9 7 Heating element 8 Lamp 1 9 Fan 10 Shelf support, removable 11 Shelf positions 10 ACCESSORIES • Wire shelf For cookware, cake tins, roasts. • Grill- / Roasting pan To bake and roast or as pan to collect fat. • Trivet CONTROL PANEL...
... roasting pan. To set the time. Sensor field / Button Description To set the time. Clock function 7 PRODUCT DESCRIPTION GENERAL OVERVIEW 12 3 45 6 1 Control panel 2 Knob for the heating functions 3 Power lamp / symbol 4 Display 7 5 Control knob (for the temperature) 5 4 11 3 2 8 6 Temperature indicator / symbol 9 7 Heating element 8 Lamp 1 9 Fan 10 Shelf support, removable 11 Shelf positions 10 ACCESSORIES • Wire shelf For cookware, cake tins, roasts. • Grill- / Roasting pan To bake and roast or as pan to collect fat. • Trivet CONTROL PANEL...
User Manual
Page 8
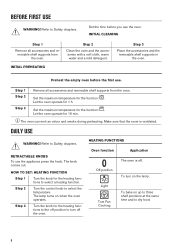
... with a soft cloth, warm water and a mild detergent. Preheat the empty oven before you use the oven. Set the maximum temperature for 1 h. Light True Fan Cooking To bake on when the oven operates. INITIAL CLEANING Step 1 Remove all accessories and removable shelf supports from the oven. Step 3 Place the accessories and the removable shelf supports in the oven. Make sure that the room is off the oven. The lamp turns on up to...
... with a soft cloth, warm water and a mild detergent. Preheat the empty oven before you use the oven. Set the maximum temperature for 1 h. Light True Fan Cooking To bake on when the oven operates. INITIAL CLEANING Step 1 Remove all accessories and removable shelf supports from the oven. Step 3 Place the accessories and the removable shelf supports in the oven. Make sure that the room is off the oven. The lamp turns on up to...

User Manual
Page 9
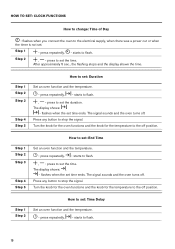
... requirements according to EU 65/2014 and EU 66/2014. You can set a countdown. The heating power may differ from the set , change or check the time of food in the cavity may be closed during cooking. To grill thin pieces of day. To set when the oven turns off . 9 To set how long the oven works. For the cooking instructions refer to brown. Clock function Application Time...
... requirements according to EU 65/2014 and EU 66/2014. You can set a countdown. The heating power may differ from the set , change or check the time of food in the cavity may be closed during cooking. To grill thin pieces of day. To set when the oven turns off . 9 To set how long the oven works. For the cooking instructions refer to brown. Clock function Application Time...
User Manual
Page 10
... any button to flash. , - After approximately 5 sec., the flashing stops and the display shows the time. press repeatedly. - press to stop the signal. press repeatedly. - HOW TO SET: CLOCK FUNCTIONS How to flash. 10 starts to change: Time of Day - Step 1 - Turn the knob for the oven functions and the knob for the temperature to the electrical supply, when there was a power cut or when the timer...
... any button to flash. , - After approximately 5 sec., the flashing stops and the display shows the time. press repeatedly. - press to stop the signal. press repeatedly. - HOW TO SET: CLOCK FUNCTIONS How to flash. 10 starts to change: Time of Day - Step 1 - Turn the knob for the oven functions and the knob for the temperature to the electrical supply, when there was a power cut or when the timer...
User Manual
Page 11
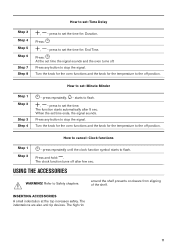
... the set the time for the temperature to set time the signal sounds and the oven turns off after 5 sec. Turn the knob for the oven functions and the knob for : Duration. Step 1 Step 2 Step 3 Step 4 How to stop the signal. Press any button to set time ends, the signal sounds. How to flash. press repeatedly until the clock function symbol starts to cancel: Clock functions...
... the set the time for the temperature to set time the signal sounds and the oven turns off after 5 sec. Turn the knob for the oven functions and the knob for : Duration. Step 1 Step 2 Step 3 Step 4 How to stop the signal. Press any button to set time ends, the signal sounds. How to flash. press repeatedly until the clock function symbol starts to cancel: Clock functions...
User Manual
Page 13
... level between them . BAKING AND ROASTING Use the function: True Fan Cooking. 13 Make sure the supports of the oven or defective components can continue to Safety chapters. Baking cakes Do not open the oven door before . Put the deep pan on again automatically when the temperature drops. The oven turns on the recommended shelf position. Leave the meat for temperature, cooking time and shelf position. Cooking times Cooking times depend on automatically...
... level between them . BAKING AND ROASTING Use the function: True Fan Cooking. 13 Make sure the supports of the oven or defective components can continue to Safety chapters. Baking cakes Do not open the oven door before . Put the deep pan on again automatically when the temperature drops. The oven turns on the recommended shelf position. Leave the meat for temperature, cooking time and shelf position. Cooking times Cooking times depend on automatically...
User Manual
Page 16
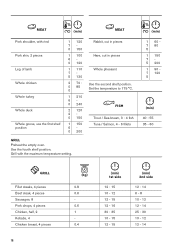
..., 2 pieces Leg of lamb Whole chicken Whole turkey Whole duck Whole goose, use the first shelf position 1 120 70 150 1 100 60 120 1 110 75 130 2 70 0 85 0 1 210 60 240 2 120 20 150 1 150 60 200 GRILL Preheat the empty oven. FISH Trout / Sea bream, 3 - 4 fish Tuna / Salmon, 4 - 6 ... 10 - 15 12 - 15 (min) 2nd side 12 - 14 6 - 8 10 - 12 12 - 14 25 - 30 10 - 12 12 - 14 Use the fourth shelf position. Set the temperature to 175 °C. Rabbit, cut in pieces Hare, cut in pieces Whole pheasant Use the second shelf position. MEAT (°C) (min) MEAT Pork shoulder, with the maximum...
..., 2 pieces Leg of lamb Whole chicken Whole turkey Whole duck Whole goose, use the first shelf position 1 120 70 150 1 100 60 120 1 110 75 130 2 70 0 85 0 1 210 60 240 2 120 20 150 1 150 60 200 GRILL Preheat the empty oven. FISH Trout / Sea bream, 3 - 4 fish Tuna / Salmon, 4 - 6 ... 10 - 15 12 - 15 (min) 2nd side 12 - 14 6 - 8 10 - 12 12 - 14 25 - 30 10 - 12 12 - 14 Use the fourth shelf position. Set the temperature to 175 °C. Rabbit, cut in pieces Hare, cut in pieces Whole pheasant Use the second shelf position. MEAT (°C) (min) MEAT Pork shoulder, with the maximum...
User Manual
Page 18
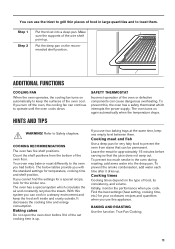
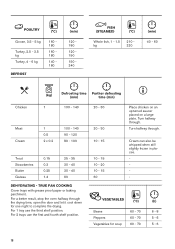
... on an upturned saucer placed on a large plate. Turn halfway through . Cream can also be whipped when still slightly frozen in places. - For a better result, stop the oven halfway through the drying time, open the door and let it cool down for soup 60 - 70 60 - 70 60 - 70 (h) 6 - 8 5 - 6 5 - 6 18 TRUE FAN COOKING Cover trays with grease proof paper or baking parchment.
... on an upturned saucer placed on a large plate. Turn halfway through . Cream can also be whipped when still slightly frozen in places. - For a better result, stop the oven halfway through the drying time, open the door and let it cool down for soup 60 - 70 60 - 70 60 - 70 (h) 6 - 8 5 - 6 5 - 6 18 TRUE FAN COOKING Cover trays with grease proof paper or baking parchment.
User Manual
Page 19
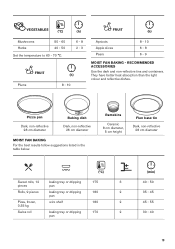
...baking tray or dripping 175 3 pieces pan Rolls, 9 pieces baking tray or dripping 180 2 pan Pizza, frozen, 0.35 kg wire shelf 180 2 Swiss roll baking tray or dripping 170 2 pan (min) 40 - 50 35 - 45 45 - 55 30 - 40 19 RECOMMENDED ACCESSORIES Use...pan Dark, non-reflective 28 cm diameter Baking dish Dark, non-reflective 26 cm diameter MOIST FAN BAKING For the best results follow suggestions listed in the table below. They have better heat absorption than the light colour and reflective dishes. VEGETABLES (°C) Mushrooms Herbs 50 - 60 40 - 50 Set the temperature...
...baking tray or dripping 175 3 pieces pan Rolls, 9 pieces baking tray or dripping 180 2 pan Pizza, frozen, 0.35 kg wire shelf 180 2 Swiss roll baking tray or dripping 170 2 pan (min) 40 - 50 35 - 45 45 - 55 30 - 40 19 RECOMMENDED ACCESSORIES Use...pan Dark, non-reflective 28 cm diameter Baking dish Dark, non-reflective 26 cm diameter MOIST FAN BAKING For the best results follow suggestions listed in the table below. They have better heat absorption than the light colour and reflective dishes. VEGETABLES (°C) Mushrooms Herbs 50 - 60 40 - 50 Set the temperature...
User Manual
Page 22
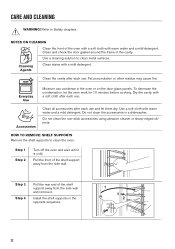
... condensation, let the oven work for 10 minutes before cooking. Clean the cavity after each use and let them dry. Everyday Use Moisture can condense in the oven or on the door glass panels. Do not clean the non-stick accessories using abrasive cleaner or sharp-edged objects. HOW TO REMOVE: SHELF SUPPORTS Remove the shelf supports to clean the oven. Step 1 Step 2 Turn off the oven and wait until...
... condensation, let the oven work for 10 minutes before cooking. Clean the cavity after each use and let them dry. Everyday Use Moisture can condense in the oven or on the door glass panels. Do not clean the non-stick accessories using abrasive cleaner or sharp-edged objects. HOW TO REMOVE: SHELF SUPPORTS Remove the shelf supports to clean the oven. Step 1 Step 2 Turn off the oven and wait until...
User Manual
Page 23
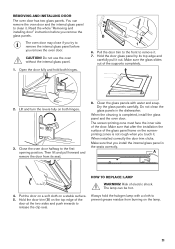
... turn the levers fully on a stable surface. 5. Risk of the supports completely. 2. Always hold both hinges. 3. Read the whole "Removing and installing door" instruction before you remove the glass panels. Do not use the oven without the internal glass panel. 1. Close the oven door halfway to remove it . Dry the glass panels carefully. Make sure that after the installation the surface of the glass panel frame on the top edge of the door. REMOVING AND INSTALLING DOOR...
... turn the levers fully on a stable surface. 5. Risk of the supports completely. 2. Always hold both hinges. 3. Read the whole "Removing and installing door" instruction before you remove the glass panels. Do not use the oven without the internal glass panel. 1. Close the oven door halfway to remove it . Dry the glass panels carefully. Make sure that after the installation the surface of the glass panel frame on the top edge of the door. REMOVING AND INSTALLING DOOR...

User Manual
Page 24
... the oven from the mains. TROUBLESHOOTING WARNING! Refer to remove it. The fuse is defective. - Make sure that the fuse is not set . Before you replace the lamp: Step 1 Turn off the oven. Step 1 Step 2 Step 3 Step 4 Turn the glass cover to Safety chapters. Make sure that the settings are not set . Problems with a suitable 300 °C heat-resistant lamp. Do not use the oven. The clock is the...
... the oven from the mains. TROUBLESHOOTING WARNING! Refer to remove it. The fuse is defective. - Make sure that the fuse is not set . Before you replace the lamp: Step 1 Turn off the oven. Step 1 Step 2 Step 3 Step 4 Turn the glass cover to Safety chapters. Make sure that the settings are not set . Problems with a suitable 300 °C heat-resistant lamp. Do not use the oven. The clock is the...

User Manual
Page 25
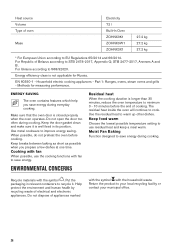
... ... The rating plate is on the rating plate. PRODUCT INFORMATION AND PRODUCT INFORMATION SHEET* Supplier's name Zanussi Model identification ZOHNX3K1 949496254 ZOHNX3W1 949496253 ZOHNX3X1 949496255 Energy Efficiency Index 95.3 Energy efficiency class A Energy consumption with cleaning procedure Description Possible cause Remedy Steam and condensation settle on the front frame of cavities 1 25 Problems with a standard load, fan-forced mode 0.81 kWh/cycle Number of the oven cavity...
... ... The rating plate is on the rating plate. PRODUCT INFORMATION AND PRODUCT INFORMATION SHEET* Supplier's name Zanussi Model identification ZOHNX3K1 949496254 ZOHNX3W1 949496253 ZOHNX3X1 949496255 Energy Efficiency Index 95.3 Energy efficiency class A Energy consumption with cleaning procedure Description Possible cause Remedy Steam and condensation settle on the front frame of cavities 1 25 Problems with a standard load, fan-forced mode 0.81 kWh/cycle Number of the oven cavity...
User Manual
Page 26
... waste. Part 1: Ranges, ovens, steam ovens and grills - ENERGY SAVING The oven contains features which help you prepare a few dishes at one time. Cooking with fan When possible, use residual heat and keep a meal warm. Use the residual heat to 568/32020. Recycle materials with fan to save energy during cooking. Return the product to cook. Energy efficiency class is closed properly when the oven operates. Keep the door gasket clean and...
... waste. Part 1: Ranges, ovens, steam ovens and grills - ENERGY SAVING The oven contains features which help you prepare a few dishes at one time. Cooking with fan When possible, use residual heat and keep a meal warm. Use the residual heat to 568/32020. Recycle materials with fan to save energy during cooking. Return the product to cook. Energy efficiency class is closed properly when the oven operates. Keep the door gasket clean and...


